
一、Python 语言核心精讲
(一)必看导言
1.为什么要学习 Python
- 开发Agents目前主要有两种语言:
Python和TypeScript
| Python | TypeScript | |
|---|---|---|
| AI生态 | ⭐⭐⭐⭐⭐ | ⭐⭐⭐⭐ |
| 学习内容 | ⭐⭐⭐⭐⭐ | ⭐⭐⭐ |
| 优先场景 | 服务端 | 客户端 |
1)职业建议
- 前端工程师:学习
TypeScript开发Agents - Agents应用工程师:学习
Python开发Agents - AI 全栈工程师:最好都学习
2.Python 什么要学,什么不学
- Agents开发会用到的要学,比如:
- 语法规则
- 包管理
- 网络通信
- 文件 IO
- 高阶函数
- ...
- Agents开发不会用到的不讲,比如:
- 桌面GUI
- 爬虫
- 游戏开发
- 数据可视化
- office套件操作
- ...
3.如何学习
- 学习任何技术只有一个目标:建立知识体系!
- 尤其是在AI时代
- 具体的手段:
- “古法编程”
- 费曼学习法
- 场景训练
- ...
(二)Python环境搭建
1.Python安装包
1)Python安装包中包含以下核心组件
- 解释器:默认为
CPython - 包管理器:
pip - 标准库:
os、sys、urllib、pathlib、... - 交互式终端:
REPL
2.Python发行版
- Python有很多的发行版,不同的发行版又有很多的版本
| 版本 | 说明 |
|---|---|
| 官方 Python (CPython) | C 语言原生实现,Python 标准参考版本,带 GIL,生态最全,日常开发默认首选 |
| ActivePython | 商业公司打包的 CPython 发行版,企业级稳定适配,预装常用依赖,偏商用场景 |
| Anaconda | 面向数据科学的全家桶 CPython,内置海量数据分析、AI 库,体积大,适合数据分析一站式环境 |
| Miniconda | Anaconda 极简精简版,仅保留 Python+conda 包管理器,无多余预装库,轻量灵活 |
| Miniforge | 开源免费 conda 发行版,无 Anaconda 商业版权限制,社区维护,替代 Miniconda 首选 |
| Mambaforge | 基于 Miniforge,把 conda 替换为极速 mamba 包管理器,安装依赖速度远超原生 conda |
| Cinder | Meta 自研优化版 CPython,针对长驻服务、低延迟做运行时与 GC 优化,内部业务专用,通用性差 |
| Nogil | Python 官方无 GIL 自由线程版本,去除全局解释器锁,支持多线程真并行,适合多核并发场景 |
| PyPy | 带 JIT 即时编译的 Python 解释器,纯 Python 代码运行速度远超 CPython,C 扩展库兼容性一般 |
| Jython | 运行在 JVM 虚拟机上的 Python,可无缝调用 Java 类库,无 GIL,不兼容 C 语言扩展包 |
| IronPython | 运行在.NET 平台上的 Python,可直接调用 C#/.NET 生态库,多用于 Windows 桌面与.NET 集成 |
| GraalPython/GraalPy | 基于 GraalVM 的高性能 Python,自带强 JIT 优化,支持与 Java 等多语言互通 |
| Stackless Python | CPython 分支,自研无栈微协程,支持超高并发轻量任务,适合游戏、高并发服务场景 |
| MicroPython | 极简裁剪版 Python,专为单片机、嵌入式 IoT 设备设计,体积小、占用内存极低 |
3.pyenv
- 建议使用
pyenv来管理多个 python 版本
1)mac 安装 pyenv
- mac 建议使用 HomeBrew 安装 pyenv
# 安装构建python包的前置依赖项
brew install zstd openssl readline xz zlib
# 安装pyenv
brew install pyenv
# 测试
pyenv --version
a)配置镜像源
# ~/.zshrc
export PYTHON_BUILD_MIRROR_URL="https://mirrors.aliyun.com/python-release/source/"
2)win 安装 pyenv
a)以管理员身份打开 powershell
# 解决权限问题
Set-ExecutionPolicy RemoteSigned -Scope CurrentUser
# 运行安装命令
Invoke-WebRequest -UseBasicParsing -Uri "https://raw.githubusercontent.com/pyenv-win/pyenv-win/master/pyenv-win/install-pyenv-win.ps1" -OutFile "./install-pyenv-win.ps1"; &"./install-pyenv-win.ps1"
b)重新打开终端
# 测试
pyenv --version
c)配置镜像源
- 右键「此电脑」→「属性」→「高级系统设置」→「环境变量」
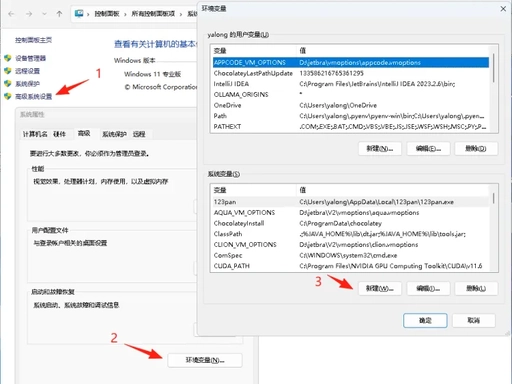
- 在 用户变量 (只影响当前用户)或 系统变量 (所有用户)里点「新建」
- 变量名:
PYTHON_BUILD_MIRROR_URL - 变量值:填下面任意一个国内源
- https://mirrors.aliyun.com/python
- https://mirrors.tuna.tsinghua.edu.cn/python/
- https://mirrors.huaweicloud.com/python/
- https://registry.npmmirror.com/-/binary/python/
- 变量名:
- 全部确定, 关闭旧 PowerShell,新开一个 即可
3)pyenv 使用
# 查看所有可安装的python版本
pyenv install --list
# 利用管道命令搜索
pyenv install --list | grep "^  3.14"
# 安装特定版本
pyenv install 3.14.1
# 卸载特定版本
pyenv uninstall 3.14.1
# 查看已安装的版本
pyenv versions
# 查看当前正在使用哪个版本
pyenv version

# 切换全局版本
pyenv global 3.14.1
# 切换本地版本
pyenv local 3.14.1
# 切换当前终端版本(临时生效)
pyenv shell 3.14.1
4.Hello World
- 新建文本文件,写入内容:
print("Hello, World!") - 将文本文件保存为:
hello.py - 终端进入到文本文件所在目录,运行
python hello.py
5.IDE
相关信息
- 选择哪个其实无所谓
- 本课程选择使用 VSCode,理由:
- 全栈开发 尽量 统一编辑器,减少心智负担
VSCode体系对AI Coding支持更友好- 轻量高效、启动速度快,低配电脑也能流畅使用
6.VSCode插件
- 安装好
VSCode后,依次安装以下插件
| 版本 | 说明 |
|---|---|
| Python | 语法高亮、代码提示、运行调试、虚拟环境识别, 最核心 |
| Code Runner | 右键一键运行Python代码,不用敲命令,新手超好用 |
| Black Formatter | 自动格式化代码,统一代码风格,不用手动排版 |
| Chinese (Simplified) | VSCode界面汉化,零基础友好 |
7.VSCode配置
1)code runner 配置
"code-runner.executorMap": {
  // ...
  // 这里要填写 python 的绝对路径
  "python": "/Users/yuanjin/.pyenv/shims/python -u",
}
2)自动格式化配置
"editor.formatOnSave": true,
"[python]": {
  "editor.defaultFormatter": "ms-python.black-formatter",
  "editor.tabSize": 4,
  "editor.insertSpaces": true,
}
8.作业
- 搭建好
Python环境 - 编写一个
hello.py文件,打印Hello World!,并能运行成功
(三)Python基本语法
1.语言基本特征
- 解释型
- 强类型
- 动态类型
- 面向对象
2.注释
# 这是单行注释

"""
这是多行注释
可以写多行
"""

'''
这也是多行注释
可以写多行
'''
3.数据类型
| 类别 | 类型名 | 字面量 | 说明 |
|---|---|---|---|
| 数字类型 | int | 1, 2, -3, 0 | 支持无限大小 |
| 数字类型 | float | 1.5, -0.3, 2e10 | 64位双精度 |
| 数字类型 | complex | 1+2j, 3-4j | j表示 |
| 数字类型 布尔类型 | bool | True, False | True是1的别名 False是0的别名 |
| 字符串 | str | "hello", 'world' | |
| 空值 | NoneType | None | |
| 容器类型 | 多种类型 | 后续介绍 | list/tuple/... |
- 原子类型/基本内置类型/标量类型
- int、float、complex、bool、str、NoneType
- 容器类型
- list、tuple、...
# 整数(多种进制)
print(42)       # 十进制
print(0b1010)   # 二进制 = 10
print(0o52)     # 八进制 = 42
print(0x2A)     # 十六进制 = 42

# 浮点数(多种写法)
print(3.14)     # 小数形式
print(-0.5)     # 负数
print(2.5e10)   # 科学计数法 = 25000000000.0
print(1.2e-3)   # 负指数 = 0.0012

# 布尔值
print(True)     # 真
print(False)    # 假

# 字符串(单双引号等价)
print("hello")  # 双引号
print('world')  # 单引号
print('''Hello
world''')  # 多行字符串
print("""Hello
world""")  # 多行字符串

# 空值
print(None)     # 空值
4.type函数
# 整数
print(type(42))       # <class 'int'>
print(type(0b1010))   # <class 'int'>
print(type(0o52))     # <class 'int'>
print(type(0x2A))     # <class 'int'>

# 浮点数
print(type(3.14))     # <class 'float'>
print(type(-0.5))     # <class 'float'>
print(type(2.5e10))   # <class 'float'>
print(type(1.2e-3))   # <class 'float'>

# 布尔值
print(type(True))     # <class 'bool'>
print(type(False))    # <class 'bool'>

# 字符串
print(type("Hello"))  # <class 'str'>
print(type('World'))  # <class 'str'>

# 空值
print(type(None))     # <class 'NoneType'>
注意
type函数返回的不是字符串,而是类型对象
print(type(42) == int) # True
5.变量
1)变量定义
- Python是动态类型语言,变量无需声明类型,直接赋值即可创建
# 变量赋值
name = "Alice"      # 字符串
age = 25            # 整数
pi = 3.14159        # 浮点数
is_valid = True     # 布尔值
2)变量命名规则
| 规则 | 说明 | 示例 |
|---|---|---|
| 字母/下划线开头 | 变量名必须以字母或下划线开头 | name, _value |
| 区分大小写 | Name 和 name 是不同的变量 | Name = 1, name = 2 |
| 不能是关键字 | 不能使用Python保留字 | if, for, class 等 |
| 只能包含字母/数字/下划线 | 不能包含空格或特殊字符 | user_name, value2 |
关键字(不能作为变量名)
False, None, True, and, as, assert, async, await, break, class, continue, def, del, elif, else, except, finally, for, from, global, if, import, in, is, lambda, nonlocal, not, or, pass, raise, return, try, while, with, yield
# 有效命名
user_name = "张三"
_age = 25
MAX_SIZE = 100
value2 = 3.14

# 无效命名(会报错)
# 2value = 10      # 数字开头
# user-name = "a"  # 包含连字符
# class = 5        # 关键字
3)命名规范
| 类型 | 规范 | 示例 |
|---|---|---|
| 变量名 | 小写字母,下划线分隔(snake_case) | user_name, total_count |
| 常量名 | 全大写字母,下划线分隔 | MAX_SIZE, PI |
| 类名 | 首字母大写的驼峰命名(PascalCase) | UserInfo, DataModel |
| 私有变量 | 以下划线开头 | _internal, __private |
4)多重赋值
# 同时赋值多个变量
a, b, c = 1, 2, 3

# 交换变量值
x, y = 10, 20
x, y = y, x  # x=20, y=10

# 相同值赋给多个变量
a = b = c = 0  # a=0, b=0, c=0
5)变量类型转换
# 字符串转整数
age_str = "25"
age_int = int(age_str)      # 25

# 整数转字符串
num = 100
num_str = str(num)          # "100"

# 整数转浮点数
x = 5
x_float = float(x)          # 5.0

# 浮点数转整数(截断小数)
y = 3.9
y_int = int(y)              # 3(不是四舍五入)

# 转布尔值
print(bool(0))      # False
print(bool(1))      # True
print(bool(""))     # False
print(bool("hi"))   # True
6.字符串格式化(f-string)
- Python 3.6+ 引入了 f-string(格式化字符串字面量),是最简洁、最常用的字符串格式化方式
- 在字符串前加
f或F,在花括号{}中直接嵌入变量或表达式
name = "Alice"
age = 25
print(f"姓名: {name}, 年龄: {age}")  # 姓名: Alice, 年龄: 25

# 直接嵌入表达式
a, b = 3, 5
print(f"{a} + {b} = {a + b}")       # 3 + 5 = 8
7.运算符
1)算术运算符
| 运算符 | 名称 | int | float | str | bool | NoneType |
|---|---|---|---|---|---|---|
+ | 加法 | 数值相加 | 数值相加 | 字符串拼接 | True=1, False=0 | 不支持 |
- | 减法 | 数值相减 | 数值相减 | 不支持 | True=1, False=0 | 不支持 |
* | 乘法 | 数值相乘 | 数值相乘 | 字符串重复 | True=1, False=0 | 不支持 |
/ | 除法 | 返回float | 返回float | 不支持 | True=1, False=0 | 不支持 |
// | 整除 | 整数除法 | 整数除法 | 不支持 | True=1, False=0 | 不支持 |
% | 取余 | 取余数 | 取余数 | 不支持 | True=1, False=0 | 不支持 |
** | 幂运算 | 幂运算 | 幂运算 | 不支持 | True=1, False=0 | 不支持 |
# int
print(5 + 3)        # 8
print(5 - 3)        # 2
print(5 * 3)        # 15
print(5 / 3)        # 1.666...
print(5 // 3)       # 1
print(5 % 3)        # 2
print(5 ** 3)       # 125

# float
print(5.0 + 3.0)    # 8.0
print(5.0 - 3.0)    # 2.0
print(5.0 * 3.0)    # 15.0
print(5.0 / 3.0)    # 1.666...
print(5.0 // 3.0)   # 1.0
print(5.0 % 3.0)    # 2.0
print(5.0 ** 3.0)   # 125.0

# str
print("Hello" + "World")  # "HelloWorld"
print("Hi" * 3)           # "HiHiHi"

# bool (True=1, False=0)
print(True + True)   # 2
print(True * 5)      # 5
print(False * 10)    # 0

# NoneType - 所有算术运算都会报错
# print(None + 1)   # TypeError
2)比较运算符
| 运算符 | 名称 | int | float | str | bool | NoneType |
|---|---|---|---|---|---|---|
== | 等于 | 数值比较 | 数值比较 | 内容比较 | True==1, False==0 | None==None |
!= | 不等于 | 数值比较 | 数值比较 | 内容比较 | True!=0 | None!=非None |
< | 小于 | 数值比较 | 数值比较 | 字典序比较 | True=1, False=0 | 不支持 |
> | 大于 | 数值比较 | 数值比较 | 字典序比较 | True=1, False=0 | 不支持 |
<= | 小于等于 | 数值比较 | 数值比较 | 字典序比较 | True=1, False=0 | 不支持 |
>= | 大于等于 | 数值比较 | 数值比较 | 字典序比较 | True=1, False=0 | 不支持 |
# int
print(5 == 5)       # True
print(5 != 3)       # True
print(5 > 3)        # True

# float
print(5.0 == 5.0)   # True
print(5.0 != 3.0)   # True
print(5.0 > 3.0)    # True

# str (按字典序/ASCII码比较)
print("abc" == "abc")     # True
print("abc" != "def")     # True
print("abc" < "def")      # True
print("A" < "a")          # True (A=65, a=97)

# bool
print(True == 1)          # True
print(False == 0)         # True
print(True > False)       # True

# NoneType
print(None == None)       # True
print(None != 0)          # True
print(None != False)      # True
# print(None > 0)         # TypeError
3)链式比较
- Python 支持 链式比较
- 可以像数学公式一样连续写比较运算符
x = 5

# 传统写法(其他语言)
print(x > 1 and x < 10)   # True

# Python 链式比较(更简洁)
print(1 < x < 10)         # True
print(1 < x <= 5)         # True
print(5 <= x < 10)        # True
print(1 < x < 3)          # False

# 甚至可以更复杂
print(1 < x < 10 < 100)   # True
等价规则
a < b < c等价于a < b and b < c- 但 只计算一次
b
4)赋值运算符
| 运算符 | 示例 | 等价于 | 适用类型 |
|---|---|---|---|
= | a = 5 | - | 所有类型 |
+= | a += 3 | a = a + 3 | int, float, str |
-= | a -= 3 | a = a - 3 | int, float |
*= | a *= 3 | a = a * 3 | int, float, str |
/= | a /= 3 | a = a / 3 | int, float |
//= | a //= 3 | a = a // 3 | int, float |
%= | a %= 3 | a = a % 3 | int, float |
**= | a **= 3 | a = a ** 3 | int, float |
# int
a = 10
a += 5    # a = 15
a -= 3    # a = 12
a *= 2    # a = 24
a /= 4    # a = 6.0 (注意:/= 结果变为float)

# str
s = "Hello"
s += " World"  # s = "Hello World"
s *= 2         # s = "Hello WorldHello World"
5)海象运算符(:=)
- Python 3.8 引入的 赋值表达式
- 可以在表达式中同时进行赋值和求值
# 传统写法:先赋值,再判断
line = input("输入: ")
while line != "quit":
    print(f"你输入了: {line}")
    line = input("输入: ")

# 使用海象运算符:赋值和判断合二为一
while (line := input("输入: ")) != "quit":
    print(f"你输入了: {line}")
注意
海象运算符是 Python 3.8 的新特性,老版本不支持
6)逻辑运算符
| 运算符 | 说明 | 返回值规则 |
|---|---|---|
and | 逻辑与 | 第一个为False则返回第一个,否则返回第二个 |
or | 逻辑或 | 第一个为True则返回第一个,否则返回第二个 |
not | 逻辑非 | 返回True或False |
- 各类型真假值:
- int:
0为False,其他为True - float:
0.0为False,其他为True - str:
""为False,其他为True - bool:
False为False,True为True - NoneType:
None为False
- int:
# int
print(0 and 5)        # 0 (0为False,返回0)
print(3 and 5)        # 5 (3为True,返回5)
print(0 or 5)         # 5 (0为False,返回5)
print(3 or 5)         # 3 (3为True,返回3)
print(not 0)          # True
print(not 5)          # False

# float
print(0.0 and 5.0)    # 0.0
print(3.0 and 5.0)    # 5.0
print(not 0.0)        # True

# str
print("" and "hello") # "" (空字符串为False)
print("hi" and "hello") # "hello"
print(not "")         # True
print(not "hello")    # False

# bool
print(True and False)  # False
print(True or False)   # True
print(not True)        # False

# NoneType
print(None and True)   # None
print(None or True)    # True
print(not None)        # True
7)三元运算符(条件表达式)
- Python 的三元运算符(条件表达式)是一种简洁的
if-else写法 - 用于在一行中根据条件选择不同的值
- 语法:
结果 = 真值 if 条件 else 假值
score = 85

# 传统写法
if score >= 60:
    result = "及格"
else:
    result = "不及格"

# 三元运算符(更简洁)
result = "及格" if score >= 60 else "不及格"
print(result)  # 及格

# 嵌套三元运算符(不推荐过度嵌套)
age = 25
category = "青年" if age < 40 else ("中年" if age < 60 else "老年")
注意
三元运算符适合简单的条件判断,复杂的逻辑应使用传统的 if-else 结构以保持代码可读性
8.输入输出
1)print输出
# 输出字符串
print("Hello, World!")

# 输出多个值,用空格分隔
print("年龄:", 25)

# 自定义分隔符
print("a", "b", "c", sep="-")  # a-b-c

# 自定义结束符(默认换行)
print("Hello", end=" ")
print("World")  # Hello World
2)input输入
# 接收用户输入,返回字符串类型
name = input("请输入你的名字: ")
print("你好,", name)

# input返回的是字符串
age_str = input("请输入年龄: ")
age = int(age_str)  # 需要转换为整数
print("明年你", age + 1, "岁")
9.流程控制
1)条件判断
| 语法 | 说明 |
|---|---|
if 条件: | 条件为True时执行 |
elif 条件: | 前一个条件为False且当前条件为True时执行 |
else: | 前面所有条件都为False时执行 |
# 基本if-else
age = 18
if age >= 18:
    print("成年人")
else:
    print("未成年人")

# if-elif-else
score = 85
if score >= 90:
    grade = "A"
elif score >= 80:
    grade = "B"
elif score >= 60:
    grade = "C"
else:
    grade = "D"
print(f"成绩等级: {grade}")

# 单行if-else(三元表达式)
result = "通过" if score >= 60 else "不及格"
注意
Python使用缩进(通常为4个空格)表示代码块,不使用花括号
2)pass占位符
pass是Python中的占位符语句,不执行任何操作- 用于语法上需要语句但逻辑上暂时不需要的情况
# 空循环体
i = 0
while i < 5:
    pass  # 暂时不执行任何操作
    i += 1

# 空代码块(占位)
if True:
    pass  # 待实现
3)循环
a)while循环
# 基本while循环
count = 0
while count < 5:
    print(count)
    count += 1

# 带条件的while循环
user_input = ""
while user_input != "quit":
    user_input = input("输入'quit'退出: ")
    print(f"你输入了: {user_input}")
b)循环控制语句
| 语句 | 作用 |
|---|---|
break | 立即终止整个循环 |
continue | 跳过当前迭代,进入下一次循环 |
# break - 找到第一个大于5的数就停止
num = 1
while num <= 10:
    if num > 5:
        print(f"找到大于5的数: {num}")
        break
    num += 1

# continue - 跳过奇数,只打印偶数
num = 0
while num < 10:
    if num % 2 != 0:
        num += 1
        continue
    print(num)  # 0, 2, 4, 6, 8
    num += 1
c)循环else子句
- 循环可以带有一个
else子句,当循环 正常结束(没有被break中断)时执行
# while循环的else
count = 0
while count < 3:
    print(count)
    count += 1
else:
    print("while循环正常完成")

# 典型用法:查找元素
num = 1
while num <= 9:
    if num == 4:
        print("找到: 4")
        break
    num += 2  # 模拟遍历奇数1, 3, 5, 7, 9
else:
    print("未找到: 4")  # 会执行,因为4不在奇数序列中
重要区别
- 循环被
break中断 → 不执行 else - 循环正常结束(包括
continue)→ 执行 else
10.作业
- 作业答案在
./answers中
1)作业一:代码输出结果预测
- 阅读以下代码,预测每行
print的输出结果,并在注释中写出你的答案
# 变量定义
a = 10
b = 3.5
c = "Python"
d = True
e = None

# 1. 数据类型与 type 函数
print(type(a))
print(type(b))
print(type(c))
print(type(d))
print(type(e))
print(type(a) == int)

# 2. 变量类型转换
print(int(b))
print(float(a))
print(str(a) + c)
print(bool(0))
print(bool(""))
print(bool("hello"))

# 3. 算术运算符
print(a + 5)
print(a / 4)
print(a // 4)
print(a % 4)
print(a ** 2)
print(c * 2)

# 4. 字符串格式化(f-string)
name = "Alice"
age = 25
print(f"姓名: {name}, 年龄: {age}")
print(f"明年{age + 1}岁")
print(f"{a} + {5} = {a + 5}")

# 5. 比较运算符与链式比较
print(a > 5)
print(a == 10)
print(5 < a < 20)
print(c == "python")
print("A" < "a")

# 6. 逻辑运算符
print(True and False)
print(True or False)
print(not d)
print(0 and 5)
print(3 or 5)
print("" and "hello")
print("hi" or "hello")
print(not None)

# 7. 三元运算符
score = 85
result = "及格" if score >= 60 else "不及格"
print(result)
level = "A" if score >= 90 else ("B" if score >= 80 else "C")
print(level)

# 8. 赋值运算符
x = 10
x += 5
print(x)
x -= 3
print(x)
x *= 2
print(x)
x /= 4
print(x)

s = "Hi"
s += " Python"
print(s)
s *= 2
print(s)
2)作业二:循环与判断代码输出预测
- 阅读以下代码,预测每行
print的输出结果,并在注释中写出你的答案
# 1. while 循环 + if-else
n = 1
result = 0
while n <= 5:
    if n % 2 == 0:
        result += n
    else:
        result -= n
    n += 1
print(result)

# 2. continue 和 break
num = 1
while num <= 10:
    if num == 3:
        num += 1
        continue
    if num == 7:
        break
    print(num)
    num += 1

# 3. 循环 else 子句
i = 0
while i < 3:
    print(i)
    i += 1
else:
    print("end")

# 4. 嵌套条件
x = 15
if x < 10:
    print("A")
elif x < 20:
    if x % 2 == 0:
        print("B")
    else:
        print("C")
else:
    print("D")

# 5. 综合练习
a = 1
b = 0
while a <= 5:
    if a == 3:
        b += 10
    elif a % 2 == 0:
        b += a * 2
    else:
        b += a
    a += 1
print(b)
3)作业三:BMI 计算器
a)编写一个 BMI 计算器程序,要求如下
- 用户输入:通过
input()函数获取用户的身高(单位:米)和体重(单位:千克) - 计算 BMI:使用公式
BMI = 体重(kg) / 身高(m)²计算 BMI 值 - 判断分类:根据 BMI 值判断身体状况(参考中国成人标准):
- BMI < 18.5:偏瘦
- 18.5 ≤ BMI < 24:正常
- 24 ≤ BMI < 28:超重
- BMI ≥ 28:肥胖
- 输出结果:使用 f-string 格式化输出用户的 BMI 值和分类结果
- 健康建议:根据分类结果给出相应的健康建议,例如:
- 偏瘦:建议适当增加营养摄入,进行适量运动
- 正常:保持良好的生活习惯
- 超重/肥胖:建议控制饮食,增加运动量
b)示例输出
请输入您的身高(米):1.75
请输入您的体重(千克):70
您的 BMI 值为:22.86
身体状况:正常
建议:保持良好的生活习惯,继续保持!
4)作业四:素数筛选器
- 素数(质数) 是指在大于 1 的自然数中,除了 1 和它本身以外不再有其他因数的数
- 例如:2、3、5、7、11 都是素数,而 4、6、8、9 则不是
a)编写一个程序,要求如下:
- 用户输入:通过
input()函数获取起始数字和结束数字 - 输入合法性检查:
- 输入必须是正整数(大于 0 的整数)
- 结束数字必须大于起始数字
- 如果输入不合法,给出相应提示并要求重新输入
- 素数判断:使用循环判断该范围内每个数字是否为素数
- 输出结果:打印该范围内的所有素数,并统计素数的个数
b)示例输出
请输入起始数字:10
请输入结束数字:50
10 到 50 之间的素数有:
11 13 17 19 23 29 31 37 41 43 47
共计 11 个素数
(四)Python容器类型
1.什么是容器类型
- 容器类型用于 存储多个数据
- Python中内置的容器类型
| 类型 | 名称 | 是否可变 | 是否有序 | 元素是否可重复 | 示例 |
|---|---|---|---|---|---|
list | 列表 | 可变 | 有序 | 可重复 | [1, 2, 2, 3] |
tuple | 元组 | 不可变 | 有序 | 可重复 | (1, 2, 3) |
dict | 字典 | 可变 | 有序(Python 3.7+) | 键不可重复 | {"a": 1, "b": 2} |
set | 集合 | 可变 | 无序 | 不可重复 | {1, 2, 3} |
str | 字符串 | 不可变 | 有序 | 可重复 | "hello" |
相关信息
str 也可以视为一种不可变的有序字符序列,本节会穿插涉及
2.列表(list)
- 列表是Python中最常用的 可变、有序 容器
- 可以存储任意类型的元素
1)创建列表
# 字面量创建
nums = [1, 2, 3, 4, 5]
mixed = [1, "hello", 3.14, True, None]
empty = []  # 空列表

# 通过list()函数创建
chars = list("abc")      # ['a', 'b', 'c']
nums2 = list((1, 2, 3))  # [1, 2, 3]
2)索引与切片
fruits = ["苹果", "香蕉", "橙子", "葡萄", "西瓜"]

# 索引访问(从0开始)
print(fruits[0])   # 苹果
print(fruits[-1])  # 西瓜(负数从末尾开始)

# 切片 [start:end:step]
print(fruits[1:4])     # ['香蕉', '橙子', '葡萄'] —— 范围[1,4)
print(fruits[:3])      # ['苹果', '香蕉', '橙子'] —— 返回[0,3)
print(fruits[2:])      # ['橙子', '葡萄', '西瓜'] —— 从索引2到末尾
print(fruits[::2])     # ['苹果', '橙子', '西瓜'] —— 从头到尾,每隔一个取一个,步长为2
print(fruits[1:4:2])	 # ['香蕉', '葡萄'] -- 范围[1,4),步长为2
print(fruits[::-1])    # ['西瓜', '葡萄', '橙子', '香蕉', '苹果'] —— 从头到尾,步长为-1(倒序,即反转列表)
3)列表操作
nums = [1, 2, 3]

# 添加元素
nums.append(4)        # [1, 2, 3, 4]      末尾添加
nums.insert(0, 0)     # [0, 1, 2, 3, 4]   指定位置插入
nums.extend([5, 6])   # [0, 1, 2, 3, 4, 5, 6]  批量添加

# 删除元素
nums.remove(0)        # [1, 2, 3, 4, 5, 6] 删除第一个匹配值
popped = nums.pop()   # 6, nums变为[1, 2, 3, 4, 5]  删除并返回末尾
popped = nums.pop(0)  # 1, nums变为[2, 3, 4, 5]    删除并返回指定位置
del nums[0]           # [3, 4, 5]  删除指定位置
nums.clear()          # []  清空列表

# 查找与统计
nums = [1, 2, 3, 2, 4]
print(nums.index(2))     # 1  第一个匹配的位置
print(nums.count(2))     # 2  出现次数

# 排序与反转
nums = [3, 1, 4, 1, 5]
nums.sort()              # [1, 1, 3, 4, 5]  原地排序
nums.sort(reverse=True)  # [5, 4, 3, 1, 1]  降序
nums.reverse()           # [1, 1, 3, 4, 5]  原地反转

# 排序但不修改原列表
nums = [3, 1, 4]
sorted_nums = sorted(nums)  # [1, 3, 4], nums不变

# 修改列表项
nums[0] = 10 # [10,3,4]
nums[4] = 10 # IndexError: list assignment index out of range
3.元组(tuple)
- 元组是 不可变 的有序序列
- 一旦创建就不能修改
1)创建元组
# 字面量创建(圆括号可省略)
point = (1, 2)
point = 1, 2       # 等价于 (1, 2)
single = (1,)      # 单元素必须加逗号!不是 (1)
empty = ()         # 空元组

# 通过tuple()函数创建
t = tuple([1, 2, 3])   # (1, 2, 3)
t = tuple("abc")       # ('a', 'b', 'c')
2)基本操作
t = (1, 2, 3, 2, 4)

# 索引和切片(与list相同)
print(t[0])      # 1
print(t[-1])     # 4
print(t[1:4])    # (2, 3, 2)

# 查询(不能修改)
print(t.index(2))    # 1
print(t.count(2))    # 2
print(3 in t)        # True

# 不能修改!
# t[0] = 100       # TypeError: 'tuple' object does not support item assignment
# t.append(5)      # AttributeError
3)元组解包
# 元组解包
coord = (3, 4)
x, y = coord
print(x, y)      # 3 4

# 扩展解包(Python 3+)
first, *rest = (1, 2, 3, 4)
print(first)     # 1
print(rest)      # [2, 3, 4]

*rest, last = (1, 2, 3, 4)
print(rest)      # [1, 2, 3]
print(last)      # 4

# 用于交换变量
a, b = 1, 2
a, b = b, a      # a=2, b=1
4.字典(dict)
- 字典是Python的 键值对 存储结构
- 通过键快速查找值
1)创建字典
# 字面量创建
person = {
    "name": "Alice",
    "age": 25,
    "city": "北京"
}
empty = {}      # 空字典

# 通过dict()函数创建
person = dict(name="Alice", age=25, city="北京")
person = dict([("name", "Alice"), ("age", 25)])

# 从键序列创建,值默认为None或指定
d = dict.fromkeys(["a", "b", "c"], 0)
# {'a': 0, 'b': 0, 'c': 0}
2)访问与修改
person = {"name": "Alice", "age": 25}

# 访问
print(person["name"])       # Alice
# print(person["gender"])   # KeyError!

# 安全访问
print(person.get("gender"))         # None(不报错)
print(person.get("gender", "未知"))  # 未知(提供默认值)

# 添加/修改
person["gender"] = "女"      # 添加新键
person["age"] = 26           # 修改已有键

# 批量更新
person.update({"phone": "123456", "age": 27})

# 删除
del person["phone"]          # 删除键值对
value = person.pop("age")    # 删除并返回值
last = person.popitem()      # 删除并返回最后插入的键值对(Python 3.7+)
person.clear()               # 清空
3)重要注意事项
# 键必须是不可变类型(hashable)
valid = {
    "string": 1,      # str ✓
    42: 2,            # int ✓
    (1, 2): 3,        # tuple ✓
    # [1, 2]: 4,     # list ✗ 不可哈希!
}

# 字典的键是唯一的,重复赋值会覆盖
person = {"name": "Alice", "name": "Bob"}
print(person)  # {'name': 'Bob'}
5.集合(set)
- 集合是 无序、不重复 的元素集合
- 支持数学上的集合运算
1)创建集合
# 字面量创建
nums = {1, 2, 3, 3, 3}   # {1, 2, 3} —— 自动去重
empty = set()             # 空集合!不是 {}(那是空字典)

# 通过set()函数创建
nums = set([1, 2, 2, 3])  # {1, 2, 3}
chars = set("hello")      # {'h', 'e', 'l', 'o'}
2)集合操作
s = {1, 2, 3}

# 添加/删除
s.add(4)          # {1, 2, 3, 4}
s.remove(2)       # {1, 3, 4} —— 不存在会报错
s.discard(10)     # 不报错,即使不存在
s.pop()           # 随机删除并返回一个元素
s.clear()         # set()

# 去重利器
nums = [1, 2, 2, 3, 3, 3]
unique = list(set(nums))   # [1, 2, 3](顺序可能不同)
6.容器操作
1)通用操作函数
- 以下函数适用于所有容器类型(
list、tuple、dict、set、str)
# len() —— 获取元素个数
len([1, 2, 3])       # 3
len((1, 2, 3))       # 3
len({"a": 1, "b": 2}) # 2(键值对数量)
len("hello")         # 5

# max() / min() —— 最大/最小值
max([3, 1, 4, 1, 5])  # 5
min((3, 1, 4))        # 1
max("hello")          # 'o'(按字符编码)

# sum() —— 求和(元素必须是数字)
sum([1, 2, 3, 4])     # 10
sum((1, 2, 3))        # 6

# sorted() —— 排序,返回新列表
sorted([3, 1, 2])           # [1, 2, 3]
sorted((3, 1, 2))           # [1, 2, 3] —— 返回列表
sorted("cba")               # ['a', 'b', 'c']
sorted([3, 1, 2], reverse=True)  # [3, 2, 1]

# reversed() —— 反转,返回迭代器
list(reversed([1, 2, 3]))   # [3, 2, 1]
list(reversed("abc"))       # ['c', 'b', 'a']
2)常用运算符
a)成员运算符
in/not in- 判断元素是否存在于容器中
# 列表
3 in [1, 2, 3]        # True
5 not in [1, 2, 3]    # True

# 元组
2 in (1, 2, 3)        # True

# 字符串
"he" in "hello"       # True —— 检查子串
"x" not in "hello"    # True

# 字典 —— 检查的是键,不是值
"name" in {"name": "Alice", "age": 25}   # True
"Alice" in {"name": "Alice", "age": 25}  # False

# 集合
2 in {1, 2, 3}        # True
b)连接与重复运算符
# + 连接(仅有序容器)
[1, 2] + [3, 4]       # [1, 2, 3, 4]
(1, 2) + (3, 4)       # (1, 2, 3, 4)
"hello " + "world"    # "hello world"
# {1, 2} + {3, 4}    # TypeError! 集合不支持

# * 重复(仅有序容器)
[1, 2] * 3            # [1, 2, 1, 2, 1, 2]
"-" * 10              # "----------"
c)相等运算符
==/!===比较的是两个容器的内容是否 相等- 而非它们是否是同一个对象
比较逻辑
- 类型必须相同
- 不同类型的容器即使内容看起来一样,也视为不相等
[1, 2] == (1, 2)结果为False
- 长度必须相同
- 长度不同的容器一定不相等
- 逐元素比较
- 从第一个元素开始,依次比较对应位置的元素
- 对于嵌套容器,会 递归 地进行逐元素比较
- 元素使用自身的
==- 容器本身不定义元素如何相等,而是调用元素自身的
__eq__方法 - 因此
[1, 2] == [1.0, 2.0]为True
- 容器本身不定义元素如何相等,而是调用元素自身的
# 基本比较
[1, 2, 3] == [1, 2, 3]        # True,内容相同
[1, 2, 3] == [1, 3, 2]        # False,顺序不同

# 类型不同
[1, 2] == (1, 2)              # False

# 嵌套容器递归比较
[[1, 2], [3, 4]] == [[1, 2], [3, 4]]  # True

# 字典比较(键值对)
{"a": 1, "b": 2} == {"b": 2, "a": 1}  # True,字典无序,键值对相同即可
注意
==比较的是 值相等,不是 身份相同(是否为内存中的同一个对象)- 要判断身份,使用
is
d)身份运算符
is/is notis用于判断两个变量是否指向 内存中的同一个对象- 即它们的
id()是否相同
a = [1, 2, 3]
b = a
c = [1, 2, 3]

a is b        # True,b 和 a 指向同一个列表对象
a is c        # False,c 是新创建的另一个对象,尽管内容相同
a == c        # True,内容相等

a is not c    # True
常见使用场景
# 判断是否为 None(Python 推荐写法)
value = None
if value is None:
    print("值为空")

# 判断单例对象
x = True
x is True     # True

# 小整数缓存(Python 优化)
a = 100
b = 100
a is b        # True(-5 到 256 的整数会被缓存复用)

x = 1000
y = 1000
x is y        # False(通常,取决于解释器实现)
重要区别
==问的是"你们长得一样吗?"(值相等)is问的是"你们就是同一个人吗?"(身份相同)- 比较
None时,永远使用is,而不是==
e)位运算符
&/|/^/~- 对于 集合(set),位运算符有特殊的集合运算含义
s1 = {1, 2, 3}
s2 = {2, 3, 4}

# & 交集(两个集合都有的元素)
s1 & s2       # {2, 3}

# | 并集(两个集合所有的元素,去重)
s1 | s2       # {1, 2, 3, 4}

# - 差集(在 s1 中但不在 s2 中的元素)
s1 - s2       # {1}
s2 - s1       # {4}

# ^ 对称差集(只在其中一个集合中的元素)
s1 ^ s2       # {1, 4}

# ~ 不适用于集合,用于整数的按位取反
对比:位运算 vs 集合方法
s1 = {1, 2, 3}
s2 = {2, 3, 4}

# 运算符写法
s1 & s2        # {2, 3}
s1 | s2        # {1, 2, 3, 4}
s1 - s2        # {1}
s1 ^ s2        # {1, 4}

# 方法写法(等价)
s1.intersection(s2)      # {2, 3}
s1.union(s2)             # {1, 2, 3, 4}
s1.difference(s2)        # {1}
s1.symmetric_difference(s2)  # {1, 4}
- 位运算符只能用于 集合(set)
- 不能用于
list、tuple、dict等其他容器类型
3)遍历容器
a)基本 for 循环
# 遍历列表
for item in [1, 2, 3]:
    print(item)

# 遍历元组
for char in ("a", "b", "c"):
    print(char)

# 遍历字符串
for ch in "hello":
    print(ch)  # h, e, l, l, o
b)遍历字典
person = {"name": "Alice", "age": 25, "city": "北京"}

# 遍历键(默认)
for key in person:
    print(key)

# 遍历键值对
for key, value in person.items():
    print(key, value)

# 仅遍历值
for value in person.values():
    print(value)

# 仅遍历键(显式)
for key in person.keys():
    print(key)
c)遍历集合
s = {1, 2, 3}
for item in s:
    print(item)
# 注意:集合是无序的,遍历顺序不固定
e)enumerate() 函数
- 遍历容器时,如果需要同时获取索引和值,使用
enumerate()
# 基本用法
fruits = ["苹果", "香蕉", "橙子"]
for index, fruit in enumerate(fruits):
    print(f"{index}: {fruit}")
# 0: 苹果
# 1: 香蕉
# 2: 橙子

# 指定起始索引
for i, v in enumerate(fruits, start=1):
    print(f"{i}. {v}")
# 1. 苹果
# 2. 香蕉
# 3. 橙子
f)zip() 函数
- 并行遍历多个容器,元素按位置一一配对
names = ["Alice", "Bob", "Charlie"]
ages = [25, 30, 35]
cities = ["北京", "上海", "广州"]

for name, age, city in zip(names, ages, cities):
    print(f"{name} 今年 {age} 岁,住在 {city}")

# zip 以最短容器为准
short = [1, 2]
long = ["a", "b", "c"]
for x, y in zip(short, long):
    print(x, y)
# 只输出两组:1 a 和 2 b
7.作业
1)作业一:列表与身份运算符综合
- 阅读以下代码,预测每行
print的输出结果,并在注释中写出你的答案
nums = [3, 1, 4, 1, 5]
copy = nums[:]
print(nums == copy, nums is copy)
nums[0] = 10

print(nums[0], copy[0])
print(nums == copy, nums is copy)
print(len(nums))

i = 0
count = 0
while i < len(nums):
    if nums[i] > 3:
        count += 1
    i += 1
print(count)
2)作业二:元组、集合与成员运算符综合
- 阅读以下代码,预测每行
print的输出结果,并在注释中写出你的答案
t = (5, 2, 8, 2)
first, *rest = t
print(first, rest)
print(sorted(t))
print(2 in t, 9 not in t)

s = set(t)
print(len(s))
s2 = {2, 8, 10}
print(s & s2, s | s2)
3)作业三:字典与遍历综合
- 阅读以下代码,预测每行
print的输出结果,并在注释中写出你的答案
d = {"x": 10, "y": 20}
d["z"] = 30
d.update({"x": 15})
print(len(d))
print("x" in d, 20 in d)
print(d.get("w", 0))

keys = []
for k in d:
    keys.append(k)
print(keys)

i = 0
while i < len(keys):
    k = keys[i]
    if d[k] > 15:
        print(k)
    i += 1
4)作业四:字符串操作与循环综合
- 阅读以下代码,预测每行
print的输出结果,并在注释中写出你的答案
s = "hello"
print(s[1:4])
print("el" in s, "x" not in s)
print(s + " world", s * 2)

i = 0
vowels = "aeiou"
count = 0
while i < len(s):
    if s[i] in vowels:
        count += 1
    i += 1
print(count)
print(f"length: {len(s)}")
5)作业五:enumerate、zip与多容器综合
- 阅读以下代码,预测每行
print的输出结果,并在注释中写出你的答案
names = ["Alice", "Bob"]
ages = (25, 30)

pairs = []
for name, age in zip(names, ages):
    pairs.append(f"{name}-{age}")
print(pairs)

for i, name in enumerate(names, 1):
    print(i, name)

d = {}
i = 0
while i < len(names):
    if ages[i] > 20:
        d[names[i]] = ages[i]
    i += 1
print(len(d))
print(d.get("Alice"))
print(d.get("Charlie", "not found"))
6)作业六:学生信息处理综合练习
- 以下是一个包含学生信息的列表,请根据要求编写代码完成各项任务
a)提示
- 以下所有任务请使用循环和条件判断完成,不要使用列表推导式
students = [
    {"id": 988985, "name": "梁平", "sex": "女", "age": 15, "address": "安徽省 淮南市", "tel": "12957961008"},
    {"id": 299422, "name": "邱杰", "sex": "男", "age": 25, "address": "辽宁省 本溪市", "tel": "12685726676"},
    {"id": 723972, "name": "王超", "sex": "女", "age": 14, "address": "新疆维吾尔自治区 阿克苏地区", "tel": "15277794541"},
    {"id": 723768, "name": "冯秀兰", "sex": "女", "age": 29, "address": "辽宁省 丹东市", "tel": "13014888148"},
    {"id": 536273, "name": "赖军", "sex": "男", "age": 19, "address": "重庆 重庆市", "tel": "15152658611"},
    {"id": 940136, "name": "顾强", "sex": "男", "age": 20, "address": "吉林省 松原市", "tel": "18562759588"},
    {"id": 489462, "name": "戴敏", "sex": "男", "age": 25, "address": "湖南省 长沙市", "tel": "11513562318"},
    {"id": 863594, "name": "吕涛", "sex": "女", "age": 16, "address": "湖北省 襄阳市", "tel": "16246419558"},
    {"id": 718313, "name": "冯静", "sex": "女", "age": 28, "address": "黑龙江省 牡丹江市", "tel": "18243767800"},
    {"id": 262068, "name": "蔡明", "sex": "男", "age": 20, "address": "黑龙江省 七台河市", "tel": "14185862227"},
    {"id": 900366, "name": "廖磊", "sex": "女", "age": 23, "address": "青海省 海南藏族自治州", "tel": "19469661693"},
    {"id": 316019, "name": "冯洋", "sex": "男", "age": 16, "address": "江西省 新余市", "tel": "18842832768"},
    {"id": 773536, "name": "韩杰", "sex": "男", "age": 23, "address": "云南省 丽江市", "tel": "18560747335"},
    {"id": 494398, "name": "江涛", "sex": "男", "age": 24, "address": "山西省 大同市", "tel": "12774658592"},
    {"id": 177459, "name": "文艳", "sex": "男", "age": 27, "address": "山东省 青岛市", "tel": "16233511417"},
    {"id": 979439, "name": "杜秀英", "sex": "男", "age": 22, "address": "甘肃省 张掖市", "tel": "14723781356"},
    {"id": 142762, "name": "丁艳", "sex": "男", "age": 28, "address": "澳门特别行政区 澳门半岛", "tel": "13157638539"},
    {"id": 157141, "name": "邓静", "sex": "女", "age": 19, "address": "海南省 三亚市", "tel": "17658672240"},
    {"id": 243063, "name": "江刚", "sex": "女", "age": 15, "address": "安徽省 六安市", "tel": "18205383748"},
    {"id": 351709, "name": "乔刚", "sex": "女", "age": 12, "address": "安徽省 蚌埠市", "tel": "14143838021"},
    {"id": 236140, "name": "史平", "sex": "男", "age": 24, "address": "广西壮族自治区 百色市", "tel": "11895866733"},
    {"id": 254260, "name": "康娜", "sex": "男", "age": 29, "address": "辽宁省 铁岭市", "tel": "18783219853"},
    {"id": 387769, "name": "袁磊", "sex": "男", "age": 28, "address": "重庆 重庆市", "tel": "15243676922"},
    {"id": 692436, "name": "龙秀英", "sex": "男", "age": 18, "address": "吉林省 延边朝鲜族自治州", "tel": "18667285569"},
    {"id": 304202, "name": "姚静", "sex": "男", "age": 21, "address": "吉林省 松原市", "tel": "17962179634"},
    {"id": 533032, "name": "潘娜", "sex": "男", "age": 13, "address": "湖北省 孝感市", "tel": "14132684173"},
    {"id": 773792, "name": "萧磊", "sex": "男", "age": 29, "address": "河南省 焦作市", "tel": "13865617456"},
    {"id": 171440, "name": "邵勇", "sex": "男", "age": 16, "address": "宁夏回族自治区 固原市", "tel": "19454444332"},
    {"id": 428587, "name": "李芳", "sex": "男", "age": 29, "address": "四川省 宜宾市", "tel": "14751601674"},
    {"id": 926156, "name": "谭芳", "sex": "女", "age": 27, "address": "湖南省 长沙市", "tel": "18683429563"},
    {"id": 171494, "name": "夏秀英", "sex": "男", "age": 14, "address": "陕西省 安康市", "tel": "17732967642"},
    {"id": 549517, "name": "程娜", "sex": "女", "age": 24, "address": "内蒙古自治区 锡林郭勒盟", "tel": "18927839708"},
    {"id": 999121, "name": "武杰", "sex": "女", "age": 21, "address": "新疆维吾尔自治区 博尔塔拉蒙古自治州", "tel": "15349698338"},
    {"id": 440785, "name": "崔军", "sex": "男", "age": 26, "address": "山西省 临汾市", "tel": "14863312346"},
    {"id": 113636, "name": "廖勇", "sex": "女", "age": 19, "address": "重庆 重庆市", "tel": "18152536541"},
    {"id": 109280, "name": "崔强", "sex": "女", "age": 25, "address": "河南省 安阳市", "tel": "12838860122"},
    {"id": 988885, "name": "康秀英", "sex": "女", "age": 29, "address": "广东省 佛山市", "tel": "12637161150"},
    {"id": 751542, "name": "余磊", "sex": "女", "age": 15, "address": "香港特别行政区 九龙", "tel": "16716667565"},
    {"id": 821693, "name": "邵勇", "sex": "女", "age": 27, "address": "内蒙古自治区 鄂尔多斯市", "tel": "11869733772"},
    {"id": 595152, "name": "贺涛", "sex": "女", "age": 12, "address": "吉林省 通化市", "tel": "18172684836"},
    {"id": 209059, "name": "万勇", "sex": "男", "age": 27, "address": "江苏省 淮安市", "tel": "13523350881"},
    {"id": 331199, "name": "江艳", "sex": "男", "age": 29, "address": "内蒙古自治区 包头市", "tel": "14357786637"},
    {"id": 597029, "name": "廖磊", "sex": "女", "age": 22, "address": "新疆维吾尔自治区 伊犁哈萨克自治州", "tel": "14343812715"},
    {"id": 243965, "name": "马芳", "sex": "女", "age": 29, "address": "湖南省 长沙市", "tel": "12226278003"},
    {"id": 796997, "name": "郝霞", "sex": "女", "age": 29, "address": "辽宁省 锦州市", "tel": "15734778439"},
    {"id": 735045, "name": "吴娜", "sex": "男", "age": 18, "address": "江西省 鹰潭市", "tel": "12550200851"},
    {"id": 858934, "name": "石秀英", "sex": "男", "age": 21, "address": "福建省 南平市", "tel": "14296454005"},
    {"id": 646003, "name": "苏静", "sex": "女", "age": 17, "address": "澳门特别行政区 澳门半岛", "tel": "11456865751"},
    {"id": 607537, "name": "于磊", "sex": "女", "age": 25, "address": "海南省 海口市", "tel": "14742847575"},
    {"id": 817410, "name": "胡超", "sex": "女", "age": 19, "address": "海外 海外", "tel": "16875962137"},
    {"id": 985064, "name": "任杰", "sex": "男", "age": 17, "address": "云南省 迪庆藏族自治州", "tel": "17548787335"},
    {"id": 644060, "name": "汪秀英", "sex": "男", "age": 19, "address": "香港特别行政区 九龙", "tel": "10278533538"},
    {"id": 755803, "name": "徐磊", "sex": "女", "age": 26, "address": "江苏省 徐州市", "tel": "18721465794"},
    {"id": 538130, "name": "熊洋", "sex": "男", "age": 13, "address": "吉林省 白城市", "tel": "13491345641"},
    {"id": 977696, "name": "孟磊", "sex": "男", "age": 24, "address": "香港特别行政区 香港岛", "tel": "10541964547"},
    {"id": 683438, "name": "赵霞", "sex": "男", "age": 28, "address": "重庆 重庆市", "tel": "13085741830"},
    {"id": 342123, "name": "曾芳", "sex": "女", "age": 15, "address": "湖南省 邵阳市", "tel": "11645124878"},
    {"id": 261733, "name": "马芳", "sex": "女", "age": 22, "address": "台湾 新北市", "tel": "10255722846"},
    {"id": 303578, "name": "姜杰", "sex": "女", "age": 17, "address": "黑龙江省 齐齐哈尔市", "tel": "12581543256"},
    {"id": 907392, "name": "熊杰", "sex": "男", "age": 16, "address": "广西壮族自治区 北海市", "tel": "18941398494"}
]
b)任务列表
- 遍历
students列表,使用 f-string 格式化输出每个学生的姓名和年龄,格式为姓名: xxx, 年龄: xx - 创建一个新列表
female_students,包含所有性别为"女"的学生(即sex键的值为"女") - 创建一个新列表
young_females,包含所有年龄小于 25 岁的女生 - 创建一个新列表
chen_students,包含所有姓"陈"的学生(提示:name[0]可以获取姓名的第一个字) - 创建一个新列表
tel_end_with_1,包含所有电话号码最后一位是 "1" 的学生(提示:字符串可以用索引访问最后一个字符,如tel[-1]) - 创建一个新列表
all_names,包含所有学生的姓名 - 创建一个新列表
female_names,包含所有女生的姓名 - 创建一个新列表
female_contacts,其中每个元素是一个字典,只包含name和tel两个键,仅包含女生的信息 - 计算并打印所有学生的年龄总和
- 计算并打印所有学生的平均年龄(保留两位小数,使用 f-string 格式化)
- 创建一个字典
result,包含两个键:"names"对应的值是所有学生姓名的列表,"ages"对应的值是所有学生年龄的列表 - 找到
id为796997的学生,打印其姓名和电话号码。如果找不到,打印"未找到" - 判断是否包含年龄大于 28 岁的男生。如果存在,打印
True并打印该学生的姓名;否则打印False - 判断是否所有女生的年龄都在 28 岁以内(即没有超过 28 岁的女生)。如果是,打印
True;否则打印False
(五)Python函数
- 函数是 可复用 的代码块,用于封装特定功能
- 通过定义函数,可以避免重复代码,提高程序的可读性和可维护性
1.定义函数
- 使用
def关键字定义函数
# 定义一个简单函数
def greet():
    print("Hello, World!")

# 调用函数
greet()  # Hello, World!
2.参数
1)位置参数
- 按照定义时的 顺序 传递参数
def add(a, b):
    return a + b

result = add(3, 5)
print(result)  # 8
2)默认参数
- 为参数指定 默认值 ,调用时可省略
def greet(name, greeting="Hello"):
    print(f"{greeting}, {name}!")

greet("Alice")              # Hello, Alice!
greet("Bob", "Hi")          # Hi, Bob!
注意
默认参数必须放在非默认参数后面
# 错误示例
# def greet(greeting="Hello", name):  # SyntaxError!
#     pass
3)关键字参数
- 通过 参数名 传递,顺序可以任意
def person_info(name, age, city):
    print(f"{name}, {age}岁, 来自{city}")

# 关键字参数,顺序无关
person_info(age=25, city="北京", name="Alice")
# Alice, 25岁, 来自北京
- 混合使用:位置参数在前,关键字参数在后
person_info("Alice", age=25, city="北京")  # 正确
# person_info(name="Alice", 25, "北京")   # 错误!位置参数不能在关键字参数后
4)可变参数
a)*args
- 接收任意数量的位置参数
def sum_all(*args):
    total = 0
    for num in args:
        total += num
    return total

# 调用
print(sum_all(1, 2, 3))     # 6
print(sum_all(1, 2, 3, 4))  # 10
print(sum_all())            # 0
args的本质:函数内部是一个 元组
def show_args(*args):
    print(type(args))  # <class 'tuple'>
    print(args)        # (1, 2, 3)

show_args(1, 2, 3)
b)**kwargs
- 接收任意数量的关键字参数
def print_info(**kwargs):
    for key, value in kwargs.items():
        print(f"{key}: {value}")

# 调用
print_info(name="Alice", age=25, city="北京")
# name: Alice
# age: 25
# city: 北京
kwargs的本质:函数内部是一个 字典
def show_kwargs(**kwargs):
    print(type(kwargs))  # <class 'dict'>
    print(kwargs)        # {'name': 'Alice', 'age': 25}

show_kwargs(name="Alice", age=25)
5)参数顺序规则
- 定义函数时,参数必须按以下顺序
def func(位置参数, 默认参数, *args, **kwargs):
    pass

# 示例
def demo(a, b=2, *args, **kwargs):
    print(f"a={a}, b={b}")
    print(f"args={args}")
    print(f"kwargs={kwargs}")

demo(1, 3, 4, 5, x=10, y=20)
# a=1, b=3
# args=(4, 5)
# kwargs={'x': 10, 'y': 20}
3.返回值
1)使用 return
- 函数通过
return返回结果
def square(x):
    return x ** 2

result = square(4)
print(result)  # 16
2)多返回值
- Python 函数可以 同时返回多个值(实际是返回元组)
def min_max(numbers):
    return min(numbers), max(numbers)

minimum, maximum = min_max([3, 1, 4, 1, 5])
print(minimum)  # 1
print(maximum)  # 5

# 本质上返回的是元组
result = min_max([3, 1, 4])
print(result)       # (1, 4)
print(type(result)) # <class 'tuple'>
3)没有 return
- 如果函数没有
return,默认返回None
def say_hello():
    print("Hello")

result = say_hello()  # Hello
print(result)         # None
4.文档字符串(Docstring)
- 用三引号编写函数的说明文档
def calculate_bmi(weight, height):
    """
    计算 BMI 指数。

    参数:
        weight: 体重,单位千克
        height: 身高,单位米

    返回:
        BMI 值
    """
    return weight / (height ** 2)

# 查看文档
print(calculate_bmi.__doc__)
5.作业
1)作业一:函数参数与列表操作综合
- 阅读以下代码,预测每行
print的输出结果,并在注释中写出你的答案
def add_items(base, items=None, *tags):
    if items is None:
        items = []
    items.append(base)
    for tag in tags:
        items.append(tag)
    return items

result1 = add_items(10)
print(result1)

result2 = add_items(20, [1, 2], 30, 40)
print(result2)

print(result1)
2)作业二:关键字参数与字典操作综合
- 阅读以下代码,预测每行
print的输出结果,并在注释中写出你的答案
def merge_data(base, **extra):
    result = base.copy() # 浅拷贝
    for key, value in extra.items():
        if key in result:
            result[key] += value
        else:
            result[key] = value
    return result

data = {"a": 10, "b": [1, 2]}
merged = merge_data(data, a=5, b=[3], c="hello")
print(merged)

print(len(merged))
print(merged.get("d", "not found"))
3)作业三:多返回值与容器遍历综合
- 阅读以下代码,预测每行
print的输出结果,并在注释中写出你的答案
def split_data(data):
    mid = len(data) // 2
    return data[:mid], data[mid:]

nums = [1, 2, 3, 4, 5, 6]
first, second = split_data(nums)
print(first, second)

def find_indices(items, target):
    indices = []
    for i, item in enumerate(items):
        if item == target:
            indices.append(i)
    return indices

scores = [85, 92, 85, 78, 85]
positions = find_indices(scores, 85)
print(positions)

result = second + [len(positions)]
print(result)
4)作业四:函数综合编程
- 请按照要求实现以下三个函数,并编写测试代码手动调用每个函数,验证功能是否正确
a)任务 1:列表扁平化
- 实现函数
flatten,接收一个可能包含嵌套列表的列表(如[1, [2, 3], [[4], 5]]) - 返回一个将所有元素展开后的一维列表(如
[1, 2, 3, 4, 5])
nested1 = [1, [2, 3], [[4], 5]]
print(flatten(nested1))  # [1, 2, 3, 4, 5]

nested2 = [[[1]], 2, [3, [4, [5]]]]
print(flatten(nested2))  # [1, 2, 3, 4, 5]

print(flatten([]))       # []
print(flatten([1, 2, 3]))  # [1, 2, 3]
b)任务 2:列表/元组转链表
- 实现函数
to_linked_list,接收一个列表或元组,将其转换为一个链表结构并返回
linked1 = to_linked_list((1, 2, 3))
print(linked1)
# {'value': 1, 'next': {'value': 2, 'next': {'value': 3, 'next': None}}}

linked2 = to_linked_list([10, 20])
print(linked2)
# {'value': 10, 'next': {'value': 20, 'next': None}}

print(to_linked_list([]))  # None
c)任务 3:字典合并
- 实现函数
merge_dicts,接收不定数量的字典参数,将它们合并为一个大字典 - 合并规则:求并集,如果有相同的键,后传入的字典中的值覆盖先传入的字典中的值(浅合并即可)
d1 = {"a": 1, "b": [1, 2]}
d2 = {"b": [3], "c": "hello"}
d3 = {"a": 10, "d": True}

merged = merge_dicts(d1, d2, d3)
print(merged)
# {'a': 10, 'b': [3], 'c': 'hello', 'd': True}

print(merge_dicts(d1))
# {'a': 1, 'b': [1, 2]}

print(merge_dicts())
# {}
(六)Python作用域
- 作用域(Scope)决定了程序中变量和名字的 可见范围
- 理解作用域能帮助预测代码的执行结果,避免变量名冲突
1.LEGB 规则
- Python 查找变量时遵循 LEGB 规则
- 按以下优先级顺序搜索
| 优先级 | 层级 | 说明 |
|---|---|---|
| 1 | Local | 函数内部(局部作用域) |
| 2 | Enclosing | 嵌套函数的外层函数(闭包) |
| 3 | Global | 模块级别(全局作用域) |
| 4 | Built-in | Python 内置(如 len、print) |
x = "global"          # G:全局作用域

def outer():
    x = "enclosing"   # E:外层函数作用域

    def inner():
        x = "local"   # L:局部作用域
        print(x)      # 按 L → E → G → B 查找

    inner()

outer()  # local
2.局部作用域(Local)
- 函数内部定义的变量,只在函数内部可见
def demo():
    local_var = 100   # 局部变量
    print(local_var)

demo()        # 100
# print(local_var)  # NameError!函数外部访问不到
- 函数参数也是局部变量
def greet(name):      # name 是局部变量
    message = f"Hello, {name}"  # message 也是局部变量
    print(message)

greet("Alice")
# print(name)     # NameError!
3.全局作用域(Global)
1)模块级别(文件最外层)定义的变量
count = 0             # 全局变量

def increment():
    print(count)      # 读取全局变量,OK

increment()  # 0
2)在函数内修改全局变量
- 直接赋值会创建局部变量,而非修改全局变量
count = 0

def wrong_increment():
    count += 1        # UnboundLocalError!

# wrong_increment()
- 使用
global关键字声明
count = 0

def increment():
    global count      # 声明使用全局变量
    count += 1
    print(count)

increment()  # 1
increment()  # 2
print(count) # 2
4.闭包作用域(Enclosing)
1)嵌套函数中,内层函数可以访问外层函数的变量
def outer():
    x = "outer"       # 外层函数的局部变量

    def inner():
        print(x)      # 访问外层变量

    inner()

outer()  # outer
2)修改外层变量
- 内层函数不能直接修改外层变量
def counter():
    count = 0

    def increment():
        count += 1    # UnboundLocalError!

    increment()

# counter()
- 使用
nonlocal关键字
def make_counter():
    count = 0

    def increment():
        nonlocal count   # 声明使用外层变量
        count += 1
        return count

    return increment

counter = make_counter()
print(counter())  # 1
print(counter())  # 2
print(counter())  # 3
nonlocal vs global
| 关键字 | 作用 |
|---|---|
global | 声明变量来自 全局 作用域 |
nonlocal | 声明变量来自 外层函数 作用域 |
5.常见错误
1)错误 1:在函数内同时读写全局变量
x = 10

def demo():
    print(x)      # 先读
    x = 20        # 再写 → 编译期就判定 x 是局部变量!

# demo()  # UnboundLocalError
- 原因:Python 在编译函数时就确定了变量作用域,一旦函数内有赋值语句,该变量就被视为局部变量
- 修正:
x = 10

def demo():
    global x
    print(x)
    x = 20

demo()  # 10
print(x)  # 20
2)错误 2:默认参数的陷阱
def add_item(item, items=[]):
    items.append(item)
    return items

print(add_item(1))  # [1]
print(add_item(2))  # [1, 2] —— 意外!列表被共享了
- 原因:默认参数在函数定义时求值,只创建一次
- 修正:
def add_item(item, items=None):
    if items is None:
        items = []
    items.append(item)
    return items
6.作用域速查
1)简单函数
name = "global"

def func():
    name = "local"    # 局部变量,不影响全局
    print(name)       # local

func()
print(name)           # global
2)嵌套函数
def outer():
    name = "outer"

    def inner():
        name = "inner"   # 自己的局部变量
        print(name)      # inner

    inner()
    print(name)          # outer

outer()
3)使用 nonlocal
def outer():
    name = "outer"

    def inner():
        nonlocal name
        name = "modified"  # 修改外层变量

    inner()
    print(name)            # modified

outer()
7.作业
1)作业一:作用域判断
- 阅读以下代码,预测每行
print的输出结果,并在注释中写出你的答案
x = 1

def func_a():
    x = 2

    def func_b():
        print(x)      # ?

    func_b()
    print(x)          # ?

func_a()
print(x)              # ?
2)作业二:global 与 nonlocal
- 阅读以下代码,预测输出结果
count = 0

def outer():
    count = 10

    def inner():
        global count
        count += 1
        print(count)  # ?

    inner()
    print(count)      # ?

outer()
print(count)          # ?
3)作业三:修复代码
- 以下代码用于统计函数调用次数,先读取全局计数器打印日志,再递增计数
- 但实际运行会报错,请修改使其正确运行
call_count = 0

def process_data(data):
  	result = sum(data)
    # 处理完成后递增计数器
    call_count += 1
    return result

print(process_data([1, 2, 3]))
print(process_data([4, 5, 6]))
print(f"总共调用了 {call_count} 次")
4)作业四:闭包计数器
- 实现一个函数
make_multiplier(n),返回一个函数 - 返回的函数接收一个参数
x,返回n * x - 要求使用闭包实现,不要使用
global
triple = make_multiplier(3)
print(triple(5))   # 15
print(triple(10))  # 30

double = make_multiplier(2)
print(double(7))   # 14
5)作业五:综合练习
- 实现一个函数
create_account(initial_balance),返回两个字典deposit(amount): 存款,返回新余额withdraw(amount): 取款,余额不足返回"余额不足",否则返回新余额
- 要求使用闭包保存余额状态,不要暴露余额变量
deposit, withdraw = create_account(100)
print(deposit(50))    # 150
print(withdraw(30))   # 120
print(withdraw(200))  # 余额不足
(七)Lambda表达式
- Lambda表达式用于创建 匿名函数,即没有名称的临时函数
- 当需要一个简单函数且只用一次时,lambda能让代码更简洁
1.基本语法
lambda 参数1, 参数2, ... : 表达式
# 普通函数
def add(x, y):
    return x + y

# 等价的lambda
add_lambda = lambda x, y: x + y

print(add(2, 3))         # 5
print(add_lambda(2, 3))  # 5
特点
- 只能包含 一个表达式,不能写多条语句
- 表达式的计算结果 自动返回
- 通常不命名,即用即走
2.Lambda vs 普通函数
| 特性 | Lambda | 普通函数 (def) |
|---|---|---|
| 名称 | 匿名(通常无名字) | 有函数名 |
| 函数体 | 只能有一个表达式 | 可以有多条语句 |
| 返回值 | 自动返回表达式结果 | 需要显式 return |
| 适用场景 | 临时、简单的逻辑 | 复杂、复用的逻辑 |
原则
- 逻辑简单且只用一次 → 用lambda
- 逻辑复杂或需要复用 → 用
def
3.应用场景:内置高阶函数
- 高阶函数是指接收函数作为参数的函数
- 这是lambda最经典的使用场景
1)map() 映射
- 对可迭代对象的每个元素执行指定操作,返回结果的迭代器
numbers = [1, 2, 3, 4, 5]

# 普通写法
def square(x):
    return x ** 2

result = map(square, numbers)
print(list(result))  # [1, 4, 9, 16, 25]

# lambda写法——更简洁
result = map(lambda x: x ** 2, numbers)
print(list(result))  # [1, 4, 9, 16, 25]
map()相当于对列表每个元素做"转换"
# 将字符串列表转为长度列表
names = ["Alice", "Bob", "Charlie"]
lengths = map(lambda s: len(s), names)
print(list(lengths))  # [5, 3, 7]

# 两个列表对应元素相加
a = [1, 2, 3]
b = [10, 20, 30]
sums = map(lambda x, y: x + y, a, b)
print(list(sums))  # [11, 22, 33]
2)filter() 过滤
- 根据条件筛选可迭代对象中的元素,保留满足条件的
numbers = [1, 2, 3, 4, 5, 6, 7, 8, 9, 10]

# 筛选偶数
evens = filter(lambda x: x % 2 == 0, numbers)
print(list(evens))  # [2, 4, 6, 8, 10]

# 筛选长度大于3的字符串
words = ["cat", "elephant", "dog", "butterfly"]
long_words = filter(lambda s: len(s) > 3, words)
print(list(long_words))  # ['elephant', 'butterfly']
filter()相当于按条件"筛选"列表
# 筛选正数
nums = [-2, -1, 0, 1, 2]
positives = filter(lambda x: x > 0, nums)
print(list(positives))  # [1, 2]
3)sorted() 排序(指定key)
sorted()和列表的.sort()都支持key参数,用于指定"按什么排序"
words = ["banana", "pie", "Washington", "book"]

# 按长度排序
sorted_by_len = sorted(words, key=lambda s: len(s))
print(sorted_by_len)  # ['pie', 'book', 'banana', 'Washington']

# 按最后一个字母排序
sorted_by_last = sorted(words, key=lambda s: s[-1])
print(sorted_by_last)  # ['banana', 'pie', 'book', 'Washington']

# 降序排序
sorted_desc = sorted(words, key=lambda s: len(s), reverse=True)
print(sorted_desc)  # ['Washington', 'banana', 'book', 'pie']
# 按绝对值排序
nums = [-5, 2, -8, 1, -9]
sorted_by_abs = sorted(nums, key=lambda x: abs(x))
print(sorted_by_abs)  # [1, 2, -5, -8, -9]
4)max() / min() 极值(指定key)
words = ["apple", "banana", "cherry"]

# 找出最长的单词
longest = max(words, key=lambda s: len(s))
print(longest)  # banana

# 找出最短的单词
shortest = min(words, key=lambda s: len(s))
print(shortest)  # apple
students = [
    {"name": "Alice", "score": 85},
    {"name": "Bob", "score": 92},
    {"name": "Charlie", "score": 78}
]

# 找出分数最高的学生
top_student = max(students, key=lambda s: s["score"])
print(top_student)  # {'name': 'Bob', 'score': 92}
5)reduce() 累积计算
reduce()在functools模块中,用于将序列逐个累积计算为一个值
from functools import reduce

numbers = [1, 2, 3, 4, 5]

# 求和
total = reduce(lambda x, y: x + y, numbers)
print(total)  # 15

# 求积
product = reduce(lambda x, y: x * y, numbers)
print(product)  # 120

# 求最大值
maximum = reduce(lambda x, y: x if x > y else y, numbers)
print(maximum)  # 5
4.作业
1)基于下面的产品信息完成练习
- 充分利用本节课学习过的Lambda表达式和内置高阶函数,完成下面的练习
products = [
  {"name": "iPhone 15", "inc": "APPLE", "price": 5999, "stock": 3012},
  {"name": "MacBook Pro", "inc": "APPLE", "price": 14999, "stock": 580},
  {"name": "AirPods Pro", "inc": "APPLE", "price": 1899, "stock": 4500},
  {"name": "iPad Air", "inc": "APPLE", "price": 4799, "stock": 1200},
  {"name": "Apple Watch", "inc": "APPLE", "price": 2999, "stock": 2100},
  {"name": "Galaxy S24", "inc": "SAMSUNG", "price": 5499, "stock": 2800},
  {"name": "Galaxy Tab", "inc": "SAMSUNG", "price": 3999, "stock": 950},
  {"name": "Galaxy Buds", "inc": "SAMSUNG", "price": 899, "stock": 3200},
  {"name": "Galaxy Watch", "inc": "SAMSUNG", "price": 2199, "stock": 1500},
  {"name": "Mate 60 Pro", "inc": "HUAWEI", "price": 6999, "stock": 800},
  {"name": "MatePad Pro", "inc": "HUAWEI", "price": 4299, "stock": 1100},
  {"name": "FreeBuds", "inc": "HUAWEI", "price": 999, "stock": 2600},
  {"name": "MateBook", "inc": "HUAWEI", "price": 6999, "stock": 670},
  {"name": "Watch GT", "inc": "HUAWEI", "price": 1488, "stock": 1800},
  {"name": "Xiaomi 14", "inc": "XIAOMI", "price": 3999, "stock": 3500},
  {"name": "Redmi K70", "inc": "XIAOMI", "price": 2499, "stock": 4200},
  {"name": "Mi Pad 6", "inc": "XIAOMI", "price": 1999, "stock": 2000},
  {"name": "Mi Band 8", "inc": "XIAOMI", "price": 239, "stock": 8000},
  {"name": "Xiaomi Buds", "inc": "XIAOMI", "price": 499, "stock": 5000},
  {"name": "Xiaomi Book", "inc": "XIAOMI", "price": 4999, "stock": 890},
  {"name": "Pixel 8", "inc": "GOOGLE", "price": 4999, "stock": 600},
  {"name": "Pixel Buds", "inc": "GOOGLE", "price": 1299, "stock": 1500},
  {"name": "Pixel Watch", "inc": "GOOGLE", "price": 2599, "stock": 900},
  {"name": "Pixel Tablet", "inc": "GOOGLE", "price": 3499, "stock": 400},
  {"name": "ThinkPad X1", "inc": "LENOVO", "price": 9999, "stock": 720},
  {"name": "Legion Y9000", "inc": "LENOVO", "price": 8999, "stock": 1100},
  {"name": "Tab P12", "inc": "LENOVO", "price": 2499, "stock": 1300},
  {"name": "Dell XPS 13", "inc": "DELL", "price": 10999, "stock": 650},
  {"name": "Dell G15", "inc": "DELL", "price": 6999, "stock": 1400},
  {"name": "Surface Pro", "inc": "MICROSOFT", "price": 8999, "stock": 580},
  {"name": "Surface Laptop", "inc": "MICROSOFT", "price": 7999, "stock": 700},
  {"name": "Surface Go", "inc": "MICROSOFT", "price": 3999, "stock": 1200},
  {"name": "OnePlus 12", "inc": "ONEPLUS", "price": 4299, "stock": 1800},
  {"name": "OnePlus Buds", "inc": "ONEPLUS", "price": 599, "stock": 3000},
  {"name": "OnePlus Watch", "inc": "ONEPLUS", "price": 1499, "stock": 1600},
  {"name": "OPPO Find X7", "inc": "OPPO", "price": 3999, "stock": 2200},
  {"name": "OPPO Pad 2", "inc": "OPPO", "price": 2999, "stock": 1000},
  {"name": "OPPO Enco", "inc": "OPPO", "price": 499, "stock": 3500},
  {"name": "Vivo X100", "inc": "VIVO", "price": 3999, "stock": 2500},
  {"name": "Vivo Pad 2", "inc": "VIVO", "price": 2499, "stock": 900},
  {"name": "Vivo TWS", "inc": "VIVO", "price": 399, "stock": 4000},
]
- 按照价格升序排序
- 按照价格降序排序
- 按照库存总额升序排序(库存总额 = 价格 × 库存数量)
- 找出XIAOMI的所有产品,得到一个字符串列表
- 找出价格最高的产品所属的公司列表(字符串列表)
- 得到每家公司产品的平均价格
- 结果示例:
[
  { "inc": "HUAWEI", "avg_price": 4156.8 },
  { "inc": "GOOGLE", "avg_price": 3099.0 },
  { "inc": "MICROSOFT", "avg_price": 6999.0 },
  { "inc": "ONEPLUS", "avg_price": 2132.3333333333335 },
  { "inc": "VIVO", "avg_price": 2299.0 },
  { "inc": "XIAOMI", "avg_price": 2372.3333333333335 },
  { "inc": "SAMSUNG", "avg_price": 3149.0 },
  { "inc": "OPPO", "avg_price": 2499.0 },
  { "inc": "DELL", "avg_price": 8999.0 },
  { "inc": "APPLE", "avg_price": 6139.0 },
  { "inc": "LENOVO", "avg_price": 7165.666666666667 }
]
(八)Python类和对象
- Python 是一门 面向对象 的编程语言
- 类(Class)是创建对象的蓝图,而对象(Object)是类的具体实例
- 通过类和对象,可以将数据(属性)和行为(方法)封装在一起,使代码更具结构性和可复用性
1.定义类
1)使用 class 关键字定义类
class Dog:
    pass

# 创建实例
my_dog = Dog()
print(type(my_dog))  # <class '__main__.Dog'>
2)使用 type() 动态定义类
- 类本身也是对象,
type()是创建类的内置函数 - 可以动态地创建类
# type(类名, (父类元组,), {属性字典})

# 定义方法
def bark(self):
    print(f"{self.name} says: Woof!")

# 动态创建 Dog 类
Dog = type('Dog', (), {'name': 'Buddy', 'bark': bark})

# 创建实例
my_dog = Dog()
print(my_dog.name)  # Buddy
my_dog.bark()       # Buddy says: Woof!
a)参数说明
- 第一个参数:类名(字符串)
- 第二个参数:继承的父类元组
- 第三个参数:类属性和方法的字典
b)实际应用场景
- 在 ORM 框架或需要根据配置动态生成类的场景中经常使用
2.构造方法 __init__
__init__是类的构造方法- 在创建对象时自动调用,用于初始化对象的属性
class Dog:
    def __init__(this, name, age):
        this.name = name
        this.age = age

# 创建对象时传入参数
my_dog = Dog("Buddy", 3)
print(my_dog.name)  # Buddy
print(my_dog.age)   # 3
注意
self 代表对象本身,必须是第一个参数,但调用时不需要传
3.实例属性与类属性
1)实例属性
- 每个对象独立的属性,通过
self定义
class Dog:
    def __init__(self, name):
        self.name = name  # 实例属性

dog1 = Dog("Buddy")
dog2 = Dog("Max")

print(dog1.name)  # Buddy
print(dog2.name)  # Max
2)类属性
- 所有对象共享的属性,在类内部直接定义
class Dog:
    species = "Canis familiaris"  # 类属性

    def __init__(self, name):
        self.name = name

dog1 = Dog("Buddy")
dog2 = Dog("Max")

print(dog1.species)  # Canis familiaris
print(dog2.species)  # Canis familiaris

# 修改类属性(通过类名)
Dog.species = "Canis lupus"
print(dog1.species)  # Canis lupus
访问规则
实例属性通过 self 访问,类属性通过 类名 或 self 访问
4.实例方法
- 定义在类中的函数
- 第一个参数必须是
self
class Dog:
    def __init__(self, name):
        self.name = name

    def bark(self):
        print(f"{self.name} says: Woof!")

    def introduce(self):
        self.bark()  # 方法内调用其他方法
        print(f"My name is {self.name}")

my_dog = Dog("Buddy")
my_dog.bark()       # Buddy says: Woof!
my_dog.introduce()  # Buddy says: Woof! My name is Buddy
4.类方法与静态方法
1)类方法 @classmethod
- 第一个参数是
cls - 代表类本身,可以访问或修改类属性
class Dog:
    count = 0  # 类属性:记录创建了多少只狗

    def __init__(self, name):
        self.name = name
        Dog.count += 1

    @classmethod
    def get_count(cls):
        return cls.count

dog1 = Dog("Buddy")
dog2 = Dog("Max")

print(Dog.get_count())  # 2
2)静态方法 @staticmethod
- 不接收
self或cls - 与普通函数类似,只是组织在类中
class MathUtils:
    @staticmethod
    def add(a, b):
        return a + b

    @staticmethod
    def is_even(n):
        return n % 2 == 0

print(MathUtils.add(3, 5))      # 8
print(MathUtils.is_even(4))     # True
对比
| 方法类型 | 装饰器 | 第一个参数 | 访问实例属性 | 访问类属性 |
|---|---|---|---|---|
| 实例方法 | 无 | self | ✓ | ✓ |
| 类方法 | @classmethod | cls | ✗ | ✓ |
| 静态方法 | @staticmethod | 无 | ✗ | ✗ |
5.继承
- 子类继承父类的属性和方法,并可以扩展或重写
class Animal:
    def __init__(self, name):
        self.name = name

    def speak(self):
        print("Some sound")

class Dog(Animal):  # Dog 继承 Animal
    def speak(self):  # 重写父类方法
        print(f"{self.name} says: Woof!")

class Cat(Animal):
    def speak(self):
        print(f"{self.name} says: Meow!")

dog = Dog("Buddy")
cat = Cat("Kitty")

dog.speak()  # Buddy says: Woof!
cat.speak()  # Kitty says: Meow!
1)调用父类方法
- 使用
super()调用父类的方法
class Animal:
    def __init__(self, name):
        self.name = name
        print("Animal init")

class Dog(Animal):
    def __init__(self, name, breed):
        super().__init__(name)  # 调用父类的 __init__
        self.breed = breed      # 扩展新属性
        print("Dog init")

dog = Dog("Buddy", "Golden Retriever")
print(dog.name)   # Buddy
print(dog.breed)  # Golden Retriever
2)多继承
- Python 支持一个子类同时继承多个父类
class Flyable:
    def fly(self):
        print("I can fly!")

class Swimmable:
    def swim(self):
        print("I can swim!")

class Duck(Flyable, Swimmable):  # 同时继承 Flyable 和 Swimmable
    pass

duck = Duck()
duck.fly()   # I can fly!
duck.swim()  # I can swim!
a)方法解析顺序(MRO)
- 当多个父类有同名方法时,Python 按照 MRO(Method Resolution Order)顺序查找
class A:
    def hello(self):
        print("Hello from A")

class B(A):
    def hello(self):
        print("Hello from B")

class C(A):
    def hello(self):
        print("Hello from C")

class D(B, C):  # MRO: D -> B -> C -> A
    pass

d = D()
d.hello()  # Hello from B(先找到 B 的方法)

# 查看 MRO 顺序
print(D.__mro__)
# (<class 'D'>, <class 'B'>, <class 'C'>, <class 'A'>, <class 'object'>)
b)super() 在多继承中的行为
super()按照 MRO 顺序调用 下一个 类的方法,不一定是直接父类
class A:
    def __init__(self):
        print("A init")

class B(A):
    def __init__(self):
        print("B init")
        super().__init__()  # 调用 C 的 __init__,不是 A

class C(A):
    def __init__(self):
        print("C init")
        super().__init__()  # 调用 A 的 __init__

class D(B, C):
    def __init__(self):
        print("D init")
        super().__init__()  # 调用 B 的 __init__

D()
# 输出:
# D init
# B init
# C init
# A init
注意
- 多继承虽然强大,但过度使用会使代码难以维护
- 通常优先考虑组合(Composition)代替多继承
6.访问控制
- Python 没有严格的私有/公有,但以下划线约定访问权限
| 命名方式 | 含义 | 访问建议 |
|---|---|---|
name | 公有 | 可自由访问 |
_name | 保护(约定) | 建议不直接访问 |
__name | 私有(名称改写) | 外部难以直接访问 |
class BankAccount:
    def __init__(self, owner, balance):
        self.owner = owner          # 公有
        self._balance = balance     # 保护
        self.__password = "123456"  # 私有(名称改写为 _BankAccount__password)

    def deposit(self, amount):
        if amount > 0:
            self._balance += amount

    def get_balance(self):
        return self._balance

account = BankAccount("Alice", 1000)
print(account.owner)      # Alice
print(account._balance)   # 1000(可以访问,但不建议)
# print(account.__password)  # AttributeError!
print(account._BankAccount__password)  # 123456(强行访问)
注意
Python 的访问控制基于约定,不是强制
7.常见操作
1)内置属性
- Python 的类和对象有一些内置属性,用于获取元信息
| 属性 | 说明 |
|---|---|
__class__ | 对象所属的类 |
__bases__ | 类的所有直接父类(元组) |
__base__ | 类的第一个直接父类 |
__dict__ | 对象或类的属性字典 |
class Animal:
    pass

class Dog(Animal):
    species = "Canis familiaris"

    def __init__(self, name):
        self.name = name

dog = Dog("Buddy")

# __class__: 查看对象所属的类
print(dog.__class__)        # <class '__main__.Dog'>
print(dog.__class__.__name__)  # Dog

# __bases__: 查看类的所有直接父类
print(Dog.__bases__)        # (<class '__main__.Animal'>,)

# __base__: 查看类的第一个直接父类
print(Dog.__base__)         # <class '__main__.Animal'>

# __dict__: 查看对象的属性字典
print(dog.__dict__)         # {'name': 'Buddy'}

# __dict__: 查看类的属性字典(包含方法)
print(Dog.__dict__.keys())  # dict_keys([..., 'species', '__init__', ...])
2)type()
- 返回对象的类型(对象是通过哪个类创建的)
dog = Dog("Buddy")

print(type(dog))       # <class '__main__.Dog'>
print(type(Dog))       # <class 'type'>
print(type(123))       # <class 'int'>
print(type("hello"))   # <class 'str'>
3)isinstance()
- 判断对象是否是指定类(或其子类)的实例
dog = Dog("Buddy")

print(isinstance(dog, Dog))      # True
print(isinstance(dog, Animal))   # True(Dog 继承 Animal)
print(isinstance(dog, str))      # False

# 支持元组形式,判断是否为多个类型之一
print(isinstance(dog, (Dog, Cat)))   # True
print(isinstance(123, (str, int)))   # True
与 `type()` 的区别
isinstance() 会考虑继承关系,type() 不会
4)issubclass()
- 判断一个类是否是另一个类的子类
print(issubclass(Dog, Animal))   # True
print(issubclass(Dog, Dog))      # True(类是自己的子类)
print(issubclass(Animal, Dog))   # False

# 支持元组
print(issubclass(Dog, (Animal, str)))  # True
5)dir()
- 返回对象的所有属性和方法列表(包括继承的)
dog = Dog("Buddy")

# 查看对象的所有属性和方法
print(dir(dog))
# ['__class__', '__delattr__', ..., 'name', 'species']

# 查看类的所有属性和方法
print(dir(Dog))

# 不带参数时,返回当前作用域的所有名称
print(dir())
6)vars()
- 返回对象的
__dict__属性,即对象的属性字典
dog = Dog("Buddy")

print(vars(dog))        # {'name': 'Buddy'}
print(vars(Dog))        # 类的 __dict__
print(dog.__dict__)     # 等同于 vars(dog)

# 不带参数时,等同于 locals()
print(vars())
7)getattr()
- 获取对象的属性值,属性不存在时可返回默认值
- 会沿着继承链查找属性(包括实例属性、类属性、父类属性)
class Animal:
    species = "Animal"

    def speak(self):
        return "Some sound"

class Dog(Animal):
    def __init__(self, name):
        self.name = name

dog = Dog("Buddy")

# 查找实例属性
print(getattr(dog, "name"))           # Buddy

# 查找类属性
print(getattr(dog, "species"))        # Animal(继承自父类)

# 查找父类方法
print(getattr(dog, "speak")())       # Some sound

# 属性不存在时,提供默认值
print(getattr(dog, "age", 3))         # 3(默认值)

# 等价于
dog.name
dog.species
dog.speak()
8)setattr()
- 设置对象的属性值,属性不存在时会创建
- 如果父类定义了描述符(如
@property.setter)或__setattr__方法,会遵循继承链上的这些机制
dog = Dog("Buddy")

setattr(dog, "age", 3)
print(dog.age)            # 3

# 等价于
dog.age = 3

# 可以动态设置属性名
attr_name = "breed"
setattr(dog, attr_name, "Golden Retriever")
print(dog.breed)          # Golden Retriever
9)hasattr()
- 判断对象是否有指定属性
- 会检查继承链上的所有属性
dog = Dog("Buddy")

# 实例属性
print(hasattr(dog, "name"))       # True

# 继承的类属性
print(hasattr(dog, "species"))    # True(继承自 Animal)

# 继承的方法
print(hasattr(dog, "speak"))      # True(继承自 Animal)

# 不存在的属性
print(hasattr(dog, "age"))        # False

# 常用于安全地访问属性前进行检查
if hasattr(dog, "name"):
    print(dog.name)
10)delattr()
- 删除对象的属性
dog = Dog("Buddy")

# 添加一个属性
setattr(dog, "age", 3)
print(dog.age)            # 3

# 删除属性
delattr(dog, "age")
# print(dog.age)          # AttributeError!

# 等价于
del dog.age
8.作业
1)腾讯面试题
- 说出下面代码的打印结果
class Base(object):
    def __init__(self):
        print("enter Base")
        print("leave Base")

class A(Base):
    def __init__(self):
        print("enter A")
        super().__init__()
        print("leave A")

class B(Base):
    def __init__(self):
        print("enter B")
        super().__init__()
        print("leave B")

class C(A, B):
    def __init__(self):
        print("enter C")
        super().__init__()
        print("leave C")

c = C()
2)综合预测题
- 说出下面代码的打印结果
class Animal:
    kingdom = "Animalia"

    def __init__(self, name):
        self.name = name

class Dog(Animal):
    count = 0

    def __init__(self, name, age):
        super().__init__(name)
        self.age = age
        Dog.count += 1

    def bark(self):
        return f"{self.name} says Woof!"

dog1 = Dog("Buddy", 3)
dog2 = Dog("Max", 5)

print(type(dog1))
print(type(Dog))
print(isinstance(dog1, Animal))
print(isinstance(dog1, (int, Dog)))
print(issubclass(Dog, object))
print(dog1.__class__.__name__)
print(Dog.__base__.__name__)
print(hasattr(dog1, "kingdom"))
print(getattr(dog1, "age"))
print(getattr(dog2, "color", "brown"))
setattr(dog1, "color", "golden")
print(dog1.color)
print("bark" in dir(dog1))
print(vars(dog2))
delattr(dog1, "color")
print(hasattr(dog1, "color"))
print(Dog.count)
3)实现链表类
- 请实现一个单链表类
LinkedList,支持以下操作 - 需要实现的方法
| 方法 | 说明 |
|---|---|
__init__(data=None) | 初始化空链表;data 可以是列表、元组或集合,其中的值会被初始化为链表的节点 |
traverse(callback) | 遍历链表,对每个节点值调用 callback(index, value) |
__str__() | 返回链表的字符串表示,如 "1 -> 2 -> 3" |
to_list() | 将链表转换为 Python 列表并返回 |
append(value) | 在链表尾部添加一个新节点 |
prepend(value) | 在链表头部添加一个新节点 |
insert(index, value) | 在指定索引位置插入新节点,索引从 0 开始 |
delete_by_value(value) | 删除第一个值等于 value 的节点,返回是否删除成功 |
delete_by_index(index) | 删除指定索引位置的节点,返回被删除的值,索引越界时返回 None |
find(value) | 查找值等于 value 的节点,返回其索引,不存在返回 -1 |
get(index) | 获取指定索引位置的值,索引越界时返回 None |
get_length() | 返回链表长度 |
is_empty() | 判断链表是否为空 |
提示
你可能需要先定义一个 Node 类来表示链表节点
(九)对象的类型
1.知识补充
1)使用 type() 动态定义类
- 类本身也是对象
type()是创建类的内置函数- 可以动态地创建类
# type(类名, (父类元组,), {属性字典})

# 定义方法
def bark(self):
    print(f"{self.name} says: Woof!")

# 动态创建 Dog 类
Dog = type('Dog', (), {'name': 'Buddy', 'bark': bark})

# 创建实例
my_dog = Dog()
print(my_dog.name)  # Buddy
my_dog.bark()       # Buddy says: Woof!
a)参数说明
- 第一个参数:类名(字符串)
- 第二个参数:继承的父类元组
- 第三个参数:类属性和方法的字典
b)实际应用场景
- 在 ORM 框架或需要根据配置动态生成类的场景中经常使用
2)MRO
class A:
    pass


class B(A):
    pass


class C(A):
    pass


class D(B, C):
    pass


print(D.__mro__)  # (D, B, C, A)
print(D.mro())  # (D, B, C, A)  和 __mro__一样
print(D.__bases__)  # (B, C)
print(D.__base__)  # B,取__bases__第一个
3)类中的私有成员
# 以下规则适用于所有成员


class A:
    _a = 1  # 约定私有成员,外部仍然可以访问,大部分情况用它
    __a = 2  # 严格私有成员,外部无法直接访问__a
    __a__ = 3  # 有特殊作用的成员,往往是系统内置的

    @classmethod
    def test(cls):
        print(cls._a, cls.__a, cls.__a__)  # 内部可以访问所有成员


A.test()  # 1 2 3
print(A._a, A.__a, A.__a__)  # __a访问不到,其他可以
2.对象的类型
- 所有的对象都是通过类创建的,创建对象的类,称之为该对象的类型(也有所属类的说法)
- 可以使用
type(对象)得到某个对象的类型

- 所有函数的类型是
function - 所有类的类型是
type - 创建类的类,称之为元类(metaclass)
见
demo1.py的打印结果
3.成员的查找顺序
1)类成员的查找顺序
- 查找自身的MRO链条
- 查找元类的MRO链条
2)其他实例的查找顺序
- 查找自身
- 查找类型的MRO链条
4.作业
1)使用费曼学习法,复述本节课内容
2)查看demo1.py的每一行结果
(十)对象的创建过程
- 下面是对象创建的伪代码
def create_object(cls, *args, **kwargs):
    # 1. 调用 __new__ 创建实例
    obj = cls.__new__(cls, *args, **kwargs)

    # 2. 类型检查:只有 obj 是 cls 的实例(或其子类的实例)时才调用 __init__
    if isinstance(obj, cls):
        obj.__init__(*args, **kwargs)

    # 3. 返回对象
    return obj


# 测试
class Person:
    def __init__(self, name, age):
        self.name = name
        self.age = age

    def sayHi(self):
        print(f"my name is {self.name}, I'm {self.age} years old")

p = create_object(Person, "shae", 5)
p.sayHi()
1.应用场景
- 理解对象的创建过程后,我们可以通过重写
__new__和__init__来实现多种设计模式
1)单例模式
- 确保一个类只有一个实例
class Database:
    _instance = None

    def __new__(cls):
        if cls._instance is None:
            cls._instance = super().__new__(cls)
        return cls._instance

# 测试
conn1 = Database()
conn2 = Database()
print(conn1 is conn2)  # True,说明是同一个实例
2)对象池/缓存
- 复用已有对象,避免重复创建
class ConnectionPool:
    _pool = {}

    def __new__(cls, conn_id):
        if conn_id not in cls._pool:
            obj = super().__new__(cls)
            cls._pool[conn_id] = obj
        return cls._pool[conn_id]

# 测试
pool1 = ConnectionPool("conn_1")
pool2 = ConnectionPool("conn_1")
pool3 = ConnectionPool("conn_2")
print(pool1 is pool2)  # True,相同 conn_id 返回同一个对象
print(pool1 is pool3)  # False,不同 conn_id 返回不同对象
3)正整数(带默认值回退)
__new__可以返回不同类型的对象- 当返回的对象不是当前类的实例时,
__init__不会被执行
class PositiveInt:
    def __new__(cls, value):
        if value < 0:
            return 0  # 返回 int 类型的 0,不是 PositiveInt 的实例
        return super().__new__(cls)

    def __init__(self, value):
        print("PositiveInt.__init__ 被调用")
        self.value = value

# 测试
p = PositiveInt(5)
print(type(p))    # <class '__main__.PositiveInt'>
print(p.value)    # 5

n = PositiveInt(-3)
print(type(n))    # <class 'int'>
print(n)          # 0
2.作业
1)自己写一遍:单例模式
(十一)可调用对象
- 在 Python 中, 可调用对象(Callable) 是指可以像函数一样使用括号
()调用的对象
1.如何判断对象是否可调用
- 使用内置函数
callable()
print(callable(len))        # True,内置函数
print(callable(int))        # True,类
print(callable([1, 2]))     # False,列表不可调用
print(callable(lambda: 1))  # True,lambda 表达式
- 函数是最常见的可调用对象
def greet(name):
    return f"Hello, {name}!"

print(callable(greet))  # True
print(greet("Alice"))   # Hello, Alice!
- 类也是可调用对象
class Dog:
    def __init__(self, name):
        self.name = name

print(callable(Dog))    # True
my_dog = Dog("Buddy")   # 调用类,创建实例
print(my_dog.name)      # Buddy
2.让对象变成可调用对象
- 在类中定义
__call__方法, 实例 就变成了可调用对象
class Adder:
    def __init__(self, n):
        self.n = n

    def __call__(self, x):
        return self.n + x

add_5 = Adder(5)
print(callable(add_5))   # True
# add_5(10) 等效于 Adder.__call__(add_5, 10)
print(add_5(10))         # 15,像函数一样调用
print(add_5(100))        # 105
关键理解
__call__让 实例 可以像函数一样被调用- 调用实例时,传入的参数会传给
__call__方法
3.实际应用场景
1)实现可配置的函数对象
class Multiplier:
    def __init__(self, factor):
        self.factor = factor

    def __call__(self, value):
        return self.factor * value

double = Multiplier(2)
triple = Multiplier(3)

print(double(5))   # 10
triple(5)   # 15
2)实现状态保持的回调函数
class Logger:
    def __init__(self, prefix):
        self.prefix = prefix
        self.log_count = 0

    def __call__(self, message):
        self.log_count += 1
        print(f"[{self.prefix}] #{self.log_count}: {message}")

error_log = Logger("ERROR")
error_log("文件未找到")     # [ERROR] #1: 文件未找到
error_log("网络连接失败")   # [ERROR] #2: 网络连接失败
4.作业
1)实现一个计数器类
- 编写一个
Counter类- 初始化时指定起始值
- 每次调用实例,计数器值加 1
- 支持
reset()方法重置为初始值 - 支持
get()方法获取当前值
c = Counter(10)
print(c())      # 11
c()             # 12
print(c.get())  # 12
c.reset()
print(c.get())  # 10
2)思考题
- 下面代码的输出是什么?为什么?
class A:
    def __call__(self):
        print("A called")

class B(A):
    def __call__(self):
        print("B called")
        super().__call__()

b = B()
b()
(十二)元类
1.类的创建过程
- 使用
class关键字定义类时,Python 底层会调用元类来创建类
class Dog:
    pass


# 等效于
class Dog(metaclass=type):
    pass


# 等效于
Dog = type("Dog", (), {})

# 等效于
Dog = type.__call__(type, "Dog", (), {})
- 也就是说,
class关键字只是语法糖,底层仍然是通过type()创建类
2.自定义元类
- 通过继承
type,可以自定义元类,控制类的创建过程
class MyMeta(type):
    def __new__(mcs, name, bases, namespace):
        print(f"正在创建类: {name}")
        print(f"父类: {bases}")
        print(f"属性: {list(namespace.keys())}")

        # 必须调用 type.__new__ 来真正创建类
        cls = super().__new__(mcs, name, bases, namespace)
        return cls


# 使用 metaclass 参数指定元类
class Dog(metaclass=MyMeta):
    species = "Canis familiaris"

    def bark(self):
        print("Woof!")


# 等效于
# def bark(self):
#     print("Woof!")


# Dog = type.__call__(MyMeta, "Dog", (), {"species": "Canis familiaris", "bark": bark})

# 输出:
# 正在创建类: Dog
# 父类: ()
# 属性: ['__module__', '__qualname__', 'species', 'bark']
mcs:元类自身(类似类方法中的cls)name:类名字符串bases:父类元组namespace:类属性的字典
3.深入:元类的查找顺序
- 子类会继承父类的元类
class MyMeta(type):
    pass

class Base(metaclass=MyMeta):
    pass

class Child(Base):  # 自动继承 MyMeta
    pass

print(type(Child))  # <class '__main__.MyMeta'>
- 如果父类元类不兼容,需要使用更通用的元类
class MetaA(type):
    pass

class MetaB(type):
    pass

class A(metaclass=MetaA):
    pass

class B(metaclass=MetaB):
    pass

# class C(A, B): pass  # TypeError! 元类冲突

# 解决方法:创建兼容的元类
class CommonMeta(MetaA, MetaB):
    pass

class C(A, B, metaclass=CommonMeta):  # 正常
    pass
4.总结
| 概念 | 说明 |
|---|---|
| 元类 | 创建类的类,默认是 type |
__new__ | 创建类,返回类对象 |
__init__ | 初始化类,无返回值 |
__call__ | 控制类的实例化过程 |
| 应用场景 | 命名检查、自动注册、方法增强、ORM 等 |
5.作业
1)实现单例元类
- 编写一个元类
SingletonMeta,使得任何使用该元类的类都自动成为单例模式
class SingletonMeta(type):
    # 你的代码
    pass

class Database(metaclass=SingletonMeta):
    def __init__(self, host):
        self.host = host

db1 = Database("localhost")
db2 = Database("remote")
print(db1 is db2)  # 应该输出 True
print(db1.host)    # 应该输出 localhost
2)自动注册子类
- 编写一个元类
PluginMeta,使得任何继承自Plugin的子类都会被自动注册到PluginMeta.registry字典中(键为类名,值为类本身)
class PluginMeta(type):
    # 你的代码
    pass

class Plugin(metaclass=PluginMeta):
    pass

class ImagePlugin(Plugin):
    pass

class TextPlugin(Plugin):
    pass

print(PluginMeta.registry)
# 应该输出类似:{'ImagePlugin': <class '__main__.ImagePlugin'>, 'TextPlugin': <class '__main__.TextPlugin'>}
3)为所有方法添加日志
- 编写一个元类
LogMeta,自动为类中每个非私有方法(即不以_开头的方法)添加执行日志 - 调用方法时,先打印
[LOG] 调用 {方法名},再执行原方法
class LogMeta(type):
    # 你的代码
    pass

class Calculator(metaclass=LogMeta):
    def add(self, a, b):
        return a + b

    def sub(self, a, b):
        return a - b

calc = Calculator()
print(calc.add(3, 5))
print(calc.sub(10, 4))

# 应该输出:
# [LOG] 调用 add
# 8
# [LOG] 调用 sub
# 6
(十三)装饰器
1.装饰器的本质
- 装饰器本质上是一个接受函数作为参数并返回新函数的高阶函数
def my_decorator(func):
    def wrapper():
        print("函数执行前")
        func()
        print("函数执行后")
    return wrapper

# 下面的代码
def say_hello():
    print("Hello!")
say_hello = my_decorator(say_hello)

# 等效于
@my_decorator
def say_hello():
    print("Hello!")

say_hello()
# 输出:
# 函数执行前
# Hello!
# 函数执行后
提示
- 装饰器是一个可调用对象,接收一个可调用对象,返回任意对象
- 但为了保证程序能正常运行,通常返回另一个可调用对象来替代原对象
2.多个装饰器叠加
- 可以同时使用多个装饰器,执行顺序为从下到上
@decorator_a
@decorator_b
def func():
    pass

# 等效于:
# func = decorator_a(decorator_b(func))
3.作业
前置知识
- 本章作业中会用到
time模块的两个功能time.time():返回当前时间的时间戳(一个浮点数)time.sleep(seconds):让程序暂停执行指定的秒数
- 例如
import time

start = time.time()
time.sleep(1)
elapsed = time.time() - start
print(f"耗时: {elapsed} 秒")
1)实现timer装饰器
import time

def timer(func):
    # 你的代码
    pass

@timer
def slow_function():
    time.sleep(1)
    return "Done"

slow_function()
# 输出:slow_function 执行时间: 1.0012 秒
2)实现wraps装饰器
- 实现wraps装饰器,用于不改变函数的名称和注释
# 实现wraps装饰器,用于不改变函数的名称和注释


def wraps(func):
    # 你的代码
    pass


def my_decorator(func):
    @wraps(func)
    def wrapper():
        print("函数执行前")
        func()
        print("函数执行后")

    return wrapper


@my_decorator
def say_hello():
    """打招呼"""
    print("Hello!")


say_hello()
# 输出:
# 函数执行前
# Hello!
# 函数执行后
print("name", say_hello.__name__)
print("doc", say_hello.__doc__)
3)实现repeat装饰器
def repeat(n):
    # 你的代码
    pass


@repeat(3)
def say_hello(s):
    print(s)


say_hello(1)  # 输出: 1 1 1
4)实现cache装饰器
- 编写一个装饰器
cache,缓存函数的计算结果 - 当使用相同的参数调用函数时,直接返回缓存的结果
def cache(func):
    # 你的代码
    pass

@cache
def fibonacci(n):
    if n < 2:
        return n
    return fibonacci(n - 1) + fibonacci(n - 2)

print(fibonacci(35))  # 应该快速返回结果
提示
使用字典存储参数到结果的映射
5)实现to_dict装饰器
- 编写一个类装饰器
to_dict,自动为类生成to_dict方法,该方法可以将对象转换为字典
def to_dict(cls):
    # 你的代码
    pass

@to_dict
class Point:
    def __init__(self, x, y):
        self.x = x
        self.y = y

p = Point(3, 4)
print(p.to_dict())  # 应该输出: {"x":3, "y":4}
(十四)魔术方法
- 魔术方法(Magic Methods)是 Python 中 以双下划线开头和结尾 的特殊方法
- 如
__init__、__str__
- 如
- 不需要显式调用,而是由 Python 在特定场景下 自动触发
1.字符串表示
- 当使用
print()、str()或repr()时,Python 会自动调用对应的魔术方法
class Point:
    def __init__(self, x, y):
        self.x = x
        self.y = y

    def __str__(self):
        """面向用户,友好的可读格式"""
        return f"Point({self.x}, {self.y})"

    def __repr__(self):
        """面向开发者,精确的重建格式"""
        return f"Point({self.x!r}, {self.y!r})"


p = Point(3, 4)
print(p)           # Point(3, 4) —— 调用 __str__
print(str(p))      # Point(3, 4) —— 调用 __str__
print(repr(p))     # Point(3, 4) —— 调用 __repr__

# 交互式环境中直接显示对象,调用 __repr__
# p  # Point(3, 4)
建议
- 两个方法都实现
- 如果只实现
__repr__,__str__会回退到使用它
2.比较操作
- 通过实现比较魔术方法,可以让自定义对象支持
==、<、>等操作
class Person:
    def __init__(self, name, age):
        self.name = name
        self.age = age

    def __eq__(self, other):
        """=="""
        if not isinstance(other, Person):
            return NotImplemented
        return self.age == other.age

    def __lt__(self, other):
        """<"""
        if not isinstance(other, Person):
            return NotImplemented
        return self.age < other.age

    def __le__(self, other):
        """<="""
        return self < other or self == other

    def __gt__(self, other):
        """>"""
        return not self <= other

    def __ge__(self, other):
        """>="""
        return not self < other

    def __ne__(self, other):
        """!="""
        return not self == other

    def __repr__(self):
        return f"Person({self.name!r}, {self.age})"


alice = Person("Alice", 30)
bob = Person("Bob", 25)

print(alice == bob)  # False
print(alice > bob)   # True
print(alice <= bob)  # False

# 实现了比较方法后,可以使用 sorted
people = [bob, alice]
print(sorted(people))  # [Person('Bob', 25), Person('Alice', 30)]
简化方案
使用 @functools.total_ordering 装饰器,只需实现 __eq__ 和其中一个(如 __lt__),其余会自动推导
from functools import total_ordering

@total_ordering
class Person:
    def __init__(self, name, age):
        self.name = name
        self.age = age

    def __eq__(self, other):
        if not isinstance(other, Person):
            return NotImplemented
        return self.age == other.age

    def __lt__(self, other):
        if not isinstance(other, Person):
            return NotImplemented
        return self.age < other.age

    def __repr__(self):
        return f"Person({self.name!r}, {self.age})"
3.算术运算
- 让对象支持
+、-、*、/等运算符
class Vector:
    def __init__(self, x, y):
        self.x = x
        self.y = y

    def __add__(self, other):
        """+"""
        if isinstance(other, Vector):
            return Vector(self.x + other.x, self.y + other.y)
        return NotImplemented  # 返回 NotImplemented,让 Python 尝试 other 的 __radd__

    def __sub__(self, other):
        """-"""
        if isinstance(other, Vector):
            return Vector(self.x - other.x, self.y - other.y)
        return NotImplemented

    def __mul__(self, scalar):
        """*,向量与标量相乘"""
        if isinstance(scalar, (int, float)):
            return Vector(self.x * scalar, self.y * scalar)
        return NotImplemented

    def __rmul__(self, scalar):
        """右乘:scalar * vector"""
        return self * scalar  # 复用 __mul__

    def __truediv__(self, scalar):
        """/"""
        if isinstance(scalar, (int, float)):
            return Vector(self.x / scalar, self.y / scalar)
        return NotImplemented

    def __neg__(self):
        """负号:-vector"""
        return Vector(-self.x, -self.y)

    def __abs__(self):
        """abs()"""
        return (self.x ** 2 + self.y ** 2) ** 0.5

    def __repr__(self):
        return f"Vector({self.x}, {self.y})"


v1 = Vector(1, 2)
v2 = Vector(3, 4)

print(v1 + v2)       # Vector(4, 6)
print(v2 - v1)       # Vector(2, 2)
print(v1 * 3)        # Vector(3, 6)
print(2 * v1)        # Vector(2, 4) —— 调用 __rmul__
print(-v1)           # Vector(-1, -2)
print(abs(v1))       # 2.236...
常用算术魔术方法
| 运算符 | 魔术方法 | 说明 |
|---|---|---|
+ | __add__ | 加法 |
- | __sub__ | 减法 |
* | __mul__ | 乘法 |
/ | __truediv__ | 真除法 |
// | __floordiv__ | 整除 |
% | __mod__ | 取模 |
** | __pow__ | 幂运算 |
+a | __pos__ | 正号 |
-a | __neg__ | 负号 |
abs() | __abs__ | 绝对值 |
4.容器协议
- 实现容器协议,让自定义对象可以像
list、dict一样使用[]、len()、in等操作
class ShoppingCart:
    def __init__(self):
        self._items = []

    def __len__(self):
        """len(cart)"""
        return len(self._items)

    def __getitem__(self, index):
        """cart[index]"""
        return self._items[index]

    def __setitem__(self, index, value):
        """cart[index] = value"""
        self._items[index] = value

    def __delitem__(self, index):
        """del cart[index]"""
        del self._items[index]

    def __contains__(self, item):
        """item in cart"""
        return item in self._items

    def __iter__(self):
        """for item in cart"""
        return iter(self._items)

    def append(self, item):
        self._items.append(item)

    def __repr__(self):
        return f"ShoppingCart({self._items!r})"


cart = ShoppingCart()
cart.append("apple")
cart.append("banana")
cart.append("orange")

print(len(cart))           # 3
print(cart[0])             # apple
print(cart[1:])            # ['banana', 'orange'] —— 支持切片
print("apple" in cart)     # True

for item in cart:
    print(item)
# apple
# banana
# orange
5.类型转换
- 实现类型转换魔术方法,让对象支持
int()、float()、bool()等转换
class Money:
    def __init__(self, amount):
        self.amount = amount

    def __int__(self):
        return int(self.amount)

    def __float__(self):
        return float(self.amount)

    def __bool__(self):
        return self.amount != 0

    def __repr__(self):
        return f"Money({self.amount})"


m = Money(100.5)
print(int(m))      # 100
print(float(m))    # 100.5
print(bool(m))     # True

m0 = Money(0)
print(bool(m0))    # False
6.属性访问拦截
- 通过实现属性访问相关的魔术方法,可以拦截对对象属性的 读取、设置和删除 操作
class Config:
    def __init__(self):
        # 必须用 object.__setattr__,否则会无限递归
        object.__setattr__(self, "_data", {})

    def __getattr__(self, name):
        """访问不存在的属性时触发"""
        if name in self._data:
            return self._data[name]
        raise AttributeError(f"'{type(self).__name__}' 对象没有属性 '{name}'")

    def __setattr__(self, name, value):
        """设置任意属性时触发"""
        if name.startswith("_"):
            # 内部属性直接设置,避免递归
            object.__setattr__(self, name, value)
        else:
            self._data[name] = value

    def __delattr__(self, name):
        """删除属性时触发"""
        if name in self._data:
            del self._data[name]
        else:
            raise AttributeError(f"'{type(self).__name__}' 对象没有属性 '{name}'")

    def __repr__(self):
        return f"Config({self._data!r})"


cfg = Config()
cfg.debug = True      # 调用 __setattr__
cfg.port = 8080       # 调用 __setattr__
print(cfg.debug)      # True —— 调用 __getattr__
print(cfg.port)       # 8080 —— 调用 __getattr__
del cfg.debug         # 调用 __delattr__
print(cfg)            # Config({'port': 8080})
注意
__setattr__拦截 所有 属性设置- 如果在其内部使用
self.xxx = value的方式赋值,会再次触发__setattr__,导致 无限递归 - 应使用
object.__setattr__(self, name, value)来绕过拦截
1)__getattr__ vs __getattribute__
__getattr__- 仅 在访问 不存在 的属性时触发
__getattribute__- 访问 任何 属性时都会触发(更底层,优先级更高)
class Demo:
    def __init__(self):
        self.existing = 100

    def __getattribute__(self, name):
        """所有属性访问都会经过这里"""
        print(f"正在访问: {name}")
        # 必须用 object.__getattribute__,否则会无限递归
        return object.__getattribute__(self, name)

    def __getattr__(self, name):
        """只有访问不存在的属性时才到这里"""
        return f"'{name}' 不存在,返回默认值"


d = Demo()
print(d.existing)   # 先触发 __getattribute__,返回 100
print(d.missing)    # 先触发 __getattribute__,找不到,再触发 __getattr__
警告
在 __getattribute__ 中再次访问 self.xxx 也会触发自身,必须使用 object.__getattribute__(self, name)
7.对象生命周期
- 除了
__init__,还有__del__在对象被销毁时调用
class DatabaseConnection:
    def __init__(self, db_name):
        self.db_name = db_name
        print(f"连接到数据库: {db_name}")

    def __del__(self):
        """对象被销毁时调用"""
        print(f"关闭数据库连接: {self.db_name}")


conn = DatabaseConnection("test_db")
del conn  # 关闭数据库连接: test_db
注意
__del__的调用时机不确定(取决于垃圾回收),不应依赖它做关键清理- 对于资源管理,应使用 上下文管理器
8.常用魔术方法速查
| 类别 | 方法 | 触发场景 |
|---|---|---|
| 构造 | __init__ | 创建对象后初始化 |
| 构造 | __new__ | 创建对象(已讲过) |
| 字符串 | __str__ | print()、str() |
| 字符串 | __repr__ | repr()、交互式显示 |
| 比较 | __eq__ | == |
| 比较 | __lt__ | < |
| 比较 | __gt__ | > |
| 比较 | __le__ | <= |
| 比较 | __ge__ | >= |
| 比较 | __ne__ | != |
| 算术 | __add__ | + |
| 算术 | __sub__ | - |
| 算术 | __mul__ | * |
| 算术 | __truediv__ | / |
| 容器 | __len__ | len() |
| 容器 | __getitem__ | obj[key] |
| 容器 | __setitem__ | obj[key] = value |
| 容器 | __delitem__ | del obj[key] |
| 容器 | __contains__ | in |
| 容器 | __iter__ | for...in |
| 转换 | __int__ | int() |
| 转换 | __float__ | float() |
| 转换 | __bool__ | bool() |
| 可调用 | __call__ | obj() |
| 属性 | __getattr__ | 访问不存在的属性 |
| 属性 | __getattribute__ | 访问任意属性 |
| 属性 | __setattr__ | 设置属性 |
| 属性 | __delattr__ | 删除属性 |
| 生命周期 | __del__ | 对象销毁 |
9.作业(可使用AI)
1)实现一个 Fraction 类,支持以下操作
f1 = Fraction(1, 2)   # 1/2
f2 = Fraction(1, 3)   # 1/3

print(f1 + f2)        # 5/6
print(f1 - f2)        # 1/6
print(f1 * f2)        # 1/6
print(f1 / f2)        # 3/2
print(f1 == f2)       # False
print(f1 > f2)        # True
print(float(f1))      # 0.5
print(str(f1))        # "1/2"
print(repr(f1))       # "Fraction(1, 2)"
提示
- 实现
__init__、__str__、__repr__ - 实现
__eq__、__lt__、__gt__、__le__、__ge__、__ne__ - 实现
__add__、__sub__、__mul__、__truediv__ - 实现
__float__
(十五)描述符
1.问题
import math

class Circle:
    def __init__(self, radius):
        self.radius = radius
        self.area = radius**2 * math.pi
        self.diameter = radius * 2


c = Circle(5)
print(c.radius, c.area, c.diameter)  # 没问题

# 出现问题
# 1. 不符合逻辑的赋值
c.radius = -10

# 2. 数据不一致
c.radius = 10
print(c.radius, c.area, c.diameter)  # 数据不一致
2.描述符协议
1)认识术语
- 描述符协议规定,只要一个类,实现了
__get__、__set__、__delete__任意一个实例方法 - 该类称之为 描述符类
- 该类的对象称之为 描述符对象,也可以简称为 描述符
- 如果描述符类实现了
__set__、__delete__任意一个 - 它的对象又称之为 数据型描述符(Data Descriptor) - 如果描述符类只实现了
__get__- 它的对象又称为 非数据型描述符(Non-Data Descriptor)
- 如果描述符类实现了
- 描述符对象只有是 类属性 时才有意义,所以描述符通常又称为 属性描述符
# 描述符类
class MyDescriptor:
    def __get__(self, instance, owner):
        pass

    def __set__(self, instance, value):
        pass

    def __delete__(self, instance):
        pass


class MyClass:
    my_attr = MyDescriptor()  # 描述符、属性描述符、数据描述符
2)访问顺序
- 当访问实例成员时,按照以下优先级查找成员
- 数据型描述符(类属性)
- 实例属性(
instance.__dict__) - 类属性(普通)
- 父类...
# 描述符类
class MyDescriptor:
    def __get__(self, instance, owner):
        pass

    def __set__(self, instance, value):
        pass

    def __delete__(self, instance):
        pass


class MyClass:
    my_attr = MyDescriptor()  # 描述符、属性描述符、数据描述符

    def __init__(self, value):
        self.my_attr = value  # 赋值的是类属性


ins = MyClass(10)
print(ins.__dict__)  # 不包含 my_attr
print(ins.my_attr)  # 访问的是类属性
3)读写删操作
- 描述符会拦截对它的读、写、删操作
# 描述符类
class MyDescriptor:
    def __get__(self, instance, owner):
        print("__get__ called")
        pass

    def __set__(self, instance, value):
        print("__set__ called")
        pass

    def __delete__(self, instance):
        print("__delete__ called")
        pass


class MyClass:
    my_attr1 = MyDescriptor()  # 描述符、属性描述符、数据描述符
    my_attr2 = MyDescriptor()  # 描述符、属性描述符、数据描述符


ins = MyClass()
ins.my_attr1  # MyDescriptor.__get__(MyClass.my_attr, ins, MyClass)
ins.my_attr1 = 10  # MyDescriptor.__set__(MyClass.my_attr, ins, 10)
del ins.my_attr1  # MyDescriptor.__delete__(MyClass.my_attr, ins)


MyClass.my_attr2  # MyDescriptor.__get__(MyClass.my_attr, None, MyClass)
MyClass.my_attr2 = 20  # 直接覆盖 my_attr2,my_attr2 不再是描述符了
del MyClass.my_attr2  # 直接删除 my_attr2 属性,my_attr2 不再存在
最佳实践
- 绝大部分时候都使用 数据型描述符
- 对描述符的访问,永远通过实例去访问
4)钩子函数
- 目前,描述符类中仅提供了一个钩子函数
__set_name__
Python3.6版本加入
# 描述符类
class MyDescriptor:
    def __set_name__(self, owner, name):
        print(f"__set_name__ called with owner={owner}, name={name}")

    def __get__(self, instance, owner):
        pass

    def __set__(self, instance, value):
        pass

    def __delete__(self, instance):
        pass


class MyClass:
    # 这里会触发__set_name__
    # 时间点:完成赋值后
    # 作用:让描述符知道自己被赋值给了哪个类的哪个属性
    my_attr1 = MyDescriptor()
    my_attr2 = MyDescriptor()
3.解决最初的问题
import math


class RadiusDescriptor:

    def __set__(self, instance, value):
        if value < 0:
            raise ValueError("半径不能为负数")
        instance._radius = value

    def __get__(self, instance, owner):
        return instance._radius

    def __delete__(self, instance):
        raise AttributeError("radius 不能被删除")


class AreaDescriptor:

    def __get__(self, instance, owner):
        return instance.radius**2 * math.pi

    def __set__(self, instance, value):
        raise AttributeError("area 是只读属性,不能设置")

    def __delete__(self, instance):
        raise AttributeError("area 不能被删除")


class DiameterDescriptor:

    def __get__(self, instance, owner):
        return instance.radius * 2

    def __set__(self, instance, value):
        raise AttributeError("diameter 是只读属性,不能设置")

    def __delete__(self, instance):
        raise AttributeError("diameter 不能被删除")


class Circle:
    radius = RadiusDescriptor()
    area = AreaDescriptor()
    diameter = DiameterDescriptor()

    def __init__(self, radius):
        self.radius = radius


c1 = Circle(5)  # 没问题
print(c1.radius)  # 输出 5
print(c1.area)  # 输出 78.53981633974483
print(c1.diameter)  # 输出 10
c1.radius = 10  # 没问题
print(c1.radius)  # 输出 10
print(c1.area)  # 输出 314.1592653589793
print(c1.diameter)  # 输出 20

c1.area = 100  # 报错
print(c1.area)
4.@property 装饰器
@property可以将方法变成 属性,访问时像访问普通属性一样,不需要加括号
class Circle:
    def __init__(self, radius):
        self._radius = radius

    @property
    def radius(self):
        """获取半径"""
        return self._radius

    @radius.setter
    def radius(self, value):
        """设置半径,带验证"""
        if value < 0:
            raise ValueError("半径不能为负数")
        self._radius = value

    @radius.deleter
    def radius(self):
        """删除半径"""
        print("删除半径")
        del self._radius

    @property
    def area(self):
        """计算面积(只读属性)"""
        import math
        return math.pi * self._radius ** 2

    @property
    def diameter(self):
        """计算直径(只读属性)"""
        return self._radius * 2


c = Circle(5)
print(c.radius)     # 5 —— 调用 getter
print(c.area)       # 78.54... —— 自动计算
print(c.diameter)   # 10

c.radius = 10       # 调用 setter
print(c.area)       # 314.15...

# c.area = 100      # AttributeError! area 没有 setter
# c.radius = -5     # ValueError! 半径不能为负数

# del c.radius      # 调用 deleter
# print(c.radius)   # AttributeError!
关键点
@property将方法变成 只读属性@属性名.setter定义可写属性(必须和 property 同名)@属性名.deleter定义可删除属性
5.应用场景
1)惰性计算
class LazyProperty:
    """惰性加载属性:只在第一次访问时计算"""

    def __init__(self, func):
        self.func = func
        self.name = func.__name__

    def __get__(self, instance, owner):
        if instance is None:
            return self
        value = self.func(instance)
        # 将结果缓存到实例的属性中
        setattr(instance, self.name, value)
        return value


class DataLoader:
    def __init__(self, file_path):
        self.file_path = file_path

    @LazyProperty
    def data(self):
        print(f"正在加载文件: {self.file_path}")
        # 模拟耗时操作
        return [1, 2, 3, 4, 5]


loader = DataLoader("data.txt")
print(loader.data)  # 正在加载文件: data.txt
                    # [1, 2, 3, 4, 5]
print(loader.data)  # [1, 2, 3, 4, 5] —— 不再加载,直接从属性读取
2)类型检查
class Typed:
    """强制类型检查的描述符"""

    def __init__(self, expected_type):
        self.expected_type = expected_type
        self.name = None

    def __set_name__(self, owner, name):
        self.name = name

    def __get__(self, instance, owner):
        if instance is None:
            return self
        return instance.__dict__[self.name]

    def __set__(self, instance, value):
        if not isinstance(value, self.expected_type):
            raise TypeError(
                f"{self.name} 必须是 {self.expected_type.__name__} 类型,"
                f"而不是 {type(value).__name__}"
            )
        instance.__dict__[self.name] = value


class Student:
    name = Typed(str)
    age = Typed(int)
    score = Typed(float)

    def __init__(self, name, age, score):
        self.name = name
        self.age = age
        self.score = score


s = Student("Alice", 20, 85.5)
# s.age = "20"      # TypeError! age 必须是 int 类型,而不是 str
6.作业(可使用AI)
1)实现只读属性
- 编写一个类
ImmutablePoint,创建后不能修改坐标
p = ImmutablePoint(3, 4)
print(p.x)      # 3
print(p.y)      # 4

# p.x = 10      # AttributeError! 不能修改只读属性
提示
使用 @property 但不提供 setter
2)实现范围验证
- 编写一个
Temperature类,温度必须在 -273.15(绝对零度)到 1000 之间
t = Temperature(25)
print(t.celsius)      # 25
print(t.fahrenheit)   # 77.0(只读属性,自动计算)
print(t.kelvin)       # 298.15(只读属性,自动计算)

# t.celsius = -300    # ValueError! 温度不能低于绝对零度
3)实现类属性计数器
- 编写一个描述符,记录某个类属性被访问和修改的次数
class AccessCounter:
    # 你的代码
    pass


class MyClass:
    value = AccessCounter(10)  # 初始值为 10


obj = MyClass()
print(obj.value)      # 10
print(obj.value)      # 10
obj.value = 20
print(obj.value)      # 20

# 查看访问和修改次数
print(AccessCounter.get_access_count())   # 3(被访问了 3 次)
print(AccessCounter.get_modify_count())   # 1(被修改了 1 次)
4)思考题
- 下面代码的输出是什么?为什么?
class Descriptor:
    def __get__(self, instance, owner):
        print(f"__get__ called, instance={instance}, owner={owner}")
        return 42

    def __set__(self, instance, value):
        print(f"__set__ called, instance={instance}, value={value}")


class A:
    x = Descriptor()


a = A()
print(a.x)
a.x = 100
a.__dict__["x"] = "instance"
print(a.x)
print(a.__dict__)
(十六)异常处理
1.异常的捕获
- 使用
try...except捕获可能发生的异常 - 可以捕获多个异常,并获取异常对象
try:
    number = int("abc")
except ValueError as e:
    print(f"数值错误: {e}")
except TypeError as e:
    print(f"类型错误: {e}")
else:
    print("没有异常时执行")
finally:
    print("始终会执行")
try:
    number = int("abc")
except ValueError as e:
    print(e.args)  # 获取异常信息
    print(e.__traceback__)  # 异常的堆栈跟踪对象
2.异常类型
- Python 内置异常形成层次结构,捕获父类异常可以捕获其所有子类
BaseException
 ├── SystemExit          # sys.exit() 引发
 ├── KeyboardInterrupt   # Ctrl+C 引发
 └── Exception           # 常规异常的基类
      ├── ArithmeticError
      │    └── ZeroDivisionError
      ├── LookupError
      │    ├── IndexError
      │    └── KeyError
      ├── TypeError
      ├── ValueError
      │    └── UnicodeError
      └── ...
# 捕获 Exception 可以捕获几乎所有常规异常
try:
    # 可能引发各种异常的操作
    pass
except Exception as e:
    print(f"发生错误: {e}")

# 但不推荐捕获过于宽泛的异常,应尽量精确
3.主动抛出异常
- 使用
raise主动抛出异常
def withdraw(balance, amount):
if amount > balance:
raise ValueError("余额不足")
if amount <= 0:
raise ValueError("取款金额必须大于零")
return balance - amount
try:
withdraw(100, 200)
except ValueError as e:
print(e) # 余额不足
- 可以重新抛出当前异常
try:
risky_operation()
except Exception:
# 记录日志后继续抛出
print("发生异常,准备抛出")
raise # 重新抛出
4.自定义异常
- 通过继承
Exception或其子类创建自定义异常
class ValidationError(Exception):
"""参数验证失败"""
pass
class NotFoundError(Exception):
"""资源不存在"""
def __init__(self, resource, resource_id):
self.resource = resource
self.resource_id = resource_id
super().__init__(f"{resource} (id={resource_id}) 不存在")
# 使用
def get_user(user_id):
if user_id <= 0:
raise ValidationError("用户ID必须大于零")
if user_id not in user_database:
raise NotFoundError("User", user_id)
return user_database[user_id]
5.异常链
def exception_chains1():
# 方式1:直接抛出(无关联)
try:
raise ValueError("错误A")
except ValueError:
raise RuntimeError("错误B") # 隐式关联,__context__ 有值
def exception_chains2():
# 方式2:from 显式关联
try:
raise ValueError("错误A")
except ValueError as e:
raise RuntimeError("错误B") from e # 显式关联,__cause__ 有值
# 查看区别
try:
exception_chains1()
except RuntimeError as e:
print("隐式关联:", e)
print(f" __cause__: {e.__cause__}") # None
print(f" __context__: {e.__context__}") # ValueError
try:
exception_chains2()
except RuntimeError as e:
print("\n显式关联:", e)
print(f" __cause__: {e.__cause__}") # ValueError
print(f" __context__: {e.__context__}") # None
6.作业(可使用AI)
1)实现安全的除法函数
def safe_divide(a, b):
"""
安全除法,要求:
1. 捕获 ZeroDivisionError,返回 0
2. 捕获 TypeError,打印"参数类型错误"并返回 None
"""
# 你的代码
pass
print(safe_divide(10, 2)) # 5.0
print(safe_divide(10, 0)) # 0
print(safe_divide("10", 2)) # 参数类型错误,None
2)实现重试装饰器
import time
def retry(max_attempts, delay=1):
"""
失败重试装饰器
如果函数抛出异常,等待 delay 秒后重试,最多重试 max_attempts 次
"""
# 你的代码
pass
@retry(max_attempts=3, delay=1)
def unstable_function():
"""模拟不稳定的操作"""
import random
if random.random() < 0.7: # 70% 概率失败
raise ConnectionError("连接失败")
return "成功"
# 应该能处理失败并重试,最终返回"成功"或抛出最后一次异常
3)自定义异常与验证
class InsufficientFundsError(Exception):
"""余额不足"""
pass
class AccountFrozenError(Exception):
"""账户已冻结"""
pass
class BankAccount:
def __init__(self, balance=0, frozen=False):
self.balance = balance
self.frozen = frozen
def withdraw(self, amount):
"""
取款,要求:
1. 如果 frozen=True,抛出 AccountFrozenError
2. 如果 amount > balance,抛出 InsufficientFundsError
3. 如果 amount <= 0,抛出 ValueError
"""
# 你的代码
pass
def deposit(self, amount):
"""
存款,要求:
1. 如果 frozen=True,抛出 AccountFrozenError
2. 如果 amount <= 0,抛出 ValueError
"""
# 你的代码
pass
# 测试
account = BankAccount(100)
account.deposit(50) # balance = 150
account.withdraw(30) # balance = 120
# account.withdraw(200) # InsufficientFundsError
# account.deposit(-10) # ValueError
frozen_account = BankAccount(100, frozen=True)
# frozen_account.withdraw(10) # AccountFrozenError
4)异常转换
- 实现一个函数,将各种异常转换为统一的 APIException
class APIException(Exception):
def __init__(self, code, message):
self.code = code
self.message = message
super().__init__(message)
def call_api():
"""模拟API调用,可能抛出各种异常"""
import random
errors = [
ValueError("参数错误"),
ConnectionError("连接超时"),
TimeoutError("请求超时"),
RuntimeError("服务器内部错误")
]
raise random.choice(errors)
def robust_api_call():
"""
调用 call_api(),将各种异常转换为 APIException:
- ValueError → APIException(400, "参数错误")
- ConnectionError/TimeoutError → APIException(503, "服务不可用")
- 其他异常 → APIException(500, "服务器内部错误")
"""
# 你的代码
pass
(十七)迭代器与生成器
1.迭代器(Iterator)
- 迭代器是实现了
__iter__和__next__方法的对象
class MyIterator:
def __iter__(self):
"""
要求:必须返回迭代器
99.999999%的情况下,返回迭代器自身
"""
return self
def __next__(self):
"""返回下一个值"""
pass
obj = MyIterator() # obj 是一个迭代器
1)应用:无限序列
class FibonacciIterator:
"""无限斐波那契数列迭代器"""
def __init__(self):
self.a = 1
self.b = 1
def __iter__(self):
return self
def __next__(self):
current = self.a
self.a, self.b = self.b, self.a + self.b
return current
# 使用示例
fib = FibonacciIterator()
print(next(fib)) # 输出: 1 等效于 fib.__next__()
print(next(fib)) # 输出: 1
print(next(fib)) # 输出: 2
print(next(fib)) # 输出: 3
print(next(fib)) # 输出: 5
print(next(fib)) # 输出: 8
2.可迭代对象(Iterable)
- 可迭代协议规定,只要一个对象实现了
__iter__()方法,且返回一个迭代器,则它就是可迭代对象 - 推理可知: 迭代器一定是可迭代对象
python中的容器类型都是可迭代对象
my_list = [1, 2, 3]
# 调用 iter() 获取迭代器
iterator = iter(my_list) # 等价于 my_list.__iter__()
print(type(iterator)) # <class 'list_iterator'>
# 使用 next() 逐个获取值
print(next(iterator)) # 1
print(next(iterator)) # 2
print(next(iterator)) # 3
# print(next(iterator)) # StopIteration! 没有更多元素了
1)示例:倒数对象
class Countdown:
"""可迭代对象:倒数"""
def __init__(self, start):
self.start = start
def __iter__(self):
"""返回一个新的迭代器"""
return CountdownIterator(self.start)
class CountdownIterator:
"""迭代器"""
def __init__(self, start):
self.current = start
def __iter__(self):
return self
def __next__(self):
if self.current < 0:
raise StopIteration
num = self.current
self.current -= 1
return num
cd = Countdown(5)
iterator = iter(cd)
print(next(iterator)) # 5
print(next(iterator)) # 4
print(next(iterator)) # 3
print(next(iterator)) # 2
print(next(iterator)) # 1
print(next(iterator)) # 0
# print(next(iterator)) # StopIteration!
2)消费者
a)for循环
# for 循环会自动调用 iter() 和 next()
for n in Countdown(3):
print(n) # 3 2 1 0
b)list()、tuple()、set() 等构造函数
print(list(Countdown(3))) # [3, 2, 1, 0]
print(tuple(Countdown(3))) # (3, 2, 1, 0)
print(set(Countdown(3))) # {0, 1, 2, 3}
c)* 解包操作符
first, *rest = Countdown(3)
print(first) # 3
print(rest) # [2, 1, 0]
# 或用列表解包
values = [*Countdown(3)]
print(values) # [3, 2, 1, 0]
d)in 成员判断
print(5 in Countdown(3)) # False
print(2 in Countdown(3)) # True
e)sum()、max()、min() 等内置函数
print(sum(Countdown(3))) # 6
print(max(Countdown(3))) # 3
print(min(Countdown(3))) # 0
f)zip()、map()、filter() 等函数
# zip 合并多个可迭代对象
names = ["Alice", "Bob", "Charlie"]
ages = [25, 30, 35]
for name, age in zip(names, ages):
print(f"{name}: {age}")
# Alice: 25
# Bob: 30
# Charlie: 35
# map 对元素进行转换
squares = map(lambda x: x**2, Countdown(3))
print(list(squares)) # [9, 4, 1, 0]
# filter 过滤元素
evens = filter(lambda x: x % 2 == 0, Countdown(3))
print(list(evens)) # [2, 0]
g)any()、all()
numbers = Countdown(3)
print(any(numbers)) # True (至少一个为真)
print(all(numbers)) # False (是否所有都为真)
3)range函数
range()是 Python 中最常用的可迭代对象之一,用于生成整数序列
# range(stop): 0 到 stop-1
for i in range(5):
print(i, end=" ") # 0 1 2 3 4
# range(start, stop): start 到 stop-1
for i in range(2, 6):
print(i, end=" ") # 2 3 4 5
# range(start, stop, step): 指定步长
for i in range(0, 10, 2):
print(i, end=" ") # 0 2 4 6 8
# 负数步长(倒序)
for i in range(5, 0, -1):
print(i, end=" ") # 5 4 3 2 1
重要特性
- 惰性计算:
range不会一次性生成所有数字,而是按需生成 - 支持索引和切片:与列表不同,
range支持随机访问
r = range(0, 100, 2)
print(len(r)) # 50
print(r[5]) # 10
print(r[0:5]) # range(0, 10, 2)
print(10 in r) # True
print(11 in r) # False
- 不是迭代器:
range是可迭代对象,但不是迭代器(可以重复使用)
r = range(3)
for i in r:
print(i, end=" ") # 0 1 2
print()
for i in r:
print(i, end=" ") # 0 1 2(可以再次遍历)
range对象在内存中只存储start、stop、step三个值,无论范围多大都占用固定内存
4)推导式
- 推导式(Comprehension)是一种简洁的语法,用于从一个可迭代对象创建新的列表、字典或集合
a)列表推导式
# 基本语法:[表达式 for 变量 in 可迭代对象]
squares = [x**2 for x in range(5)]
print(squares) # [0, 1, 4, 9, 16]
# 带条件过滤:[表达式 for 变量 in 可迭代对象 if 条件]
evens = [x for x in range(10) if x % 2 == 0]
print(evens) # [0, 2, 4, 6, 8]
# 带 if-else 条件
labels = ["偶数" if x % 2 == 0 else "奇数" for x in range(5)]
print(labels) # ['偶数', '奇数', '偶数', '奇数', '偶数']
b)字典推导式
# 基本语法:{键表达式: 值表达式 for 变量 in 可迭代对象}
square_dict = {x: x**2 for x in range(5)}
print(square_dict) # {0: 0, 1: 1, 2: 4, 3: 9, 4: 16}
# 带条件过滤
odd_squares = {x: x**2 for x in range(10) if x % 2 != 0}
print(odd_squares) # {1: 1, 3: 9, 5: 25, 7: 49, 9: 81}
c)集合推导式
# 基本语法:{表达式 for 变量 in 可迭代对象}
square_set = {x**2 for x in range(10)}
print(square_set) # {0, 1, 4, 81, 64, 9, 16, 49, 25, 36}
# 带条件过滤
evens = {x for x in range(20) if x % 2 == 0}
print(evens) # {0, 2, 4, 6, 8, 10, 12, 14, 16, 18}
d)嵌套推导式
# 嵌套列表推导式:将二维列表展平
matrix = [[1, 2, 3], [4, 5, 6], [7, 8, 9]]
flat = [x for row in matrix for x in row]
print(flat) # [1, 2, 3, 4, 5, 6, 7, 8, 9]
# 等价于:
# flat = []
# for row in matrix:
# for x in row:
# flat.append(x)
# 嵌套条件
matrix = [[1, 2, 3], [4, 5, 6], [7, 8, 9]]
# 只保留偶数
result = [x for row in matrix for x in row if x % 2 == 0]
print(result) # [2, 4, 6, 8]
e)元组推导式
Python中没有元组推导式
f)推导式 vs 循环
- 推导式通常比等效的
for循环更快,也更简洁
# 推导式(推荐)
squares = [x**2 for x in range(10)]
# 等效的循环写法
squares = []
for x in range(10):
squares.append(x**2)
注意
当逻辑过于复杂时,使用普通循环会更清晰易读
3.生成器(Generator)
1)生成器函数
# Python识别到这个函数中包含yield的关键字,因此该函数是一个生成器函数。
def simple_generator():
print("开始")
yield 1
print("继续")
yield 2
print("结束")
yield 3
g = simple_generator() # 生成器函数返回的是生成器,生成器是一个迭代器。
print(next(g)) # 开始
# 1
print(next(g)) # 继续
# 2
print(next(g)) # 结束
# 3
# print(next(g)) # StopIteration!
- 可以利用生成器这种简易写法,快速完成迭代器的编写
def countdown(start):
"""生成器函数"""
while start >= 0:
yield start
start -= 1
# 调用生成器函数,返回生成器
cd = countdown(5)
print(type(cd)) # <class 'generator'>
for n in cd:
print(n, end=" ") # 5 4 3 2 1 0
生成器的特点
- 惰性计算:只在需要时生成值,不占用大量内存
- 状态保存:每次
yield后暂停,下次从暂停处继续 - 一次性:和迭代器一样,只能遍历一次
2)链式调用
def sub_generator():
yield 1
yield 2
def main_generator():
yield "开始"
for value in sub_generator():
yield value
yield "结束"
for value in main_generator():
print(value)
# 开始
# 1
# 2
# 结束
- 可使用
yield from语法糖简化代码
def main_generator():
yield "开始"
yield from sub_generator() # 委托给子生成器
yield "结束"
3)发送数据
- 当调用生成器的
send函数的时候,可以向生成器发送数据,该数据会导致yield的表达式返回对应的值
def calculator():
total = 0
while True:
x = yield total # yield 返回当前总数,并接收新值
if x is None:
break
total += x
calc = calculator()
print(next(calc)) # 输出: 0 (启动)
print(calc.send(10)) # 输出: 10 (发送10,累加后返回)
print(calc.send(20)) # 输出: 30
print(calc.send(5)) # 输出: 35
4)生成器表达式
- 类似列表推导式,但使用圆括号,返回生成器
# 生成器表达式 —— 惰性计算,节省内存
squares_gen = (x**2 for x in range(1000000))
print(type(squares_gen)) # <class 'generator'>
# 按需获取值
print(next(squares_gen)) # 0
print(next(squares_gen)) # 1
print(next(squares_gen)) # 4
4.itertools 简介
itertools模块提供了许多高效的迭代器工具
import itertools
# count(start, step):无限计数
counter = itertools.count(10, 2)
print(next(counter)) # 10
print(next(counter)) # 12
print(next(counter)) # 14
# cycle(iterable):无限循环
cy = itertools.cycle(["A", "B", "C"])
print(next(cy)) # A
print(next(cy)) # B
print(next(cy)) # C
print(next(cy)) # A(重新开始)
# repeat(value, times):重复值
times_three = list(itertools.repeat("x", 3))
print(times_three) # ['x', 'x', 'x']
# chain(*iterables):连接多个可迭代对象
combined = list(itertools.chain([1, 2], [3, 4], [5, 6]))
print(combined) # [1, 2, 3, 4, 5, 6]
# islice(iterable, start, stop, step):切片(支持无限迭代器)
first_five = list(itertools.islice(itertools.count(), 5))
print(first_five) # [0, 1, 2, 3, 4]
# permutations(iterable, r):排列
perms = list(itertools.permutations([1, 2, 3], 2))
print(perms) # [(1, 2), (1, 3), (2, 1), (2, 3), (3, 1), (3, 2)]
# combinations(iterable, r):组合
combs = list(itertools.combinations([1, 2, 3, 4], 2))
print(combs) # [(1, 2), (1, 3), (1, 4), (2, 3), (2, 4), (3, 4)]
5.作业
- 先使用费曼学习法,复述迭代器、可迭代对象、生成器的概念和关系
1)实现扁平化迭代器
- 编写一个生成器函数
flatten,将嵌套的列表扁平化
def flatten(nested_list):
# 你的代码
pass
nested = [1, [2, [3, 4], 5], 6, [7, 8]]
print(list(flatten(nested)))
# [1, 2, 3, 4, 5, 6, 7, 8]
2)实现分页迭代器
- 编写一个生成器,模拟从数据库分页读取数据
def paginated_query(total_items, page_size):
"""
模拟分页查询
total_items: 总数据量
page_size: 每页大小
每次 yield 返回一页数据(列表)
"""
# 你的代码
pass
for page in paginated_query(25, 10):
print(page)
# [0, 1, 2, 3, 4, 5, 6, 7, 8, 9]
# [10, 11, 12, 13, 14, 15, 16, 17, 18, 19]
# [20, 21, 22, 23, 24]
3)思考题
- 下面代码的输出是什么?为什么?
def generator():
print("准备 yield 1")
yield 1
print("准备 yield 2")
yield 2
print("准备 yield 3")
yield 3
print("生成器结束")
g = generator()
print("生成器已创建")
print(next(g))
print("---")
print(next(g))
print("---")
g.close()
print("生成器已关闭")
print(next(g))
(十八)上下文管理器
with 表达式 as 变量名:
代码块
# 等效于
变量名 = 表达式.__enter__()
try:
代码块
except Exception as e:
stopPropagation = 变量名.__exit__(type(e), e, e.__traceback__)
if not stopPropagation:
raise
else:
变量名.__exit__(None, None, None)
- 带
__enter__和__exit__方法的对象叫做 上下文管理器(Context Manager) - 上下文管理器是支持
with语句的对象 - 必须同时实现 两个方法,否则
with会报错
1.基本用法
# 文件操作 —— 自动关闭文件
with open("data.txt", "r") as f:
content = f.read()
# 离开 with 块时,文件自动关闭
# 等价于
f = open("data.txt", "r")
try:
content = f.read()
except Exception as e:
stopPropagation = f.__exit__(type(e), e, e.__traceback__)
if not stopPropagation:
raise
else:
f.__exit__(None, None, None)
2.自定义上下文管理器
- 实现
__enter__和__exit__方法
class DatabaseConnection:
def __init__(self, host):
self.host = host
self.connected = False
def __enter__(self):
"""进入 with 块时调用,返回的对象赋值给 as 后的变量"""
print(f"连接到数据库: {self.host}")
self.connected = True
return self # 返回自身,供 with 块使用
def __exit__(self, exc_type, exc_val, exc_tb):
"""
离开 with 块时调用
exc_type: 异常类型(无异常时为 None)
exc_val: 异常值
exc_tb: 异常追踪信息
返回 True 表示异常已处理,不再向上传播
"""
print(f"关闭数据库连接: {self.host}")
self.connected = False
return False # 返回 False,不处理异常,让异常继续传播
def query(self, sql):
if not self.connected:
raise RuntimeError("未连接到数据库")
print(f"执行查询: {sql}")
return ["result1", "result2"]
# 使用上下文管理器
with DatabaseConnection("localhost") as conn:
print(f"连接状态: {conn.connected}") # True
results = conn.query("SELECT * FROM users")
print(results)
# 离开 with 块后
print(f"连接状态: {conn.connected}") # False
3.异常处理
__exit__方法可以处理或记录异常
class SuppressError:
"""忽略指定类型的异常"""
def __init__(self, *exception_types):
self.exception_types = exception_types
def __enter__(self):
return self
def __exit__(self, exc_type, exc_val, exc_tb):
if exc_type is not None and issubclass(exc_type, self.exception_types):
print(f"捕获并忽略异常: {exc_type.__name__}: {exc_val}")
return True # 返回 True,异常被处理,不再传播
return False # 不处理其他异常
# 使用
with SuppressError(ZeroDivisionError):
result = 1 / 0 # 不会报错
print("这行不会执行")
print("程序继续执行") # 正常执行
4.使用 @contextmanager 装饰器
- 对于简单的上下文管理器,可以使用
contextlib模块的@contextmanager装饰器,用生成器函数实现
from contextlib import contextmanager
@contextmanager
def managed_resource(name):
"""用生成器实现上下文管理器"""
print(f"获取资源: {name}")
resource = {"name": name, "status": "active"}
try:
yield resource # yield 之前的代码等价于 __enter__
finally:
print(f"释放资源: {name}") # yield 之后的代码等价于 __exit__
# 使用
with managed_resource("database") as res:
print(f"使用资源: {res}")
# 获取资源: database
# 使用资源: {'name': 'database', 'status': 'active'}
# 释放资源: database
带异常处理的版本
from contextlib import contextmanager
@contextmanager
def safe_file_write(file_path):
"""安全写入文件:先写入临时文件,成功后再替换原文件"""
temp_path = file_path + ".tmp"
try:
f = open(temp_path, "w")
yield f
f.close()
# 写入成功,替换原文件
import os
os.replace(temp_path, file_path)
print("写入成功")
except Exception as e:
# 写入失败,清理临时文件
f.close()
import os
if os.path.exists(temp_path):
os.remove(temp_path)
print(f"写入失败: {e}")
raise # 重新抛出异常
# 使用
with safe_file_write("data.txt") as f:
f.write("Hello, World!\n")
5.多个上下文管理器
- 可以同时使用多个
with
# 嵌套写法
with open("input.txt", "r") as fin:
with open("output.txt", "w") as fout:
fout.write(fin.read().upper())
# 简化写法(Python 3.1+)
with open("input.txt", "r") as fin, open("output.txt", "w") as fout:
fout.write(fin.read().upper())
6.作业(使用AI)
1)实现代码块计时
from contextlib import contextmanager
# 使用
with timer("数据处理"):
import time
time.sleep(1)
print("处理完成")
# 处理完成
# 数据处理 耗时: 1.0012 秒
2)实现上下文管理器
- 编写一个
TempDirectory上下文管理器,进入时创建临时目录,退出时自动删除
with TempDirectory() as tmp_dir:
print(f"临时目录: {tmp_dir}")
# 可以在这个目录中创建文件
# 离开 with 块时,目录及其内容自动删除
print("临时目录已清理")
提示
使用 tempfile 模块创建临时目录,使用 shutil.rmtree 删除目录
3)实现重试装饰器(结合上下文管理器思想)
编写一个上下文管理器 retry,在发生指定异常时自动重试
这道题有问题,上下文管理器无法实现retry功能,retry需要使用装饰器实现,见answers/p3-1.py
4)思考题
- 下面代码的输出是什么?为什么?
from contextlib import contextmanager
@contextmanager
def demo():
print("进入")
yield
print("正常退出")
with demo():
print("执行中")
raise ValueError("出错了")
print("这行不会执行")
- 如果改成下面的代码,输出会有什么不同?
@contextmanager
def demo():
print("进入")
try:
yield
except Exception as e:
print(f"捕获异常: {e}")
finally:
print("清理")
with demo():
print("执行中")
raise ValueError("出错了")
(十九)抽象类(Abstract Base Class)
- 抽象类是 不能被实例化 的类,用于定义子类 必须实现 的接口
- Python 通过
abc模块提供抽象类的支持
from abc import ABC, abstractmethod
class Animal(ABC): # 继承 ABC,表示这是一个抽象类
@abstractmethod
def speak(self):
"""子类必须实现这个方法"""
pass
# animal = Animal() # TypeError: 不能实例化抽象类
class Dog(Animal):
def speak(self): # 必须实现抽象方法
print("Woof!")
dog = Dog()
dog.speak() # Woof!
在vscode设置中,打开
python.analysis.typeCheckingMode开关
1.定义抽象类
- 使用
abc模块中的ABC类和@abstractmethod装饰器
from abc import ABC, abstractmethod
class Shape(ABC):
@abstractmethod
def area(self):
"""计算面积"""
pass
@abstractmethod
def perimeter(self):
"""计算周长"""
pass
def describe(self):
"""普通方法,子类可直接使用"""
print(f"这是一个图形,面积: {self.area()}, 周长: {self.perimeter()}")
要点
- 继承
ABC表示这是一个抽象类 @abstractmethod标记的方法 必须 在子类中实现- 抽象类可以包含普通方法(有默认实现)
- 抽象类 不能 被实例化
2.抽象属性
- 除了抽象方法,还可以定义抽象属性
from abc import ABC, abstractmethod
class Employee(ABC):
@property
@abstractmethod
def salary(self):
"""子类必须实现 salary 属性"""
pass
class FullTimeEmployee(Employee):
def __init__(self, monthly_salary):
self._monthly_salary = monthly_salary
@property
def salary(self):
return self._monthly_salary
emp = FullTimeEmployee(10000)
print(emp.salary) # 10000
注意
@property 和 @abstractmethod 的顺序 不能颠倒
3.子类必须实现所有抽象方法
- 如果子类没有实现所有抽象方法,它仍然是抽象类,不能被实例化
class Rectangle(Shape):
def __init__(self, width, height):
self.width = width
self.height = height
def area(self):
return self.width * self.height
# 忘记实现 perimeter 方法
# rect = Rectangle(3, 4) # TypeError: 不能实例化抽象类 Rectangle
4.实际应用场景
- 抽象类常用于定义 插件接口 或 框架扩展点
from abc import ABC, abstractmethod
class DataSource(ABC):
"""数据源抽象基类,所有数据源必须实现这些接口"""
@abstractmethod
def connect(self):
pass
@abstractmethod
def read(self):
pass
@abstractmethod
def close(self):
pass
class MySQLSource(DataSource):
def connect(self):
print("连接 MySQL")
def read(self):
return "MySQL 数据"
def close(self):
print("关闭 MySQL 连接")
class MongoDBSource(DataSource):
def connect(self):
print("连接 MongoDB")
def read(self):
return "MongoDB 数据"
def close(self):
print("关闭 MongoDB 连接")
def process_data(source: DataSource):
"""统一处理数据,不关心具体数据源"""
source.connect()
data = source.read()
print(f"读取到: {data}")
source.close()
# 使用不同的数据源
process_data(MySQLSource())
process_data(MongoDBSource())
5.作业(使用AI)
1)实现抽象缓存类
- 编写一个抽象基类
Cache,定义缓存的基本接口,然后实现MemoryCache和FileCache
from abc import ABC, abstractmethod
class Cache(ABC):
@abstractmethod
def get(self, key):
pass
@abstractmethod
def set(self, key, value):
pass
@abstractmethod
def delete(self, key):
pass
# 实现 MemoryCache(使用字典存储)
# 实现 FileCache(使用文件存储)
2)实现抽象序列类
- 编写一个抽象基类
Sequence,然后实现ListSequence和LinkedListSequence
from abc import ABC, abstractmethod
class Sequence(ABC):
@abstractmethod
def append(self, item):
pass
@abstractmethod
def get(self, index):
pass
@abstractmethod
def length(self):
pass
@abstractmethod
def __iter__(self):
pass
def is_empty(self):
return self.length() == 0
# 实现 ListSequence(基于 Python 列表)
# 实现 LinkedListSequence(基于链表)
3)思考题
- 下面代码的输出是什么?为什么?
from abc import ABC, abstractmethod
class A(ABC):
@abstractmethod
def foo(self):
pass
def bar(self):
print("A.bar")
class B(A):
def foo(self):
print("B.foo")
class C(B):
pass
c = C()
c.foo()
c.bar()
- 如果改成下面的代码,会发生什么?
class D(A):
pass
d = D()
(二十)类型标注
现在开始,开启
python.analysis.typeCheckingMode
1.为什么需要类型标注
# 问题:参数类型不明确
def add(a, b):
return a + b
# 调用者不知道应该传什么类型
add(1, 2) # 3
add("1", "2") # "12" —— 这也是合法的,但可能不是预期行为
add([1], [2]) # [1, 2] —— 同样合法
# 没有类型提示,难以在编码时发现错误
2.基础类型标注
1)变量类型标注
# 声明变量的类型
name: str = "Alice"
age: int = 25
pi: float = 3.14
is_active: bool = True
# 没有初始值
value: int
value = 10
# Python 是动态语言,类型标注不会强制约束
x: int = "hello" # 不会报错,但类型检查工具会提示
2)函数类型标注
def greet(name: str, age: int) -> str:
"""函数参数和返回值的类型标注"""
return f"{name} 今年 {age} 岁"
# 调用
greet("Alice", 25) # 正确
greet("Alice", "25") # 运行不会报错,但类型检查会警告
from typing import NoReturn
def exit_program() -> NoReturn:
"""表示函数永远不会正常返回"""
import sys
sys.exit(1)
3.常用复合类型
1)Optional 和 Union
from typing import Optional, Union
# Optional:值可以是某个类型,也可以是 None
def find_user(user_id: int) -> Optional[str]:
"""返回用户名,找不到时返回 None"""
if user_id <= 0:
return None
return f"User_{user_id}"
# Union:值可以是多种类型之一
def parse_value(value: str) -> Union[int, float, str]:
"""尝试将字符串转换为数字,失败则返回原字符串"""
try:
if "." in value:
return float(value)
return int(value)
except ValueError:
return value
2)容器类型
from typing import List, Dict, Tuple, Set
# 列表:元素类型
scores: List[int] = [85, 90, 78]
names: List[str] = ["Alice", "Bob", "Charlie"]
# 字典:键类型, 值类型
student_scores: Dict[str, int] = {
"Alice": 85,
"Bob": 90,
}
# 元组:固定长度,每个位置类型可不同
point: Tuple[int, int] = (10, 20)
person: Tuple[str, int, bool] = ("Alice", 25, True)
# 集合:元素类型
tags: Set[str] = {"python", "typing", "type-hints"}
3)Any 和 类型别名
from typing import Any, TypeAlias
# Any:任意类型,相当于没有类型约束
def log_data(data: Any) -> None:
print(f"数据: {data}")
# 类型别名,让复杂类型更易读
Vector: TypeAlias = List[float]
Matrix: TypeAlias = List[List[float]]
def dot_product(v1: Vector, v2: Vector) -> float:
"""计算两个向量的点积"""
return sum(a * b for a, b in zip(v1, v2))
4.类与自定义类型
from typing import Self
class Point:
def __init__(self, x: float, y: float) -> None:
self.x = x
self.y = y
def move(self, dx: float, dy: float) -> Self:
"""返回移动后的新点"""
return Point(self.x + dx, self.y + dy)
def distance_to(self, other: "Point") -> float:
"""计算到另一个点的距离"""
return ((self.x - other.x) ** 2 + (self.y - other.y) ** 2) ** 0.5
# 使用
p1 = Point(0, 0)
p2 = Point(3, 4)
print(p1.distance_to(p2)) # 5.0
5.泛型
from typing import TypeVar, Generic
T = TypeVar("T")
class Stack(Generic[T]):
"""泛型栈,可以存储任意类型的元素"""
def __init__(self) -> None:
self._items: list[T] = []
def push(self, item: T) -> None:
self._items.append(item)
def pop(self) -> T:
if not self._items:
raise IndexError("栈为空")
return self._items.pop()
def peek(self) -> T | None:
if not self._items:
return None
return self._items[-1]
# 使用
int_stack: Stack[int] = Stack()
int_stack.push(1)
int_stack.push(2)
print(int_stack.pop()) # 2
str_stack: Stack[str] = Stack()
str_stack.push("hello")
# str_stack.push(123) # 类型检查会警告
6.Callable 和 回调函数
from typing import Callable
def execute_callback(
callback: Callable[[int, int], int],
a: int,
b: int
) -> int:
"""执行回调函数"""
return callback(a, b)
# 使用
result = execute_callback(lambda x, y: x + y, 3, 5)
print(result) # 8
7.应用场景
1)API 接口定义
from typing import TypedDict
class UserResponse(TypedDict):
"""API 返回的用户数据结构"""
id: int
name: str
email: str
is_active: bool
def get_user(user_id: int) -> UserResponse:
return {
"id": user_id,
"name": "Alice",
"email": "alice@example.com",
"is_active": True,
}
2)配合 IDE 获得智能提示
类型标注让 IDE 可以提供:
- 自动补全
- 参数提示
- 类型错误高亮
class Database:
def connect(self, host: str, port: int = 5432) -> "Connection":
...
def query(self, sql: str) -> list[dict[str, Any]]:
...
db = Database()
conn = db.connect("localhost") # IDE 会提示 port 参数
8.忽略类型检查
- 有时某些代码难以标注或不需要检查,可以使用
# type: ignore忽略
# 忽略整行的类型检查
data = some_dynamic_library.load() # type: ignore
# 有具体错误码时,可以指定忽略特定错误
x: int = "hello" # type: ignore[assignment]
注意
应该尽量少用,只在必要时使用
9.作业(可使用AI)
1)为函数添加类型标注
- 为以下函数添加合适的类型标注
def calculate_bmi(weight, height):
"""计算 BMI 指数"""
if height <= 0:
raise ValueError("身高必须大于0")
return weight / (height ** 2)
def get_grade(score):
"""根据分数返回等级"""
if score >= 90:
return "A"
elif score >= 80:
return "B"
elif score >= 70:
return "C"
elif score >= 60:
return "D"
else:
return "F"
2)实现泛型缓存
from typing import TypeVar, Generic, Optional
K = TypeVar("K")
V = TypeVar("V")
class Cache(Generic[K, V]):
"""泛型缓存类"""
def __init__(self) -> None:
# 你的代码
pass
def set(self, key: K, value: V) -> None:
"""设置缓存"""
# 你的代码
pass
def get(self, key: K) -> Optional[V]:
"""获取缓存,不存在返回 None"""
# 你的代码
pass
def clear(self) -> None:
"""清空缓存"""
# 你的代码
pass
# 测试
cache: Cache[str, int] = Cache()
cache.set("a", 1)
cache.set("b", 2)
print(cache.get("a")) # 1
print(cache.get("c")) # None
cache.clear()
3)定义配置类
- 使用
TypedDict定义应用配置结构
from typing import TypedDict, Optional
class DatabaseConfig(TypedDict):
"""数据库配置"""
# 你的代码:包含 host(str), port(int), username(str), password(str), database(str)
class AppConfig(TypedDict):
"""应用配置"""
# 你的代码:包含 app_name(str), debug(bool), db(DatabaseConfig)
def load_config() -> AppConfig:
"""加载默认配置"""
return {
"app_name": "MyApp",
"debug": False,
"db": {
"host": "localhost",
"port": 5432,
"username": "admin",
"password": "secret",
"database": "mydb",
}
}
4)思考题
- 下面代码的类型标注是否正确?如果不正确,如何修改?
from typing import List, Dict
def process_data(items: List) -> Dict:
"""处理数据项"""
result = {}
for item in items:
result[item["id"]] = item["value"]
return result
def find_max(a: int, b: int) -> int | None:
"""返回较大的数"""
if a == b:
return None
return a if a > b else b
(二十一)模块化
1.包、模块、成员关系
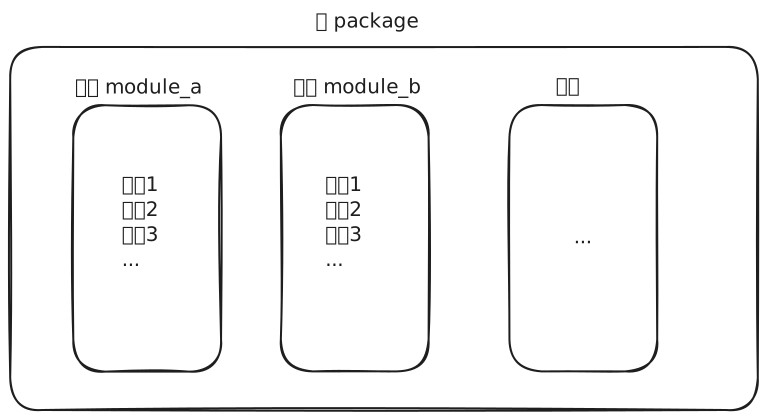
2.定义模块(导出)
- 创建一个
.py文件,就是在 定义 一个模块 - 文件顶层的所有定义(变量、函数、类)就是这个模块 导出 的内容
# my_math.py —— 这就是一个模块,文件名叫 my_math.py,模块名就是 my_math
pi: float = 3.14159 # 导出变量
def add(a: int, b: int) -> int: # 导出函数
return a + b
class Calculator: # 导出类
def multiply(self, a: int, b: int) -> int:
return a * b
要点
- 文件名即模块名(去掉
.py) - 文件顶层的 变量、函数、类 都是模块的导出成员
- 在函数/类 内部 定义的内容不是导出成员(外部无法访问)
1)私有成员约定
- Python 没有真正的私有机制,但用 下划线开头 表示"内部实现,外部不应直接使用"
# my_math.py
PI: float = 3.14159 # 公开
def add(a: int, b: int) -> int: # 公开
return a + b
def _internal_helper(a: int) -> int: # "私有"——约定外部不应使用
return a * 2
from module import *时,下划线开头的成员 不会 被导入
2)使用 __all__ 控制导出清单
__all__明确指定哪些成员是公开 API
# my_math.py
__all__: list[str] = ["PI", "add"] # 只导出 PI 和 add
PI: float = 3.14159
E: float = 2.71828 # 没有在 __all__ 中,from import * 不会导入
def add(a: int, b: int) -> int:
return a + b
def subtract(a: int, b: int) -> int: # 不在 __all__ 中
return a - b
`__all__` 的作用
- 控制
from my_math import *导入哪些成员 - 作为模块的"文档",告诉使用者哪些是稳定 API
- 和一些其他工具配合
3)模块的 __name__ 与直接运行
- 每个模块都有一个内置属性
__name__- 直接运行时:
__name__ == "__main__" - 被导入时:
__name__ == 模块名
- 直接运行时:
- 利用这个特性,可以在模块中写测试代码,只有直接运行时才执行
# my_math.py
__all__: list[str] = ["PI", "add"]
PI: float = 3.14159
def add(a: int, b: int) -> int:
return a + b
# 以下代码只有在 python my_math.py 直接运行时才执行
# 作为模块被导入时不会执行
if __name__ == "__main__":
print(add(3, 5)) # 8
print(add(-1, 1)) # 0
3.导入模块
- Python在 运行时 动态导入
1)import 语句
import my_math # 导入整个模块
print(my_math.PI) # 通过模块名访问
print(my_math.add(3, 5))
from my_math import PI, add # 只导入需要的成员
print(PI)
print(add(3, 5))
from my_math import * # 导入 __all__ 中列出的成员(谨慎使用)
print(PI)
print(add(3, 5))
# subtract 不在 __all__ 中,不会导入
import my_math as mm # 模块别名
from my_math import add as my_add # 成员别名
print(mm.PI)
print(my_add(3, 5))
2)模块的动态导入
import importlib
# 模块名来自变量
module_name = "math"
math = importlib.import_module(module_name)
print(math.sqrt(16)) # 4.0
# 来自用户输入
user_input = "json"
module = importlib.import_module(user_input)
data = module.dumps({"key": "value"})
# 动态导入子模块
submodule = importlib.import_module("os.path")
print(submodule.join("a", "b")) # a/b
3)模块的执行与缓存
- 模块在 首次导入 时 执行一次,后续导入使用缓存,不会重复执行
import my_math # 第一次导入:执行 my_math.py
import my_math # 第二次导入:使用缓存,不执行
import my_math # 第三次导入:使用缓存,不执行
- 缓存存储在
sys.modules中
import sys
# 查看已加载的所有模块
print("math" in sys.modules) # True(因为 math 已被导入)
print(my_math in sys.modules.values()) # True
4.包(Package)
- 只要一个目录中包含
__init__.py模块,Python就会将该目录其视为一个包
1)__init__.py 的作用
__init__.py是包的初始化文件,它在第一次导入该包的时候会自动运行,可以- 组织导出接口:在包级别暴露子模块的成员
- 包级别的初始化:接数据库、加载配置等
# utils/__init__.py
__all__: list[str] = ["add", "subtract", "to_upper", "reverse"]
from .math_ops import add, subtract
from .string_ops import to_upper, reverse
5.相对导入
- 包内部的模块可以通过相对导入引用兄弟模块
project/
├── main.py
└── utils/
├── __init__.py
├── math_ops.py
└── string_ops.py
# utils/string_ops.py
from .math_ops import add # . 表示当前包(utils)
def add_and_reverse(a: int, b: int) -> str:
result: int = add(a, b)
return reverse(str(result))
- 相对导入符号
.:当前包..:父包...:祖父包
限制
相对导入 不能 用于直接运行的模块,只用于包内模块被导入时
6.搜索路径
1)import 语句按以下顺序搜索模块
- 内置模块,如:
sys
import sys
print(sys.builtin_module_names) # 查看所有内置模块
sys.path- 当前脚本所在目录
PYTHONPATH环境变量中的路径- Python 内置模块
- 第三方包(
site-packages)
import sys
# 查看模块搜索路径
for path in sys.path:
print(path)
7.循环导入问题
# a.py
from b import bar
def foo() -> str:
return bar()
# b.py —— 此时 a.py 还没执行完,foo 还不存在
from a import foo # ImportError
def bar() -> str:
return "bar"
解决方案
- 将公共代码抽到第三个模块
- 延迟导入(在函数内部导入)
8.作业
1)使用费曼学习法,复述
- 包、模块、成员关系
__all__的作用__init__.py的作用- python对模块或包的搜索是怎样的
2)学习 __slots__
- 查询
python中__slots__的作用
(二十二)标准库
1.官方手册
- 按功能:https://docs.python.org/zh-cn/3.14/library/index.html
- 按名称:https://docs.python.org/zh-cn/3/py-modindex.html
- 包含:
- 内置API
- 内置模块
- 标准库
2.作业(使用AI)
1)树形目录展示
- 编写一个函数
show_tree(dir_path: str, show_hidden: bool = False),接收两个参数dir_path:目录路径,可以是绝对路径或相对路径(相对当前工作目录 CWD)show_hidden:布尔类型,表示是否显示隐藏文件/目录
- 隐藏判断简单处理:文件或目录只要以
.开头,则视为隐藏文件或目录,否则的话视为可视 - 函数的功能是用树形递归的方式展示指定目录下的所有内容,效果类似于 Linux 的
tree命令 - 输出格式参考如下
.
├── file1.txt
├── dir1
│ ├── file2.txt
│ └── file3.txt
└── file4.txt
2)Markdown 文件合并
- 编写一个函数
merge_markdown(files: list[str], output: str) -> None,接收两个参数files:Markdown 文件路径列表output:合并后保存的目标文件路径
- 函数的作用是将多个 Markdown 文件合并为一个文件保存到目标路径
- 合并规则如下
1. 最终合并结果的一级标题固定为 `# 合并结果`
2. 所有原始 Markdown 文件的标题需要降级:
- 一级标题 `#` → 二级标题 `##`
- 二级标题 `##` → 三级标题 `###`
- 以此类推
- 六级标题 `######` → 正文,用 **加粗** 表示
3. 非标题内容(正文、列表、代码块等)保持不变
(二十三)第三方库
- Python 拥有庞大的第三方库生态,可以通过包管理工具
pip来安装、升级、卸载和管理依赖
1.pip 概述
pip是 Python 的官方包管理器,从 Python 3.4 开始自带- 从 PyPI(Python Package Index) 下载包,默认源为 https://pypi.org
# 查看 pip 版本
pip --version
# 查看帮助
pip help
相关信息
- 如果同时安装了 Python 2 和 Python 3,可能需要用
pip3代替pip - 或者使用
python -m pip确保调用的是当前 Python 对应的 pip
2.国内镜像源
- 由于网络原因,国内访问 PyPI 可能很慢,可以使用国内镜像
# 临时使用阿里云镜像
pip install 包名 -i https://mirrors.aliyun.com/pypi/simple/
# 临时使用清华大学镜像
pip install 包名 -i https://pypi.tuna.tsinghua.edu.cn/simple/
1)配置默认镜像源(全局生效)
pip config set global.index-url https://mirrors.aliyun.com/pypi/simple/
2)常用国内镜像源
| 镜像源 | URL |
|---|---|
| 阿里云 | https://mirrors.aliyun.com/pypi/simple/ |
| 清华大学 | https://pypi.tuna.tsinghua.edu.cn/simple/ |
| 中国科技大学 | https://pypi.mirrors.ustc.edu.cn/simple/ |
| 华为云 | https://repo.huaweicloud.com/repository/pypi/simple/ |
3.安装第三方库
1)基础安装
# 安装最新版本
pip install 包名
# 实际例子
pip install requests
pip install flask
2)指定版本
# 安装指定版本
pip install requests==2.31.0
# 安装高于某个版本
pip install "requests¡2.20"
# 安装某个范围内的版本
pip install "requests>=2.20,<3.0"
| 符号 | 作用 |
|---|---|
== | 固定版本 |
>= | 最低版本限制 |
> | 严格高于 |
<= | 最高版本限制 |
< | 严格低于 |
~= | 同系列小版本更新 |
, | 组合多条件 |
!= | 排除指定版本 |
* | 通配补丁版本 |
3)一次安装多个
pip install requests flask django
4.升级第三方库
# 升级到最新版本
pip install --upgrade 包名
# 或简写
pip install -U 包名
# 升级 pip 自身
pip install --upgrade pip
5.卸载第三方库
# 卸载包及其依赖
pip uninstall 包名
# 卸载多个
pip uninstall requests flask
# 注意:卸载操作会询问确认,加 -y 跳过确认
pip uninstall -y 包名
6.查看与管理包
# 列出所有已安装的包
pip list
# 查看过时的包(可升级的)
pip list --outdated
# 查看特定包的详细信息
pip show 包名
# 示例输出
pip show requests
# Name: requests
# Version: 2.31.0
# Summary: Python HTTP for Humans.
# Requires: certifi, charset-normalizer, idna, urllib3
# Required-by: (哪些包依赖它)
7.依赖管理
1)requirements.txt
- 在项目中使用
requirements.txt记录所有依赖
# 生成当前环境的依赖列表
pip freeze > requirements.txt
requirements.txt文件内容示例
requests==2.31.0
flask==3.0.0
numpy>=1.24.0
- 从
requirements.txt安装依赖
pip install -r requirements.txt
8.虚拟环境
- 不同项目可能需要不同版本的依赖,使用虚拟环境可以隔离依赖
# 创建虚拟环境(Python 3.3+)
python -m venv .venv
# 激活虚拟环境
# macOS / Linux
source .venv/bin/activate
# Windows
.venv\Scripts\activate
# 激活后,pip 安装的包只在该环境中生效
pip install requests
# 退出虚拟环境
deactivate
1)使用 venv 管理项目依赖
# 1. 创建并激活虚拟环境
python -m venv .venv
source .venv/bin/activate
# 2. 安装项目依赖
pip install -r requirements.txt
# 3. 开发完成后冻结依赖
pip freeze > requirements.txt
# 4. 退出虚拟环境
deactivate
小知识
-m表示python会按照模块的查找顺序查找模块运行venv的前身是一个第三方库virtualenv,从Python 3.3开始,官方将venv作为其功能的“精简版”集成到了标准库中,这样我们就不需要额外安装,开箱即用了
9.作业(使用AI)
- 实现一个命令行工具,实现和AI的聊天
(二十四)事件循环
1.同步代码的问题
import requests
def task1():
# 任务1
requests.post(...) # 发送请求,阻塞线程
def task2():
# 任务2
pass
task1() # task1的阻塞导致后续任务白白等待,浪费了CPU资源
task2()
2.什么是异步
- 异步是一种编程模式,当有多个任务需要在 一个线程 上执行时,这种模式可以让任务不会造成线程阻塞
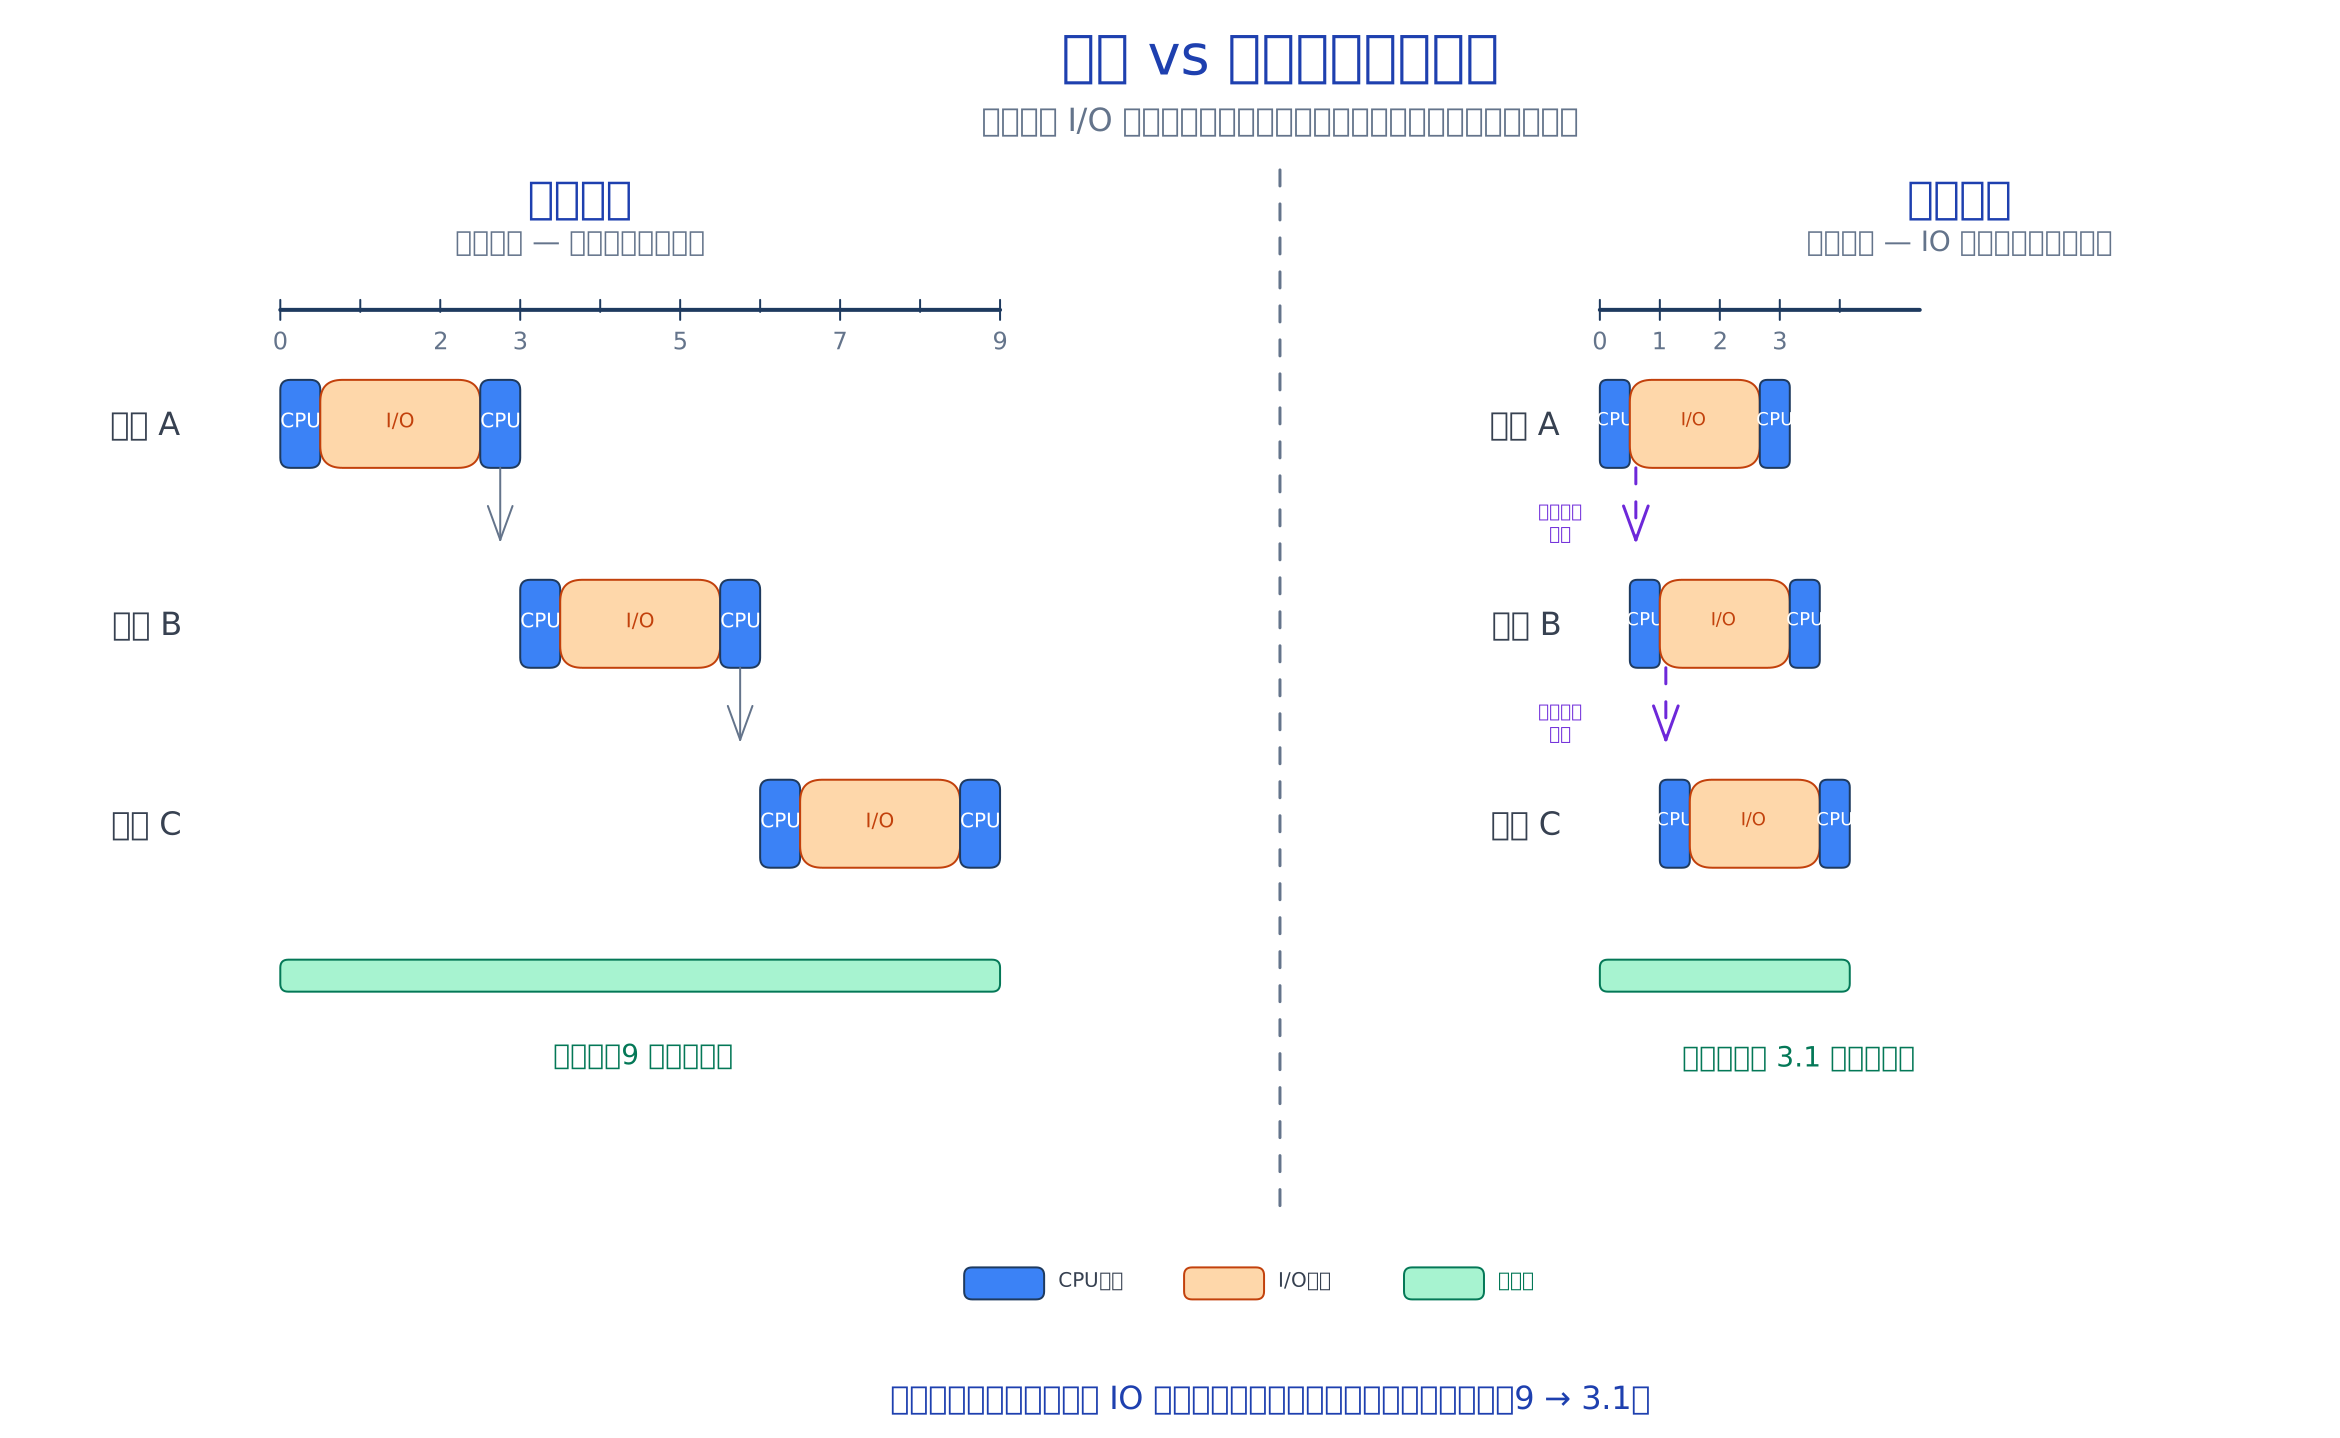
3.异步 VS 多线程
- 运算密集型:多线程
- I/O密集型:异步
4.Python的事件循环
- 事件循环是实现异步的基础手段
1)AbstractEventLoop类
- 在
python中,一个事件循环就是一个AbstractEventLoop类的对象
import asyncio
# 创建一个新的事件循环对象
loop = asyncio.new_event_loop()
# 绑定事件循环到当前线程
asyncio.set_event_loop(loop)
# 获取当前线程的事件循环
current_loop = asyncio.get_event_loop()
print("当前事件循环:", current_loop)
# 移除事件循环绑定
asyncio.set_event_loop(None)
# 运行事件循环
# 陷入死循环,除非在循环中终止,否则后续代码永远无法得到运行
current_loop.run_forever()
# 停止事件循环
current_loop.stop()
2)run_forever方法
def run_forever(self):
"""Run until stop() is called."""
while True:
self._run_once()
if self._stopping:
break
3)_run_once逻辑
_run_once方法的核心,就是调度事件循环中的队列- 要确保每次该方法运行,都能保证ready队列中的所有回调得到执行
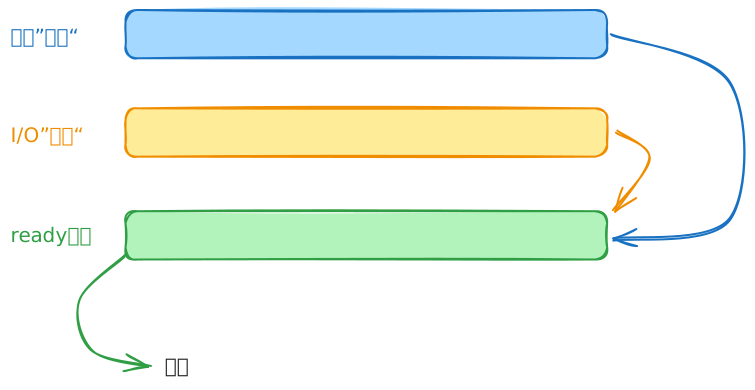
- 检查延时队列,加入ready
- 计算等待时间 timeout
- ready有东西,timeout = 0
- 延时队列还有任务,timeout = 延时队列的队首 - 当前时间
- 都没有任务,timeout = None
- 用timeout的时间阻塞线程,等待I/O,期间有任何IO任务到达,马上加入ready
- 如果timeout时间到达后还没有I/O任务,则重新处理一次延时队列
- 复制ready队列
- 执行复制的队列
试一试下面的代码
import inspect
import asyncio
loop = asyncio.new_event_loop()
# 将函数直接放入ready队列
def my_ready_callback():
print("这是一个直接进入ready队列的回调函数")
loop.call_soon(my_ready_callback)
# 将函数放入延迟队列,1秒后进入ready队列
def my_scheduled_callback():
print("这是一个延迟1秒后进入ready队列的回调函数")
loop.stop() # 停止事件循环
loop.call_later(1, my_scheduled_callback)
loop.run_forever()
print("事件循环已停止")
5.作业
1)预测以下代码的输出结果
import asyncio
loop = asyncio.new_event_loop()
def task1():
print("任务1")
def task2():
print("任务2")
def task3():
print("任务3")
loop.call_soon(task1)
print("task1 over")
loop.call_soon(task2)
print("task2 over")
loop.call_soon(task3)
print("task3 over")
loop.run_forever()
print("已结束")
2)预测以下代码的输出结果
import asyncio
loop = asyncio.new_event_loop()
def delayed():
print(1)
loop.call_later(0, lambda: print(2))
loop.call_soon(lambda: print(3))
def soon():
print(4)
loop.call_soon(lambda: print(5))
loop.call_later(0, delayed)
loop.call_soon(soon)
loop.run_forever()
print("done")
3)预测以下代码的输出结果
import asyncio
loop = asyncio.new_event_loop()
def first():
print(1)
def second():
print(2)
loop.call_soon(lambda: print(3))
loop.stop()
def third():
print(4)
loop.call_soon(first)
loop.call_soon(second)
loop.call_soon(third)
loop.run_forever()
print("循环已停止")
(二十五)Future类
- 在异步场景中,有很多任务开始后,只能在 将来 的某个时间点才能完成
- 为了表达这一逻辑,Python封装了
Future类 Future类表达了一个在将来会完成的异步任务
1.每一个 Future 对象拥有两种状态
- 未完成:表示任务还在等待
- 已完成:表示任务已有结果
- 正常完成
- 有错误
- 被取消
开发者可以通过以下代码操作和检查状态
import asyncio
loop = asyncio.new_event_loop()
fut = loop.create_future() # 通过事件循环对象创建Future
# print(fut.done()) # False,未完成
# print(fut.result()) # 引发InvalidStateError异常
# 让fut完成
# fut.set_result("result") # 设置完成结果的值
# print(fut.done(), fut.result()) # 是否完成、完成结果,打印:True result
# 发生异常
# fut.set_exception(TypeError("类型异常")) # 设置异常
# print(fut.done(), fut.exception())
# print(fut.result()) # 此时获取result会引发异常
# 取消
# fut.cancel("不等了") # 取消future
# print(fut.done(), fut.cancelled()) # 已完成、已取消
# print(fut.result()) # 获取结果会引发CancelledError异常
# print(fut.exception()) # 获取异常结果同样会引发CancelledError异常
# # 注册回调
# def on_done(f: asyncio.Future) -> None:
# try:
# print(f"Future完成,结果:{f.result()}")
# except Exception as e:
# print(f"Future完成,但发生异常:{e}")
# # 注册回调函数
# # 该回调函数会被放到事件循环的ready队列中,等待事件循环调度执行
# fut.add_done_callback(on_done)
2.作业
- 理解
25. Future/demo目录中的两个python代码
(二十六)协程 Coroutine
1.回调之痛
- 在之前的课程中,我们用
Future把延时函数和网络请求封装成了异步模式,但使用者依然需要注册回调
async_delay(2).add_done_callback(lambda _: print("2秒后执行"))
- 如果请求之后还有请求,就会出现 回调地狱
- 代码横向增长,可读性急剧下降
async_request("host1").add_done_callback(lambda r1:
async_request("host2").add_done_callback(lambda r2:
async_request("host3").add_done_callback(lambda r3:
...
)
)
)
2.协程函数
Python中,使用async def定义一个 协程函数- 调用协程函数会得到一个 协程对象
from async_delay import async_delay
from async_request import async_request
import asyncio
async def test():
print("main begins")
resp1 = await async_request("localhost", 5500, "/index.html")
print("resp1", resp1[:9])
await async_delay(1)
print("delayed")
resp2 = await async_request("localhost", 5500, "/index.html")
print("resp2", resp2[:9])
return "ok"
3.协程 VS 线程
| 对比维度 | 🧵 线程 (Thread) | 🍃 协程 (Coroutine) |
|---|---|---|
| 运行载体 | 运行在操作系统内核态,受系统管理 | 完全运行在用户态,由事件循环(如 asyncio)管理 |
| 资源开销 | 较高 每个线程需要独立的栈空间(通常数MB)和内核资源,创建和切换开销大 | 极低 协程栈空间很小(通常几KB),切换只需保存少量CPU寄存器上下文 |
| 切换成本 | 昂贵 涉及用户态与内核态切换,需要数百个CPU时钟周期 | 非常廉价 纯用户态操作,仅需几十个时钟周期 |
| 数据同步 | 复杂且易出错 多线程共享内存,需要使用 锁(Lock)、信号量(Semaphore) 等机制,容易产生 死锁、竞态条件 | 相对安全 单线程内运行,同一时刻只有一个协程在执行,天然避免了数据竞争。但使用多线程事件循环时仍需注意 |
| 利用多核 | ✅ 原生支持 可将不同线程分配到不同CPU核心,实现并行计算(CPU密集型任务) | ❌ 单线程内不支持 一个事件循环默认只运行在一个线程、一个核心上。需要配合 asyncio 的 run_in_executor 或多进程才能利用多核 |
| 适用场景 | CPU密集型任务 或 对实时性要求高的I/O任务(通过多线程掩盖阻塞) | 海量I/O密集型任务 网络爬虫、Web服务器(如FastAPI)、聊天服务、高并发数据库访问等。可以轻松创建成千上万个协程 |
| 代表库/语法 | threading concurrent.futures.ThreadPoolExecutor | asyncio async/await trio gevent (基于协程的库) |
| 典型数量级 | 百级别(数百个线程开销已相当可观) | 万/十万级别(轻松创建数万个协程) |
4.驱动协程对象
def main():
coro = test()
loop = asyncio.get_event_loop()
f = loop.create_future()
r = coro.send(None)
def done_callback(fut):
try:
r = coro.send(fut.result())
r.add_done_callback(done_callback)
except StopIteration as e:
f.set_result(e.value)
r.add_done_callback(done_callback)
return f
loop = asyncio.new_event_loop()
asyncio.set_event_loop(loop)
def run():
fut = main()
def done_callback(fut):
loop.stop()
print(fut.result())
fut.add_done_callback(done_callback)
loop.call_soon(run)
loop.run_forever()
print("over")
5.Task
Task是Future的子类- 专门用于驱动协程对象的执行
def main():
coro = test()
loop = asyncio.get_event_loop()
f = loop.create_future()
r = coro.send(None)
def done_callback(fut):
try:
r = coro.send(fut.result())
r.add_done_callback(done_callback)
except StopIteration as e:
f.set_result(e.value)
r.add_done_callback(done_callback)
return f
loop = asyncio.new_event_loop()
asyncio.set_event_loop(loop)
def run():
fut = main()
def done_callback(fut):
loop.stop()
print(fut.result())
fut.add_done_callback(done_callback)
loop.call_soon(run)
loop.run_forever()
print("over")
# 等效于
loop = asyncio.new_event_loop()
asyncio.set_event_loop(loop)
def run():
task = asyncio.create_task(test()) # 将协程包装成一个Task
def done_callback(task):
loop.stop()
print(task.result())
task.add_done_callback(done_callback)
loop.call_soon(run)
loop.run_forever()
print("over")
6.asyncio.run
asyncio.run可以直接驱动一个协程对象,在内部会将其转换为Task
loop = asyncio.new_event_loop()
asyncio.set_event_loop(loop)
def run():
task = asyncio.create_task(test()) # 将协程包装成一个Task
def done_callback(task):
loop.stop()
print(task.result())
task.add_done_callback(done_callback)
loop.call_soon(run)
loop.run_forever()
print("over")
# 等效于
result = asyncio.run(test())
print(result)
print("over")
7.深度总结
async修饰的函数称之为 协程函数/异步函数,调用后返回 协程对象- 协程对象可以通过
asyncio.create_task包装成一个Task,用于驱动协程对象Task创建后,会立即启动协程对象的执行,执行放到ready队列中- 协程对象执行结束,Task完成,完成的数据即是协程对象的返回值
await关键字可以等待一个awaitable对象await必须在协程函数中- 常见的
awaitable对象 - 协程对象
- Task
- Future
asyncio.run可接收一个协程对象,其在内部转换为Task
8.作业
1)实现 gather 函数
import asyncio
from async_delay import async_delay
from typing import Coroutine
def gather(*aws: Coroutine) -> asyncio.Future:
# 你的代码
pass
async def coro(name: str, duration: int):
await async_delay(duration)
return f"{name} 完成"
async def main():
results = await gather(
coro("A", 2),
coro("B", 1),
coro("C", 3),
)
print(results) # 预期: ['A 完成', 'B 完成', 'C 完成']
asyncio.run(main())
2)实现 Event 类
import asyncio
from async_delay import async_delay
from gather import gather
class Event:
# 你的代码
pass
async def test():
event = Event()
async def waiter():
print("waiter: 开始等待")
await event.wait()
print("waiter: 被唤醒")
async def setter():
print("setter: 1秒后设置事件")
await async_delay(1)
event.set()
print("setter: 事件已设置")
await gather(waiter(), setter())
asyncio.run(test())
# 预期结果:
"""
waiter: 开始等待
setter: 1秒后设置事件
setter: 事件已设置
waiter: 被唤醒
"""
(二十七)异步编程
- 前面三节课我们分别学习了事件循环、Future 和协程的底层原理
- 从这节课开始,我们不再自己造轮子,而是使用 Python 官方和社区给我们准备好的 API,高效地进行异步开发
1.异步生成器与异步迭代器
- 在协程函数中使用
yield,就变成了 异步生成器 - 每次
yield产出值时都可以await其他协程
async def async_generator():
for i in range(3):
await asyncio.sleep(1)
yield i
async def main():
# 必须用 async for 来遍历异步生成器
async for item in async_generator():
print(item) # 每隔 1 秒打印一个数字
asyncio.run(main())
- 同样可以自定义 异步迭代器
- 实现
__aiter__和__anext__两个协议方法
class AsyncCounter:
def __init__(self, limit: int):
self._limit = limit
self._count = 0
def __aiter__(self):
return self
async def __anext__(self) -> int:
self._count += 1
if self._count > self._limit:
raise StopAsyncIteration
await asyncio.sleep(0.5)
return self._count
async def main():
async for num in AsyncCounter(5):
print(num) # 每隔 0.5 秒打印 1 2 3 4 5
对比同步迭代协议
| 同步 | 异步 |
|---|---|
__iter__ / __next__ | __aiter__ / __anext__ |
for x in iterable | async for x in async_iterable |
StopIteration | StopAsyncIteration |
生成器 yield | 异步生成器 async def + yield |
2.异步上下文管理器
async with背后是__aenter__和__aexit__两个协议方法- 和同步的
with类似,只是都是异步的
class AsyncResource:
async def __aenter__(self):
print("获取资源")
await asyncio.sleep(0.5)
return self
async def __aexit__(self, exc_type, exc_val, exc_tb):
print("释放资源")
await asyncio.sleep(0.5)
async def main():
async with AsyncResource() as res:
print("使用资源")
对比同步上下文管理器
| 同步 | 异步 |
|---|---|
__enter__ / __exit__ | __aenter__ / __aexit__ |
with ctx | async with ctx |
3.官方 asyncio 核心 API
1)sleep —— 非阻塞等待
- 回顾之前在
async_delay.py中,我们自己用loop.call_later+Future实现的延时
def async_delay(duration: int):
loop = asyncio.get_event_loop()
future = loop.create_future()
loop.call_later(duration, future.set_result, None)
return future
- 官方直接提供了
asyncio.sleep,用法完全相同
async def main():
print("开始")
await asyncio.sleep(1) # 挂起当前协程 1 秒,事件循环去调度其他协程
print("1秒后")
2)创建与运行协程
import asyncio
async def say_hello():
await asyncio.sleep(1)
return "Hello"
async def main():
# 1. asyncio.run —— 最高层入口
pass
result = asyncio.run(say_hello())
3)create_task —— 将协程包装成 Task 并调度执行
async def main():
# 创建 Task,协程会立即被调度到事件循环中执行
task = asyncio.create_task(say_hello())
# 这里可以做别的事,task 已经在后台运行
result = await task # 等待 task 完成
print(result)
4)gather —— 并发执行多个协程
async def fetch(url: str, delay: int) -> str:
await asyncio.sleep(delay)
return f"{url} 完成"
async def main():
# 同时发起多个请求,等待所有完成
results = await asyncio.gather(
fetch("url1", 2),
fetch("url2", 1),
fetch("url3", 3),
)
print(results) # ['url1 完成', 'url2 完成', 'url3 完成']
asyncio.run(main())
gather 的特点
- 所有协程 并发 执行
- 返回结果顺序与传入顺序一致
- 任何一个协程抛出异常,gather 会立即传播异常(其他协程仍会继续运行)
- 可通过
return_exceptions=True让异常以结果形式返回,不中断 gather
async def fail() -> str:
raise ValueError("出错了")
async def main():
results = await asyncio.gather(
fetch("ok", 1),
fail(),
return_exceptions=True, # 将异常作为返回值,不抛出
)
print(results) # ['ok 完成', ValueError('出错了')]
5)wait —— 更灵活的等待方式
import asyncio
from typing import Coroutine
async def main():
tasks = [
asyncio.create_task(fetch("A", 2)),
asyncio.create_task(fetch("B", 1)),
asyncio.create_task(fetch("C", 3)),
]
# FIRST_COMPLETED: 任一完成就返回
# FIRST_EXCEPTION: 任一异常就返回
# ALL_COMPLETED: 全部完成(默认)
done, pending = await asyncio.wait(tasks, return_when=asyncio.FIRST_COMPLETED)
print(f"已完成: {len(done)}, 待完成: {len(pending)}")
# 还可以手动处理未完成的任务
for task in pending:
task.cancel()
6)as_completed —— 谁先完成谁先处理
async def main():
coros = [fetch("A", 2), fetch("B", 1), fetch("C", 3)]
for coro in asyncio.as_completed(coros):
result = await coro
print(result) # 按照完成的先后顺序打印
7)TaskGroup —— 结构化并发
Python 3.11+
async def main():
# TaskGroup 保证所有子任务在退出前完成
# 如果某个子任务异常,会取消组内所有其他任务
async with asyncio.TaskGroup() as tg:
task1 = tg.create_task(fetch("A", 2))
task2 = tg.create_task(fetch("B", 1))
task3 = tg.create_task(fetch("C", 3))
# 到这里所有任务都已安全完成
print(task1.result(), task2.result(), task3.result())
8)Lock —— 互斥锁
- 多个协程可能竞争共享资源,Lock 保证同一时刻只有一个协程能访问
import asyncio
shared_data: int = 0
lock = asyncio.Lock()
async def safe_increment():
global shared_data
async with lock: # 获取锁,等锁释放前其他协程会在此等待
temp = shared_data
await asyncio.sleep(0) # 模拟耗时操作,此时切换协程也不会出问题
shared_data = temp + 1
async def main():
await asyncio.gather(*[safe_increment() for _ in range(100)])
print(shared_data) # 100
9)Event —— 事件通知
- 一个协程等待另一个协程发出信号
async def waiter(event: asyncio.Event):
print("waiter: 开始等待")
await event.wait() # 等待事件被设置
print("waiter: 被唤醒")
async def setter(event: asyncio.Event):
print("setter: 1秒后设置事件")
await asyncio.sleep(1)
event.set() # 设置事件,唤醒所有等待者
async def main():
event = asyncio.Event()
await asyncio.gather(waiter(event), setter(event))
10)Semaphore —— 限制并发数
semaphore = asyncio.Semaphore(3) # 同时最多 3 个
async def limited_fetch(url: str):
async with semaphore: # 超过并发限制时等待
print(f"开始请求 {url}")
await asyncio.sleep(1)
print(f"完成请求 {url}")
return url
async def main():
urls = [f"url{i}" for i in range(10)]
await asyncio.gather(*[limited_fetch(url) for url in urls])
11)Queue —— 异步队列
- 生产者-消费者模式的基石
import random
async def producer(queue: asyncio.Queue):
for i in range(10):
item = f"item_{i}"
await queue.put(item)
print(f"生产: {item}")
await asyncio.sleep(random.random())
await queue.put(None) # 发送结束信号
async def consumer(name: str, queue: asyncio.Queue):
while True:
item = await queue.get()
if item is None: # 收到结束信号
queue.task_done()
break
print(f"{name} 消费: {item}")
queue.task_done()
async def main():
queue = asyncio.Queue(maxsize=5)
await asyncio.gather(
producer(queue),
consumer("C1", queue),
consumer("C2", queue),
)
12)asyncio.wait_for
async def slow_operation():
await asyncio.sleep(10)
return "完成"
async def main():
try:
result = await asyncio.wait_for(slow_operation(), timeout=2)
except TimeoutError:
print("操作超时了")
13)asyncio.timeout
Python 3.11+
async def main():
try:
async with asyncio.timeout(2):
result = await slow_operation()
except TimeoutError:
print("操作超时了")
14)在异步中运行同步代码
import time
def blocking_io() -> str:
time.sleep(0.5) # 同步阻塞操作
return "文件读取完成"
def cpu_intensive() -> int:
return sum(i * i for i in range(10_000_000))
async def main():
# to_thread:将同步阻塞函数放到线程池中执行
result = await asyncio.to_thread(blocking_io)
print(result)
# run_in_executor:更底层,可以指定执行器
loop = asyncio.get_running_loop()
result = await loop.run_in_executor(None, cpu_intensive)
print(result)
4.第三方异步库
1)网络请求
a)aiohttp
- 第三方最流行的异步 HTTP 库
import aiohttp
async def fetch_url(url: str) -> str:
async with aiohttp.ClientSession() as session:
async with session.get(url) as response:
return await response.text()
async def main():
html = await fetch_url("https://example.com")
print(len(html))
b)httpx
- 支持同步/异步双模式,API 更友好
import httpx
async def fetch_url(url: str) -> str:
async with httpx.AsyncClient() as client:
response = await client.get(url)
return response.text
async def main():
html = await fetch_url("https://example.com")
print(len(html))
2)文件 I/O
a)aiofiles
- 异步文件操作
import aiofiles
async def read_write_example():
# 写文件
async with aiofiles.open("example.txt", "w") as f:
await f.write("Hello, 异步文件!\n")
# 读文件
async with aiofiles.open("example.txt", "r") as f:
content = await f.read()
print(content)
5.常见异步编程模式(面试题)
1)并发批处理模式
async def batch_process(urls: list[str]):
"""将一批任务并发执行,并收集结果"""
async def process(url: str) -> dict:
async with httpx.AsyncClient() as client:
resp = await client.get(url)
return {"url": url, "status": resp.status_code}
results = await asyncio.gather(*[process(url) for url in urls])
return results
2)限速器模式
class RateLimiter:
"""限制单位时间内的请求数"""
def __init__(self, max_rate: float, interval: float = 1.0):
self._sem = asyncio.Semaphore(max_rate)
self._interval = interval
async def acquire(self):
await self._sem.acquire()
def release():
self._sem.release()
loop = asyncio.get_running_loop()
loop.call_later(self._interval, release)
async def __aenter__(self):
await self.acquire()
async def __aexit__(self, *args):
pass
async def main():
rate_limiter = RateLimiter(max_rate=2, interval=1.0)
async def fetch(url: str) -> str:
async with rate_limiter:
await asyncio.sleep(0.3)
return f"{url} done"
results = await asyncio.gather(*[fetch(f"url{i}") for i in range(6)])
print(results) # 每秒最多完成 2 个请求
asyncio.run(main())
3)重试模式
async def retry(coro_factory, max_retries: int = 3, delay: float = 1.0):
"""为异步操作添加重试机制"""
for attempt in range(max_retries):
try:
return await coro_factory()
except Exception as e:
if attempt == max_retries - 1:
raise
print(f"第 {attempt + 1} 次失败,{delay} 秒后重试...")
await asyncio.sleep(delay)
async def main():
n = 0
async def unstable_request() -> str:
nonlocal n
n += 1
if n < 3:
raise ConnectionError(f"第 {n} 次请求失败")
return "成功响应"
result = await retry(unstable_request, max_retries=3, delay=0.5)
print(result) # 前 2 次失败,第 3 次成功
asyncio.run(main())
4)优雅关闭模式
import asyncio
import signal
class GracefulServer:
def __init__(self):
self._running = True
async def serve(self):
while self._running:
try:
await asyncio.sleep(1) # 模拟处理请求
print("正在处理请求...")
except asyncio.CancelledError:
print("收到取消信号,正在关闭...")
break
def shutdown(self):
print("开始优雅关闭...")
self._running = False
async def run(self):
loop = asyncio.get_running_loop()
stop = loop.create_future()
def signal_handler():
stop.set_result(None)
loop.add_signal_handler(signal.SIGINT, signal_handler) # Ctrl+C
loop.add_signal_handler(signal.SIGTERM, signal_handler) # 终止信号
task = asyncio.create_task(self.serve())
await stop # 等待关闭信号
self.shutdown()
task.cancel()
await task
async def main():
server = GracefulServer()
await server.run()
# 按 Ctrl+C 触发 SIGINT,程序会优雅退出而非直接崩溃
asyncio.run(main())
6.最佳实践与注意事项
1)不要在协程中调用同步阻塞函数
import time
async def bad():
time.sleep(1) # 错误!将阻塞整个事件循环
async def good():
await asyncio.sleep(1) # 正确!主动让出控制权
async def acceptable():
await asyncio.to_thread(time.sleep, 1) # 可行!让线程池去阻塞
2)始终使用 asyncio.run 作为入口
# 错误:手动管理事件循环
loop = asyncio.new_event_loop()
asyncio.set_event_loop(loop)
task = loop.create_task(main())
loop.run_forever()
# 正确:asyncio.run 自动创建和关闭事件循环
asyncio.run(main())
3)小心协程对象未被 await
async def main():
# 错误:创建了协程但未 await,协程永远不会执行
fetch("url", 1)
# 正确
await fetch("url", 1)
# 或通过 gather
await asyncio.gather(fetch("url1", 1), fetch("url2", 2))
4)gather 异常处理
- gather 默认任何协程异常都会立即传播,其他协程不会取消,但结果丢失
async def main():
# 方式一:使用 return_exceptions=True
results = await asyncio.gather(
risky_task(),
safe_task(),
return_exceptions=True,
)
for r in results:
if isinstance(r, Exception):
print(f"某个任务失败: {r}")
# 方式二:使用 TaskGroup(Python 3.11+)
# 任一异常会取消组内所有任务
5)使用 debug 模式
- asyncio 的 debug 模式可以帮助你发现异步代码中的常见问题
- 比如协程阻塞事件循环、忘记 await、回调执行时间过长等
# 开启 asyncio 调试模式
asyncio.run(main(), debug=True)
# 或通过环境变量
# PYTHONASYNCIODEBUG=1 python script.py
a)检测长时间阻塞的协程
- debug 模式下,事件循环会监控每个协程的执行时间
- 如果某个协程执行超过 0.1 秒(默认阈值),会在 stderr 输出警告
import time
import asyncio
async def blocking_coroutine():
"""模拟一个协程内部做了同步阻塞操作"""
print("开始阻塞操作...")
time.sleep(0.2) # 同步阻塞,会阻塞整个事件循环
print("阻塞操作结束")
async def main():
await blocking_coroutine()
asyncio.run(main(), debug=True)
- 输出类似
开始阻塞操作...
阻塞操作结束
Executor <TaskInfo name='Task-1' ...> running at (...)
blocking_coroutine at demo.py:12
main at demo.py:18
...
time.sleep(0.2)是同步阻塞,但 debug 模式下检测到协程在同一个位置停留超过 0.1 秒,会打印出执行栈信息,精确定位阻塞的代码行
b)检测未 await 的协程对象
- 忘记
await协程是新手最容易犯的错误,debug 模式会检测到协程对象被创建但从未被迭代
import asyncio
async def fetch_data(url: str) -> str:
await asyncio.sleep(0.5)
return f"{url} 数据"
async def main():
# 忘记 await,协程对象永远不会执行
fetch_data("https://example.com")
await asyncio.sleep(1)
asyncio.run(main(), debug=True)
- 输出类似
Coroutine 'fetch_data' was never awaited (at demo.py:12)
- 这个警告在你忘记
await时非常有用,避免协程"静默丢失"
c)自定义慢操作阈值
- 通过
loop.slow_callback_duration调整检测阈值
async def main():
loop = asyncio.get_running_loop()
loop.slow_callback_duration = 0.5 # 改为 0.5 秒才报警
def acceptable_callback():
time.sleep(0.3) # 0.3 秒,低于自定义阈值,不会报警
loop.call_later(0.1, acceptable_callback)
await asyncio.sleep(0.5)
asyncio.run(main(), debug=True)
6)避免全局事件循环
# 错误:在模块级别获取事件循环
loop = asyncio.get_event_loop() # 可能获取到错误的事件循环
# 正确:在协程内部获取当前事件循环
async def my_func():
loop = asyncio.get_running_loop()
7)CancelledError 的正确处理
async def cleanup():
try:
await long_running_task()
except asyncio.CancelledError:
# 务必完成清理后再重新抛出
await release_resources()
raise # 必须重新抛出
7.作业(使用AI)
1)读懂 ./answers 中的代码
(二十八)多线程和多进程
- 之前的课程中我们一直在讲异步编程,它适用于 I/O 密集型 任务
- 但如果遇到 CPU 密集型 任务,或者需要调用同步阻塞的库,多线程就派上用场了
1.进程 vs 线程 vs 协程
| 对比维度 | 🖥️ 进程 (Process) | 🧵 线程 (Thread) | 🍃 协程 (Coroutine) |
|---|---|---|---|
| 运行载体 | 操作系统内核态 | 操作系统内核态 | 用户态(事件循环) |
| 资源开销 | 极高 独立地址空间、文件描述符等,创建需 fork/clone | 中等 共享进程地址空间,独立栈空间(数 MB) | 极低 共享线程栈,状态极小(几 KB) |
| 切换成本 | 最昂贵 涉及 TLB 刷新、页表切换 | 昂贵 内核态切换,数百 CPU 周期 | 非常廉价 纯用户态,数十 CPU 周期 |
| 数据共享 | 需 IPC(管道、共享内存、socket 等) | 共享内存,需同步机制 | 单线程天然安全,但需注意非原子操作 |
| 利用多核 | ✅ 原生支持 | ✅ 原生支持 | ❌ 单线程内不支持 |
| 适用场景 | 隔离性要求高的多任务 | CPU 密集型、同步阻塞 I/O | 海量 I/O 密集型 |
| 创建数量级 | 十级别 | 百/千级别 | 万/十万级别 |
2.threading 模块
threading是 Python 标准库中用于多线程编程的模块
1)创建线程
import threading
import time
def worker(name: str, duration: int):
print(f"线程 {name} 开始工作")
time.sleep(duration)
print(f"线程 {name} 工作完成")
# 创建线程
t = threading.Thread(target=worker, args=("A", 2))
t.start() # 启动线程
print("主线程继续执行")
t.join() # 等待线程结束
print("主线程等待结束")
- 输出
线程 A 开始工作
主线程继续执行
...
线程 A 工作完成
主线程等待结束
2)继承 Thread 类
import threading
import time
class WorkerThread(threading.Thread):
def __init__(self, name: str, duration: int):
super().__init__(name=name)
self._duration = duration
def run(self) -> None:
print(f"线程 {self.name} 开始,参数: {self._duration}")
time.sleep(self._duration)
print(f"线程 {self.name} 完成")
t = WorkerThread("B", 1)
t.start()
t.join()
3)守护线程 (Daemon)
- 主线程退出时,非守护线程 会阻止进程退出,守护线程 会被强制终止
import threading
import time
def daemon_worker():
while True:
print("守护线程运行中...")
time.sleep(1)
d = threading.Thread(target=daemon_worker, daemon=True)
d.start()
time.sleep(3)
print("主线程结束,守护线程被强制终止")
注意
守护线程中不应操作资源(如写文件),因为可能在操作过程中被强制终止
3.线程安全与竞态条件
- 多个线程同时访问共享变量时,会出现 竞态条件 (Race Condition)
import threading
import time
class BankAccount:
def __init__(self, balance):
self.balance = balance
def withdraw(account, amount, person_name):
"""取款函数 - 有竞态条件漏洞"""
print(f"{person_name}: 查询余额,当前有 {account.balance} 元")
# 关键漏洞:检查余额和扣款不是原子操作
if account.balance >= amount:
print(f"{person_name}: 余额充足,开始取款...")
# 这个延迟让另一个线程有机会插进来
time.sleep(0.1) # 模拟输入密码、出钞等过程
# 扣款
account.balance -= amount
print(f"{person_name}: ✓ 取款{amount}元成功!剩余 {account.balance} 元")
return True
else:
print(f"{person_name}: ✗ 余额不足,取款失败")
return False
# 创建一个账户,余额1000元
account = BankAccount(1000)
# 两个人同时取款800元
person1 = threading.Thread(target=withdraw, args=(account, 800, "张三"))
person2 = threading.Thread(target=withdraw, args=(account, 800, "李四"))
# 同时启动
print("=== 两个人同时开始取款 ===")
person1.start()
person2.start()
# 等待两人完成
person1.join()
person2.join()
print("\n=== 最终结果 ===")
print(f"账户余额: {account.balance} 元")
print(f"如果正常,应该只剩: {1000 - 800} = 200 元")
print(f"两人共取出了: {1600 - account.balance} 元")
相关信息
account.balance -= amount并非原子操作,它对应三条 CPU 指令:LOAD balance→SUB amount→STORE balance- 线程切换可能发生在任意两条指令之间。
- 更关键的是 检查余额和扣款这两个步骤之间 也存在时间窗口
4.Lock —— 互斥锁
Lock确保同一时刻只有一个线程可以访问临界区,用锁修复上面的银行账户问题
import threading
import time
class BankAccount:
def __init__(self, balance):
self.balance = balance
self._lock = threading.Lock()
def withdraw(account: BankAccount, amount: int, person_name: str):
"""取款函数 - 使用锁保证线程安全"""
with account._lock: # 获取锁,同一时刻只有一个线程能进入
print(f"{person_name}: 查询余额,当前有 {account.balance} 元")
if account.balance >= amount:
print(f"{person_name}: 余额充足,开始取款...")
time.sleep(0.1)
account.balance -= amount
print(f"{person_name}: ✓ 取款{amount}元成功!剩余 {account.balance} 元")
return True
else:
print(f"{person_name}: ✗ 余额不足,取款失败")
return False
account = BankAccount(1000)
person1 = threading.Thread(target=withdraw, args=(account, 800, "张三"))
person2 = threading.Thread(target=withdraw, args=(account, 800, "李四"))
print("=== 两个人同时开始取款 ===")
person1.start()
person2.start()
person1.join()
person2.join()
print("\n=== 最终结果 ===")
print(f"账户余额: {account.balance} 元")
print(f"如果正常,应该只剩: {1000 - 800} = 200 元")
- 锁的常见问题
import threading
lock = threading.Lock()
# 同一个线程重复 acquire 会死锁
lock.acquire()
lock.acquire() # 死锁!我锁我自己 —— 因为线程还没释放就再次申请
5.RLock —— 可重入锁
RLock允许同一个线程多次 acquire,内部维护一个计数器
import threading
lock = threading.RLock()
def recurse(n: int):
with lock:
if n > 0:
print(f"Recursing with n={n}")
recurse(n - 1) # 同一个线程再次 acquire ✅
recurse(5) # 正常运行
6.Semaphore —— 限制并发数
import threading
import time
semaphore = threading.Semaphore(3)
def limited_worker(n: int):
with semaphore:
print(f"线程 {n} 进入\n", end="")
time.sleep(1)
print(f"线程 {n} 离开\n", end="")
threads = [threading.Thread(target=limited_worker, args=(i,)) for i in range(10)]
for t in threads:
t.start()
for t in threads:
t.join()
7.Event —— 线程间通知
import threading
import time
event = threading.Event()
def waiter():
print("waiter: 开始等待")
event.wait() # 等待事件被设置
print("waiter: 被唤醒")
def setter():
print("setter: 1秒后设置事件")
time.sleep(1)
event.set()
print("setter: 事件已设置")
t1 = threading.Thread(target=waiter)
t2 = threading.Thread(target=setter)
t1.start()
t2.start()
t1.join()
t2.join()
8.Queue —— 线程安全的生产者消费者
import queue
import random
import threading
import time
def producer(q: queue.Queue):
for i in range(10):
item = f"item_{i}"
q.put(item)
print(f"生产: {item}\n", end="")
time.sleep(random.random())
q.put(None)
def consumer(name: str, q: queue.Queue):
while True:
item = q.get()
if item is None:
q.task_done()
break
print(f"{name} 消费: {item}\n", end="")
q.task_done()
q = queue.Queue(maxsize=5)
threads = [
threading.Thread(target=producer, args=(q,)),
threading.Thread(target=consumer, args=("C1", q)),
threading.Thread(target=consumer, args=("C2", q)),
]
for t in threads:
t.start()
for t in threads:
t.join()
提示
queue.Queue 内部已经实现了线程同步,无需额外加锁
9.ThreadPoolExecutor —— 线程池
- 频繁创建线程开销大,使用线程池复用线程
from concurrent.futures import ThreadPoolExecutor
import time
def fetch_url(url: str) -> str:
time.sleep(1) # 模拟网络请求
return f"{url} 完成"
with ThreadPoolExecutor(max_workers=3) as executor:
urls = ["url1", "url2", "url3", "url4", "url5"]
# map 返回结果的顺序与传入顺序一致
results = executor.map(fetch_url, urls)
for r in results:
print(r)
# 也可以 submit 逐条提交
futures = [executor.submit(fetch_url, url) for url in urls]
for f in futures:
print(f.result())
1)ThreadPoolExecutor 与 asyncio 配合
import asyncio
import time
from concurrent.futures import ThreadPoolExecutor
def blocking_io() -> str:
time.sleep(0.5) # 同步阻塞
return "文件读取完成"
async def main():
# to_thread 将同步阻塞函数放到线程池中执行
result = await asyncio.to_thread(blocking_io)
print(result)
# 也可以手动指定执行器
loop = asyncio.get_running_loop()
with ThreadPoolExecutor() as pool:
result = await loop.run_in_executor(pool, blocking_io)
print(result)
asyncio.run(main())
10.线程局部数据 (Thread Local)
- 每个线程拥有独立的副本,互不干扰
import threading
import time
local_data = threading.local()
def worker(name: str):
local_data.name = name # 每个线程独立存储
local_data.count = 0
for _ in range(3):
local_data.count += 1
print(f"{local_data.name}: {local_data.count}")
time.sleep(0.1)
threads = [
threading.Thread(target=worker, args=("A",)),
threading.Thread(target=worker, args=("B",)),
]
for t in threads:
t.start()
for t in threads:
t.join()
11.多线程常见问题
1)GIL —— 全局解释器锁
- CPython 中有一个 GIL (Global Interpreter Lock)
- 它保证同一时刻只有一个线程在执行 Python 字节码
import threading
import time
def cpu_intensive():
total = 0
for i in range(50_000_000):
total += i * i
return total
# 多线程 vs 单线程 —— 多线程不会更快!
t1 = threading.Thread(target=cpu_intensive)
t2 = threading.Thread(target=cpu_intensive)
start = time.time()
t1.start()
t2.start()
t1.join()
t2.join()
print(f"多线程: {time.time() - start:.2f}s")
start = time.time()
cpu_intensive()
cpu_intensive()
print(f"单线程: {time.time() - start:.2f}s")
相关信息
- GIL 的存在意味着:Python 多线程无法利用多核 CPU 加速 CPU 密集型任务
- 那多线程的意义在哪?
- 对于 I/O 密集型 任务,线程在等待 I/O 时会释放 GIL,其他线程可以继续执行,所以仍然有加速效果
2)CPU 密集型 —— 应该用多进程
from multiprocessing import Process
def cpu_intensive():
total = 0
for i in range(50_000_000):
total += i * i
return total
p1 = Process(target=cpu_intensive)
p2 = Process(target=cpu_intensive)
p1.start()
p2.start()
p1.join()
p2.join()
3)死锁
import threading
import time
lock_a = threading.Lock()
lock_b = threading.Lock()
def task_1():
with lock_a:
time.sleep(0.1)
with lock_b: # 等待 lock_b
print("task_1 完成")
def task_2():
with lock_b:
time.sleep(0.1)
with lock_a: # 等待 lock_a
print("task_2 完成")
t1 = threading.Thread(target=task_1)
t2 = threading.Thread(target=task_2)
t1.start()
t2.start()
t1.join()
t2.join()
# 死锁!两个线程互相等待对方释放锁
解决死锁的原则
固定锁的获取顺序
import threading
import time
lock_a = threading.Lock()
lock_b = threading.Lock()
def task_1():
with lock_a:
time.sleep(0.1)
with lock_b:
print("task_1 完成")
def task_2():
with lock_a: # 与 task_1 获取锁的顺序一致
time.sleep(0.1)
with lock_b:
print("task_2 完成")
12.何时用线程,何时用协程?
| 场景 | 推荐方案 |
|---|---|
| CPU 密集型 | multiprocessing / ProcessPoolExecutor |
| 同步 I/O 密集型(文件读写、数据库驱动阻塞) | threading / ThreadPoolExecutor |
| 异步 I/O 密集型(网络爬虫、Web 服务) | asyncio / 协程 |
| 调用第三方同步库 | 用 asyncio.to_thread 或 run_in_executor 包装 |
(二十九)构建发布
1.库的开发流程
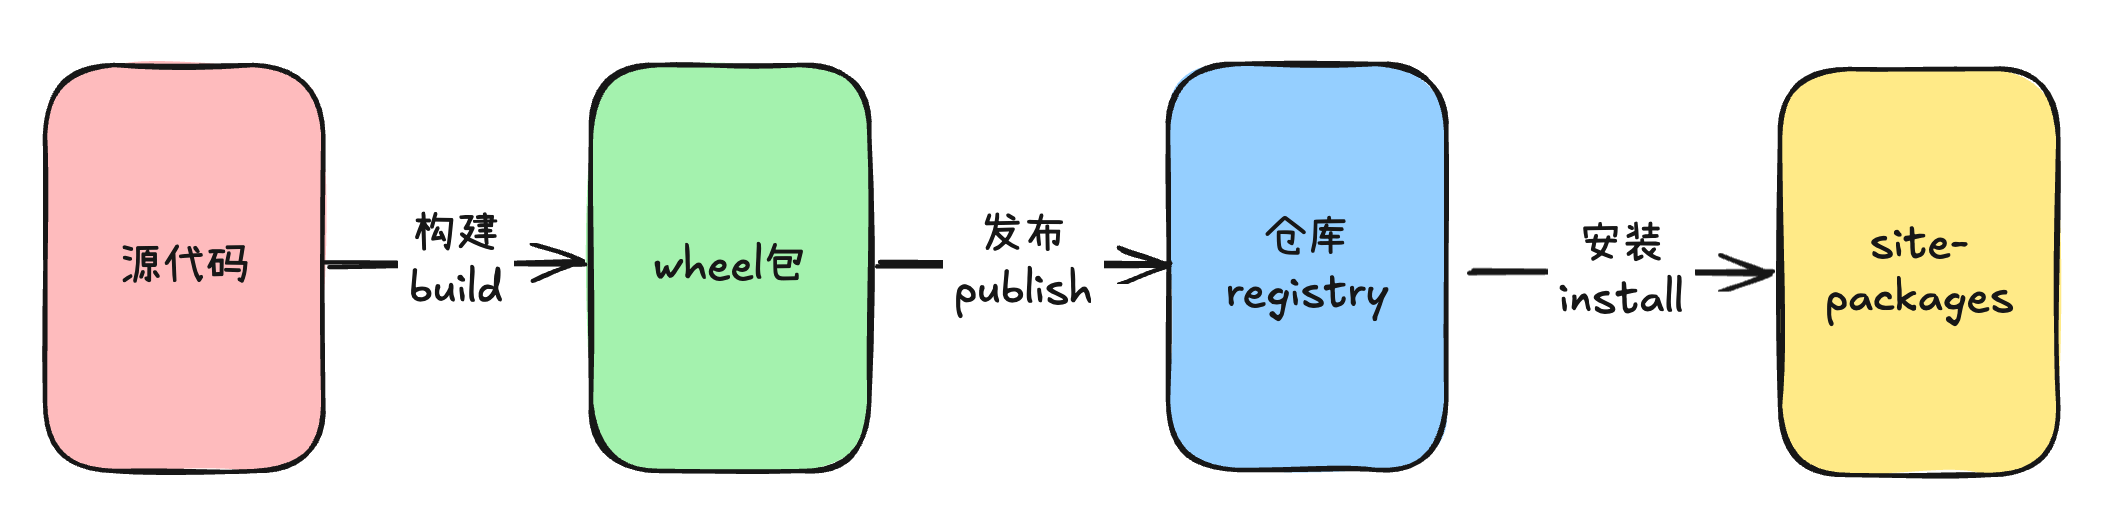
2.构建
# pyproject.toml
[build-system] # 构建系统配置,指定构建工具和依赖
requires = ["hatchling"] # 依赖的后端构建工具
build-backend = "hatchling.build" # 使用哪个工具的哪个模块来构建项目
[project] # 工程描述
name = "duyi-utils" # 发行版名称
version = "0.1.3" # 版本号,遵循语义化版本控制
description = "一个用于学习 Python 公共库构建和发布的示例工程" # 项目简介
requires-python = ">=3.14" # 指定支持的 Python 版本
readme = "README.md" # 指定项目的 README 文件路径
dependencies = [
"python-dateutil>=2.8", # 依赖的第三方库,指定版本要求
"Markdown>=3.5", # 另一个依赖
]
[tool.hatch.build.targets.sdist] # 配置源代码分发包
# 配置留空,表示它会默认包含所有项目文件
[tool.hatch.build.targets.wheel] # 配置 wheel 包
packages = ["src/duyi_utils"] # 配置 wheel 包的构建目标,指定包含的包路径
相关信息
- 需要安装VSCode插件:even better toml
- 常用构建前端:
uv、Poetry、PDM、... - 常用构建后端:
hatchling、setuptools、PDM-backend、uv-buildpoetry-core...
- 构建方式
# 1. 创建虚拟环境
python -m venv .venv
# 2. 激活虚拟环境
source .venv/bin/activate
# 3. 安装构建工具
pip install build
# 4. 运行构建
python -m build
构建产物放到了
./dist中
3.发布和安装
1)发布前的准备
# 先构建(略)
# 安装官方的发布工具
pip install twine
# 【可选】验证构建产物的完整性
twine check dist/*
2)发布到官方仓库
- 注册账号:https://pypi.org/account/register/
- 创建一个token:https://pypi.org/manage/account/token/
- 复制token
- 运行
twine upload dist/*命令上传 - 安装:使用
pip install xxx安装即可
3)发布到私有仓库
a)通常使用云服务完成私有仓库的搭建
- 创建阿里云效制品仓库 https://packages.aliyun.com/
- 按照仓库指南配置并上传包
b)安装
- 将制品仓库作为镜像源
[global]
index-url = 制品仓库地址
extra-index-url = 镜像源地址
trusted-host = packages.aliyun.com
- 直接安装
pip install xxx即可
4.可编辑依赖
- 可编辑安装(editable install)又称开发模式安装
- 通过
pip install -e .将项目以链接形式安装到当前环境
- 通过
- 当项目被可编辑安装后,对源码的任何修改都会 即时生效,无需重新构建和重新安装
相关信息
- 这在日常开发中非常有用
- 可以在一个项目里开发公共库,同时在另一个项目里导入并实时测试
- 代码改动后不用反复执行
pip install,节约大量时间
# 在项目根目录执行
pip install -e 目标工程路径
- 其原理是在
site-packages中创建一个指向项目源码的链接(.pth文件),而不是复制一份代码过去
# 执行后,可以在任意位置导入
from duyi_utils import some_func
# 修改源码后,下次调用自动生效
5.作业
1)完整一个库的构建、私有发布、安装
2)使用费曼学习法复述一个库整个的构建流程
(三十)项目管理工具
- 从上一节我们知道,构建和发布一个 Python 项目需要依赖
venv、pip、build、twine等一系列工具,流程繁琐且容易出错 - UV 就是为解决这些问题而生的现代项目管理工具
- 官方文档:https://docs.astral.sh/uv/
1.[可选]pyenv 卸载
- 之前我们使用
pyenv来管理多版本 Python - 现在 UV 集成了 Python 版本管理功能(
uv python install/uv python list/uv python pin),不再需要pyenv,可以将其卸载
1)macOS(Homebrew 安装)
# 1. 卸载 pyenv
brew uninstall pyenv
# 2. 删除残留的 pyenv 目录和数据
rm -rf ~/.pyenv
# 3. 编辑 ~/.zshrc,移除以下内容:
# - eval "$(pyenv init -)"
# - export PYTHON_BUILD_MIRROR_URL="..."
# 然后执行 source ~/.zshrc 刷新
2)Windows(pyenv-win)
# 1. 删除安装目录(默认路径)
rm -r $env:USERPROFILE\.pyenv
# 2. 打开「系统环境变量」,删除:
# - 用户变量中的 PYENV
# - 用户变量中的 PYTHON_BUILD_MIRROR_URL
# - Path 中的 %USERPROFILE%\.pyenv\pyenv-win\bin 和 %USERPROFILE%\.pyenv\pyenv-win\shims
3)验证
pyenv --version
# 输出类似:command not found: pyenv
# 说明卸载成功
2.UV 简介
- UV 是用 Rust 编写的极速 Python 包和项目管理器,来自 Astral 公司
- 致力于替代以下工具
| 被替代的工具 | UV 对应命令 | 说明 |
|---|---|---|
pip | uv pip | 安装包 |
pip-tools | uv lock / uv sync | 锁定依赖版本,同步环境 |
pipx | uv tool | 运行/安装 CLI 工具 |
virtualenv / venv | uv venv | 管理虚拟环境 |
pyenv | uv python | 管理多版本 Python |
poetry / pdm | uv init / uv add / uv remove | 项目初始化、依赖管理 |
- 最大亮点是 快 —— 比 pip 快 10–100 倍
3.安装
# macOS / Linux
curl -LsSf https://astral.sh/uv/install.sh | sh
# Windows (PowerShell)
powershell -ExecutionPolicy ByPass -c "powershell -c \"irm https://astral.sh/uv/install.ps1 | iex\""
# macOS 上也支持 brew
brew install uv
- 安装后确认
uv --version
相关信息
- UV 会自动将自身添加到
PATH - 如果找不到命令,可以手动将
~/.local/bin加入PATH
1)配置镜像源(国内加速)
- 由于网络原因,国内用户建议配置 PyPI 镜像源来加速包下载
- 编写文件
~/.config/uv/uv.toml
[[index]]
name = "aliyun-private"
url = "阿里云私有源地址"
default = true
[[index]]
name = "tuna"
url = "https://pypi.tuna.tsinghua.edu.cn/simple"
2)VSCode Code Runner 配置
"python": "uv run"
4.Python 版本管理
- UV 集成了 Python 版本管理功能,无需再使用
pyenv
# 查看所有可用的 Python 版本(可安装的)
uv python list
# 查看本地已安装的 Python 版本
uv python list --only-installed
# 安装特定 Python 版本(例如 3.12.3)
uv python install 3.12.3
# 安装最新稳定版 Python
uv python install
# 安装多个版本
uv python install 3.11.9 3.12.3
# 卸载特定 Python 版本
uv python uninstall 3.12.3
# 查看当前环境使用的 Python 路径
uv python find
# 为当前项目固定 Python 版本(会在目录下生成 .python-version 文件)
uv python pin 3.12
# 移除当前项目的 Python 版本固定(删除 .python-version 文件)
uv python pin --rm
# 查看当前项目固定了哪个 Python 版本
uv python pin
# 使用特定 Python 版本执行临时命令(不修改项目设置)
uv run --python 3.11 python --version
# 创建虚拟环境时指定 Python 版本
uv venv --python 3.12
# 查看所有已安装的 Python 版本及其路径
uv python list --only-installed --verbose
5.快速上手:创建一个项目
1)初始化项目
# 创建目录并初始化
uv init my-project
cd my-project
# 对当前目录初始化
uv init
# 不创建git仓库
uv init --vcs none
# 生成src layout结构的目录
uv init --lib
2)配置脚本
uv init生成的项目默认没有入口模块配置- 要让项目可以通过
uv run直接执行,或发布后提供命令行工具,需要在pyproject.toml中配置[project.scripts]
[project.scripts]
# 等号左边是命令名称,右边是 "模块路径:函数名"
my-cli = "my_project:main"
- 配置后
- 项目内执行
uv run my-cli即可调用my_project/__init__.py中的main()函数 - 发布到 PyPI 后,用户
pip install安装即可在终端使用my-cli命令
- 项目内执行
3)安装依赖
# 添加依赖
uv add requests
# 添加开发依赖
uv add --dev pytest
# 指定版本
uv add "fastapi>=0.100.0"
- 执行
uv add后,UV 会自动- 解析依赖树,找到满足所有约束的最新版本
- 安装到当前项目的虚拟环境
- 更新
pyproject.toml中的dependencies - 生成/更新
uv.lock锁定文件
# 查看当前依赖树(类似 pipdeptree)
uv tree
- 输出示例
my-project v0.1.0
├── certifi v2024.2.2
├── charset-normalizer v3.3.2
├── idna v3.6
├── pytest v8.1.1
│ ├── iniconfig v2.0.0
│ ├── packaging v24.0
│ └── pluggy v1.4.0
└── requests v2.31.0
├── certifi v2024.2.2
├── charset-normalizer v3.3.2
├── idna v3.6
└── urllib3 v2.2.1
4)移除依赖
uv remove requests
5)同步环境
- 如果别人拉取了你的代码,或者你想根据
pyproject.toml/uv.lock重建环境
uv sync
uv sync会根据uv.lock(如果有)或pyproject.toml安装所有依赖,确保环境与锁文件一致
6)运行项目
# 运行指定文件
uv run src/main.py
# 运行指定模块
uv run -m src.main
uv run会自动激活虚拟环境并执行命令,无需手动source .venv/bin/activate
6.虚拟环境管理
- UV 可以独立管理虚拟环境,而不必依赖项目
1)创建虚拟环境
# 在当前目录创建 .venv
uv venv
# 指定目录
uv venv my-env
# 指定 Python 版本
uv venv --python 3.11
# 指定 Python 版本范围
uv venv --python 3.10
2)激活与退出
# 激活
source .venv/bin/activate
# 退出
deactivate
a)查看环境信息
uv venv --list # 显示所有管理的 venv(需要配合项目)
- UV 会在项目根目录创建
.venv,并在pyproject.toml中记录 - 不需要手动管理
venv的路径 ——uv run会自动检测
3)UV 的项目级 vs 全局级
| 模式 | 命令 | 说明 |
|---|---|---|
| 项目级 | uv add / uv sync / uv run | 关联 pyproject.toml,依赖写入项目 |
| 全局级 | uv pip install / uv venv | 独立于任何项目,像传统 pip 一样使用 |
相关信息
- UV 的全局模式兼容 pip 的用法
- 如果有现成的
requirements.txt
uv pip install -r requirements.txt
- 项目模式比全局模式更推荐使用
4)全局缓存
- UV 使用全局缓存(
~/.cache/uv)来存储下载的包,多个项目共享同一份缓存
# 查看缓存信息
uv cache dir
# 清理缓存
uv cache clean
7.Running Tools —— 无需安装即可运行
- 在开发中经常需要临时运行一些工具,比如
black、ruff、pre-commit等 - 传统做法是先
pip install,用完再卸载 - UV 提供了更优雅的方式
1)uvx —— 一键运行
# 运行一个工具,无需安装
uvx ruff check .
# 等价于传统的
# pip install ruff && ruff check . && pip uninstall ruff
# 指定版本
uvx bandit@1.7.5 .
# 传递参数(跟在 `--` 后面)
uvx cowsay -- "Hello, UV!"
- 在临时虚拟环境中安装指定包
- 运行对应命令
- 结束后清理环境
2)uv tool —— 持久安装 CLI 工具
- 如果想长期使用一个工具
# 安装
uv tool install ruff
# 运行
ruff check .
# 查看所有安装的工具
uv tool list
# 更新
uv tool upgrade ruff
# 卸载
uv tool uninstall ruff
3)在项目中添加工具依赖
# 将工具作为开发依赖添加到项目中
uv add --dev ruff black mypy
- 然后在项目中
uv run ruff check .
uv run black .
uv run mypy src/
通过
uv add --dev安装的工具,其他协作者执行uv sync后同样可用,这是团队协作推荐的方式
8.构建与发布
- UV 内置了构建和发布功能,完全替代了
build+twine
1)构建
# 构建 sdist 和 wheel
uv build
# 产物在 dist/ 目录下
ls dist/
# my_project-0.1.0.tar.gz
# my_project-0.1.0-py3-none-any.whl
uv build会读取pyproject.toml中的[build-system]配置- 使用后端工具(如
hatchling)完成构建
2)发布
# 发布到 PyPI
uv publish
# 指定 token(推荐用环境变量)
UV_PUBLISH_TOKEN=pypi-xxxxx uv publish
# 发布到私有仓库
uv publish \
--publish-url 私有仓库地址\
--username 你的用户名\
--password 你的密码\
dist/*
uv publish直接替代了twine upload- 首次发布需要先在 pypi.org 注册账号并创建 API token
- UV 也支持使用
.pypirc配置文件
9.Makefile —— 统一项目命令入口
make是 macOS 和 Linux 系统自带的工具,但 Windows 默认没有- Windows 用户可以按以下方式安装
# 方式一:Chocolatey(推荐)
choco install make
# 方式二:winget
winget install GnuWin32.Make
# 方式三:通过 Git Bash 安装(安装 Git 时勾选 Git Bash 即可)
# 然后在 Git Bash 中运行 make,或将其加入 PATH
- 安装后验证
make --version
- 虽然 UV 提供了丰富的命令,但团队成员(或未来的你)仍需要记住
uv run pytest、uv run ruff check、uv build等一串命令 - =Makefile== 可以把常用操作封装成简短一致的名字
1)一个典型的 Python + UV 项目的 Makefile
.PHONY: install test lint format build clean
# 安装依赖
install:
uv sync
# 运行测试
test:
uv run pytest
# 代码检查
lint:
uv run ruff check .
# 自动格式化
format:
uv run ruff format .
# 构建分发包
build:
uv build
# 清理构建产物和缓存
clean:
rm -rf dist/
rm -rf .pytest_cache/
uv cache clean
- 使用方式
make install # uv sync
make test # uv run pytest
make lint # uv run ruff check .
make format # uv run ruff format .
make build # uv build
make clean # 清理
2)带参数的目标
.PHONY: publish
# 发布到指定仓库,用法: make publish REPO_URL=https://...
publish:
uv publish --publish-url $(REPO_URL)
3)串联多个任务
.PHONY: ci
# CI 流程:检查 → 测试 → 构建
ci:
lint test build
make ci # 依次执行 lint → test → build
Makefile 的核心价值是 ==约定==
- 不管项目用什么工具链,新人只需
make test就能跑测试,make build就能构建 - 对于 CI/CD 也天然适配
10.常用命令速查
| 命令 | 作用 |
|---|---|
uv init | 初始化新项目 |
uv add | 添加依赖 |
uv remove | 移除依赖 |
uv sync | 同步环境(安装/更新依赖) |
uv lock | 更新锁定文件 |
uv run | 在项目环境中运行命令 |
uv tree | 查看依赖树 |
uv build | 构建分发包 |
uv publish | 发布到 PyPI |
uv venv | 创建虚拟环境 |
uv python install | 安装 Python 版本 |
uv python list | 列出已安装的 Python |
uv python pin | 锁定项目 Python 版本 |
uv tool install | 安装 CLI 工具 |
uv tool run / uvx | 临时运行 CLI 工具 |
uv cache clean | 清理缓存 |
11.作业
1)将 27. 异步编程 的代码改造成UV工程的格式
2)将 29. 构建发布 的代码使用uv发布到阿里云私有仓库
(三十一)Monorepo
1.什么是 Monorepo
- Monorepo(单一仓库)是将多个相关的项目/包放在同一个代码仓库中管理的策略
my-monorepo/
├── packages/
│ ├── utils/ # 公共工具库
│ ├── client-sdk/ # 客户端 SDK
│ └── web-app/ # Web 应用
├── pyproject.toml # workspace 根配置
└── README.md
1)Multirepo VS Monorepo
| 对比维度 | MultiRepo | Monorepo |
|---|---|---|
| 代码共享 | 需要发版、发布 pip 包才能共享 | 源码级别直接引用,即时生效 |
| 原子提交 | 跨仓库改动需要多个 PR 协同 | 一次提交完成所有关联改动 |
| 工具规范 | 各仓库独立配置工具 | 统一的工具与规范 |
| 重构成本 | 跨仓库重构代价极高 | 工具链覆盖整个仓库,安全重构 |
| CI/CD | 多个 Pipeline 各自独立 | 统一 CI,可增量检测受影响的包 |
| 适用场景 | 团队独立、版本节奏不一致的项目 | 紧密协作的微服务、SDK 集合、工具链 |
2.搭建 Workspace
uv workspace文档:https://docs.astral.sh/uv/concepts/projects/workspaces/#using-workspaces
1)第一步:初始化根项目
mkdir my-monorepo && cd my-monorepo
uv init
- 根级
pyproject.toml
# 添加 members
[tool.uv.workspace]
members = [
"packages/*",
"app/*",
]
members支持 glob 模式
| 模式 | 匹配范围 |
|---|---|
packages/* | packages/ 下的直接子目录 |
packages/** | packages/ 下的所有子目录(含嵌套) |
libs/* | libs/ 下的直接子目录 |
apps/* | apps/ 下的直接子目录 |
- 可以同时配置多个目录
[tool.uv.workspace]
members = [
"packages/*",
"apps/*",
"libs/*",
]
2)第二步:创建成员包
uv init --lib packages/agents
uv init --lib packages/shared
uv init app/web-service
3)第三步:成员包依赖
# packages/agents/pyproject.toml
dependencies = [
"shared",
]
[tool.uv.sources]
shared = { workspace = true }
# app/web-service/pyproject.toml
dependencies = [
"agents",
]
[tool.uv.sources]
agents = { workspace = true }
提示
[tool.uv.sources]是 UV workspace 的 核心机制- 它告诉 UV:
utils依赖不从 PyPI 下载,而是从工作区内的同名成员包中链接 - 如果某个包在 PyPI 和 workspace 中同名,workspace 优先
- 需要强制走 PyPI 时可以写成
utils = { workspace = false }
- 需要强制走 PyPI 时可以写成
4)[可选]第四步:同步安装
uv sync --all-packages
- UV 读取所有成员包的
pyproject.toml - 解析完整的依赖树(包括成员间的依赖)
- 在根目录生成统一的
uv.lock - 在根目录创建
.venv,安装所有依赖
5)第五步:运行
uv run --package web-service python app/web-service/main.py
6)[可选]使用Makefile
.PHONY: run-web
run-web:
uv run --package web-service python app/web-service/main.py
7)[可选]安装第三方依赖
# 给某个成员包添加依赖
uv add --package <成员包> <包名>
# 给项目根添加依赖
uv add --dev <包名>
8)[可选]构建
# 构建全部
uv build
# 构建指定包
uv build --package utils
9)[可选]查看依赖关系
# 查看 workspace 中某个包的依赖树
uv tree --package web-app
# 查看所有包的依赖树
uv tree
- 输出示例
web-app v0.1.0
├── data-tools v0.1.0 (workspace)
│ └── pandas v2.1.0
│ ├── numpy v1.26.0
│ └── python-dateutil v2.8.2
└── utils v0.1.0 (workspace)
- workspace 中的包会标记为
(workspace),一目了然
3.包间依赖的三种模式
1)源码链接(workspace 模式)
[tool.uv.sources]
utils = { workspace = true }
- 本地直接引用源码,修改即时生效
- 无需
pip install -e .或uv add重新安装 - 适合日常开发
2)路径引用
[tool.uv.sources]
utils = { path = "../utils" }
- 引用工作区之外的本地包
- 路径可以是相对或绝对路径
3)Git 引用
[tool.uv.sources]
utils = { git = "https://github.com/org/utils.git", rev = "v0.1.0" }
- 引用 Git 仓库中的某个版本
- 可用于引用未发布到 PyPI 的依赖
4.作业
1)手工复现本节课工程,并将 shared、agents 发布到阿里云制品仓库
(三十二)断点调试
1.调试组件
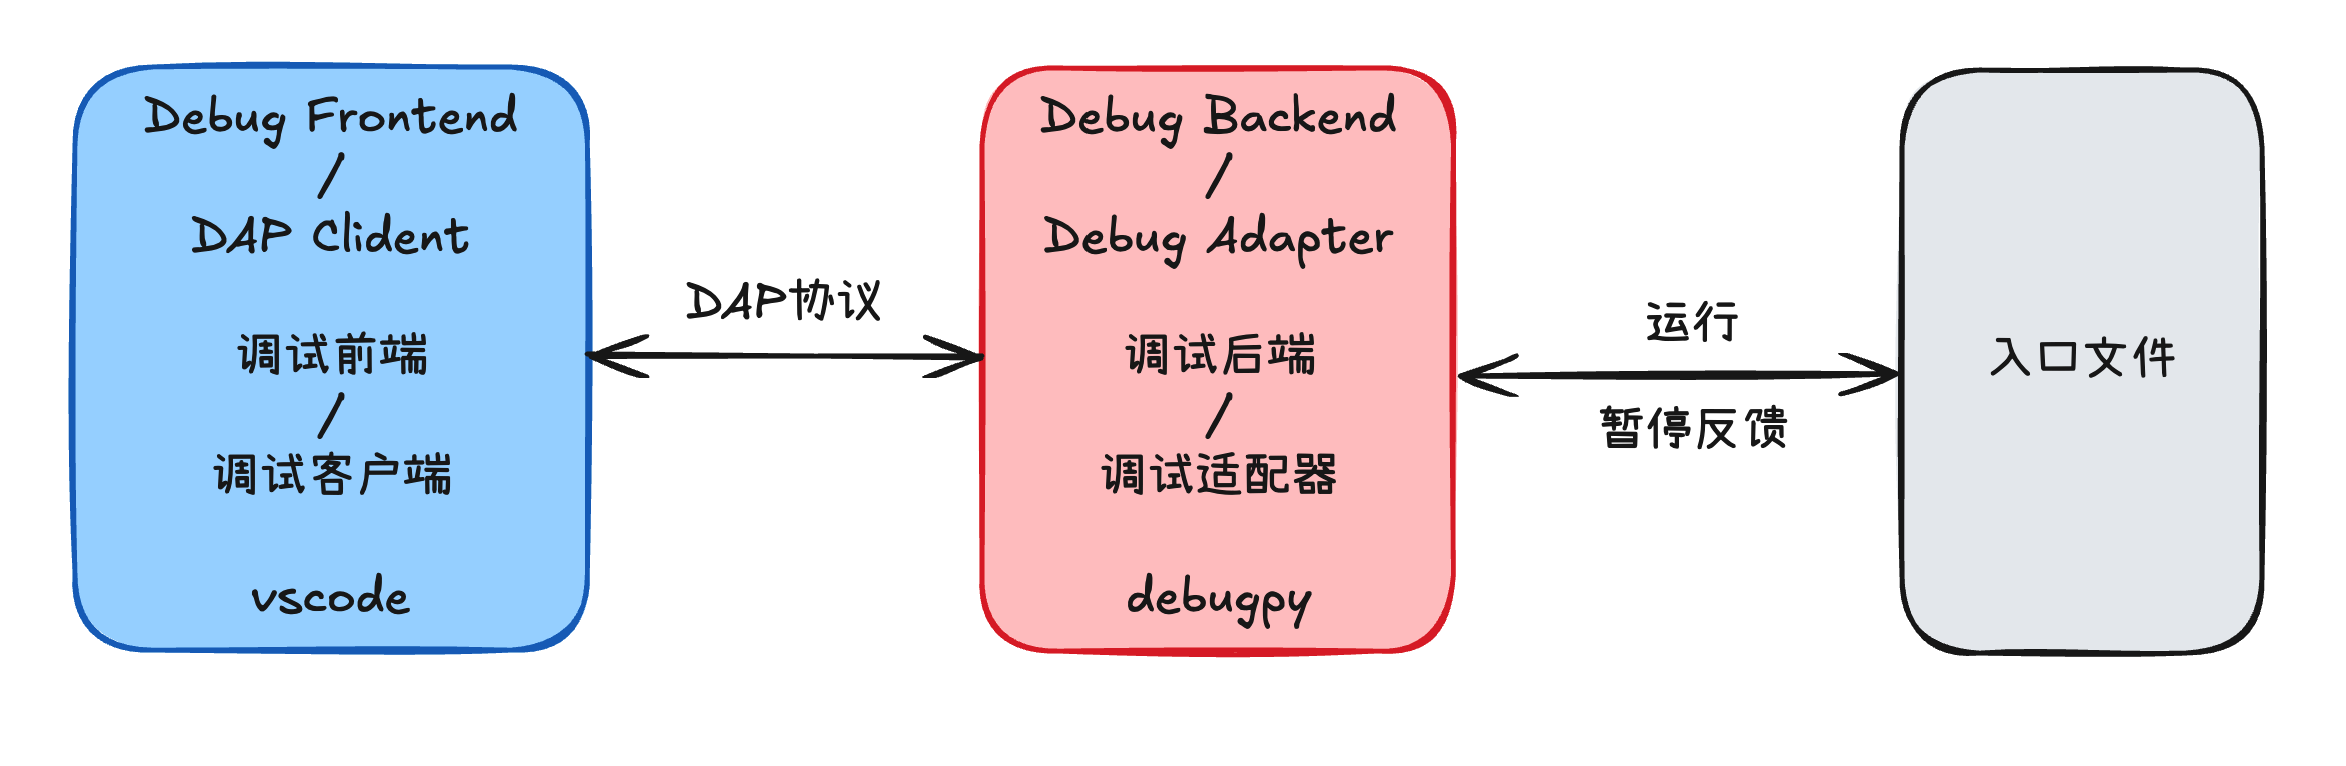
2.调试原理
- 待调试的文件
# demo.py
def main():
a = 1
b = 2
c = a + b
return c
r = main()
print(r)
- 调试适配器的核心逻辑
# debugpy
import os
import sys
# 获取当前代码文件所在目录
current_dir = os.path.dirname(os.path.abspath(__file__))
file_path = os.path.join(current_dir, "demo.py")
code = open(file_path, "r").read()
def my_tracer(frame, event, arg):
print(f"事件: {event}, 行号: {frame.f_lineno}")
return my_tracer
sys.settrace(my_tracer)
exec(code)
3.单文件调试
{
// 使用 IntelliSense 了解相关属性。
// 悬停以查看现有属性的描述。
// 欲了解更多信息,请访问: https://go.microsoft.com/fwlink/?linkid=830387
"version": "0.2.0",
"configurations": [
{
"name": "Python 调试程序: 当前文件", // 调试名称
"type": "debugpy", // 调试器类型
"request": "launch", // 调试请求类型
"program": "${file}", // 要调试的程序,使用当前打开的文件
"console": "integratedTerminal" // 在集成终端中运行调试程序
}
]
}
4.工程调试
1)配置
- 安装依赖
uv add --dev debugpy
- 配置调试器
# Makefile
run-web-debug:
uv run --package web-service python -m debugpy --listen 5678 --wait-for-client app/web-service/main.py
- 配置调试客户端
{
// 使用 IntelliSense 了解相关属性。
// 悬停以查看现有属性的描述。
// 欲了解更多信息,请访问: https://go.microsoft.com/fwlink/?linkid=830387
"version": "0.2.0",
"configurations": [
{
"name": "Attach to make run",
"type": "debugpy",
"request": "attach", // 使用附加模式
"connect": {
"host": "localhost",
"port": 5678
}
}
]
}
2)启动调试
- 启动调试器
make run-web-debug
- 启动调试客户端