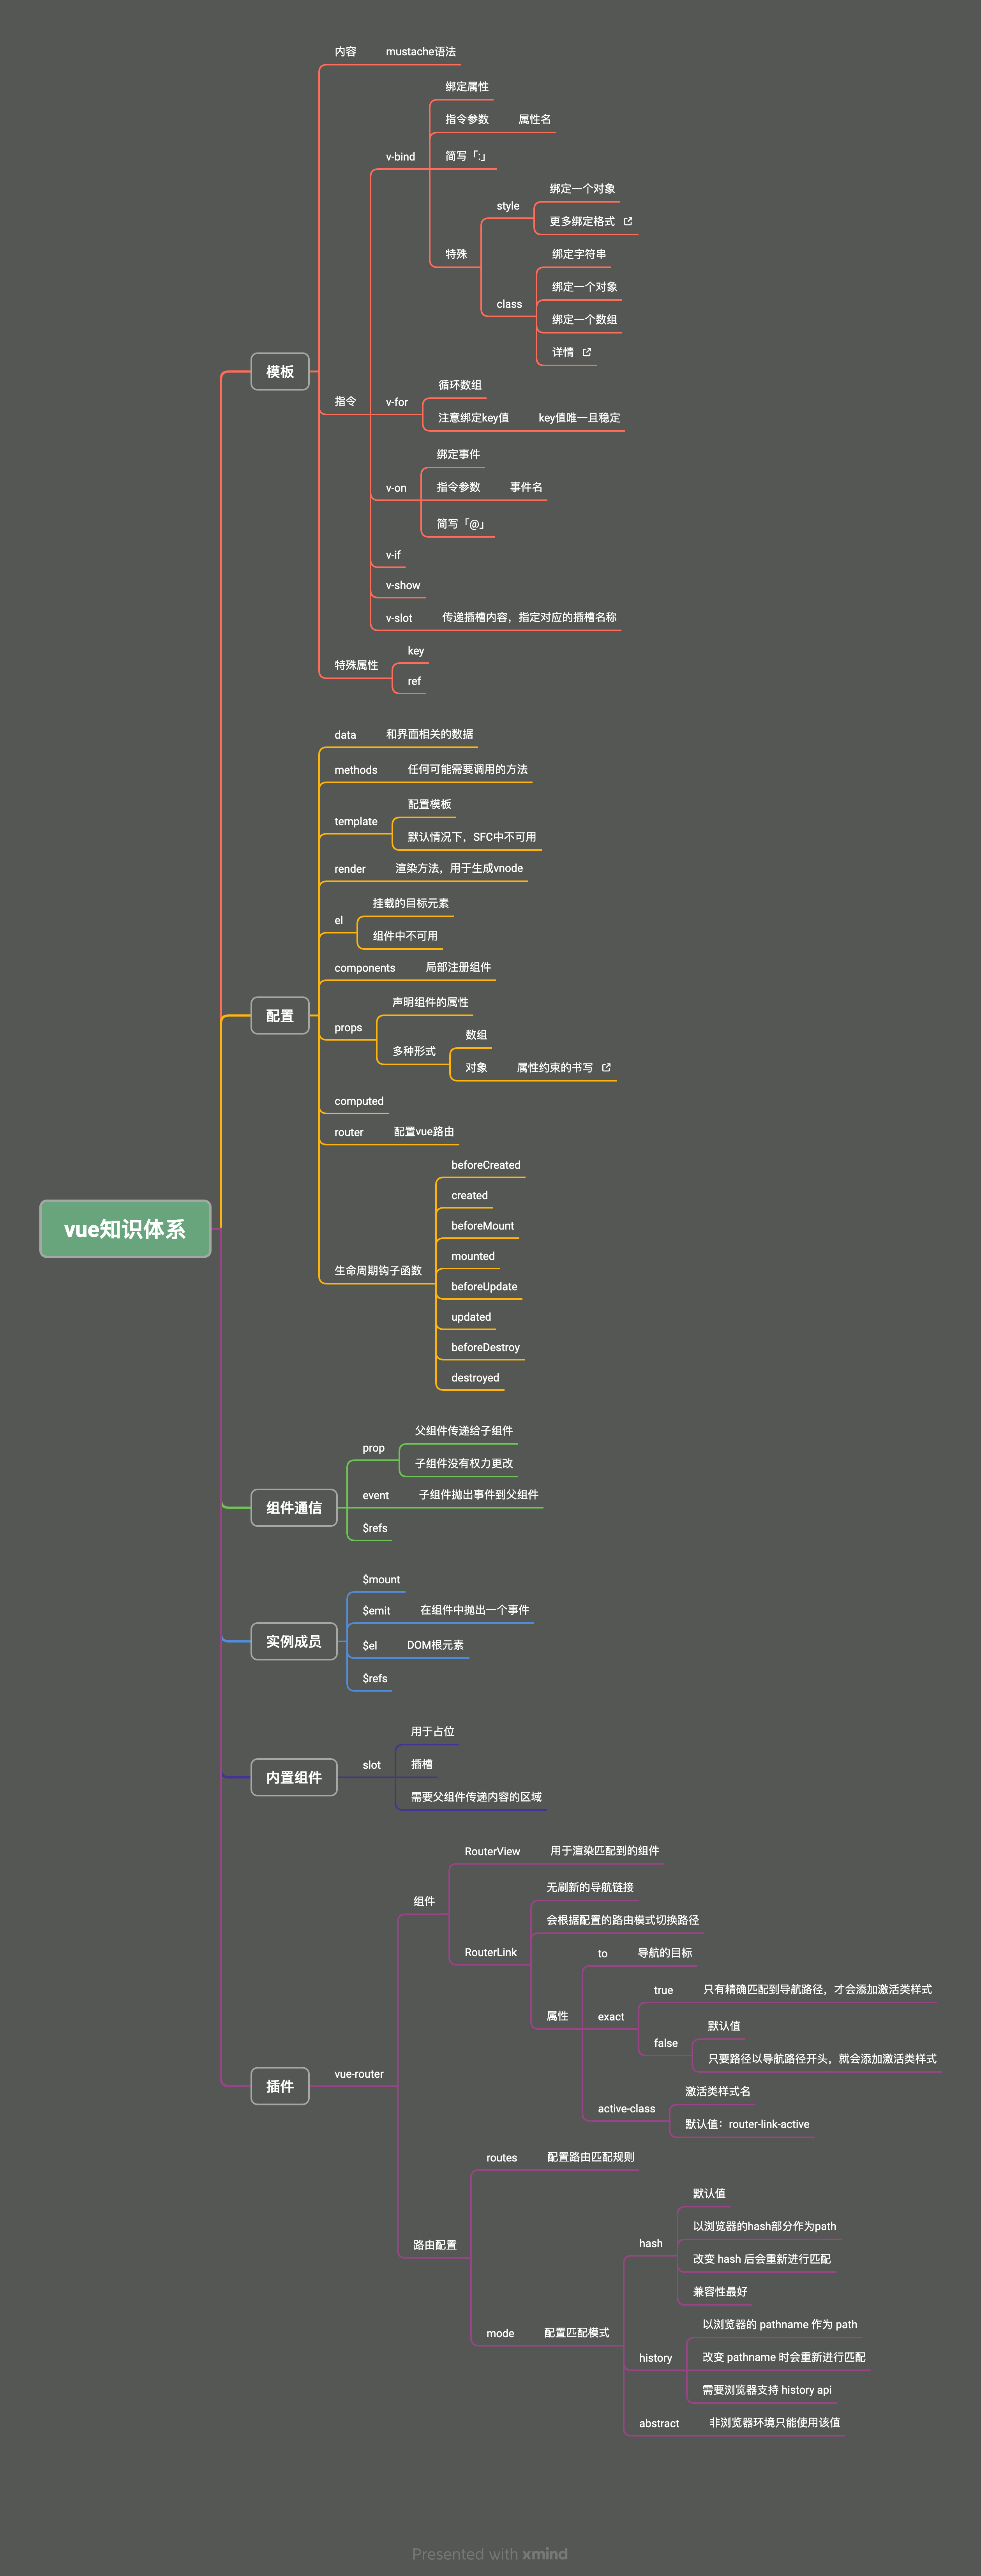
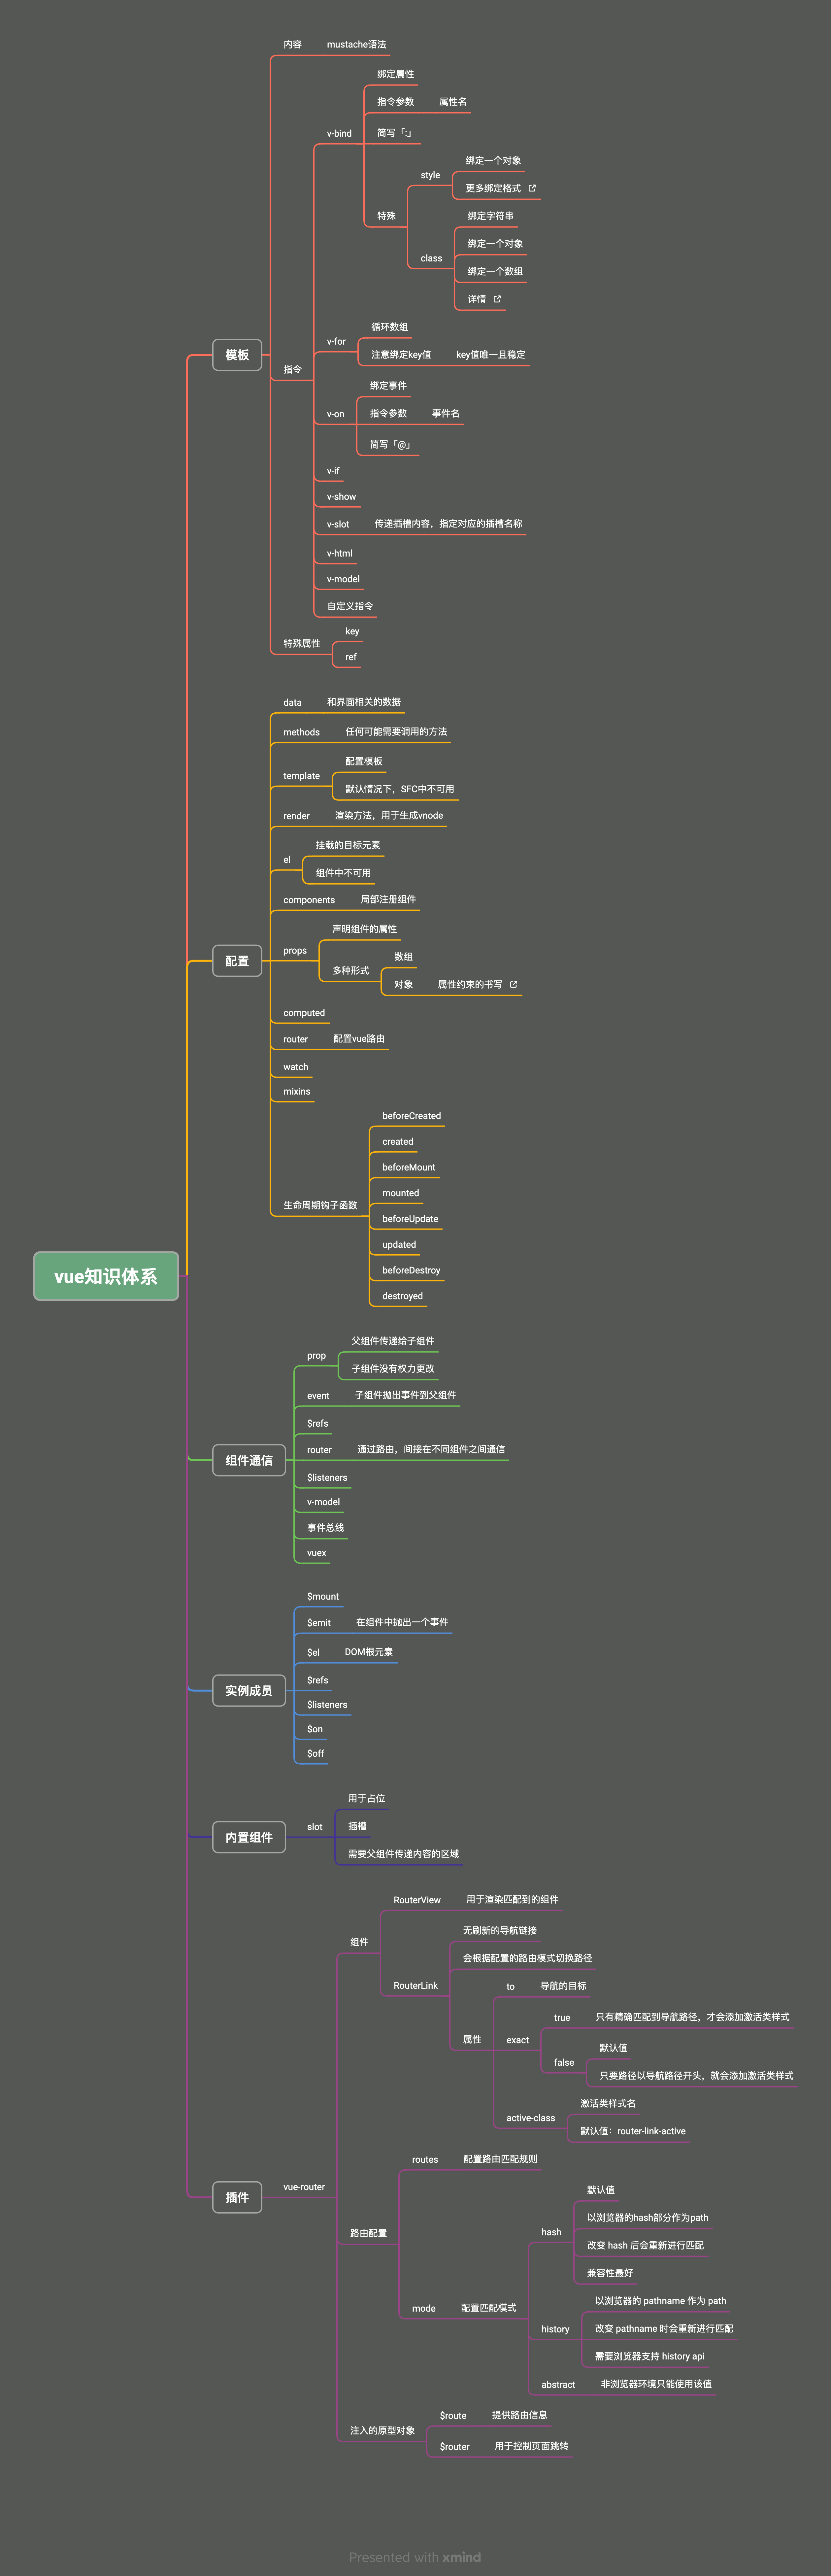
二、Vue从入门到实战
大约 67 分钟约 20171 字
(一)前端框架的由来
Vue 官网:https://cn.vuejs.org/
1.服务端渲染
2.前后端分离
3.单页应用
4.vue 框架
5.前端框架变迁
1)过去的前端开发方式
- 早期前端盛行库,最出名的就是 JQuery
- JQuery 诞生于 2006 年 1 月,最早的口号是 “Write less, do more”
- JQuery 特点
- 简单的选择器和链式操作
- 跨浏览器兼容性
- 强大的动画
- 简单的 Ajax 支持
- 强大的插件系统, 如 Swiper.js 等
2)MVVM 模式的流行
- MVVM,Model-View-ViewModel,是一种设计模式
- 主要目的是分离用户界面(View)和业务数据(Model)
- 该模式最早由微软提出,并在 silverlight 和 wpf 中应用
- MVVM 模式包括三个部分
- Model:代表数据
- View:代表视图,即用户看到的与其进行交互的界面
- ViewModel:View 和 Model 之间的桥梁
- 当用户在 View 中进行操作时,ViewModel 的命令就会被调用,自动更新 Model
- 当 Model 数据状态发生变化时,ViewModel 会将其更新暴露给 View,使 View 自动显示最新的内容
- 该模式应用到前端后,由于 ViewModel 提供了数据绑定的能力,无需再手动操作 DOM 来更新 View
- 在 VueJS 出现前,前端业界已出现基于 MVVM 模式的框架:KnockoutJS、EmberJS
ReactJS 不是 MVVM 模式的框架
- 采用的是 Flux 的架构模式
- Flux 中数据流是单向的,用户交互触发视图发出 actions,actions 通过派发器(dispatcher)分发到数据仓库(store),store 更新后进行视图更新
- 所以 React 一个出名的特点就是单向数据流,
UI = render(state)
- VueJS 是 MVVM 模式的框架
- Model:模型,即 data 对象中的数据
- View:视图,即 template 模板
- ViewModel:视图模型,即 Vue 实例
6.现代前端框架的特点和对比
1)React
- React 是由 Facebook(Meta)在 2013 年推出的构建用户界面的 JS 库
- 本身 React 库只关注界面构建,现在提到的 React 框架更多指的是 React 全家桶
- React 在发布初期就火了,原因在于提出了虚拟 DOM 的概念
误区
虚拟 DOM 操作一定比原生 DOM 操作快
- 假设要创建一个 DOM
const newP = document.createElement("P");
document.body.appendChild(newP);
- 根据 React 团队的研究,在更新页面时,相比使用原生 DOM 的 API,开发人员更倾向于使用
innerHTML这一类 API
document.body.innerHTML = `<p>111</p>`;
- 此时, innerHTML 的操作涉及到两个层面的计算
- JS 层面:解析字符串
- DOM 层面:创建对应的 DOM 节点
| innerHTML | 虚拟 DOM | |
|---|---|---|
| JS 层面计算 | 解析字符串 | 创建 JS 对象 |
| DOM 层面计算 | 创建对应的 DOM 节点 | 创建对应的 DOM 节点 |
- 第一次创建 DOM 节点时,虚拟 DOM 和原生 DOM 方式都需要经历两个层面的计算
- 而虚拟 DOM 发挥作用是在更新 DOM 的时候
- 使用 innerHTML 进行更新时,要全部重新赋值,即之前创建的 DOM 节点要全部销毁,重新创建
- 虚拟 DOM 只会去修改必要的 DOM 节点
| innerHTML | 虚拟 DOM | |
|---|---|---|
| JS 层面计算 | 解析字符串 | 创建 JS 对象 |
| DOM 层面计算 | 销毁原来所有的 DOM 节点 | 修改必要的 DOM 节点 |
| DOM 层面计算 | 重新创建原来所有的 DOM 节点 |
- 虚拟 DOM 还有跨平台渲染的能力,可以对接不同的宿主环境
- 浏览器环境:使用 ReactDOM 包
- Native 宿主环境:使用 ReactNative 包
- Canvas、SVG 宿主环境:使用 ReactArt 包
- React 相比 KnockoutJS 和 EmberJS,不仅提供了虚拟 DOM,还提供了更好的组件化支持和慢慢丰富的生态,都为单页开发提供了良好的支持
2)Vue
- Vue 诞生于 2014 年
- 从 1.0 版本就选择了响应式
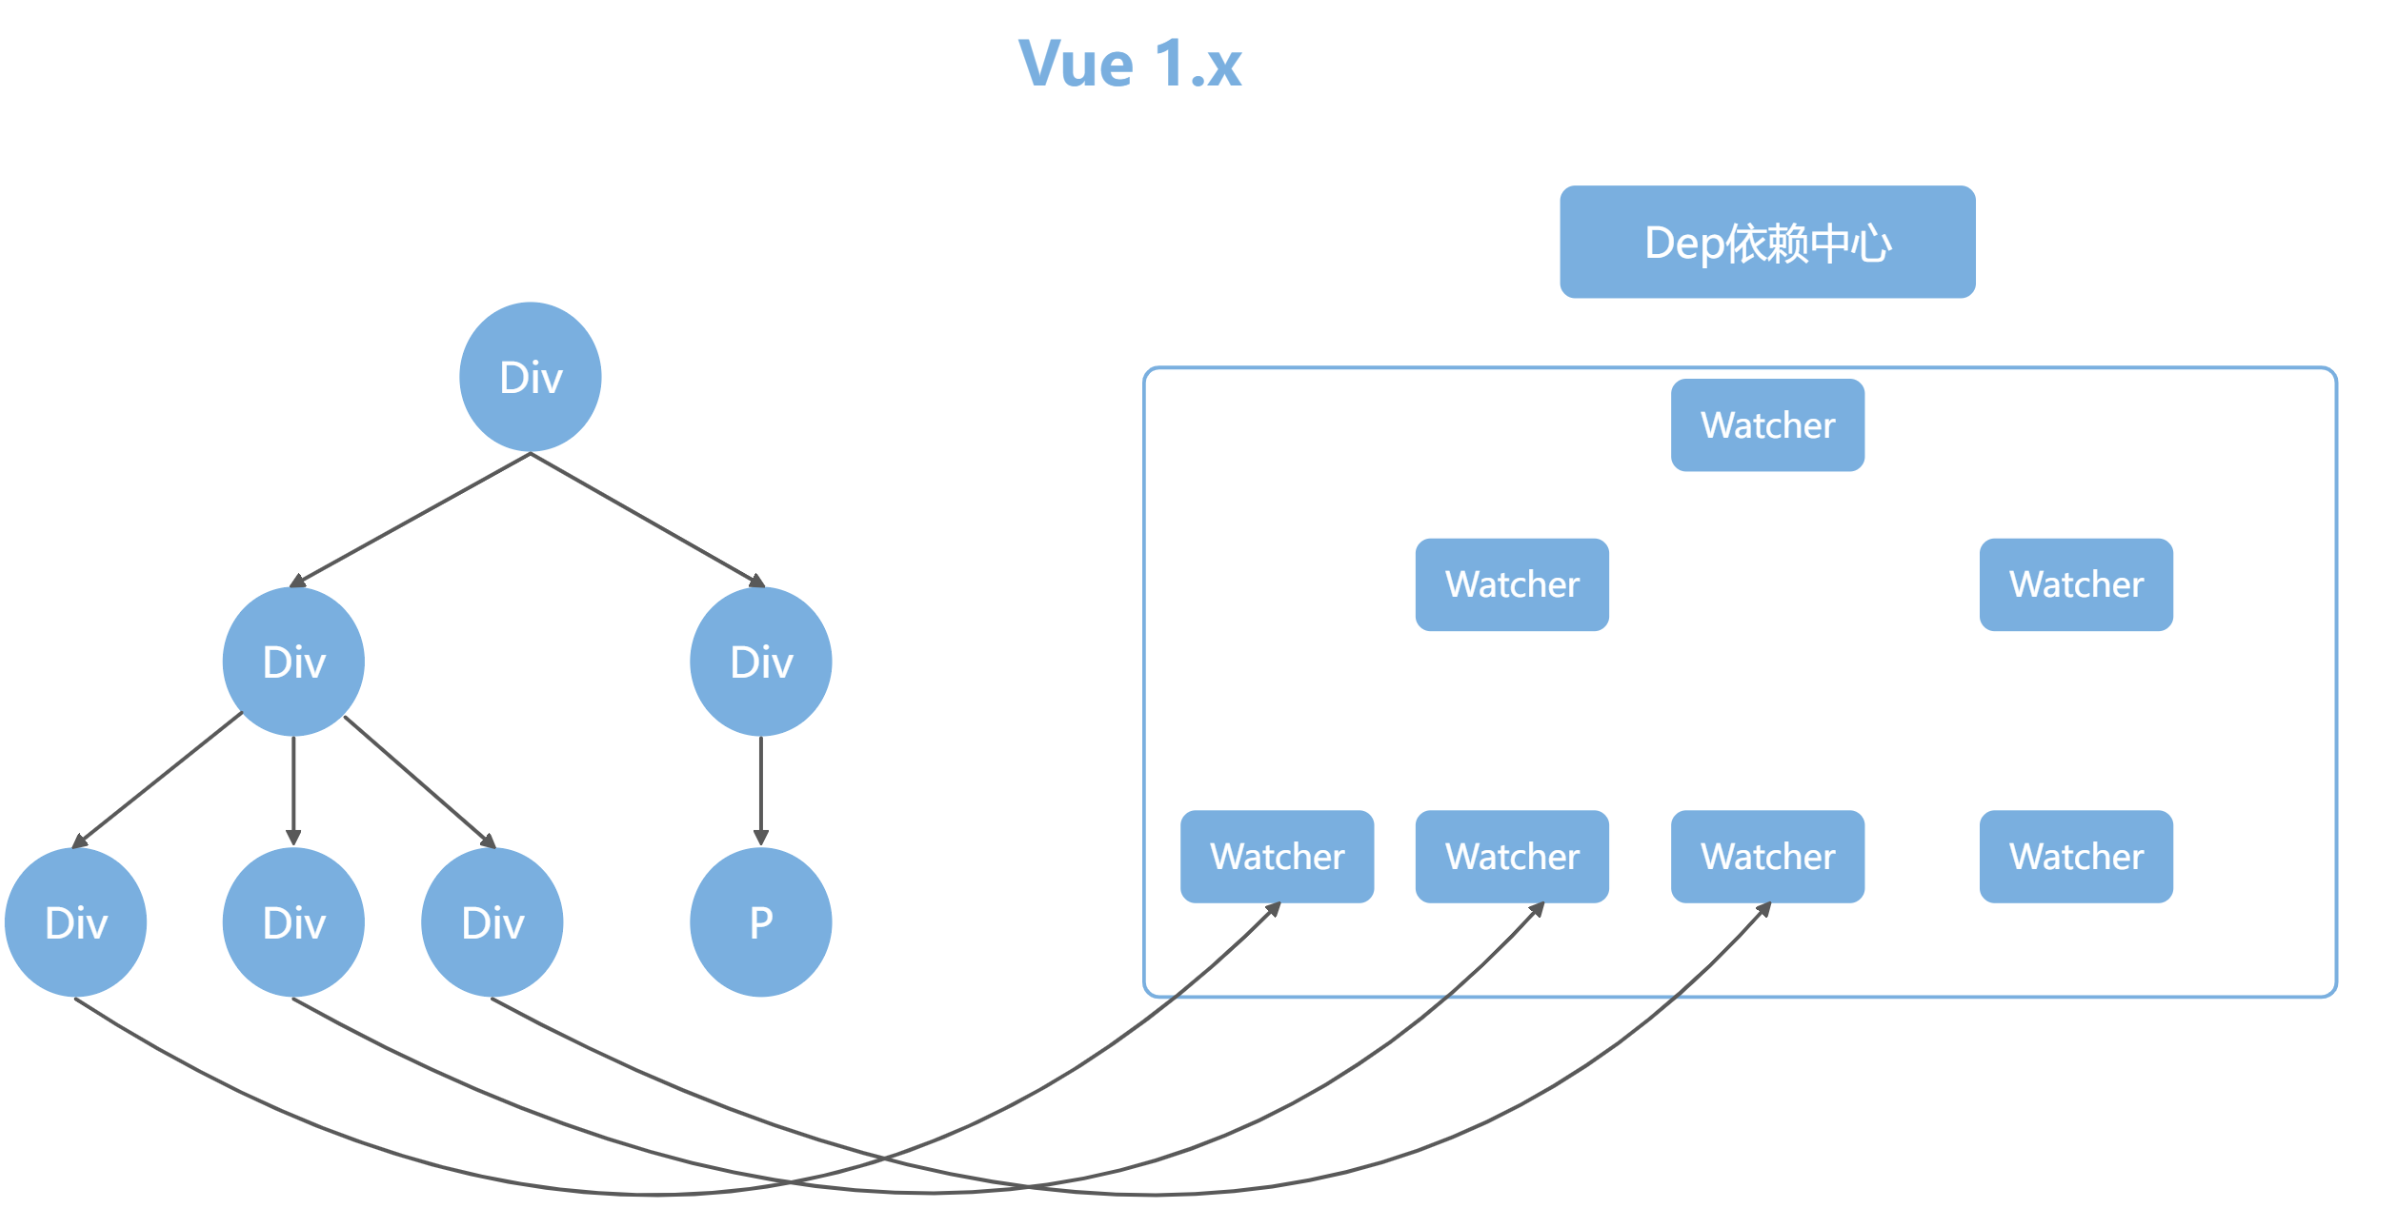
- Vue1.x 这种设计方案虽然方便,但是会导致响应式数据过多,带来内存占用的问题
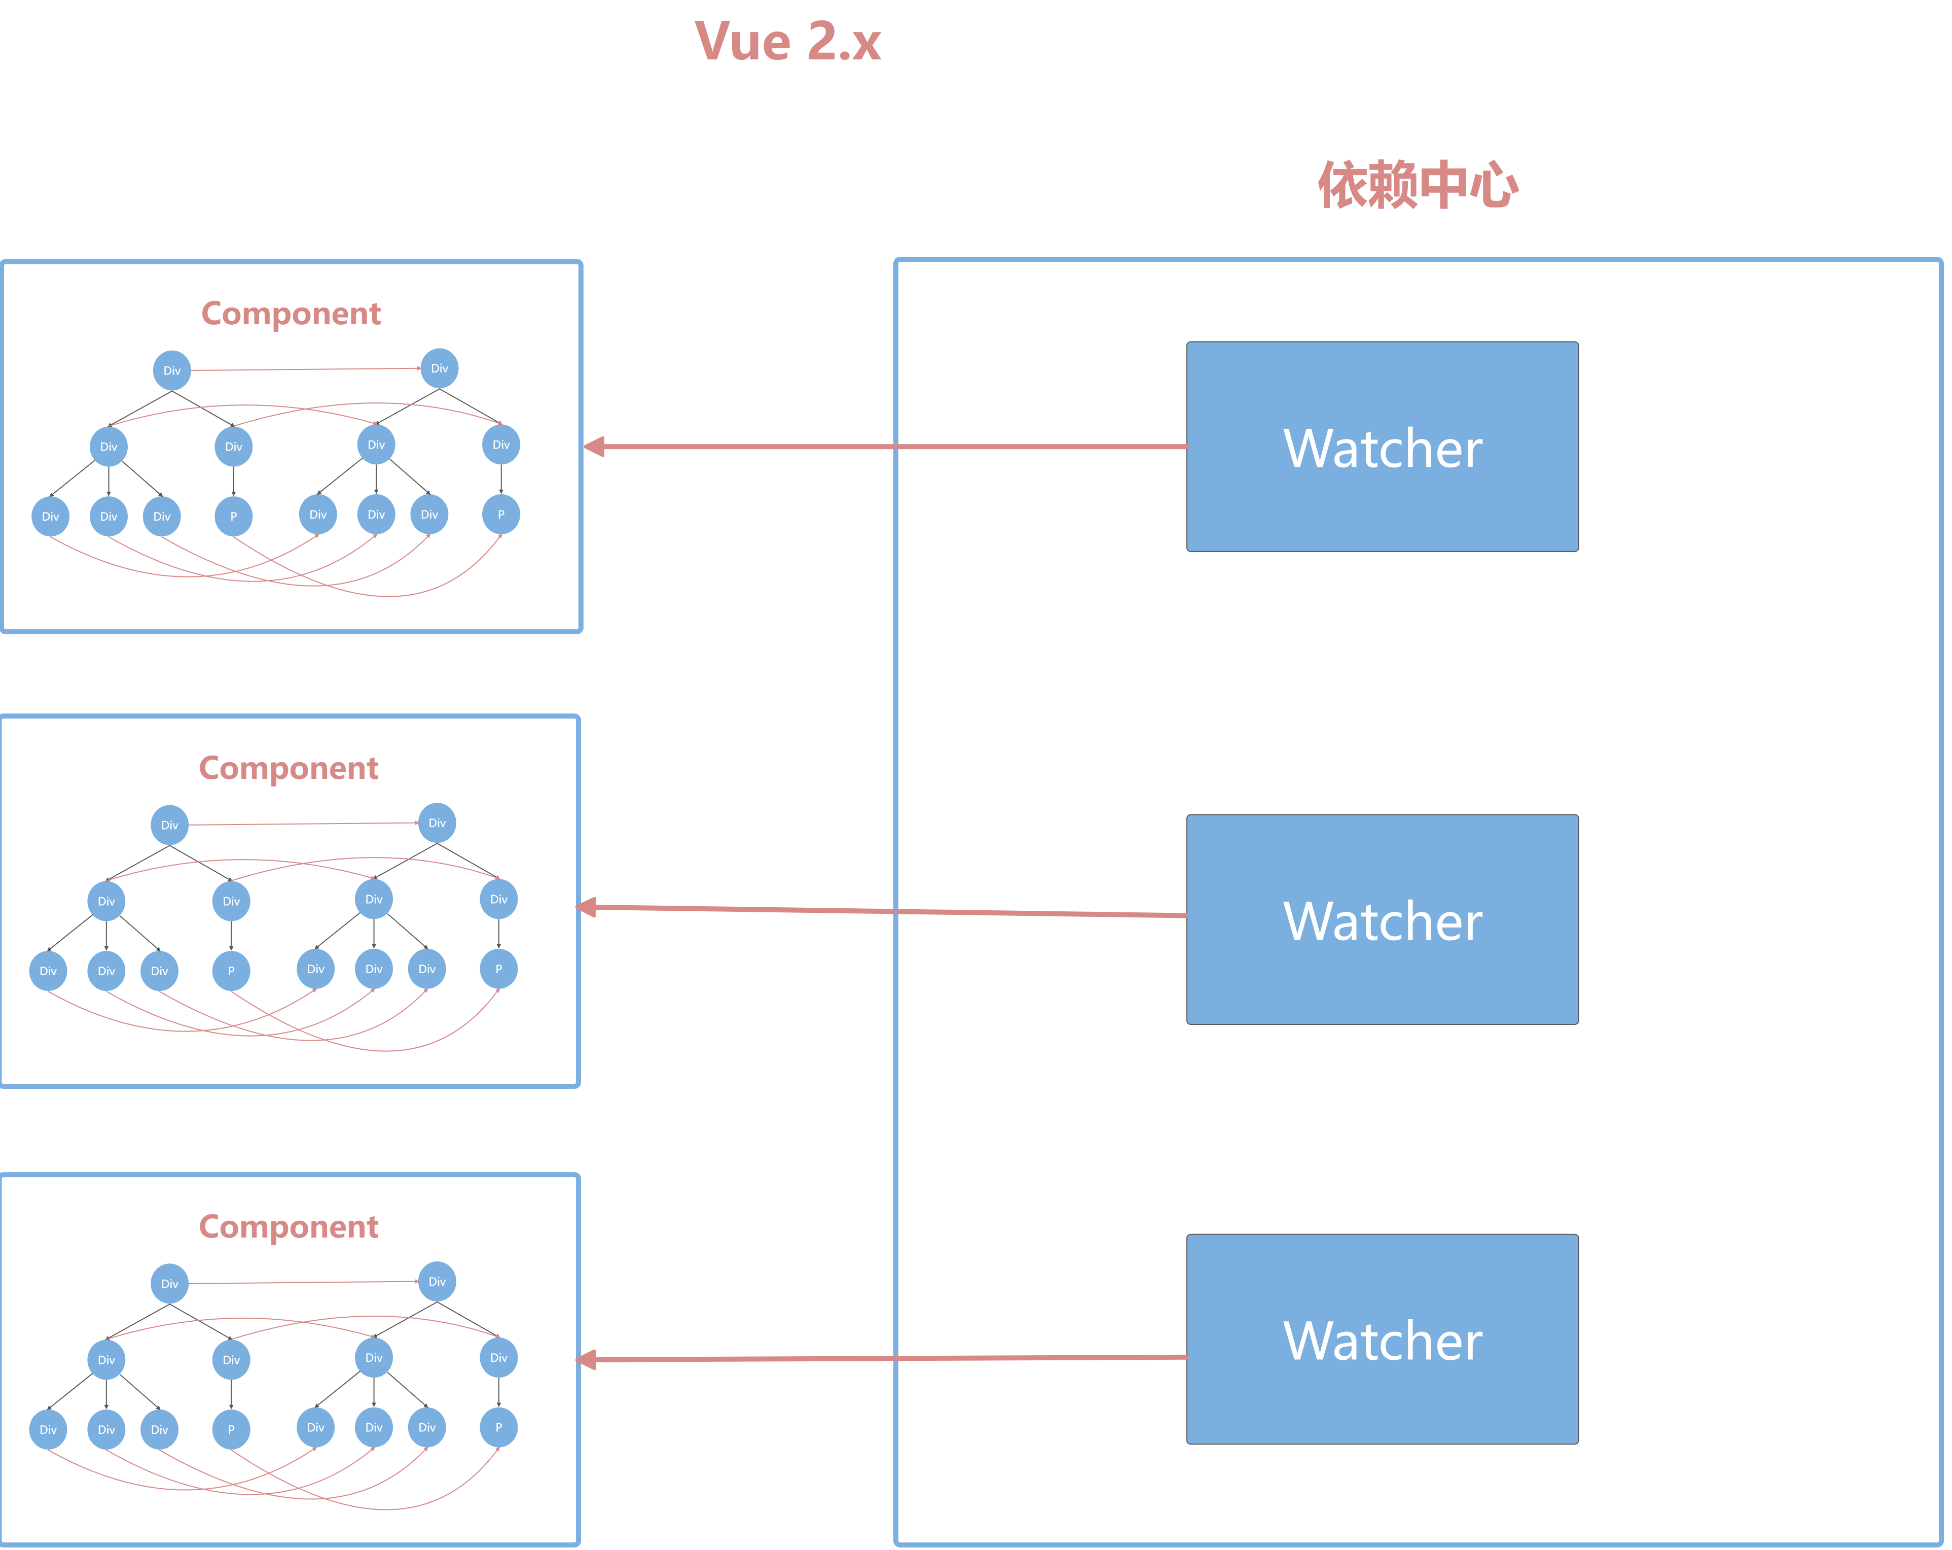
- Vue2.x 引入了虚拟 DOM,但是不代表 Vue 抛弃了响应式系统
- Vue 将自身的响应式系统和虚拟 DOM 做了一个很好的融合,改变了响应式的粒度
- 响应式只通知到组件级别,组件内部通过虚拟 DOM diff 的方式去做对比,找到变化的部分
(二)第一个 Vue 应用
1.框架
- 框架是为了降低项目复杂度
- vue 框架是运行在浏览器端的应用
2.数据响应式
- 数据变化 -> 页面渲染
- 数据的变化引起视图的更新
- Vue、React 框架最终还是操作 DOM
- 操作原生 DOM 的效率一定是最高的
3.Vue2 响应式的实现
- 使用
Object.defineProperty()
<!DOCTYPE html>
<html lang="en">
  <head>
    <meta charset="UTF-8" />
    <meta name="viewport" content="width=device-width, initial-scale=1.0" />
    <title>Document</title>
    <style>
      #showTxt {
        width: 200px;
        height: 300px;
        border: 1px solid #ddd;
        padding: 8px;
      }
    </style>
  </head>
  <body>
    <input id="txt" type="text" />
    <br />
    <div id="showTxt"></div>
  </body>
  <script>
    var txt = document.getElementById("txt");
    var showTxt = document.getElementById("showTxt");

    window.data = {};

    txt.addEventListener("input", function (e) {
      window.data.value = e.target.value;
    });

    Object.defineProperty(window.data, "value", {
      get() {
        return this._value || "";
      },
      set(value) {
        this._value = value;
        showTxt.innerHTML = this._value;
      },
    });
  </script>
</html>
- 主要组成
- Observer
- Compiler
- Watcher
- 通过 Observer 监听 model 的数据变化,通过 Compiler 来解析模板指令,最终利用 Watcher 搭建起 Observer 和 Compiler 之间的桥梁
(三)核心概念

1.注入
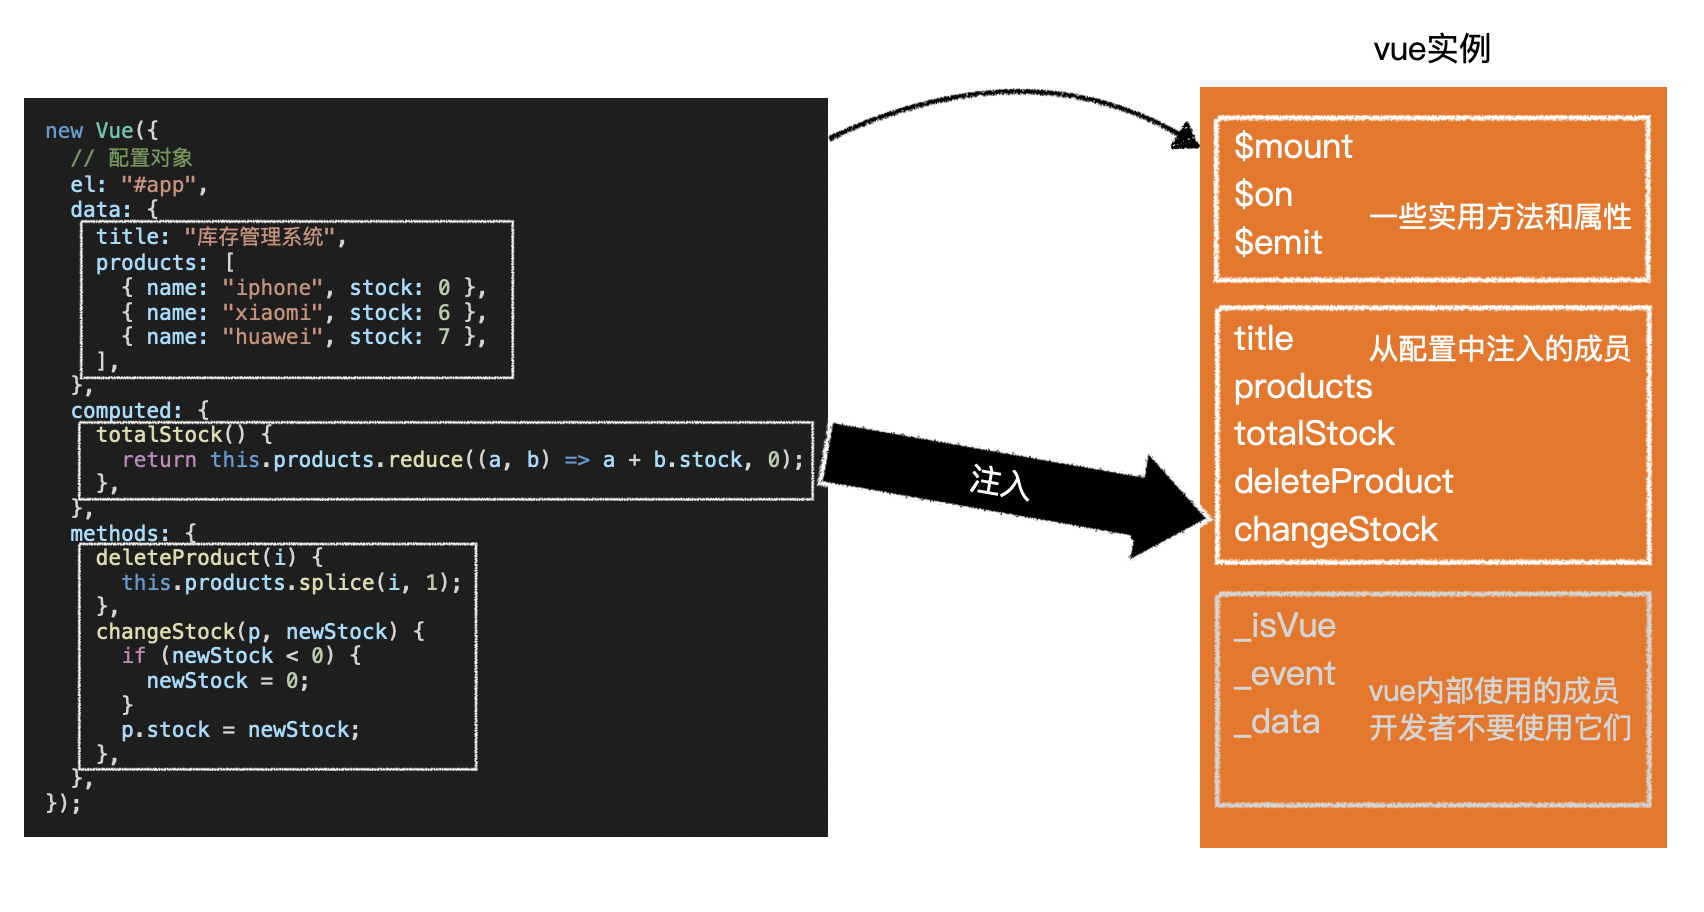
- vue 会将以下配置注入到 vue 实例:
- data:和界面相关的数据
- computed:通过已有数据计算得来的数据
- methods:方法
- 注入后才有数据响应式
提示
模板中可以使用 vue 实例中的成员
2.虚拟 DOM 树
- 直接操作真实的 DOM 会引发严重的效率问题
- vue 使用虚拟 DOM(vnode)的方式来描述要渲染的内容
- vnode 是一个 普通的 JS 对象
- 用于描述界面上应该有什么
var vnode = {
  tag: "h1",
  children: [
    {
      tag: undefined,
      text: "第一个vue应用:Hello World",
    },
  ],
};
// 描述:有一个标签名为h1的节点,它有一个子节点,该子节点是一个文本,内容为「第一个vue应用:Hello World」
注意
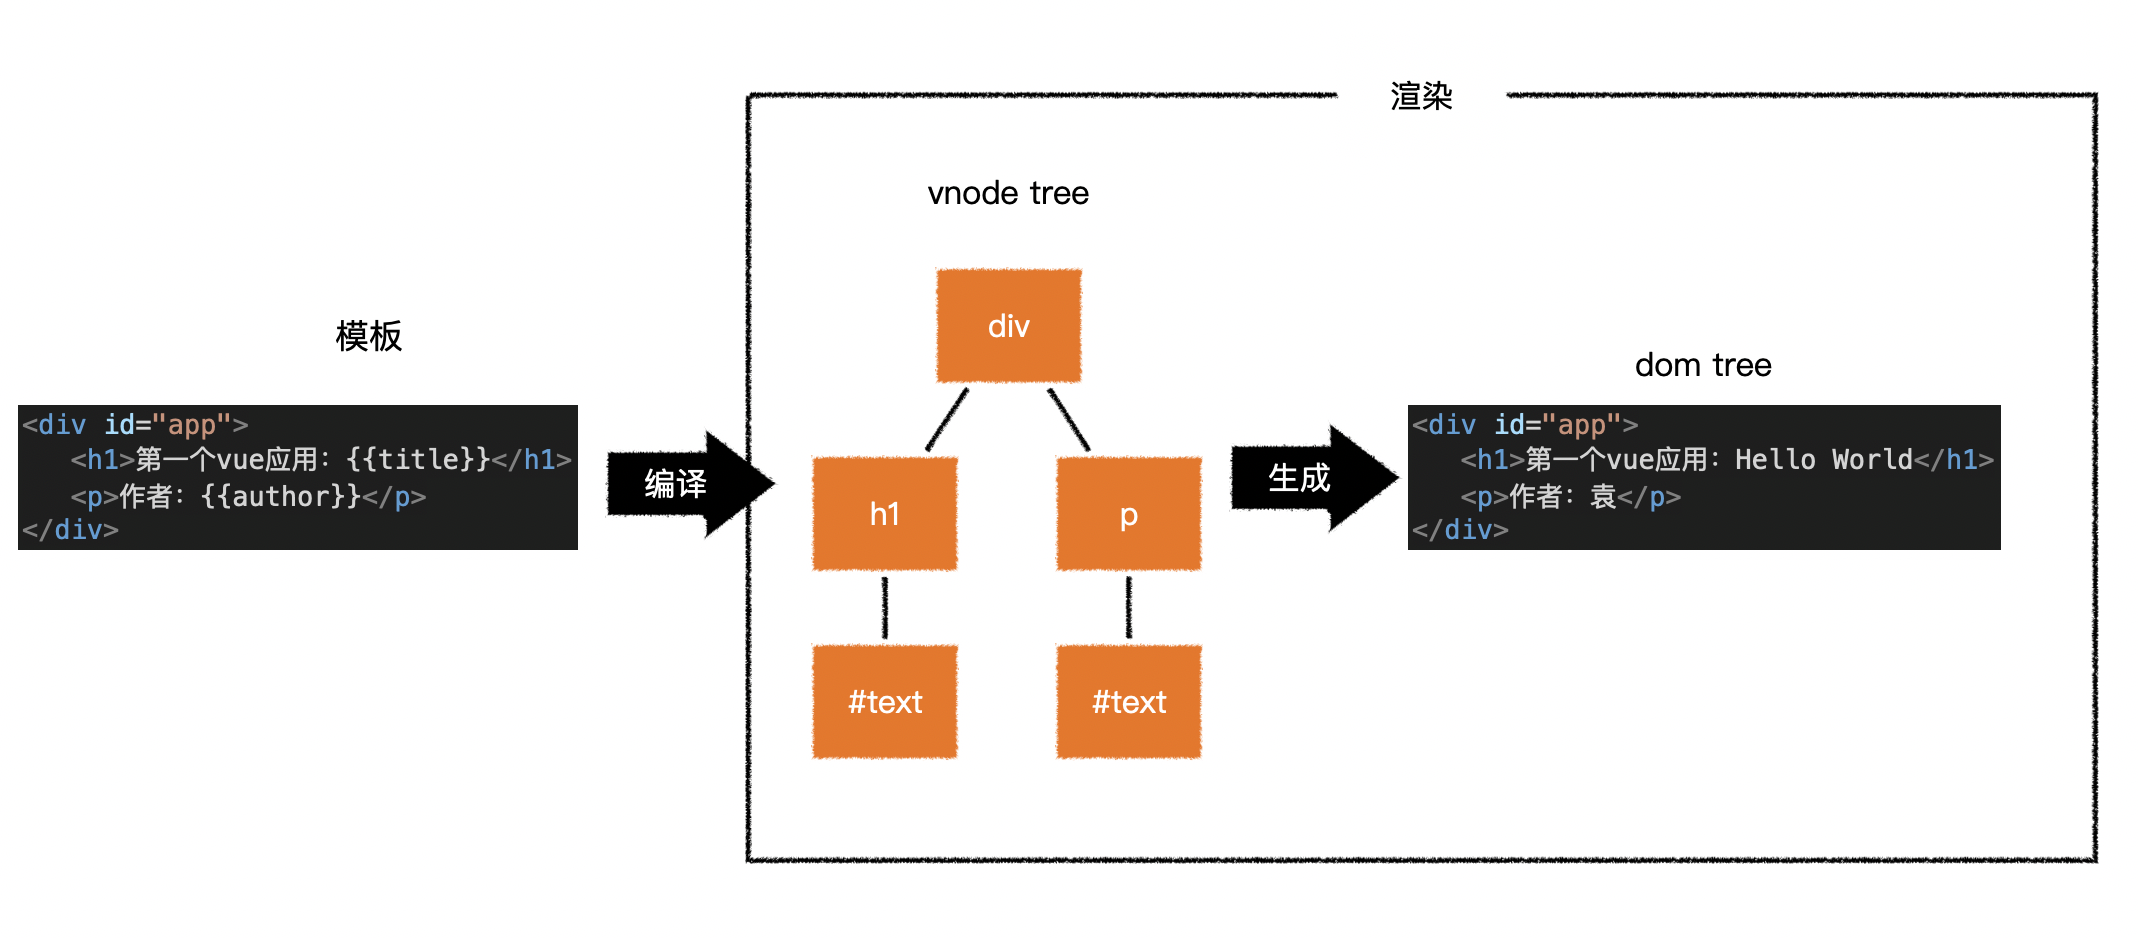
vue 模板并不是真实的 DOM,会被编译为虚拟 DOM
<div id="app">
  <h1>第一个vue应用:{{title}}</h1>
  <p>作者:{{author}}</p>
</div>
- 上面的模板会被编译为类似下面结构的虚拟 DOM
- 虚拟 DOM 是一个描述 DOM 结构的 JS 对象
定义为对象格式的好处
可以使用对象的某些属性或方法,加快虚拟 DOM 的对比、替换等操作
{
  tag: "div",
  children: [
    {
      tag: "h1",
      children: [
        {
          text: "第一个vue应用:Hello World",
        },
      ],
    },
    {
      tag: "p",
      children: [
        {
          text: "作者:袁",
        },
      ],
    },
  ],
}
- 虚拟 DOM 树会最终生成为真实的 DOM 树
- 当数据变化后,将引发重新渲染
- vue 会比较新旧两棵 vnode tree,找出差异
- 然后仅把差异部分应用到真实 dom tree 中
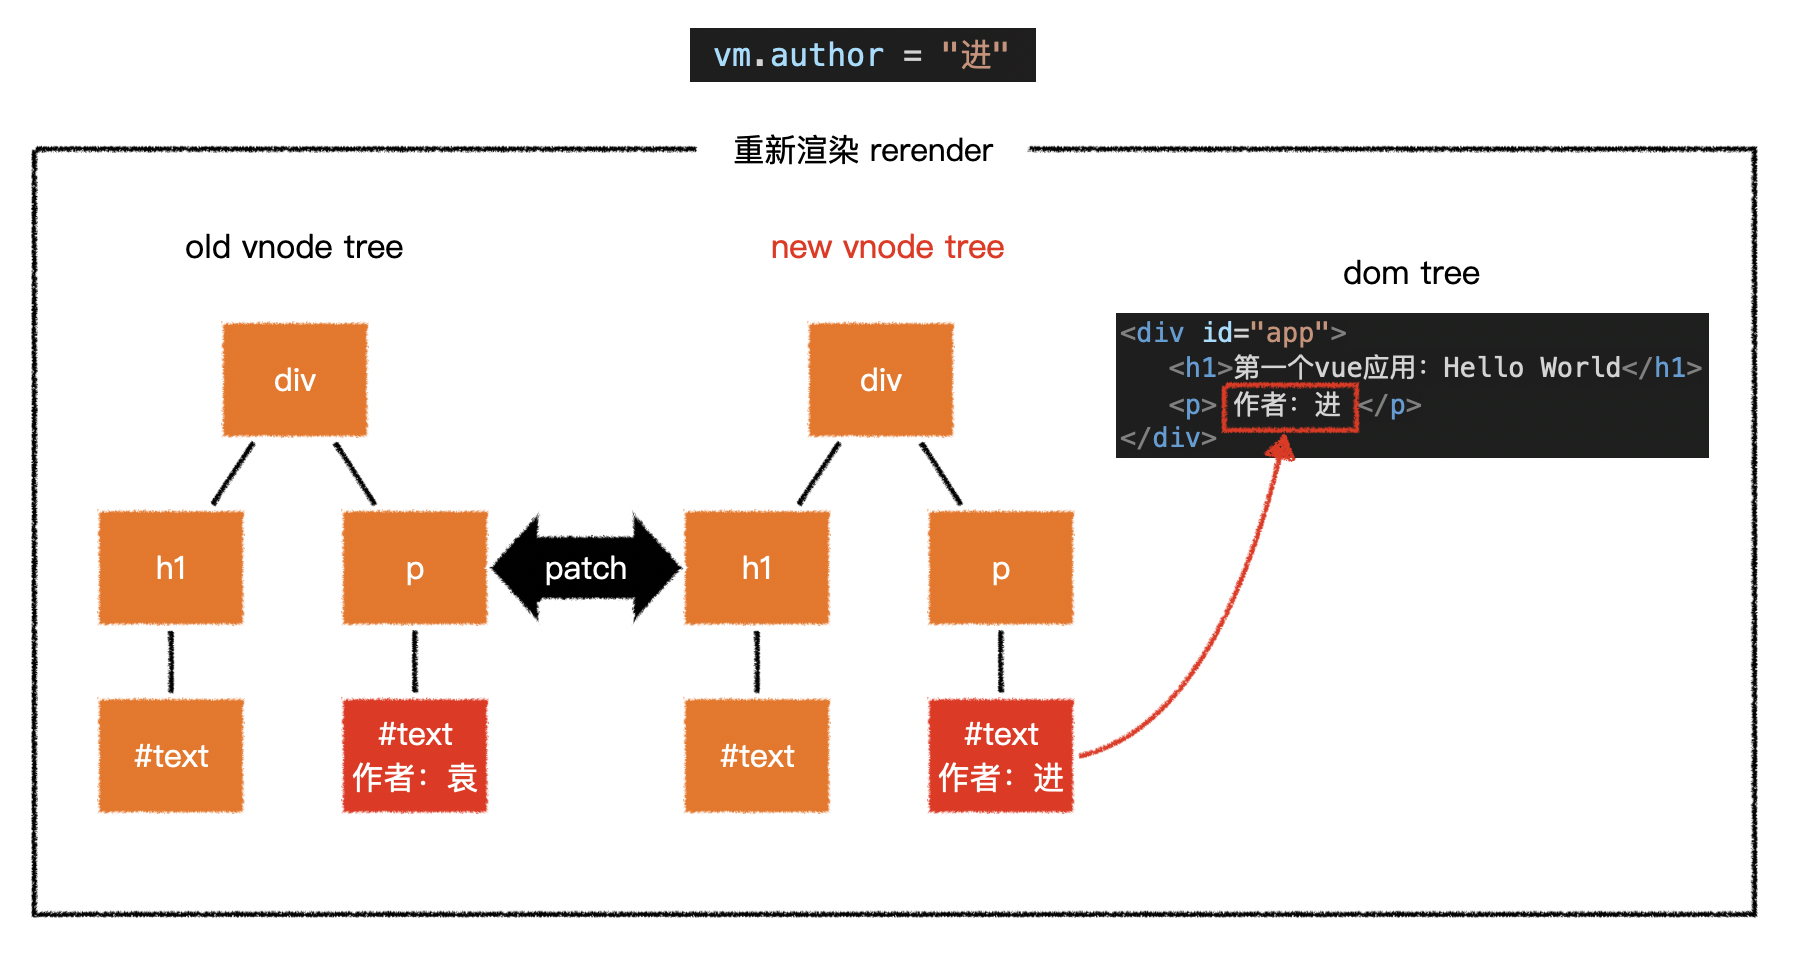
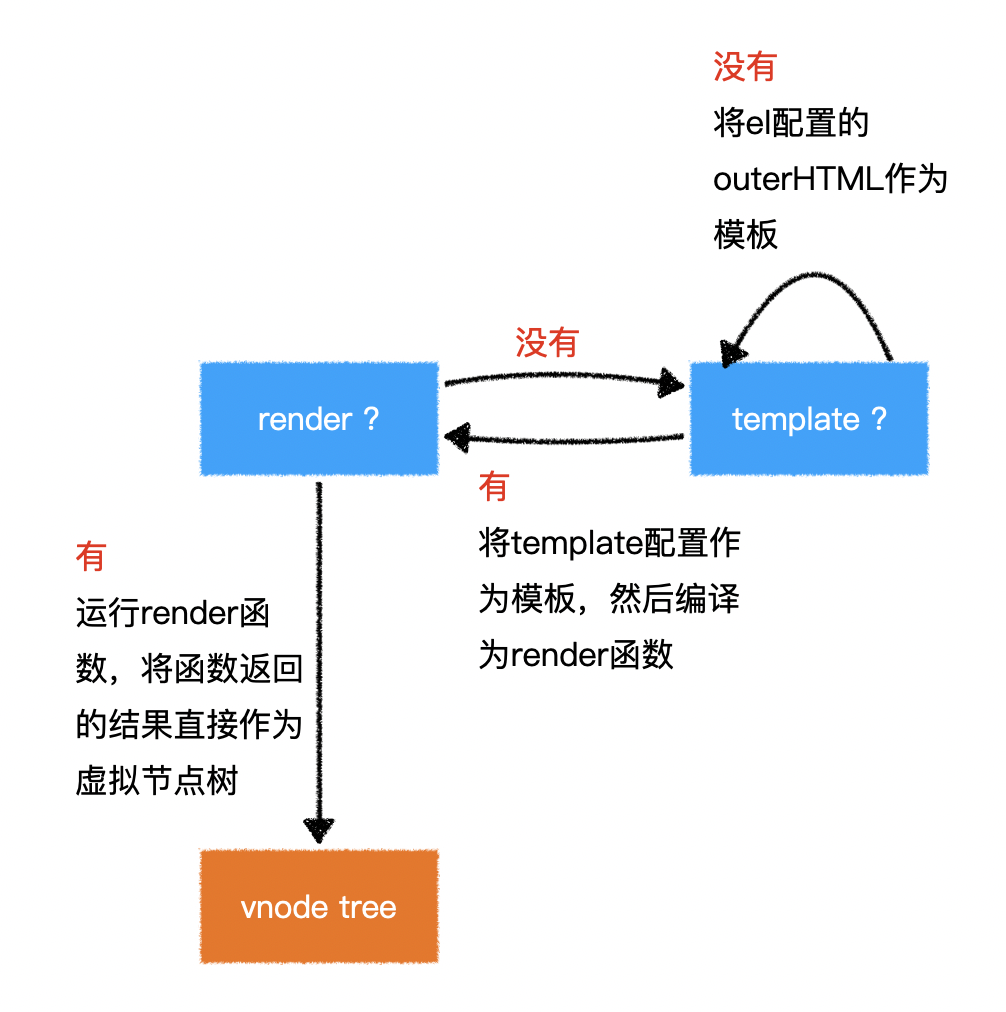
- 在 vue 中,要得到最终的界面,必须要生成一个 vnode tree
- vue 通过运行 render 函数生成 vnode tree 【本质】
- 实际开发中不会自己编写 render 函数
- vue 通过 template 模板编译生成 render 函数,再运行
- 数据变化则重新运行 render 函数(重新渲染)
var vm = new Vue({
  el: "#app",
  data: {
    title: "Hello World",
    author: "袁",
  },
  render(h) {
    console.log("render");
    return h("div", [h("h1", `第一个vue应用:${this.title}`), h("p", `作者:${this.author}`)]);
  },
});
警告
虚拟节点树必须是单根的(必须只有一个根节点)
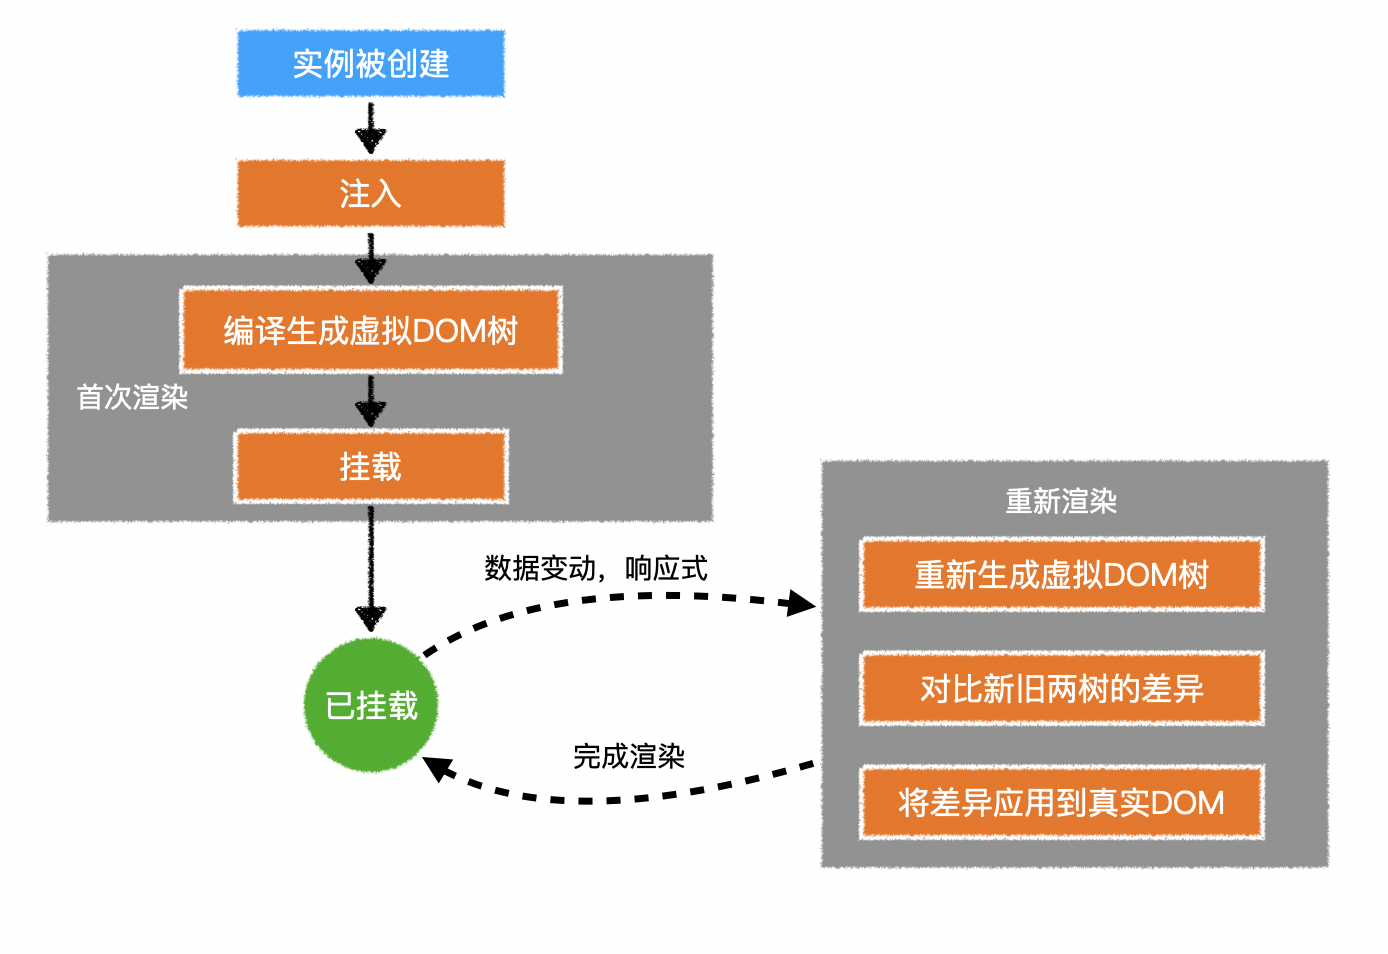
3.挂载
- 将生成的真实 DOM 树,放置到某个元素位置,称之为挂载
- 挂载的方式
- 通过
el:"css选择器"进行配置 - 通过
vue实例.$mount("css选择器")进行配置
- 通过
4.完整流程
5.指令
1)v-bind
- 绑定属性
- 可简写为:
:
<div id="app">
  <img v-bind:src="image" />
  <!-- 简写为 -->
  <img :src="image" />
</div>
2)v-for
- 遍历数组
- 注意绑定 key 值
- key 值唯一且稳定
<div v-for="(item, index) in products" :key="item.id">
  <span>{{ item.name }}</span>
</div>
3)v-on
- 绑定事件
- 可简写为:
@
<div>
  <button v-on:click="count++">Add</button>
  <!-- 简写为 -->
  <button @click="count++">Add</button>
</div>
(四)组件
1.意义
- 降低整体复杂度,提升代码的可读性和可维护性
- 细粒度的划分:粗粒度 -> 细粒度
- 提升局部代码的可复用性
2.组成
- 绝大部分情况下,一个组件就是页面中某个区域
- 组件包含该区域的
- 功能(JS 代码)
- 内容(模板代码)
- 样式(CSS 代码)
- 要在组件中包含样式,需要构建工具的支撑
3.组件开发
1)创建组件
- 组件是根据一个普通的配置对象创建的
- 要开发一个组件,只需要写一个配置对象即可
- 该配置对象和 vue 实例的配置是 几乎一样 的
//组件配置对象
var myComp = {
  data() {
    return {
      // ...
    };
  },
  template: `....`,
};
- 组件配置对象和 vue 实例有以下几点差异
- 无
el data必须是一个 函数 ,该函数返回的对象作为数据- 由于没有
el配置,组件的虚拟 DOM 树必须定义在template或render中
- 无
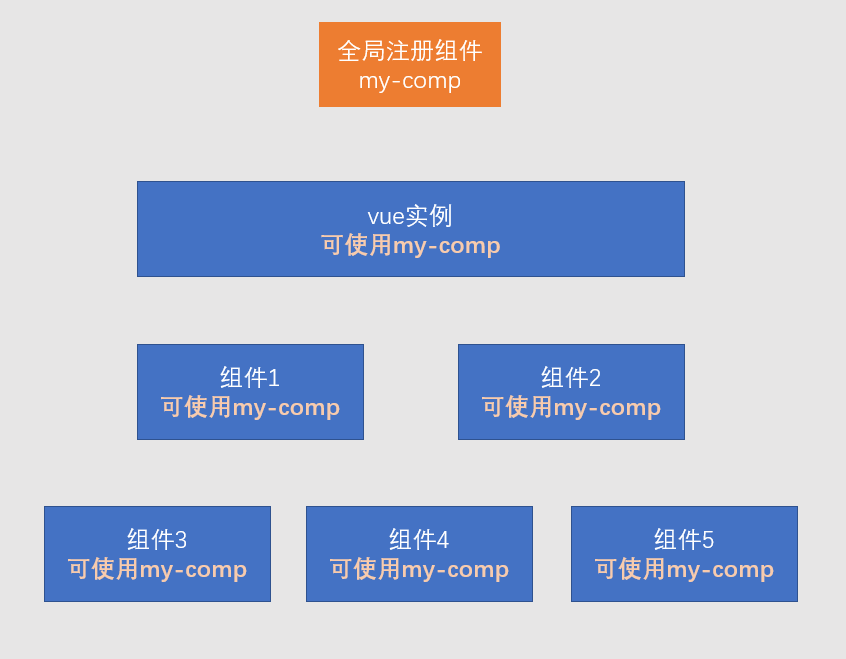
2)注册组件
- 全局注册
- 整个应用中任何地方都可以使用该组件
/**
 * 该代码运行后,即可在模板中使用组件
 * 参数1:组件名称,将来在模板中使用组件时,会使用该名称
 * 参数2:组件配置对象
 */
Vue.component("my-comp", myComp);
<my-comp />
<!-- 或 -->
<my-comp></my-comp>
相关信息
- 在一些工程化的大型项目中,很多组件都不需要全局使用
- 比如一个登录组件,只有在登录的相关页面中使用
- 如果全局注册,将导致构建工具无法优化打包
- 因此,除非组件特别通用,否则不建议使用全局注册
- 局部注册
- 哪里要用到组件,就在哪里注册
- 在要使用组件的组件或实例中加入配置
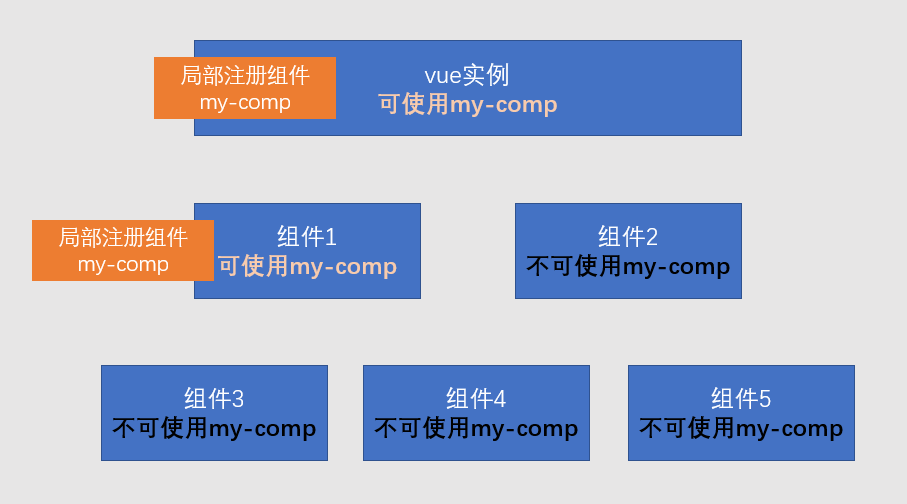
// 这是另一个要使用my-comp的组件
var otherComp = {
  components:{
    // 属性名为组件名称,模板中将使用该名称
    // 属性值为组件配置对象
    "my-comp": myComp
  },
  template: `
    <div>
      <!-- 该组件的其他内容 -->
      <my-comp></my-comp>
    </div>
  `;
}
3)应用组件
- 在模板中把组件名当作 HTML 元素名即可使用组件
- 组件必须有结束
- 组件可以自结束
- 也可以用结束标记结束
- 错误:
<my-comp>
- 组件的命名
- 无论使用哪种方式注册组件,组件的命名需要遵循规范
- 组件可以使用
kebab-case 短横线命名法 - 也可以使用
PascalCase 大驼峰命名法【推荐】
var otherComp = {
  components: {
    "my-comp": myComp, // 方式1
    MyComp: myComp, // 方式2
  },
};
相关信息
使用 小驼峰命名法 camelCase 也是可以识别的,只不过不符合官方要求的规范
- 使用
PascalCase方式命名可以在模板中使用两种组件名
var otherComp = {
  components: {
    MyComp: myComp,
  },
};
- 模板中可用
<my-comp />
<!-- 或 -->
<MyComp />
使用组件一般方式
var MyComp = {
  //组件配置
};

var OtherComp = {
  components: {
    MyComp, // ES6速写属性
  },
};
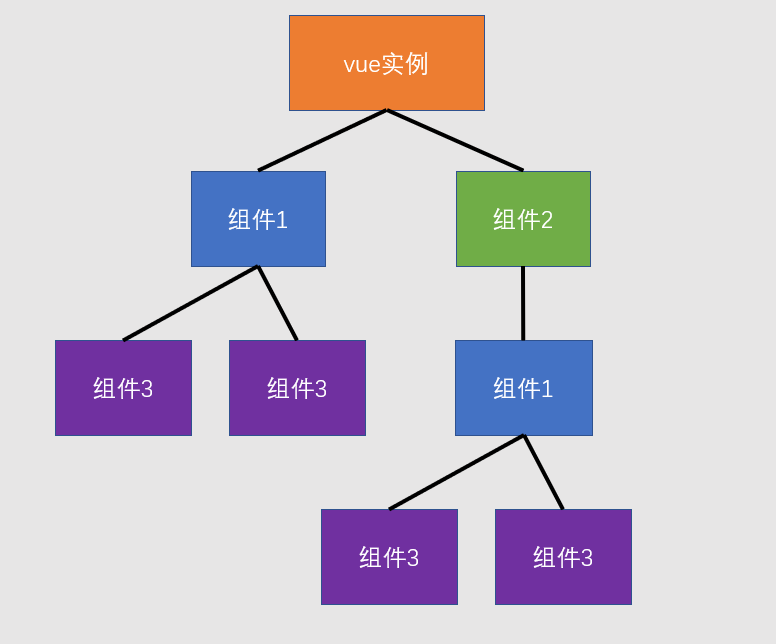
4.组件树
- 一个组件创建好后,往往会在各种地方使用
- 可能多次出现在 vue 实例中,也可能出现在其他组件中
- 于是就形成了一个组件树
5.向组件传递数据
- 大部分组件要完成自身的功能,都需要一些额外的信息
- 比如一个头像组件,需要头像的地址,这就需要在使用组件时向组件传递数据
- 传递数据的方式有很多种,最常见的一种是使用 组件属性 component props
1)定义组件时,声明接收的属性
var MyComp = {
  props: ["p1", "p2", "p3"],
  // 和vue实例一样,使用组件时也会创建组件的实例
  // 而组件的属性会被提取到组件实例中,因此可以在模板中使用
  template: `
    <div>
      {{p1}}, {{p2}}, {{p3}}
    </div>
  `,
};
2)使用组件时,传递相应的属性
var OtherComp = {
  components: {
    MyComp,
  },
  data() {
    return {
      a: 1,
    };
  },
  template: `
    <my-comp :p1="a" :p2="2" p3="3"/>
  `,
};
注意
- 在组件中,属性是 只读 的
- 绝不可以更改,这叫做单向数据流

6.ES6 模块化的 VueJS 文件
.vue.browser.js- 不会污染全局变量
import Vue from "./vue.browser.js";

new Vue({}).$mount("#app");
(五)搭建工程
vue-cli: https://cli.vuejs.org/zh/
1.vue-cli
vue-cli是一个脚手架工具,用于搭建vue工程- 内部使用了
webpack,并预置了诸多插件plugin和加载器loader,以达到开箱即用的效果 - 除了基本的插件和加载器外,
vue-cli还预置了以下工具库- babel
- webpack-dev-server
- eslint
- postcss
- less-loader
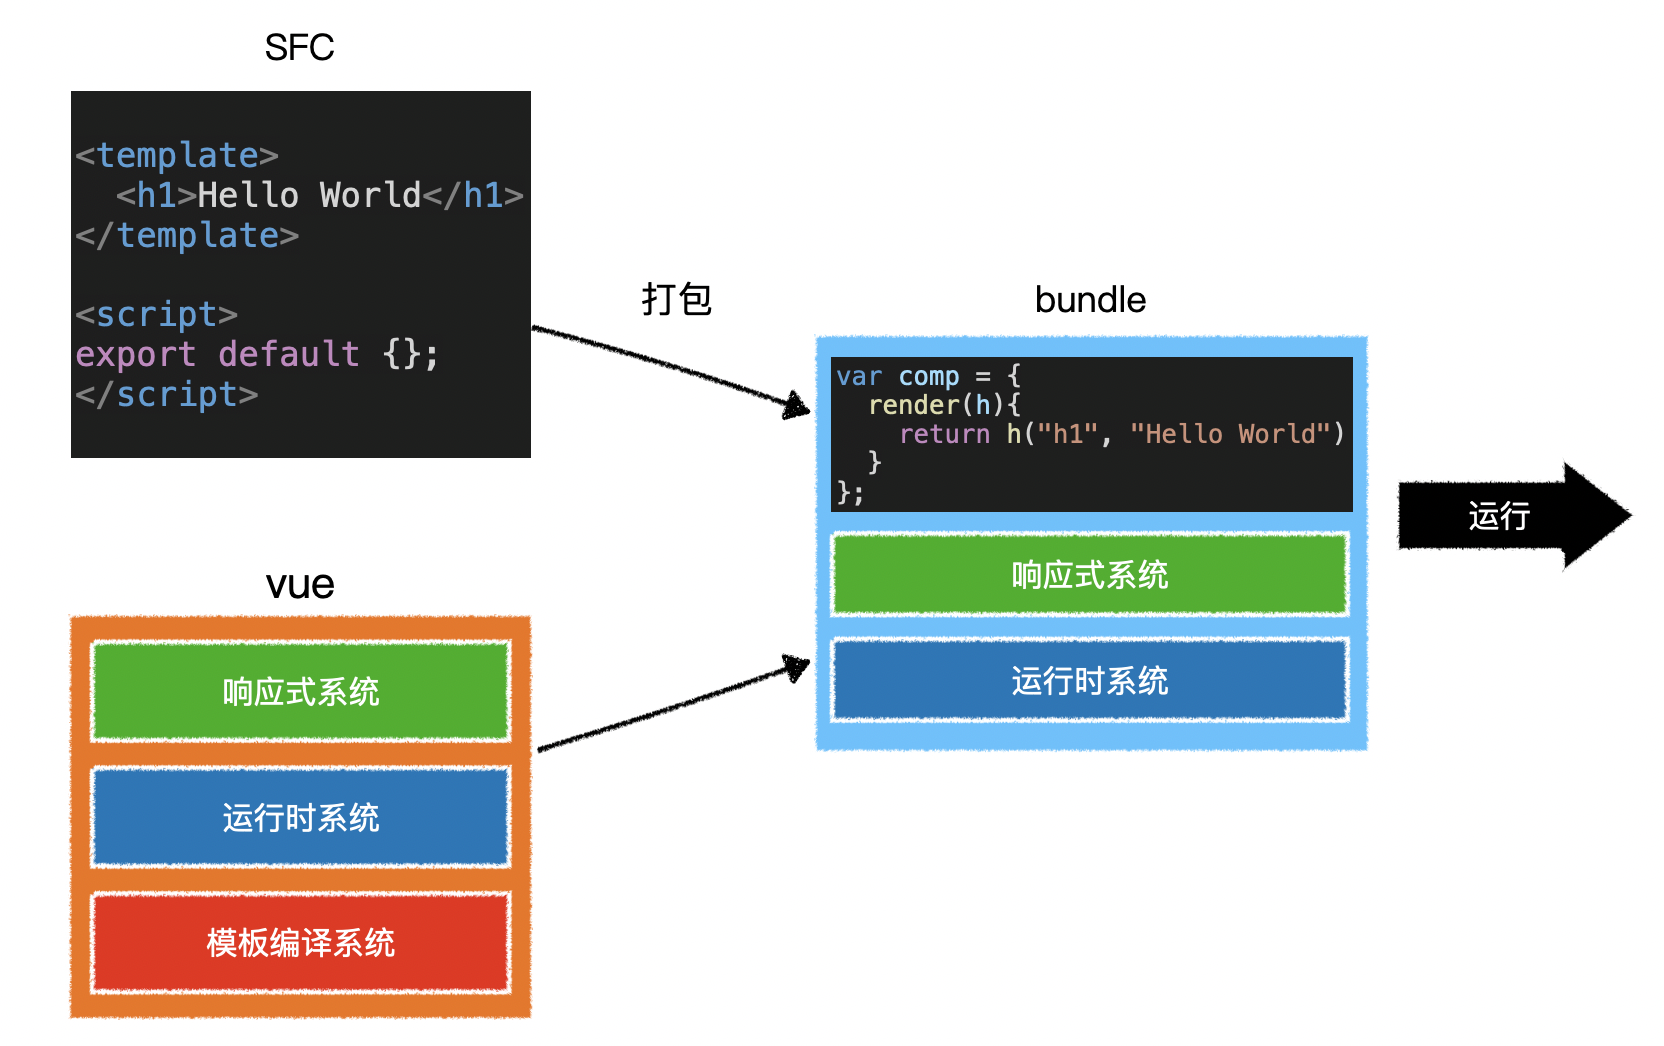
2.SFC
- 单文件组件,Single File Component
- 一个文件就包含了一个组件所需的全部代码
<template>
  <!-- 组件模板代码 -->
</template>

<script>
  export default {
    // 组件配置
  };
</script>

<style>
  /* 组件样式 */
</style>
3.模板预编译
1)概念
- 当
vue-cli进行 打包 时,会直接把组件中的模板转换为render函数
2)好处
- 运行时不再需要编译模板,提高了运行效率
- 打包结果中不再需要 vue 的编译代码,减少了打包体积
(六)计算属性
1.面试题:计算属性和方法有什么区别?
- 计算属性本质上是包含 getter 和 setter 的方法
- 当获取计算属性时,实际上是在调用计算属性的 getter 方法
- vue 会收集计算属性的依赖,并缓存计算属性的返回结果
- 只有当依赖变化后才会重新进行计算
- 方法没有缓存,每次调用方法都会导致重新执行
- 计算属性的 getter 和 setter 参数固定,getter 没有参数,setter 只有一个参数
- 而方法的参数不限
- 由于有以上的这些区别,因此计算属性通常是根据已有数据得到其他数据,并在得到数据的过程中不建议使用异步、当前时间、随机数等副作用操作
- 实际上,最重要的区别是含义上的区别
- 计算属性含义上也是一个数据,可以读取也可以赋值
- 方法含义上是一个操作,用于处理一些事情
2.完整的计算属性
computed: {
  propName: {
    get(){
      // getter
    },
    set(val){
      // setter
    }
  }
}
3.只包含 getter 的计算属性(简写)
computed: {
  propName(){
    // getter
  }
}
4.作用域样式对子组件根元素的影响
- 加上
scoped最多只能影响到子组件的根元素的样式 - 子组件内部嵌套的相同类名的样式不受父组件影响
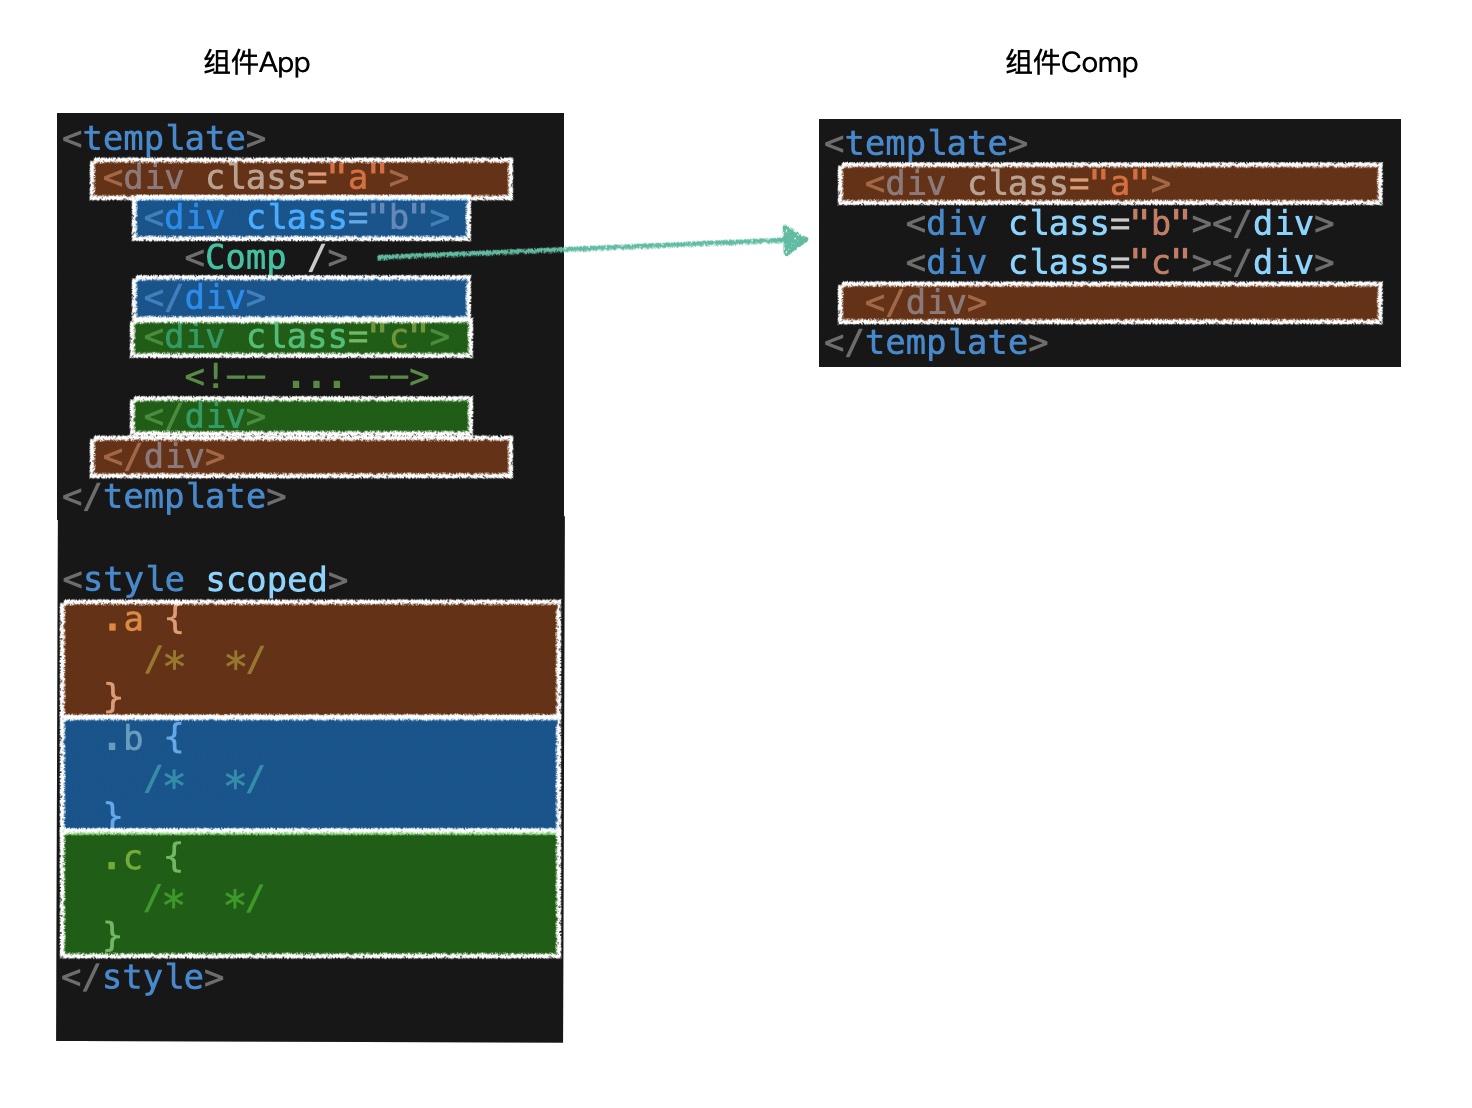
提示
- 一般给子组件的根元素类名定为:
${子组件名称}-container - 如:Pager.vue => class="pager-container"
- 方便在父组件中编写影响子组件根元素的样式
(七)组件事件
1.pager 组件

1)属性
| 属性名 | 含义 | 类型 | 必填 | 默认值 |
|---|---|---|---|---|
| current | 当前页码 | Number | 否 | 1 |
| total | 总数据量 | Number | 否 | 0 |
| limit | 页容量 | Number | 否 | 10 |
| visibleNumber | 可见页码数 | Number | 否 | 10 |
2)事件
| 事件名 | 含义 | 事件参数 | 参数类型 |
|---|---|---|---|
| pageChange | 页码变化 | 新的页码 | Number |
2.全局样式
- 样式中快速定位到 src 目录,使用
~@ - 脚本中快速定位到 src 目录,使用
@
@import "~@/styles/var.less";
3.v-if 和 v-show
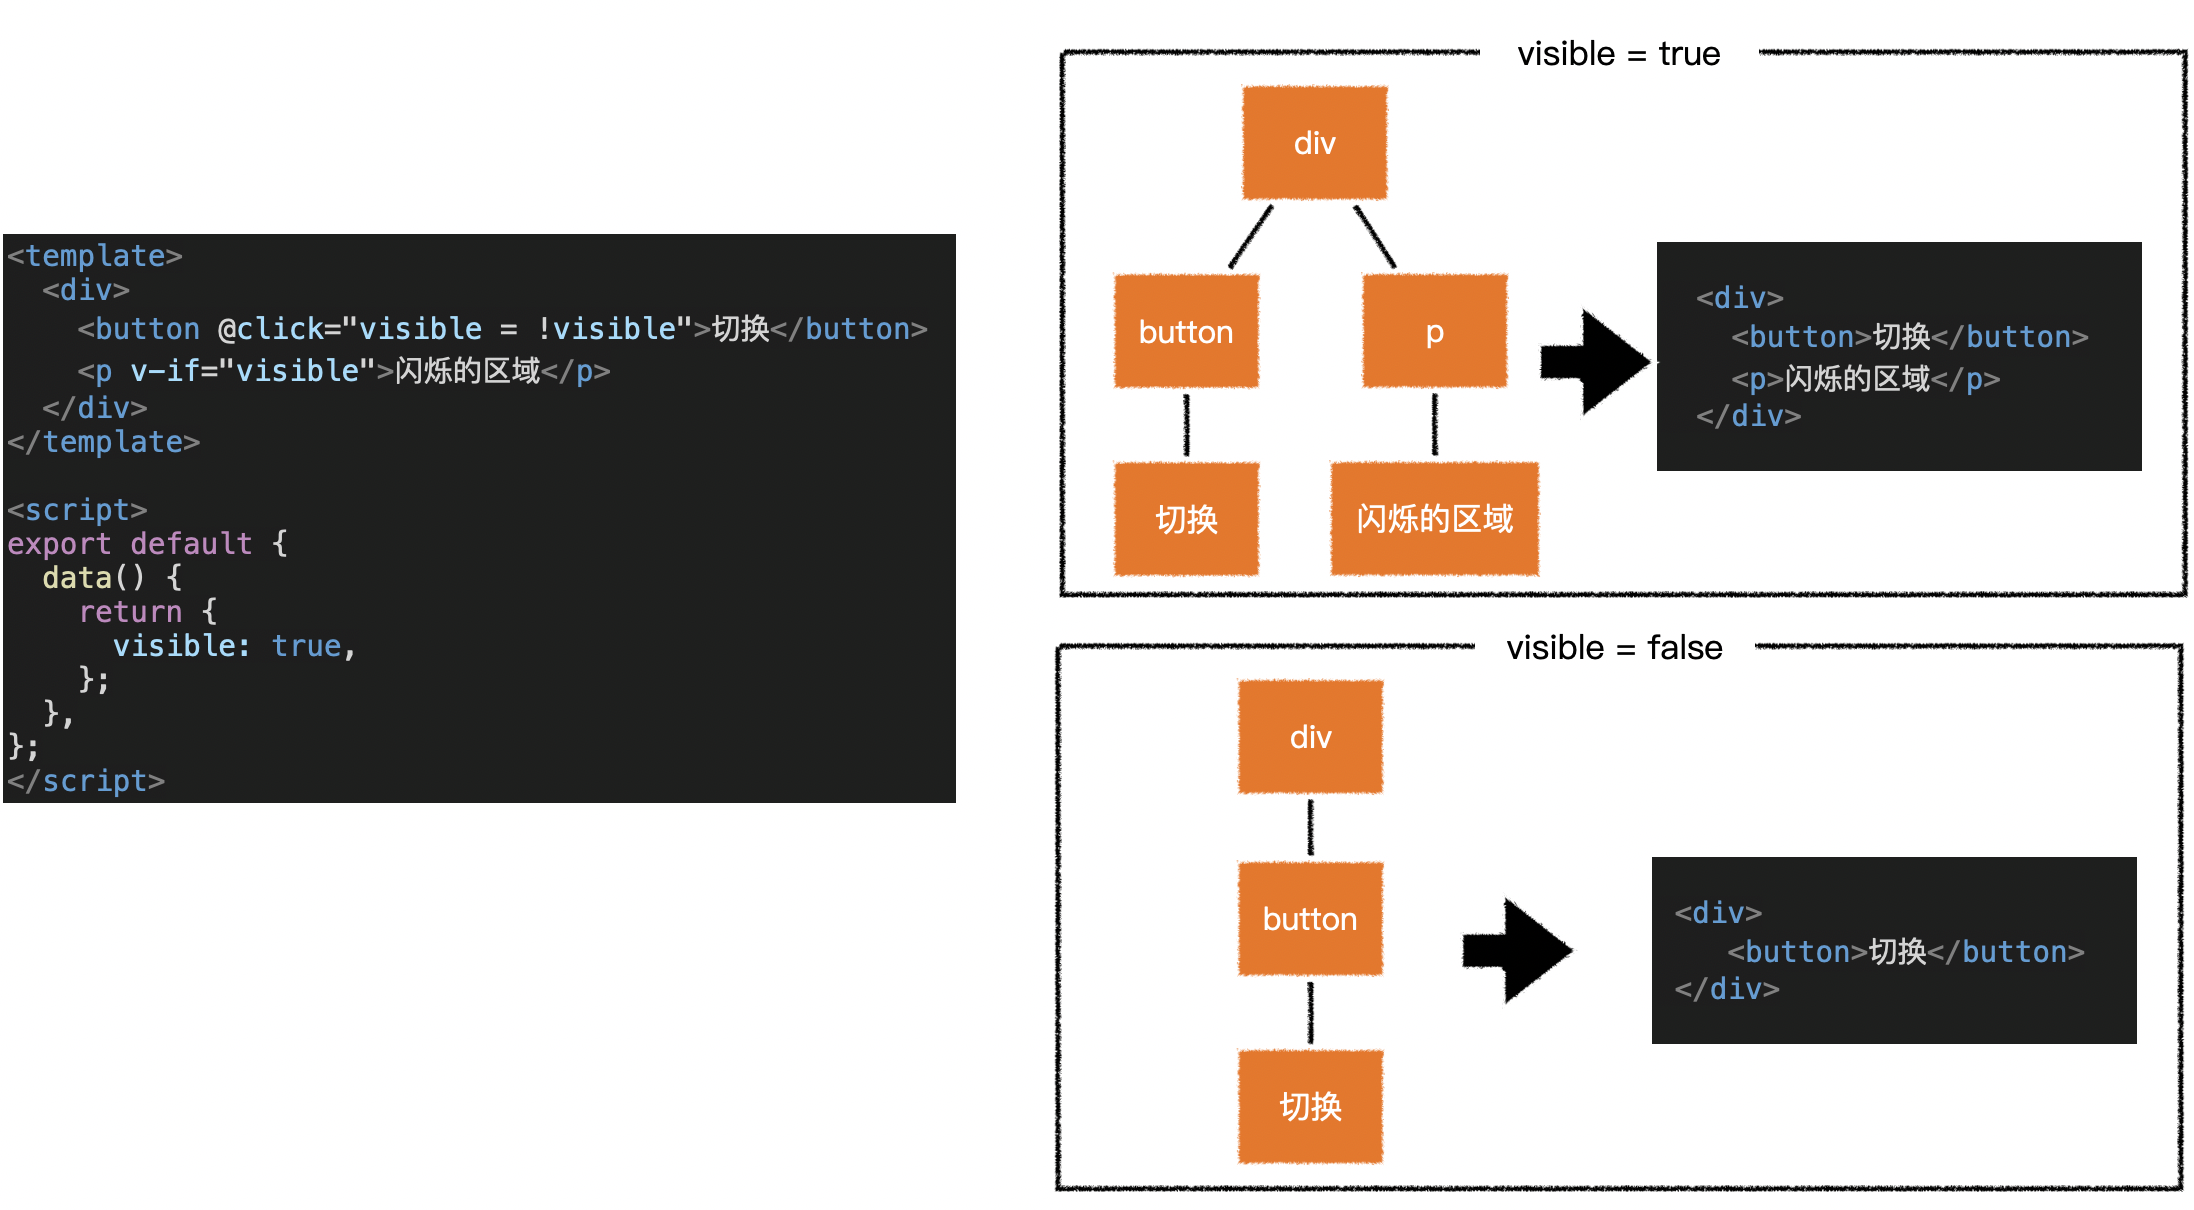
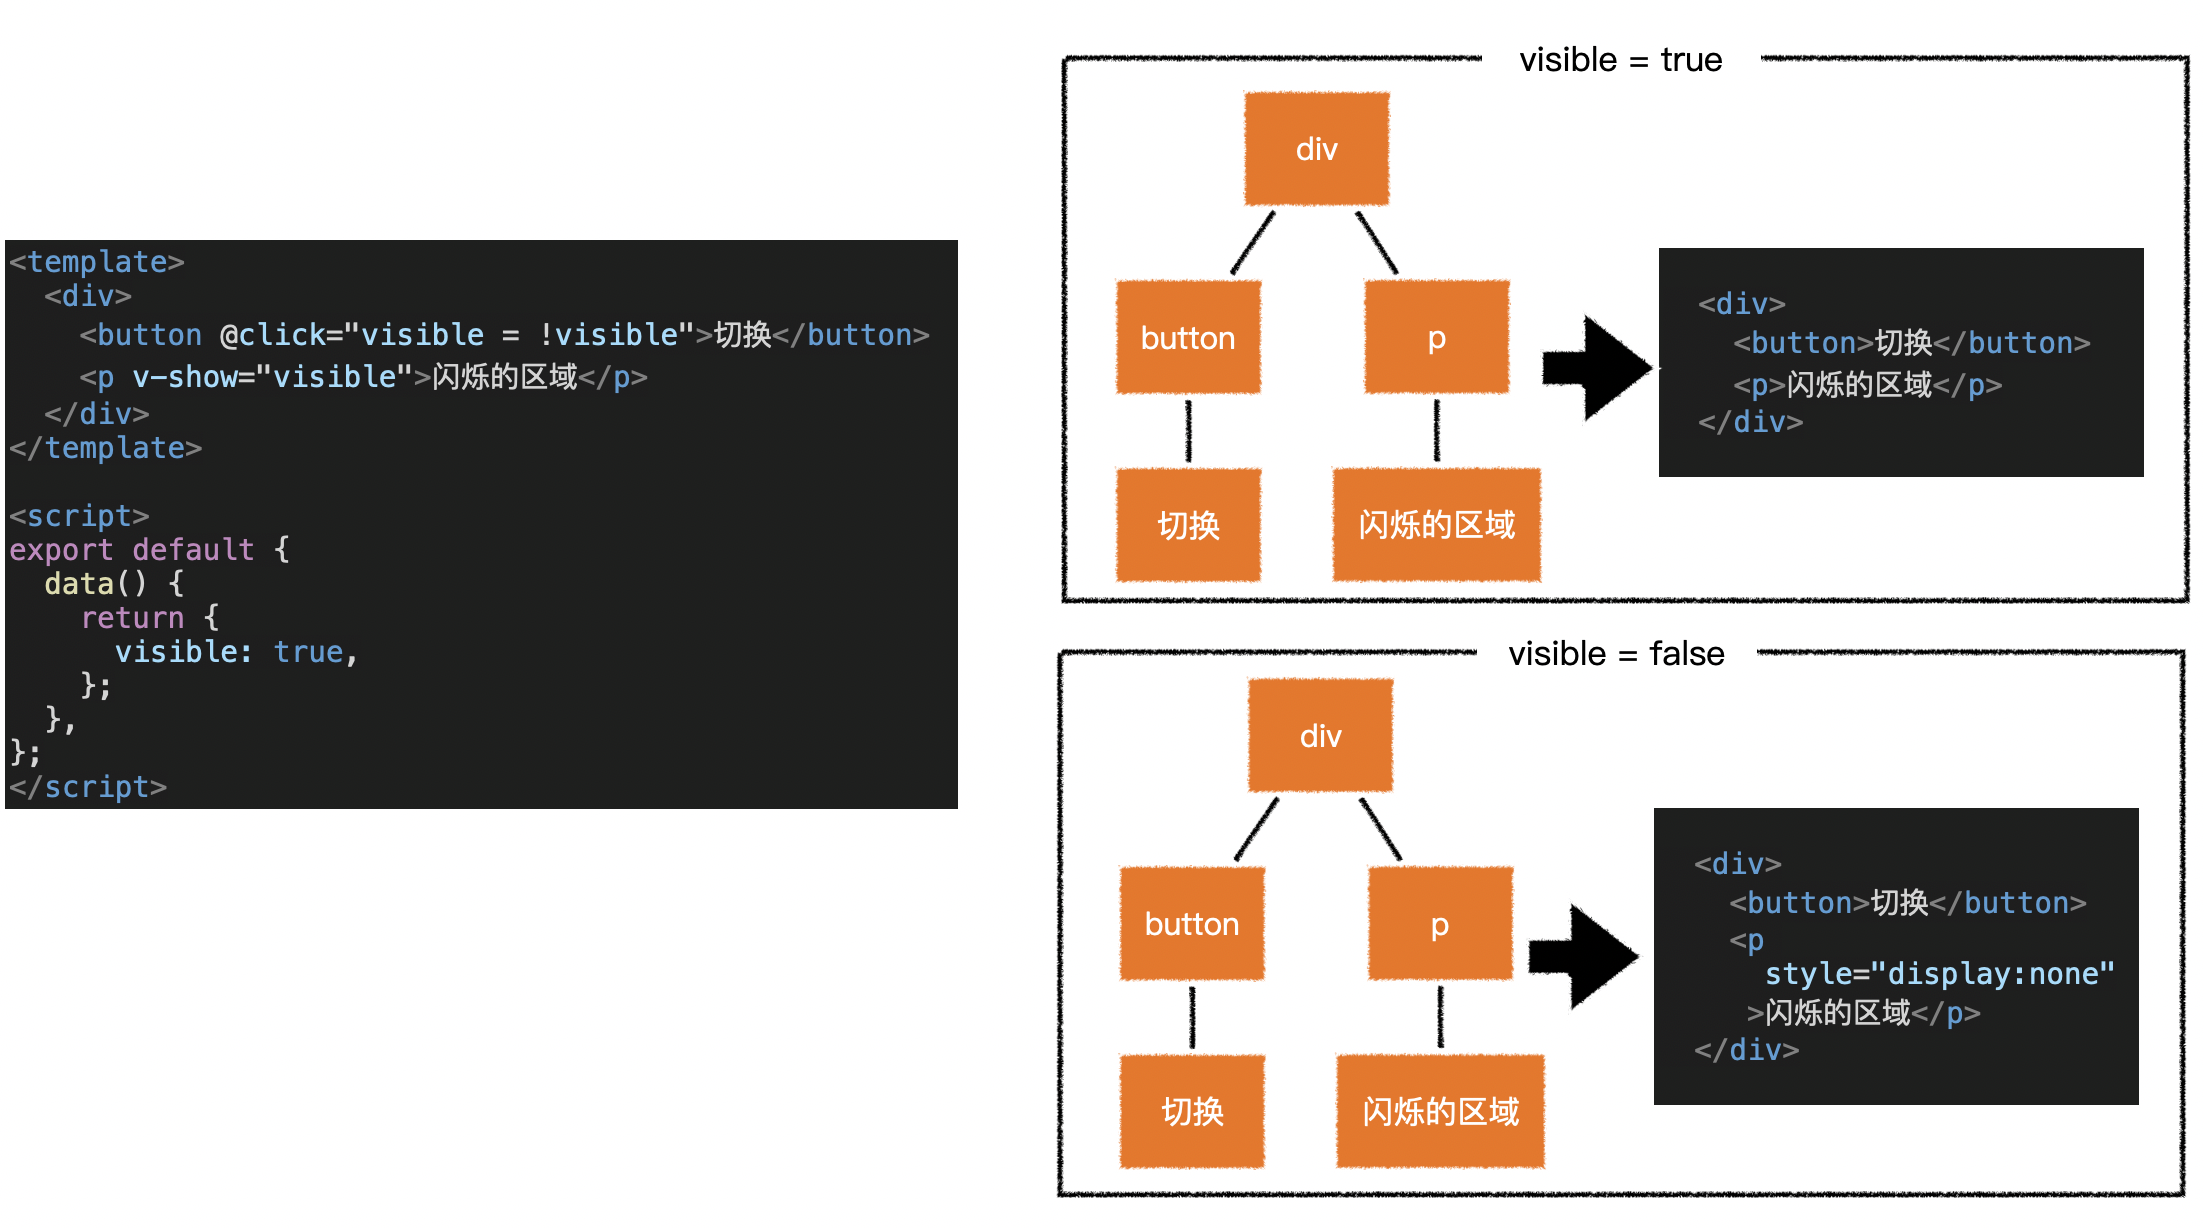
1)面试题:v-if 和 v-show 有什么区别?
- v-if 能够控制是否生成 vnode,也就间接控制了是否生成对应的 dom
- 当 v-if 为 true 时,会生成对应的 vnode,并生成对应的 dom 元素
- 当其为 false 时,不会生成对应的 vnode,自然不会生成任何的 dom 元素
- v-show 始终会生成 vnode,也就间接导致了始终生成 dom
- 只是控制 dom 的 display 属性,当 v-show 为 true 时,不做任何处理
- 当其为 false 时,生成的 dom 的 display 属性为 none
- 使用 v-if 可以有效的减少树的节点和渲染量,但也会导致树的不稳定
- 使用 v-show 可以保持树的稳定,但不能减少树的节点和渲染量
- 因此,在实际开发中,显示状态变化频繁的情况下应该使用 v-show,以保持树的稳定
- 显示状态变化较少时应该使用 v-if,以减少树的节点和渲染量
4.组件事件
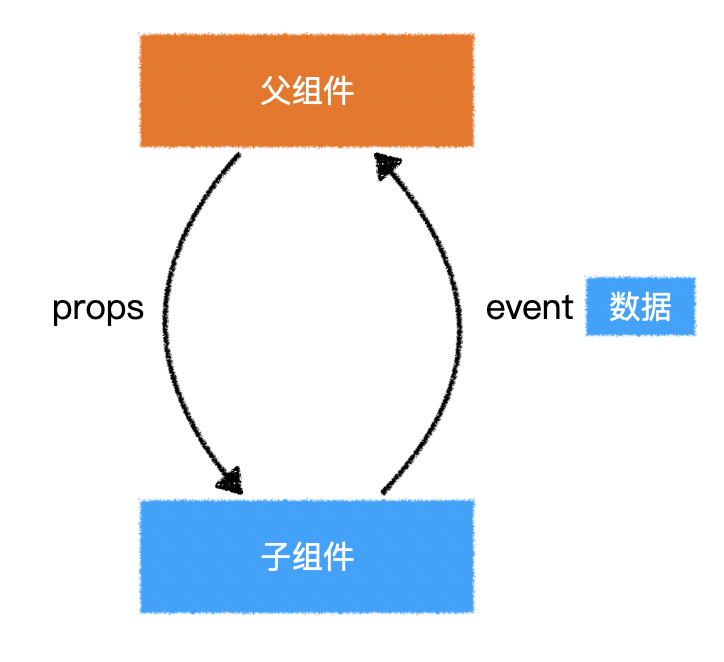
1)抛出事件
- 子组件在某个时候发生了一件事,但自身无法处理
- 于是通过事件的方式通知父组件处理
this.$emit("pageChange", 新的页码);
2)事件参数
- 子组件抛出事件时,传递给父组件的数据
- 如果子组件抛出时没有携带
(),则参数列表默认收到事件对象e - 如果子组件抛出时携带了
(),则参数列表没有收到e- 必须通过
$event声明才可以收到
- 必须通过
<div>
  <a @click="handleClick1">1</a>
  <a @click="handleClick2($event, 'haha')">2</a>
</div>
methods: {
  handleClick1(e) {
    console.log(e);
  },
  handleClick2(e, s) {
    console.log(e, s);
  }
}
3)注册事件
- 父组件声明,当子组件发生某件事的时候,自身将做出一些处理
<Pager :total="50" :current="current" @pageChange="handlePageChange" />
methods: {
  handlePageChange() {

  }
}
(八)优化工程结构
1.如何使用组件
- 编写组件说明文档
./src/components/README.md
1)Avatar
① 属性
| 属性名 | 含义 | 类型 | 必填 | 默认值 |
|---|---|---|---|---|
| url | 头像图片路径 | String | 是 | 无 |
| size | 头像尺寸,宽高相等 | Number | 否 | 150 |
2)Icon
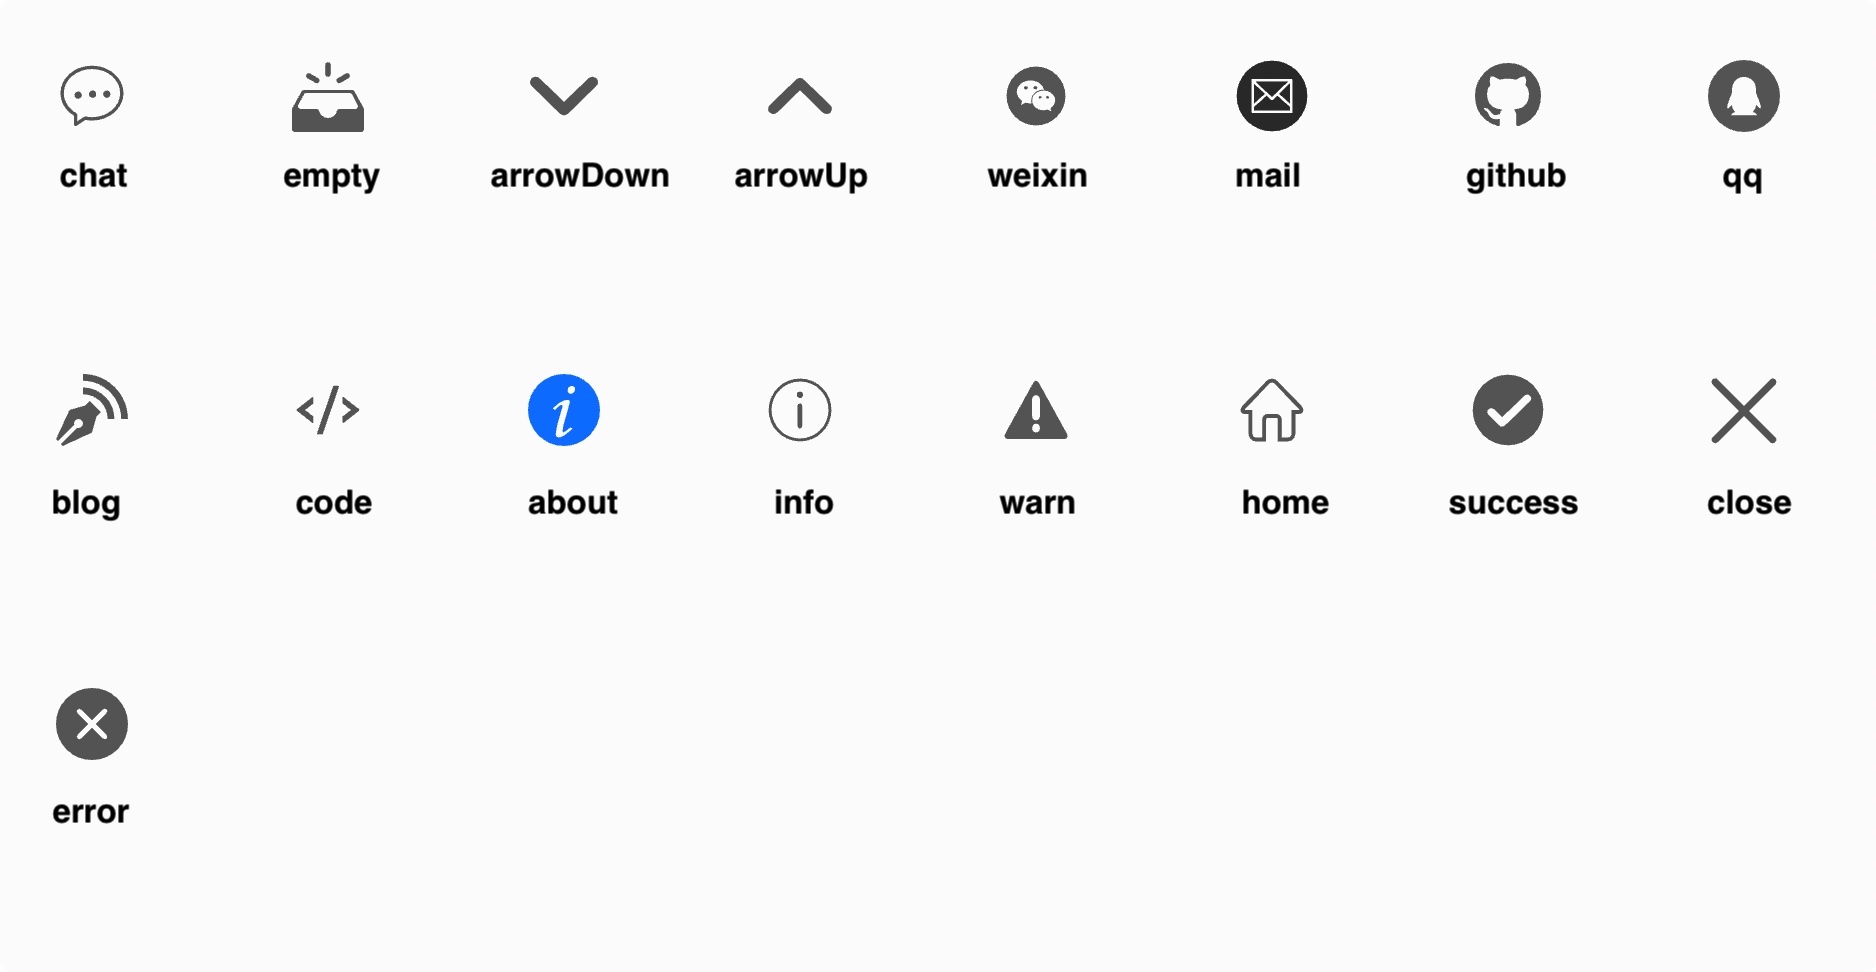
- 图标组件
- 使用的图标源来自于「阿里巴巴矢量库」
| 属性名 | 含义 | 类型 | 必填 | 默认值 |
|---|---|---|---|---|
| type | 图标类型 | String | 是 | 无 |
3)pager
① 属性
| 属性名 | 含义 | 类型 | 必填 | 默认值 |
|---|---|---|---|---|
| current | 当前页码 | Number | 否 | 1 |
| total | 总数据量 | Number | 否 | 0 |
| limit | 页容量 | Number | 否 | 10 |
| visibleNumber | 可见页码数 | Number | 否 | 10 |
② 事件
| 事件名 | 含义 | 事件参数 | 参数类型 |
|---|---|---|---|
| pageChange | 页码变化 | 新的页码 | Number |
2.如何测试组件效果
- 每个组件使用
文件夹/index.vue的形式 - 父组件引入:
import Xxx from "@/components/Xxx"- Webpack 会自动定位到 Xxx 文件夹下的 index 文件
- 安装
npm i -g @vue/cli-service-global- 无需打包运行整个项目,仅打包运行指定的文件
- 可以在待测试的组件文件夹下方新建
test.vue- 专门测试当前组件,便于后续维护迭代测试
1)打包运行指定测试文件
vue serve ./components/Pager/test.vue
2)配置命令运行测试组件
"scripts": {
  "serve": "vue-cli-service serve",
  "build": "vue-cli-service build",
  "test:Avatar": "vue serve ./src/components/Avatar/test.vue",
  "test:Icon": "vue serve ./src/components/Icon/test.vue",
  "test:Pager": "vue serve ./src/components/Pager/test.vue"
},
npm run test:Pager
(九)组件练习
- 组件说明文档
./src/components/README.md
1.Avatar
1)属性
| 属性名 | 含义 | 类型 | 必填 | 默认值 |
|---|---|---|---|---|
| url | 头像图片路径 | String | 是 | 无 |
| size | 头像尺寸,宽高相等 | Number | 否 | 150 |
2.Icon
- 图标组件
- 使用的图标源来自于「阿里巴巴矢量库」
| 属性名 | 含义 | 类型 | 必填 | 默认值 |
|---|---|---|---|---|
| type | 图标类型 | String | 是 | 无 |
3.pager
1)属性
| 属性名 | 含义 | 类型 | 必填 | 默认值 |
|---|---|---|---|---|
| current | 当前页码 | Number | 否 | 1 |
| total | 总数据量 | Number | 否 | 0 |
| limit | 页容量 | Number | 否 | 10 |
| visibleNumber | 可见页码数 | Number | 否 | 10 |
2)事件
| 事件名 | 含义 | 事件参数 | 参数类型 |
|---|---|---|---|
| pageChange | 页码变化 | 新的页码 | Number |
<template>
<div v-if="pageNumber > 1" class="pager-container">
<a :class="{ disabled: current === 1 }" @click="handleClick(1)">|<<</a>
<a :class="{ disabled: current === 1 }" @click="handleClick(current - 1)"><<</a>
<a v-for="(page, index) in numbers" :key="index" :class="{ active: current === page }" @click="handleClick(page)">{{ page }}</a>
<a :class="{ disabled: current === pageNumber }" @click="handleClick(current + 1)">>></a>
<a :class="{ disabled: current === pageNumber }" @click="handleClick(pageNumber)">>>|</a>
</div>
</template>
<script>
export default {
name: "Pager",
props: {
current: {
type: Number,
default: 1,
},
total: {
type: Number,
default: 0,
},
limit: {
type: Number,
default: 10,
},
visibleNumber: {
type: Number,
default: 10,
},
},
computed: {
// 总页数
pageNumber() {
return Math.ceil(this.total / this.limit);
},
// 页码中最小的数字
visibleMin() {
let min = this.current - Math.floor(this.visibleNumber / 2);
if (min < 1) min = 1;
return min;
},
// 页码中最大的数字
visibleMax() {
let max = this.visibleMin + this.visibleNumber - 1;
if (max > this.pageNumber) max = this.pageNumber;
return max;
},
// 页码数组
numbers() {
let nums = [];
for (let i = this.visibleMin; i <= this.visibleMax; i++) {
nums.push(i);
}
return nums;
},
},
methods: {
handleClick(newPage) {
if (newPage < 1) newPage = 1;
if (newPage > this.pageNumber) newPage = this.pageNumber;
if (newPage === this.current) return;
// 抛出一个事件
this.$emit("pageChange", newPage);
},
},
};
</script>
<style lang="less" scoped>
@import "~@/styles/var.less";
.pager-container {
display: flex;
justify-content: center;
margin: 20px 0;
a {
color: @primary;
margin: 0 5px;
&.disabled {
color: @lightWords;
cursor: not-allowed;
}
&.active {
color: @words;
font-weight: bold;
cursor: default;
}
}
}
</style>
4.Empty
- 该组件需要在外层容器中横向垂直居中
1)属性
| 属性名 | 含义 | 类型 | 必填 | 默认值 |
|---|---|---|---|---|
| text | 显示的文字 | String | 否 | "无数据" |
5.ImageLoader

- 该组件可以实现一个渐进式图片
1)属性
| 属性名 | 含义 | 类型 | 必填 | 默认值 |
|---|---|---|---|---|
| src | 原始图片的路径 | String | 是 | 无 |
| placeholder | 原始图片加载完成前的占位图片 | String | 是 | 无 |
| duration | 原始图片加载完成后,切换到原始图经过的毫秒数 | Number | 否 | 500 |
2)事件
| 事件名 | 含义 | 事件参数 | 参数类型 |
|---|---|---|---|
| load | 原始图片加载完成后触发 | 无 | 无 |
3)示例
<ImageLoader
  src="https://images.pexels.com/photos/33109/fall-autumn-red-season.jpg?fit=crop&crop=entropy&w=3456&h=2304"
  placeholder="https://images.pexels.com/photos/33109/fall-autumn-red-season.jpg?w=100"
/>
<template>
  <div class="image-loader-container">
    <img v-if="!hidePlaceholder" :src="placeholder" class="place" />
    <img
      :src="src"
      :style="{
        opacity: originOpacity,
        transition: `${duration}ms`,
      }"
      @load="handleImageLoaded"
    />
  </div>
</template>

<script>
  export default {
    name: "ImageLoader",
    props: {
      src: {
        type: String,
        required: true,
      },
      placeholder: {
        type: String,
        required: true,
      },
      duration: {
        type: Number,
        default: 500,
      },
    },
    computed: {
      originOpacity() {
        return this.isOriginLoaded ? 1 : 0;
      },
    },
    data() {
      return {
        isOriginLoaded: false,
        hidePlaceholder: false,
      };
    },
    methods: {
      handleImageLoaded() {
        this.isOriginLoaded = true;
        setTimeout(() => {
          this.hidePlaceholder = true;
          this.$emit("load");
        }, this.duration);
      },
    },
  };
</script>

<style lang="less" scoped>
  @import "~@/styles/mixin.less";

  .image-loader-container {
    width: 100%;
    height: 100%;
    position: relative;
    overflow: hidden;

    img {
      .fill();
      object-fit: cover;
    }

    .place {
      filter: blur(2vw);
    }
  }
</style>
6.Contact
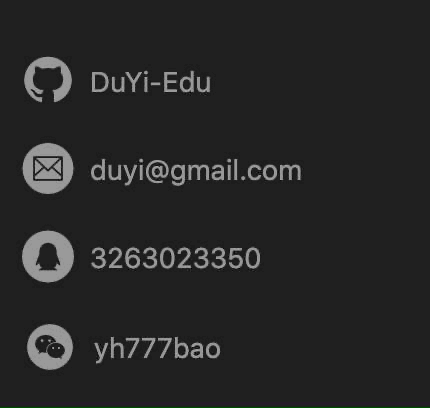
- 该组件需要横向撑满容器,背景色透明
1)如何实现点击弹出 QQ 对话?
- 设置超链接为:tencent://message/?Menu=yes&uin=要对话的 QQ 号&Service=300&sigT=45a1e5847943b64c6ff3990f8a9e644d2b31356cb0b4ac6b24663a3c8dd0f8aa12a595b1714f9d45
2)如何实现点击弹出发送邮件?
- 设置超链接为:mailto:邮件地址
7.Menu
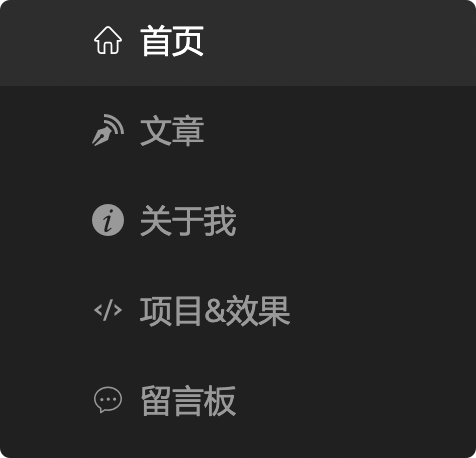
- 该组件需要横向撑满容器,背景色透明
- 每个菜单的信息如下
- 首页
- 链接地址:/
- 选中条件:路径等于 /
- 文章
- 链接地址:/blog
- 选中条件:路径以
/blog开头
- 关于我
- 链接地址:/about
- 选中条件:路径等于
/about
- 项目&效果
- 链接地址:/project
- 选中条件:路径等于
/project
- 留言板
- 链接地址:/message
- 选中条件:路径等于
/message
- 首页
<template>
  <div class="menu-container">
    <!-- :class="{
      active:
        currentPath === item.link ||
        (item.link === '/blog' && currentPath.startsWith('/blog')),
    }" -->
    <a
      v-for="item in items"
      :class="{
        active: isActive(item),
      }"
      :href="item.link"
      :key="item.id"
      class="items"
    >
      <Icon :type="item.icon" />
      <span>{{ item.title }}</span>
    </a>
  </div>
</template>

<script>
  import Icon from "@/components/Icon";
  export default {
    name: "Contact",
    components: {
      Icon,
    },
    // computed: {
    //   currentPath() {
    //     return location.pathname;
    //   },
    // },
    data() {
      return {
        items: [
          {
            id: "1",
            icon: "home",
            link: "/",
            title: "首页",
          },
          {
            id: "2",
            icon: "blog",
            link: "/blog",
            title: "文章",
            startWith: true, // 只要当前路径以link开头,当前菜单就是选中的
          },
          {
            id: "3",
            icon: "about",
            link: "/about",
            title: "关于我",
          },
          {
            id: "4",
            icon: "code",
            link: "/project",
            title: "项目&效果",
          },
          {
            id: "5",
            icon: "chat",
            link: "/message",
            title: "留言板",
          },
        ],
      };
    },
    methods: {
      isActive(menu) {
        const path = menu.link.toLowerCase();
        const currentPath = location.pathname.toLowerCase();
        if (menu.startWith) {
          return currentPath.startsWith(path);
        }
        return currentPath === path;
      },
    },
  };
</script>

<style lang="less" scoped>
  @import "~@/styles/var.less";

  .menu-container {
    width: 100%;
    margin: 20px 0;
    display: flex;
    flex-direction: column;
    align-items: flex-start;

    .items {
      width: 100%;
      height: 50px;
      padding-left: 50px;
      display: flex;
      align-items: center;
      justify-content: flex-start;
      color: @gray;

      .iconfont {
        font-size: 20px;
        margin-right: 10px;
      }

      &:hover {
        color: @white;
      }

      &.active {
        color: @white;
        background-color: rgba(255, 255, 255, 0.1);
      }
    }
  }
</style>
8.SiteAside
- 网站侧边栏
- 宽度和高度撑满外层容器
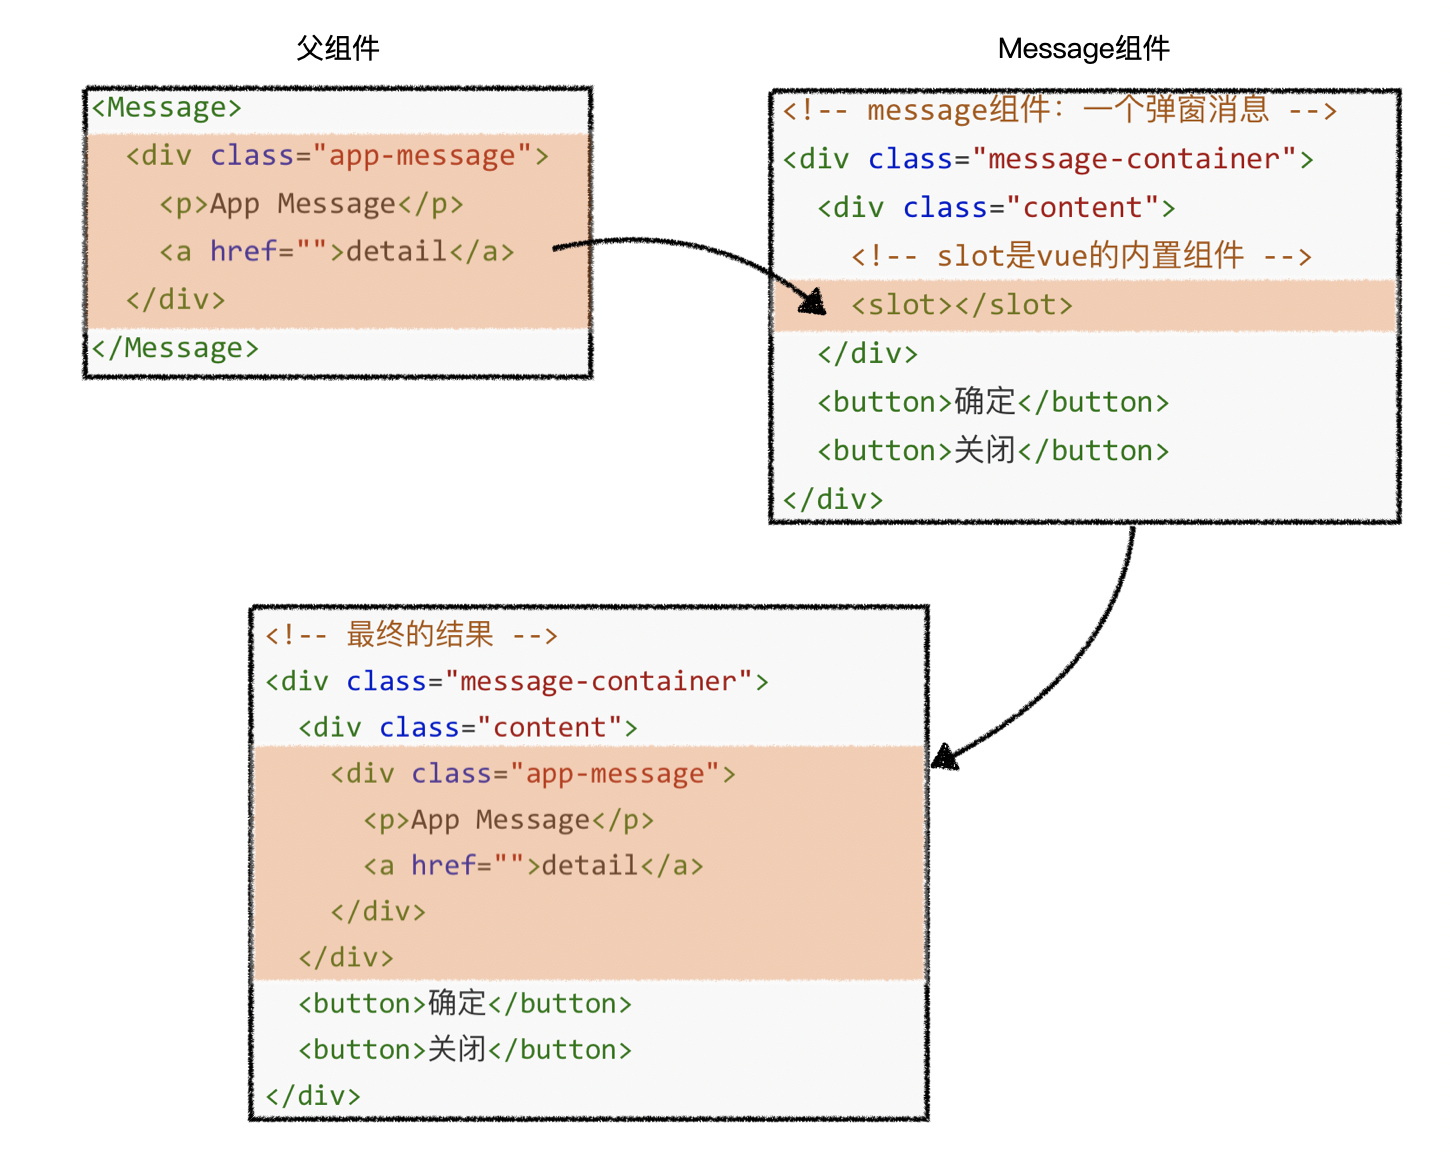
(十)插槽
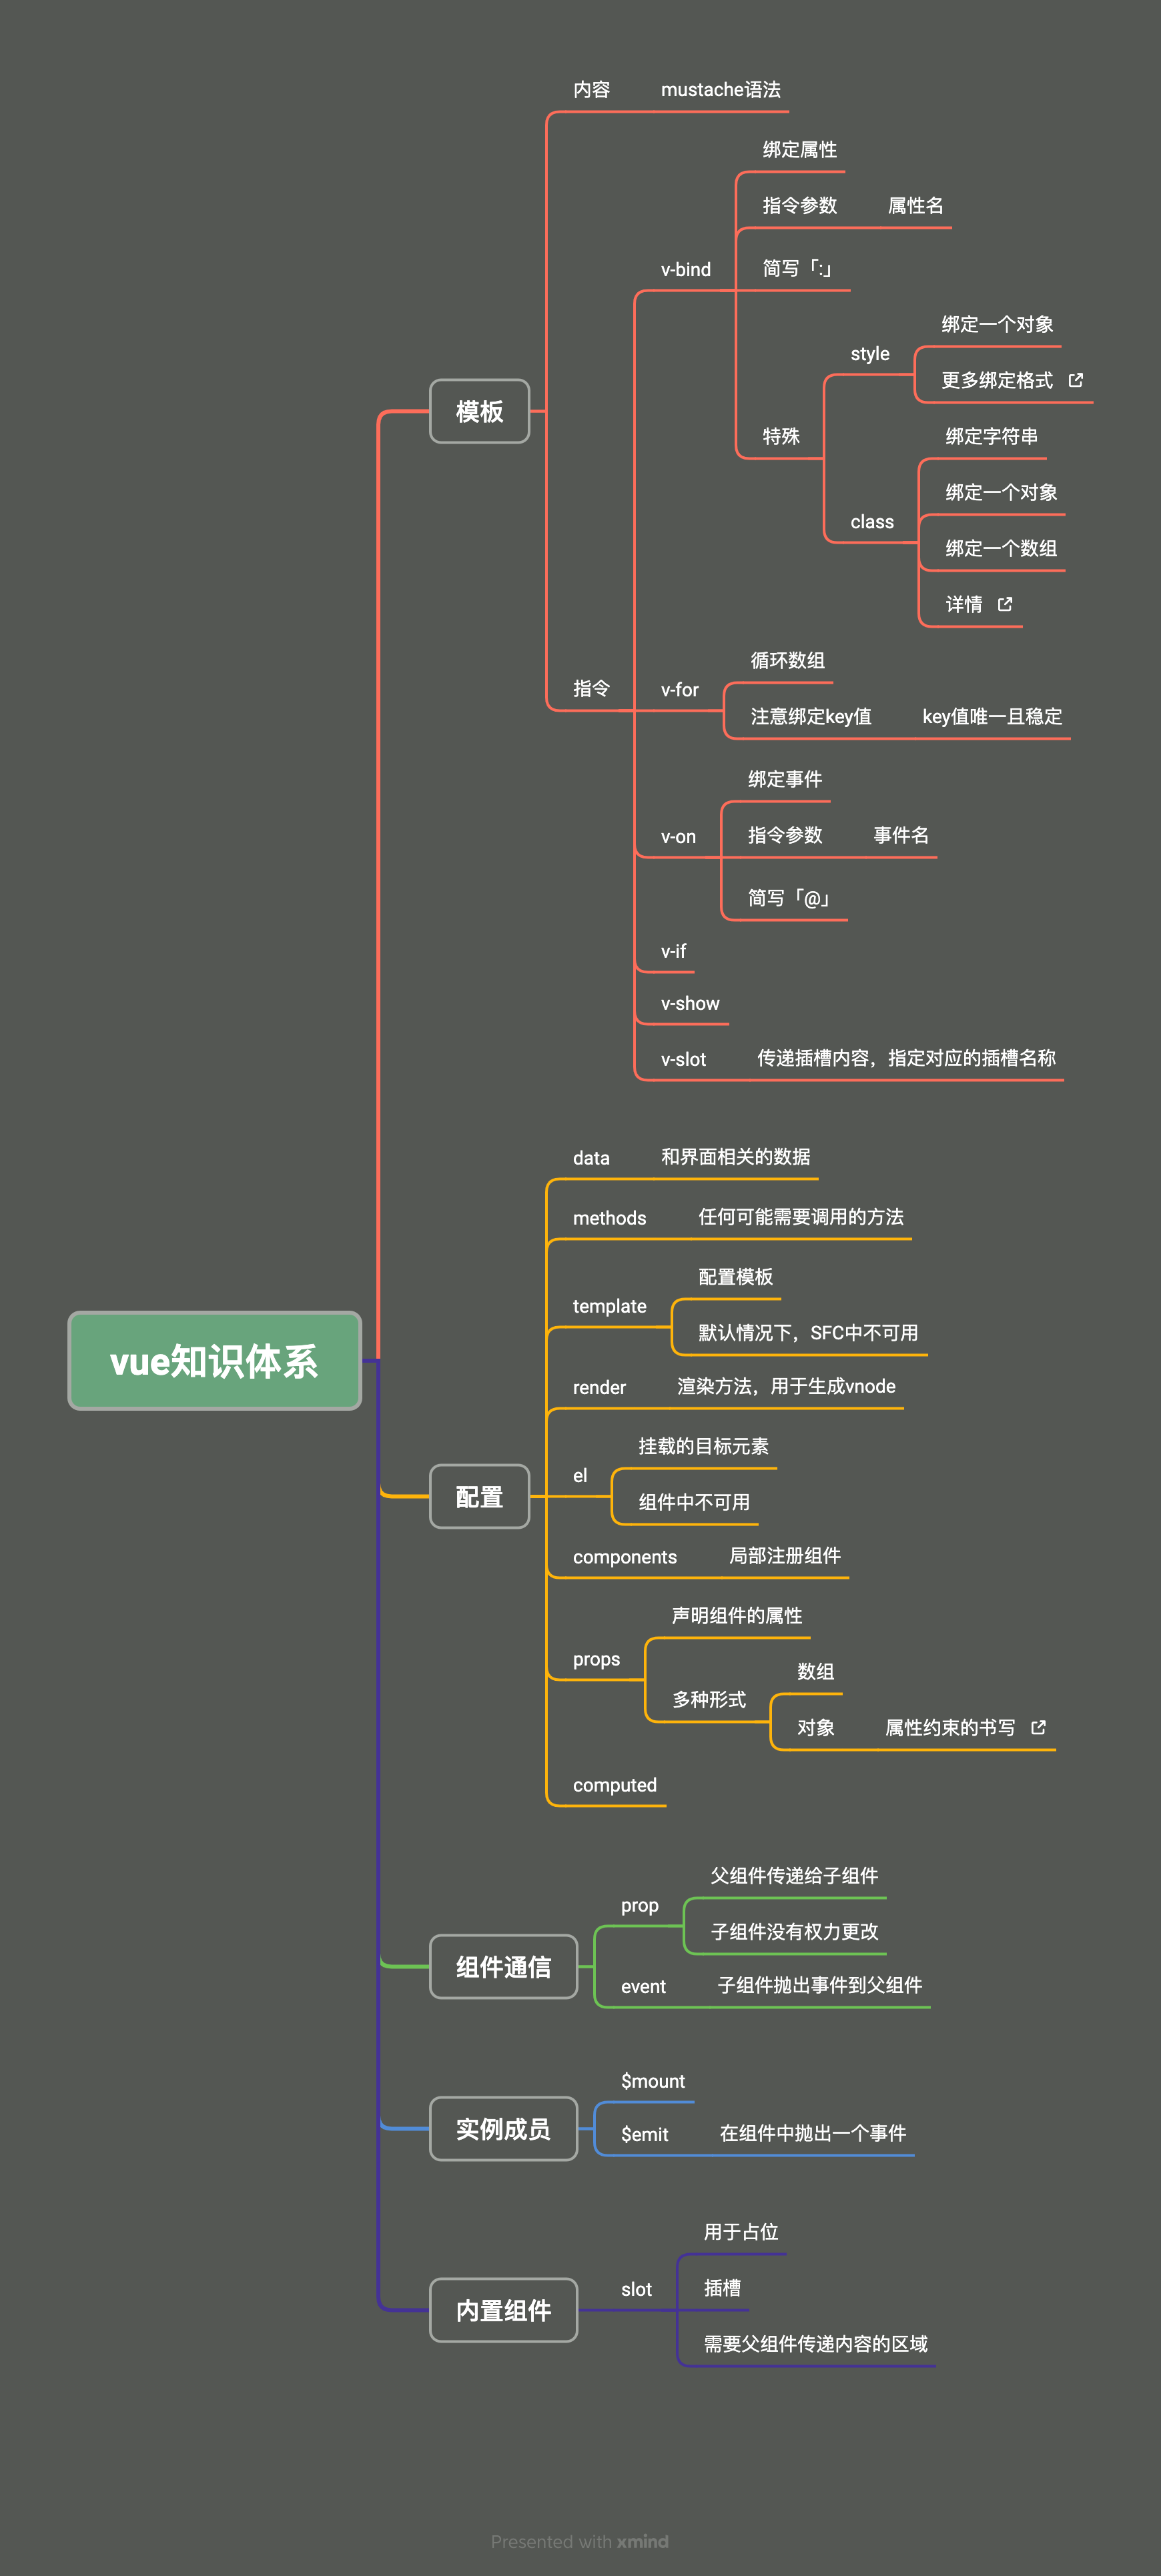
1.插槽的简单用法
- 在某些组件的模板中,有一部分区域需要父组件来指定
<!-- message组件:一个弹窗消息 -->
<div class="message-container">
  <div class="content">
    <!-- 这里是消息内容,可以是一个文本,也可能是一段html,具体是什么不知道,需要父组件指定 -->
  </div>
  <button>确定</button>
  <button>关闭</button>
</div>
- 此时,就需要使用插槽来定制组件的功能
<!-- message组件:一个弹窗消息 -->
<div class="message-container">
  <div class="content">
    <!-- slot是vue的内置组件 -->
    <slot></slot>
  </div>
  <button>确定</button>
  <button>关闭</button>
</div>

<!-- 父组件App -->
<Message>
  <div class="app-message">
    <p>App Message</p>
    <a href="">detail</a>
  </div>
</Message>

<!-- 最终的结果 -->
<div class="message-container">
  <div class="content">
    <div class="app-message">
      <p>App Message</p>
      <a href="">detail</a>
    </div>
  </div>
  <button>确定</button>
  <button>关闭</button>
</div>
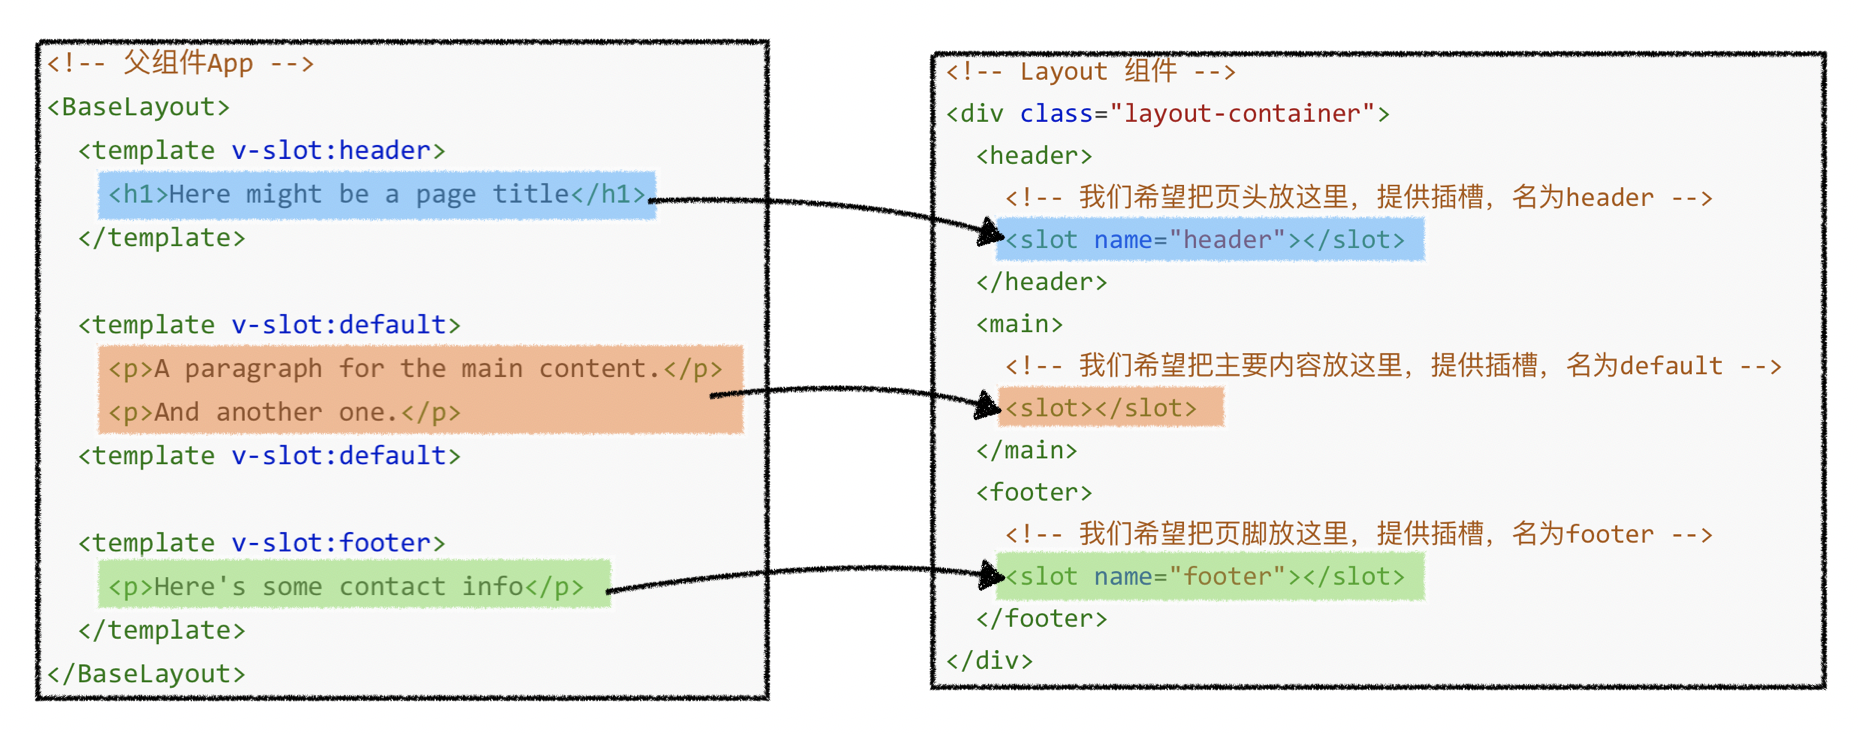
2.具名插槽
- 如果某个组件中需要父元素传递多个区域的内容,也就意味着需要提供多个插槽
- 为了避免冲突,就需要给不同的插槽赋予不同的名字
<!-- Layout 组件 -->
<div class="layout-container">
  <header>
    <!-- 希望把页头放这里,提供插槽,名为header -->
    <slot name="header"></slot>
  </header>
  <main>
    <!-- 希望把主要内容放这里,提供插槽,名为default -->
    <slot></slot>
  </main>
  <footer>
    <!-- 希望把页脚放这里,提供插槽,名为footer -->
    <slot name="footer"></slot>
  </footer>
</div>

<!-- 父组件App -->
<BaseLayout>
  <template v-slot:header>
    <h1>Here might be a page title</h1>
  </template>

  <template v-slot:default>
    <p>A paragraph for the main content.</p>
    <p>And another one.</p>
  </template>

  <template v-slot:footer>
    <p>Here's some contact info</p>
  </template>
</BaseLayout>
3.Layout
1)示例
<Layout>
  <template #left>
    <div>左边栏区域,宽度适应内容,溢出隐藏</div>
  </template>
  <div>主区域,宽度占满剩余空间,溢出隐藏</div>
  <template #right>
    <div>右边栏区域,宽度适应内容,溢出隐藏</div>
  </template>
</Layout>
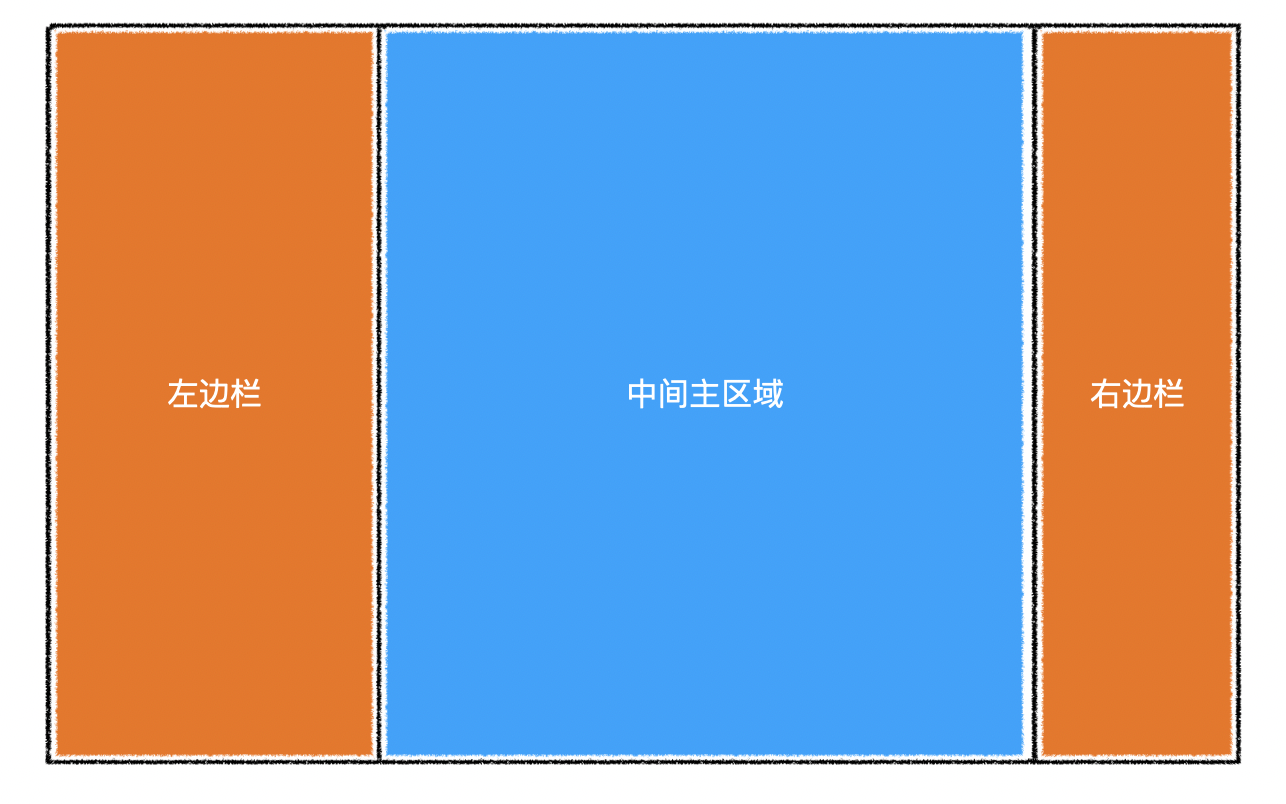
2)插槽
| 插槽名 | 含义 |
|---|---|
| default | 中间主区域 |
| left | 左边栏 |
| right | 右边栏 |
<template>
  <div class="layout-container">
    <div class="left">
      <slot name="left"></slot>
    </div>
    <div class="main">
      <slot></slot>
    </div>
    <div class="right">
      <slot name="right"></slot>
    </div>
  </div>
</template>

<script>
  export default {
    name: "Layout",
  };
</script>

<style lang="less" scoped>
  .layout-container {
    width: 100%;
    height: 100%;
    display: flex;
    align-items: center;

    .left {
      flex: 0 0 auto;
      height: 100%;
      overflow: hidden;
    }

    .main {
      flex: 1 1 auto;
      height: 100%;
    }

    .right {
      flex: 0 0 auto;
      height: 100%;
      overflow: hidden;
    }
  }
</style>
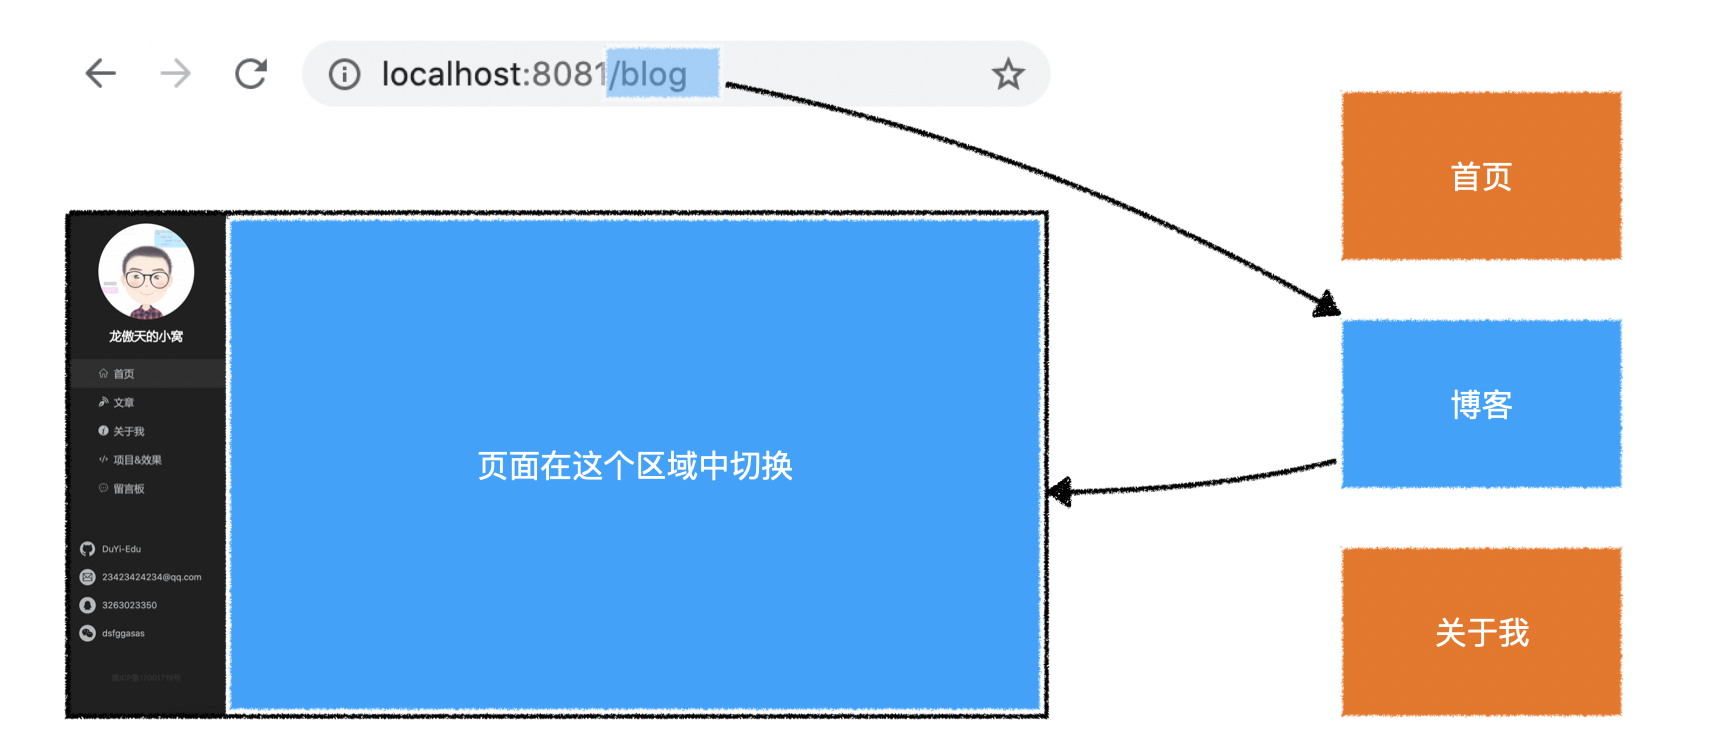
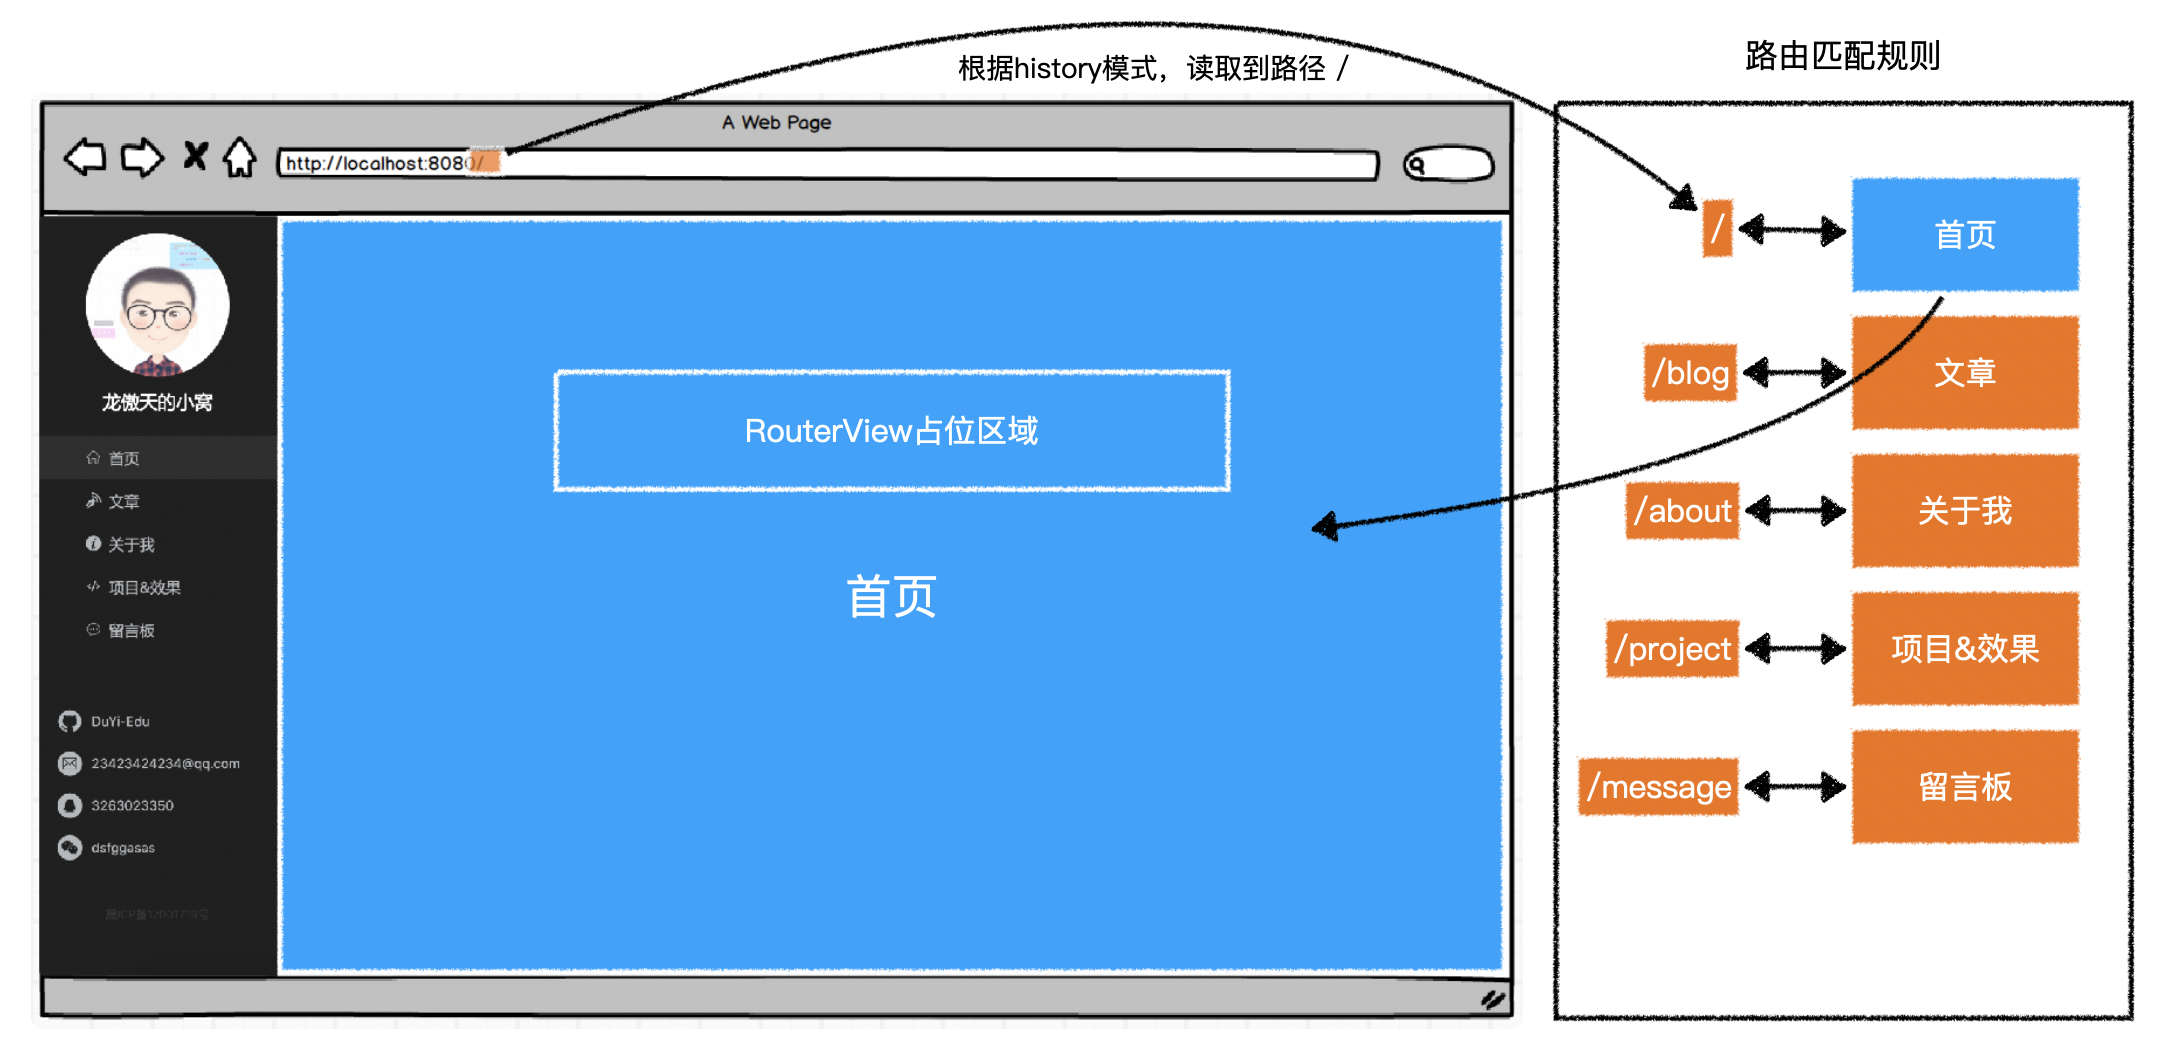
(十一)路由
vue-router 官网:https://router.vuejs.org/zh/
- 如何根据地址中的路径选择不同的组件
- 把选择的组件放到哪个位置
- 如何无刷新的切换组件
1.路由插件
# 为了保证和课程一致,请安装3.4.9版本
npm i vue-router@3.4.9
1)路由插件的使用
import Vue from 'vue'
import VueRouter from 'vue-router'

Vue.use(VueRouter); // Vue.use(插件)  在Vue中安装插件

const router = new VueRouter({
  // 路由配置
})
new Vue({
  ...,
  router
})
2.基本使用
// 路由配置
const router = new VueRouter({
  routes: [
    // 路由规则
    // 当匹配到路径 /foo 时,渲染 Foo 组件
    { path: "/foo", component: Foo },
    // 当匹配到路径 /bar 时,渲染 Bar 组件
    { path: "/bar", component: Bar },
  ],
});
<!-- App.vue -->
<div class="container">
  <div>
    <!-- 公共区域 -->
  </div>
  <div>
    <!-- 页面区域 -->
    <!-- vue-router 匹配到的组件会渲染到这里 -->
    <RouterView />
  </div>
</div>
3.路由模式
- 路由模式决定了
- 路由从哪里获取访问路径
- 路由如何改变访问路径
vue-router提供了三种路由模式
1)hash
- 默认值
- 路由从浏览器地址栏中的
hash部分获取路径 - 改变路径也是改变的 hash 部分
- 该模式兼容性最好
http://localhost:8081/#/blog  -->  /blog
http://localhost:8081/about#/blog  --> /blog
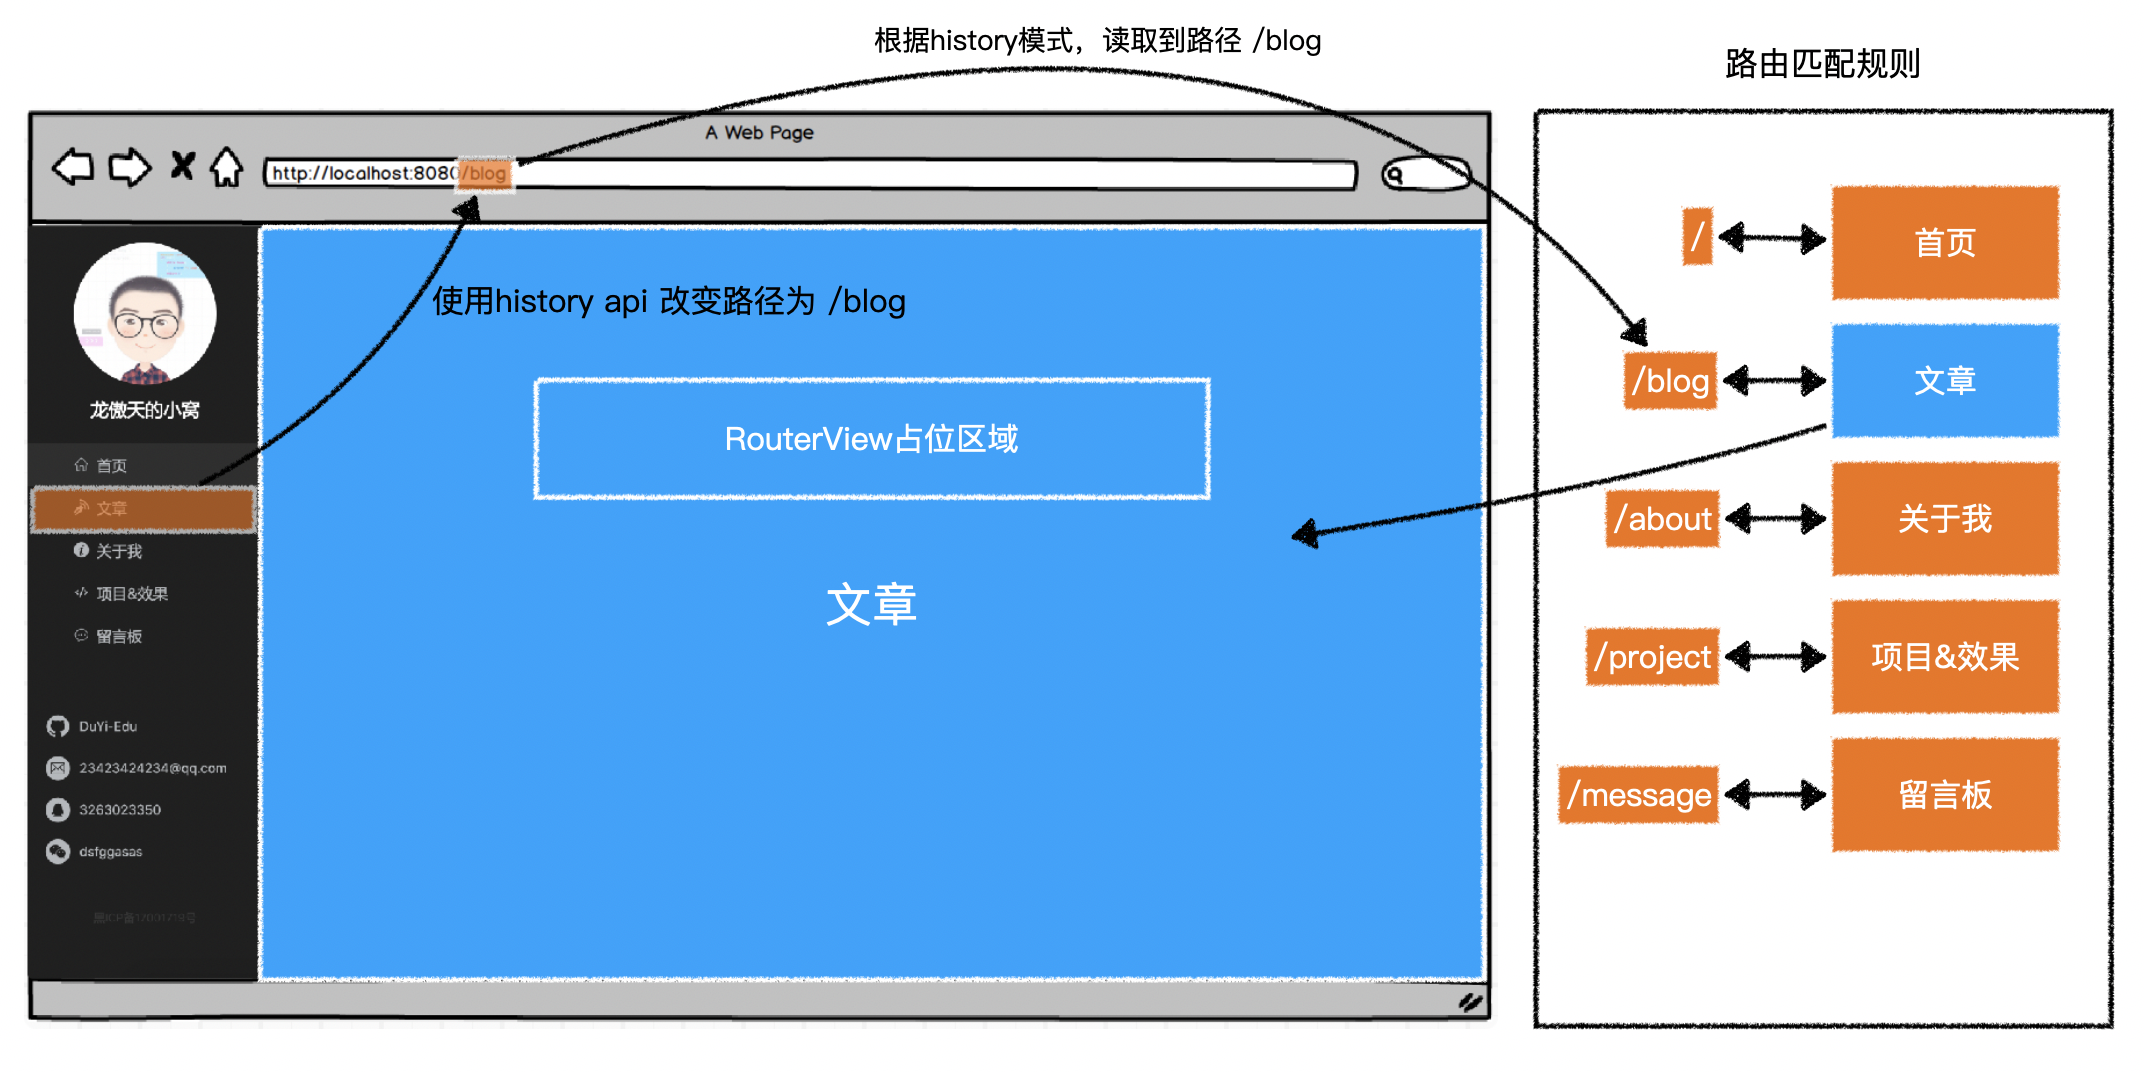
2)history
- 路由从浏览器地址栏的
location.pathname中获取路径 - 改变路径使用的 H5 的
history api - 该模式可以让地址栏最友好
- 但是需要浏览器支持
history api
http://localhost:8081/#/blog  -->  /
http://localhost:8081/about#/blog  --> /about
http://localhost:8081/blog  --> /blog
3)abstract
- 路由从内存中获取路径
- 改变路径也只是改动内存中的值
- 这种模式通常应用到非浏览器环境中(如移动端 APP)
内存: /			-->   /
内存: /about	--> /about
内存: /blog	  --> /blog
4.导航
1)渲染
vue-router提供了全局的组件RouterLink- 渲染结果是一个
a元素
<RouterLink to="/blog">文章</RouterLink>

<!-- mode:hash 生成 -->
<a href="#/blog">文章</a>

<!-- mode:history 生成 -->
<!-- 为了避免刷新页面,vue-router实际上为它添加了点击事件,并阻止了默认行为,在事件内部使用hitory api更改路径 -->
<a href="/blog">文章</a>
2)激活状态
- 默认情况下,
vue-router会用 当前路径 匹配 导航路径- 如果当前路径是以导航路径开头,则算作匹配
- 会为导航的 a 元素添加类名
router-link-active
- 会为导航的 a 元素添加类名
- 如果当前路径完全等于导航路径,则算作精确匹配
- 会为导航的 a 元素添加类名
router-link-exact-active
- 会为导航的 a 元素添加类名
- 如果当前路径是以导航路径开头,则算作匹配
- 例如,当前访问的路径是
/blog,则:
| 导航路径 | 类名 |
|---|---|
| / | router-link-active |
| /blog | router-link-active router-link-exact-active |
| /about | 无 |
| /message | 无 |
- 可以为组件
RouterLink添加 bool 属性exact - 将匹配规则改为:必须要精确匹配才能添加匹配类名
router-link-active - 例如,当前访问的路径是
/blog,则:
| 导航路径 | exact | 类名 |
|---|---|---|
| / | true | 无 |
| /blog | false | router-link-active router-link-exact-active |
| /about | true | 无 |
| /message | true | 无 |
- 例如,当前访问的路径是
/blog/detail/123,则:
| 导航路径 | exact | 类名 |
|---|---|---|
| / | true | 无 |
| /blog | false | router-link-active |
| /about | true | 无 |
| /message | true | 无 |
- 可以通过
active-class属性更改匹配的类名 - 通过
exact-active-class更改精确匹配的类名
5.命名路由
- 使用命名路由可以解除系统与路径之间的耦合
// 路由配置
const router = new VueRouter({
  routes: [
    // 路由规则
    // 当匹配到路径 /foo 时,渲染 Foo 组件
    { name: "foo", path: "/foo", component: Foo },
    // 当匹配到路径 /bar 时,渲染 Bar 组件
    { name: "bar", path: "/bar", component: Bar },
  ],
});
<!-- 向to属性传递路由信息对象 RouterLink会根据你传递的信息以及路由配置生成对应的路径 -->
<RouterLink :to="{ name:'foo' }">go to foo</RouterLink>
(十二)弹出消息
1.使用 css module
- 需要将样式文件命名为
xxx.module.ooo xxx为文件名ooo为样式文件后缀名- 可以是
css、less
- 可以是
2.得到组件渲染的 Dom
- Vue 实例身上的
$el属性
1)封装方法
/**
 * 获取某个组件渲染的Dom根元素
 */
function getComponentRootDom(comp, props) {
  const vm = new Vue({
    render: (h) => h(comp, { props }),
  });
  vm.$mount();
  return vm.$el;
}
2)获取真实 DOM 元素
import Icon from "./components/Icon";
var dom = getComponentRootDom(Icon, {
  type: "home",
});
console.log(dom); // <i class="iconfont iconzhuye"></i>
3.扩展 vue 实例
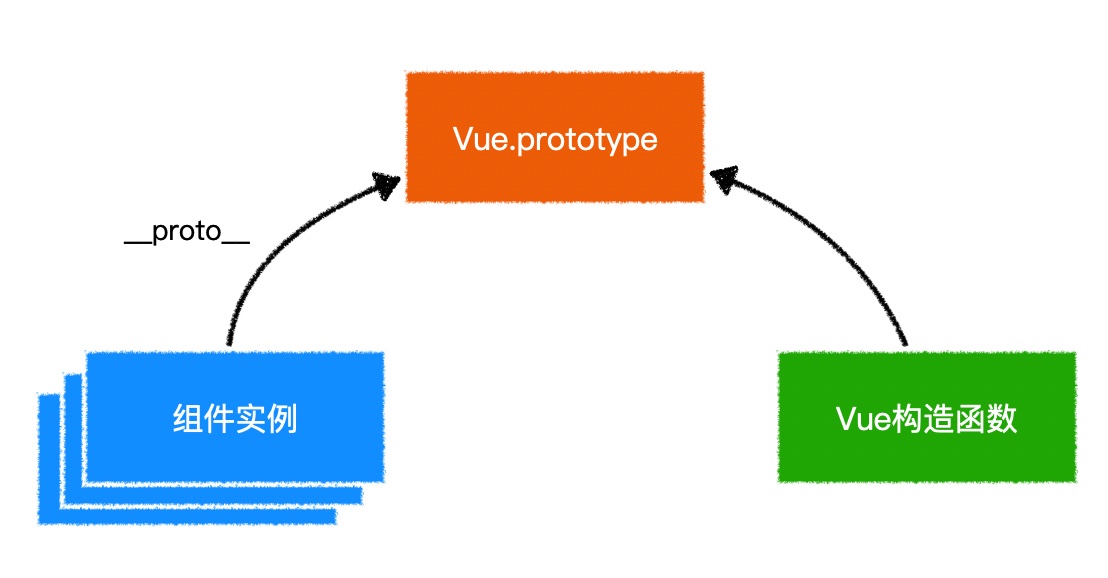
- 向实例注入成员
- 所有组件都可以调用实例的原型上的成员
- 一般自定义的属性和方法命名会加上
$
Vue.prototype.$sayHello = function () {
  console.log("Hello");
};
4.ref
<template>
  <div>
    <p ref="para">some paragraph</p>
    <ChildComp ref="comp" />
    <button @click="handleClick">查看所有引用</button>
  </div>
</template>

<script>
  import ChildComp from "./ChildComp";
  export default {
    components: {
      ChildComp,
    },
    methods: {
      handleClick() {
        // 获取持有的所有引用
        console.log(this.$refs);
      },
    },
  };
</script>
- 元素标签上标记了 ref 属性
- 实例身上的
$refs属性会增加相应的属性 - 属性值为当前真实的 DOM 元素
- 实例身上的
{
  para: p元素(原生DOM),
  comp: ChildComp的组件实例
}
- 获取到组件实例即可在父组件中访问 ref 绑定的子组件定义的属性和方法
- 也可以修改
this.$refs.comp.a; // 定义在ChildComp组件中的属性
注意
- 通过
ref可以直接操作 dom 元素- 甚至可能直接改动子组件
- 这些都不符合 vue 的设计理念
- 除非迫不得已,否则不要使用 ref
(十三)获取远程数据
vue cli: https://cli.vuejs.org/zh/
axios: https://github.com/axios/axios
mockjs:http://mockjs.com/
1.远程获取数据的意义
2.开发环境有跨域问题
3.生产环境没有跨域问题
4.解决开发环境的跨域问题
5.为什么要 Mock 数据
(十四)组件生命周期
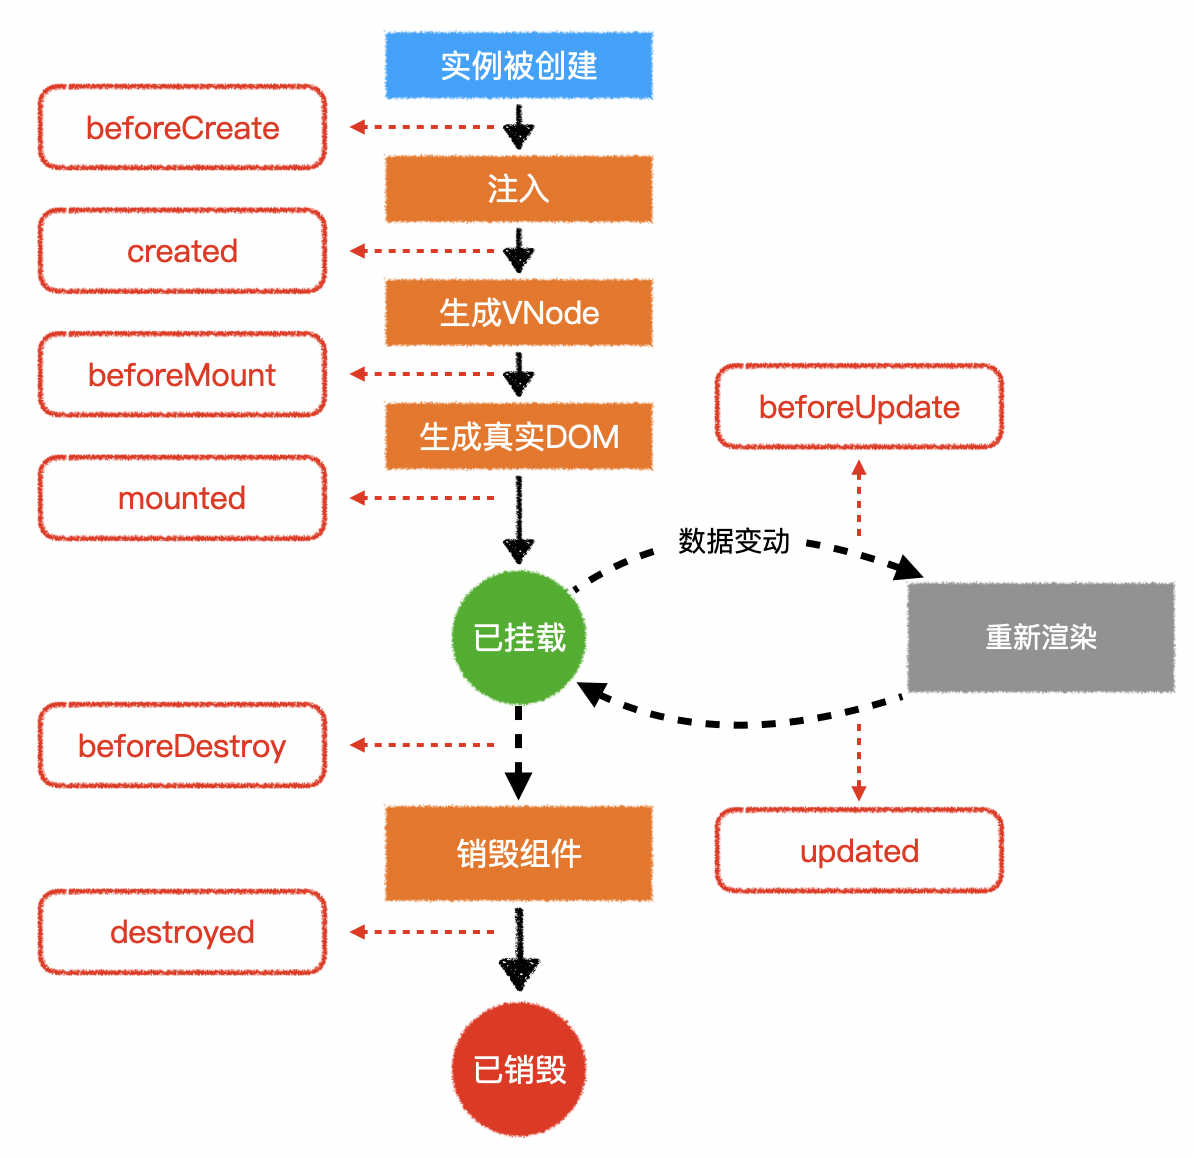
1.加载远程数据
export default {
  data() {
    return {
      news: [],
    };
  },
  async created() {
    this.news = await getNews();
  },
};
2.直接操作 DOM
export default {
  data() {
    return {
      containerWidth: 0,
      containerHeight: 0,
    };
  },
  mounted() {
    this.containerWidth = this.$refs.container.clientWidth;
    this.containerHeight = this.$refs.container.containerHeight;
  },
};
3.启动和清除计时器
export default {
  data(){
    return {
      timer: null
    }
  },
  created(){
    this.timer = setInterval(()=>{
     ...
    }, 1000)
  },
  destroyed(){
    clearInterval(this.timer);
  }
}
(十五)完成首页 - Part1
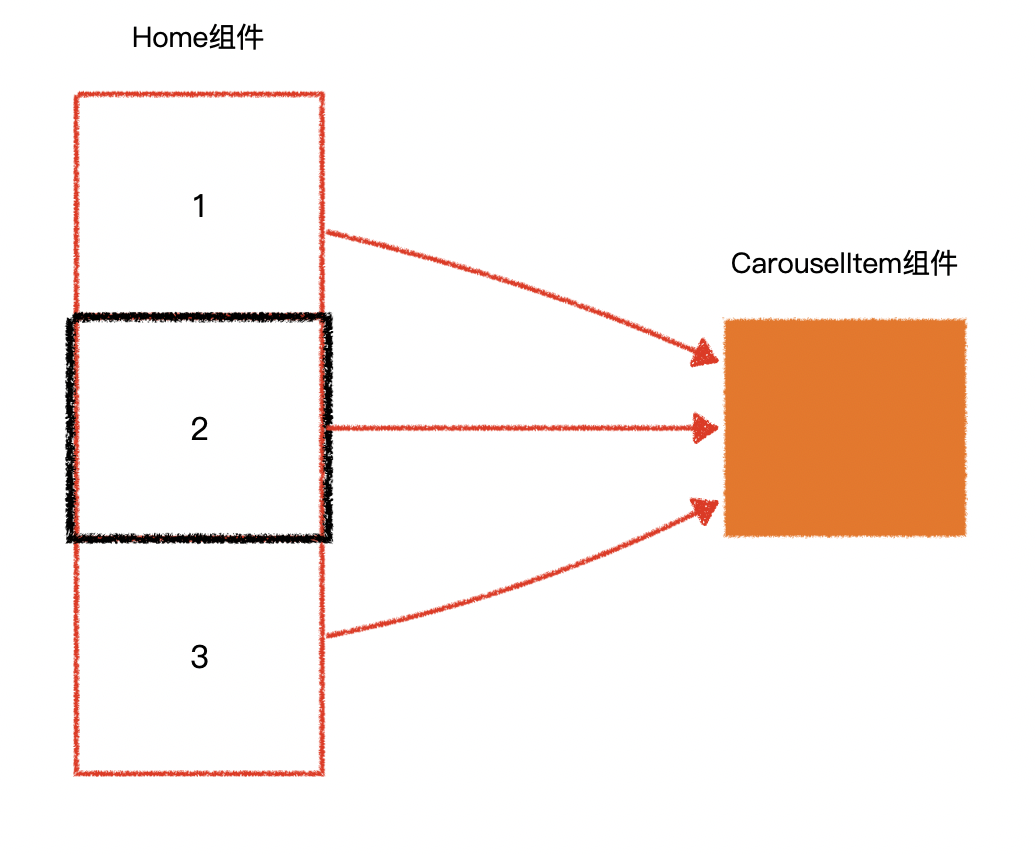
1.Home 组件
- 负责呈现整体效果
- 整体布局
- 监听鼠标滚轮事件,切换轮播图
- 提供上下按钮,切换轮播图
- 提供指示器,切换轮播图
2.CarouselItem 组件
- 负责呈现单张轮播图的全部事务
(十六)完成首页 - Part2
1.切换轮播图
- 滚动鼠标滚轮
- 点击上下箭头
- 点击指示器
<template>
  <div v-loading="isLoading" @wheel="handleWheel" class="home-container" ref="homeContainer">
    <ul
      :style="{
        marginTop,
      }"
      @transitionend="handleTransitionEnd"
      ref="carouselContainer"
      class="carousel-container"
    >
      <li v-for="banner in banners" :key="banner.id">
        <CarouselItem :banner="banner" />
      </li>
    </ul>
    <div v-show="index >= 1" @click="switchTo(index - 1)" class="icon icon-up">
      <Icon type="arrowUp" />
    </div>
    <div v-show="index < banners.length - 1" @click="switchTo(index + 1)" class="icon icon-down">
      <Icon type="arrowDown" />
    </div>
    <ul class="indicator">
      <li
        v-for="(banner, idx) in banners"
        :key="banner.id"
        :class="{
          active: idx === index,
        }"
        @click="switchTo(idx)"
      ></li>
    </ul>
  </div>
</template>

<script>
  import CarouselItem from "./CarouselItem";
  import Icon from "@/components/Icon";
  import { getBanners } from "@/api/banner";
  export default {
    name: "Home",
    components: {
      CarouselItem,
      Icon,
    },
    data() {
      return {
        isLoading: true,
        banners: [],
        index: 0, // 当前显示的是第几张轮播图
        containerHeight: 0, // 整个容器的高度
        isSwitching: false, // 是否正在翻页
      };
    },
    computed: {
      marginTop() {
        return -this.index * this.containerHeight + "px";
      },
    },
    async created() {
      this.banners = await getBanners();
      this.isLoading = false;
    },
    mounted() {
      this.containerHeight = this.$refs.carouselContainer.clientHeight;
      window.addEventListener("resize", this.handleResize);
    },
    methods: {
      // 切换轮播图
      switchTo(idx) {
        this.index = idx;
      },
      // 滚轮事件
      handleWheel(e) {
        if (this.isSwitching) return;
        if (e.deltaY < -5 && this.index > 0) {
          this.isSwitching = true;
          this.index--;
        } else if (e.deltaY > 5 && this.index < this.banners.length - 1) {
          this.isSwitching = true;
          this.index++;
        }
      },
      // 过渡效果结束
      handleTransitionEnd() {
        this.isSwitching = false;
      },
      // 窗口变化
      handleResize() {
        this.containerHeight = this.$refs.carouselContainer.clientHeight;
      },
    },
    destroyed() {
      window.removeEventListener("resize", this.handleResize);
    },
  };
</script>

<style lang="less" scoped>
  @import "~@/styles/mixin.less";
  @import "~@/styles/var.less";

  .home-container {
    width: 100%;
    height: 100%;
    position: relative;
    overflow: hidden;
    @gap: 20px;
    @jump: 10px;

    .carousel-container {
      width: 100%;
      height: 100%;
      transition: 0.5s;

      li {
        width: 100%;
        height: 100%;
      }
    }

    .icon {
      .self-center();
      color: @gray;
      cursor: pointer;
      transform: translateX(-50%);

      .iconfont {
        font-size: 30px;
      }

      &.icon-up {
        top: @gap;
        animation: jump-up 2s infinite;
      }

      &.icon-down {
        top: auto;
        bottom: @gap;
        animation: jump-down 2s infinite;
      }

      @keyframes jump-up {
        0% {
          transform: translate(-50%, @jump);
        }
        50% {
          transform: translate(-50%, -@jump);
        }
        100% {
          transform: translate(-50%, @jump);
        }
      }

      @keyframes jump-down {
        0% {
          transform: translate(-50%, -@jump);
        }
        50% {
          transform: translate(-50%, @jump);
        }
        100% {
          transform: translate(-50%, -@jump);
        }
      }
    }

    .indicator {
      .self-center();
      transform: translateY(-50%);
      left: auto;
      right: @gap;

      li {
        width: 8px;
        height: 8px;
        border-radius: 50%;
        background-color: @words;
        margin-bottom: 10px;
        border: 1px solid @white;
        transition: 0.5s;
        cursor: pointer;

        &.active {
          background-color: @white;
        }
      }
    }
  }
</style>
(十七)完成首页 - Part3
1.标题文字滑动进入动效
<template>
  <div class="carousel-item-container" ref="container">
    <div :style="bannerPos" class="banner" ref="banner">
      <ImageLoader :src="banner.bigImg" :placeholder="banner.midImg" @load="showWords" />
    </div>
    <div class="title" ref="title">{{ banner.title }}</div>
    <div class="description" ref="desc">{{ banner.description }}</div>
  </div>
</template>

<script>
  import ImageLoader from "@/components/ImageLoader";
  export default {
    name: "CarouselItem",
    components: {
      ImageLoader,
    },
    props: {
      banner: {
        type: Object,
        required: true,
      },
    },
    data() {
      return {
        titleWidth: 0,
        descWidth: 0,
      };
    },
    mounted() {
      this.titleWidth = this.$refs.title.clientWidth;
      this.descWidth = this.$refs.desc.clientWidth;
    },
    methods: {
      // 显示文字
      showWords() {
        this.$refs.title.style.opacity = 1;
        this.$refs.title.style.width = 0;
        this.$refs.desc.style.opacity = 1;
        this.$refs.desc.style.width = 0;
        // 强制渲染
        this.$refs.title.clientWidth;
        this.$refs.title.style.transition = "1s";
        this.$refs.title.style.width = this.titleWidth + "px";
        this.$refs.desc.clientWidth;
        this.$refs.desc.style.transition = "2s 1s";
        this.$refs.desc.style.width = this.descWidth + "px";
      },
    },
  };
</script>

<style lang="less" scoped>
  @import "~@/styles/var.less";

  .carousel-item-container {
    width: 100%;
    height: 100%;
    color: @white;
    position: relative;
    overflow: hidden;

    .title,
    .description {
      position: absolute;
      left: 20px;
      letter-spacing: 2px;
      text-shadow:
        1px 0 0 rgba(0, 0, 0, 0.5),
        -1px 0 0 rgba(0, 0, 0, 0.5),
        0 1px 0 rgba(0, 0, 0, 0.5),
        0 -1px 0 rgba(0, 0, 0, 0.5);
      white-space: nowrap;
      overflow: hidden;
      opacity: 0;
    }

    .title {
      top: calc(50% - 40px);
      font-size: 2em;
    }

    .description {
      top: calc(50% + 20px);
      font-size: 1.2em;
      color: lighten(@gray, 20%);
    }
  }
</style>
2.轮播图跟随鼠标移动
<template>
  <div @mousemove="handleMouseMove" @mouseleave="handleMouseLeave" class="carousel-item-container" ref="container">
    <div :style="bannerPos" class="banner" ref="banner">
      <ImageLoader :src="banner.bigImg" :placeholder="banner.midImg" @load="showWords" />
    </div>
    <div class="title" ref="title">{{ banner.title }}</div>
    <div class="description" ref="desc">{{ banner.description }}</div>
  </div>
</template>

<script>
  import ImageLoader from "@/components/ImageLoader";
  export default {
    name: "CarouselItem",
    components: {
      ImageLoader,
    },
    props: {
      banner: {
        type: Object,
        required: true,
      },
    },
    data() {
      return {
        containerSize: null, // 外层容器的尺寸
        innerSize: null, // 里层图片的尺寸
        mouseX: 0, // 鼠标横坐标
        mouseY: 0, // 鼠标纵坐标
      };
    },
    computed: {
      // 图片坐标
      bannerPos() {
        if (!this.innerSize || !this.containerSize) return;
        const delX = this.innerSize.width - this.containerSize.width; // 图片溢出宽度
        const delY = this.innerSize.height - this.containerSize.height; // 图片溢出高度
        const left = (-delX / this.containerSize.width) * this.mouseX;
        const top = (-delY / this.containerSize.height) * this.mouseY;
        return {
          transform: `translate(${left}px, ${top}px)`,
        };
      },
      centerPos() {
        return {
          x: this.containerSize.width / 2,
          y: this.containerSize.height / 2,
        };
      },
    },
    mounted() {
      this.setSize();
      this.mouseX = this.centerPos.x;
      this.mouseY = this.centerPos.y;
      window.addEventListener("resize", this.setSize);
    },
    methods: {
      // 设置尺寸
      setSize() {
        this.containerSize = {
          width: this.$refs.container.clientWidth,
          height: this.$refs.container.clientHeight,
        };
        this.innerSize = {
          width: this.$refs.banner.clientWidth,
          height: this.$refs.banner.clientHeight,
        };
      },
      // 鼠标移动
      handleMouseMove(e) {
        const containerRect = this.$refs.container.getBoundingClientRect();
        this.mouseX = e.clientX - containerRect.left;
        this.mouseY = e.clientY - containerRect.top;
      },
      // 鼠标离开
      handleMouseLeave() {
        this.mouseX = this.centerPos.x;
        this.mouseY = this.centerPos.y;
      },
    },
    destroyed() {
      window.removeEventListener("resize", this.setSize);
    },
  };
</script>

<style lang="less" scoped>
  @import "~@/styles/var.less";

  .carousel-item-container {
    width: 100%;
    height: 100%;
    color: @white;
    position: relative;
    overflow: hidden;

    .banner {
      width: 110%;
      height: 110%;
      position: absolute;
      left: 0;
      top: 0;
      transition: 0.3s;
    }
  }
</style>
(十八)自定义指令

1.定义指令
1)全局定义
- 和注册组件一样,代码会进入打包结果中
- 如果代码占用空间过大,一般使用局部定义
- 局部定义的组件被使用时,代码才会加入打包结果中
// 指令名称为:mydirec1
Vue.directive("mydirec1", {
  // 指令配置
});

// 指令名称为:mydirec2
Vue.directive("mydirec2", {
  // 指令配置
});
- 所有的组件均可以使用
mydirec1和mydirec2指令
<template>
  <!-- 某个组件代码 -->
  <div>
    <MyComp v-mydirec1="js表达式" />
    <div v-mydirec2="js表达式">...</div>
    <img v-mydirec1="js表达式" />
  </div>
</template>
2)局部定义
- 局部定义是指在某个组件中定义指令,和局部注册组件类似
- 定义的指令仅在该组件中有效
<template>
  <!-- 某个组件代码 -->
  <div>
    <MyComp v-mydirec1="js表达式" />
    <div v-mydirec2="js表达式">...</div>
    <img v-mydirec1="js表达式" />
  </div>
</template>

<script>
  export default {
    // 定义指令
    directives: {
      // 指令名称:mydirec1
      mydirec1: {
        // 指令配置
      },
      // 指令名称:mydirec2
      mydirec2: {
        // 指令配置
      },
    },
  };
</script>
- 和局部注册组件一样,为了让指令更加通用
- 通常我们会把指令的配置提取到其他模块
<template>
  <!-- 某个组件代码 -->
  <div>
    <MyComp v-mydirec1="js表达式" />
    <div v-mydirec2="js表达式">...</div>
    <img v-mydirec1="js表达式" />
  </div>
</template>

<script>
  // 导入当前组件需要用到的指令配置对象
  import mydirec1 from "@/directives/mydirec1";
  import mydirec2 from "@/directives/mydirec2";
  export default {
    // 定义指令
    directives: {
      mydirec1,
      mydirec2,
    },
  };
</script>
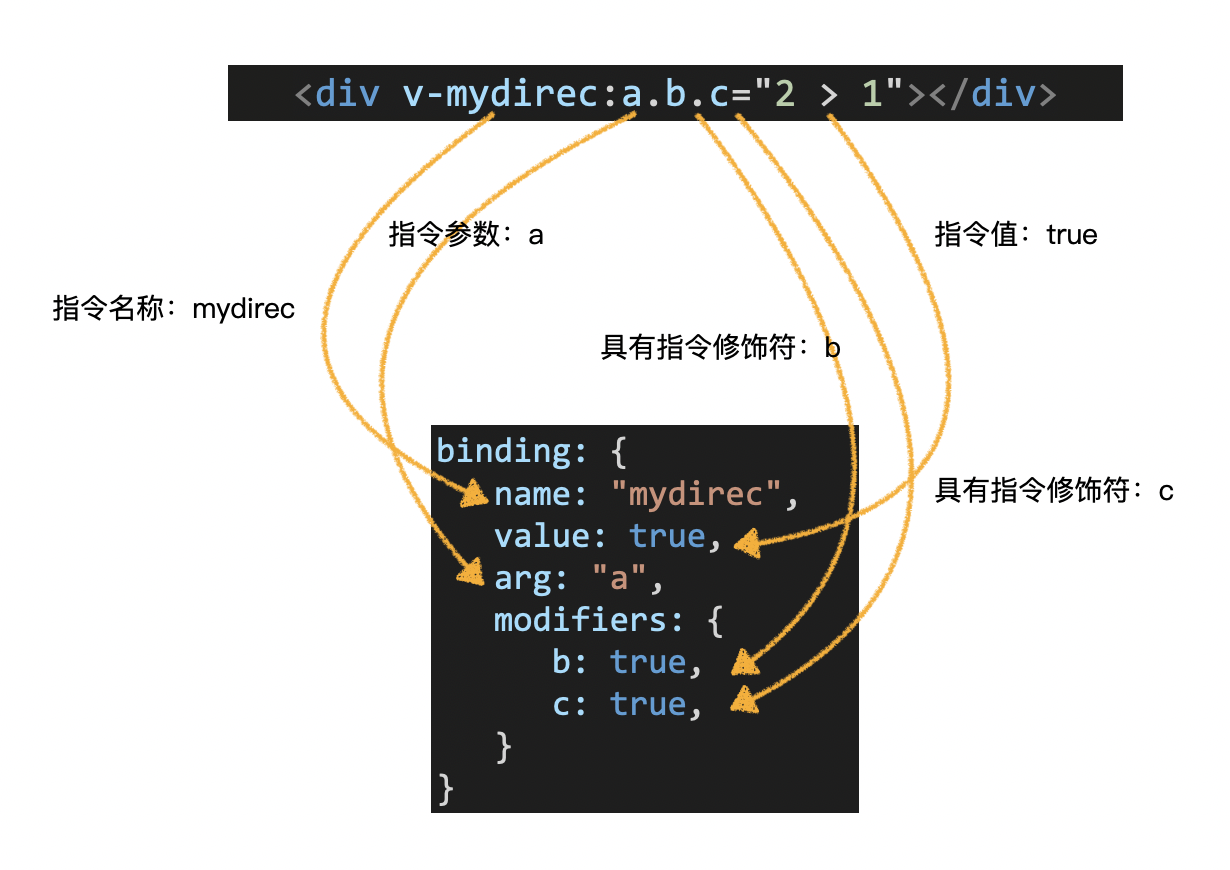
2.指令配置对象
- 没有配置的指令,就像没有配置的组件一样,毫无意义
vue支持在指令中配置一些 钩子函数- 在适当的时机,
vue会调用这些钩子函数并传入适当的参数
1)常用的钩子函数
// 指令配置对象
export default {
  bind() {
    // 只调用一次,指令第一次绑定到元素时调用,在这里可以进行一次性的初始化设置
  },
  inserted() {
    // 被绑定元素插入父节点时调用
  },
  update() {
    // 所在组件的 VNode 更新时调用
  },
};
2)钩子参数
- 每个钩子函数在调用时,
vue都会向其传递一些参数(四个) - 其中最重要的是 前两个参数
// 指令配置对象
export default {
  bind(el, binding) {
    // el 是被绑定元素对应的真实DOM
    // binding 是一个对象,描述了指令中提供的信息
  },
};
3)binding 对象
- 类似于:
v-on:click - 指令是
on,指令参数是click
3.配置简化
- 在配置自定义指令时,都会配置两个钩子函数
export default {
  bind(el, binding) {},
  update(el, binding) {},
};
- 这样在元素绑定和更新时,都能运行到钩子函数
- 如果这两个钩子函数实现的功能相同,可以直接把指令配置简化为一个单独的函数
export default (el, binding) => {
  // 该函数会被同时设置到bind和update中
};
更多的自定义指令用法见 官网
4.loading 加载动画
1)./src/directives/loading.js
import loadingSrc from "@/assets/loading.svg";
import styles from "./loading.module.less";

/**
 * 得到el中的loadingDOM元素
 * @param {HTMLElement} el 容器DOM元素
 * @returns el中的loadingDOM元素,不存在则返回null
 */
const getLoading = (el) => {
  return el.querySelector("img[data-role='loading']");
};

/**
 * 创建loadingDOM元素,绑定自定义属性data-role为loading
 * @returns loadingDOM元素
 */
const createLoading = () => {
  const img = document.createElement("img");
  img.dataset.role = "loading";
  img.src = loadingSrc;
  img.className = styles.loading;
  return img;
};

// 导出指令配置对象
export default (el, binding) => {
  // 根据binding.value的值,决定创建或删除img元素
  const img = getLoading(el);
  if (binding.value) {
    if (img) return;
    const newImg = createLoading();
    el.appendChild(newImg);
  } else {
    img && img.remove();
  }
};
2)./src/directives/loading.module.less
@import "~@/styles/mixin.less";

.loading {
  .self-center();
}
3)main.js
// 注册全局指令
import vLoading from "./directives/loading";
Vue.directive("loading", vLoading);
4)./src/views/Home/index.vue
<template>
  <div v-loading="isLoading" class="home-container" ref="homeContainer">
    <!-- .... -->
  </div>
</template>

<script>
  import { getBanners } from "@/api/banner";
  export default {
    name: "Home",
    data() {
      return {
        isLoading: true,
      };
    },
    async created() {
      this.banners = await getBanners();
      this.isLoading = false;
    },
  };
</script>
(十九)组件混入
- 有的时候,许多组件有着类似的功能
- 这些功能代码分散在组件不同的配置中
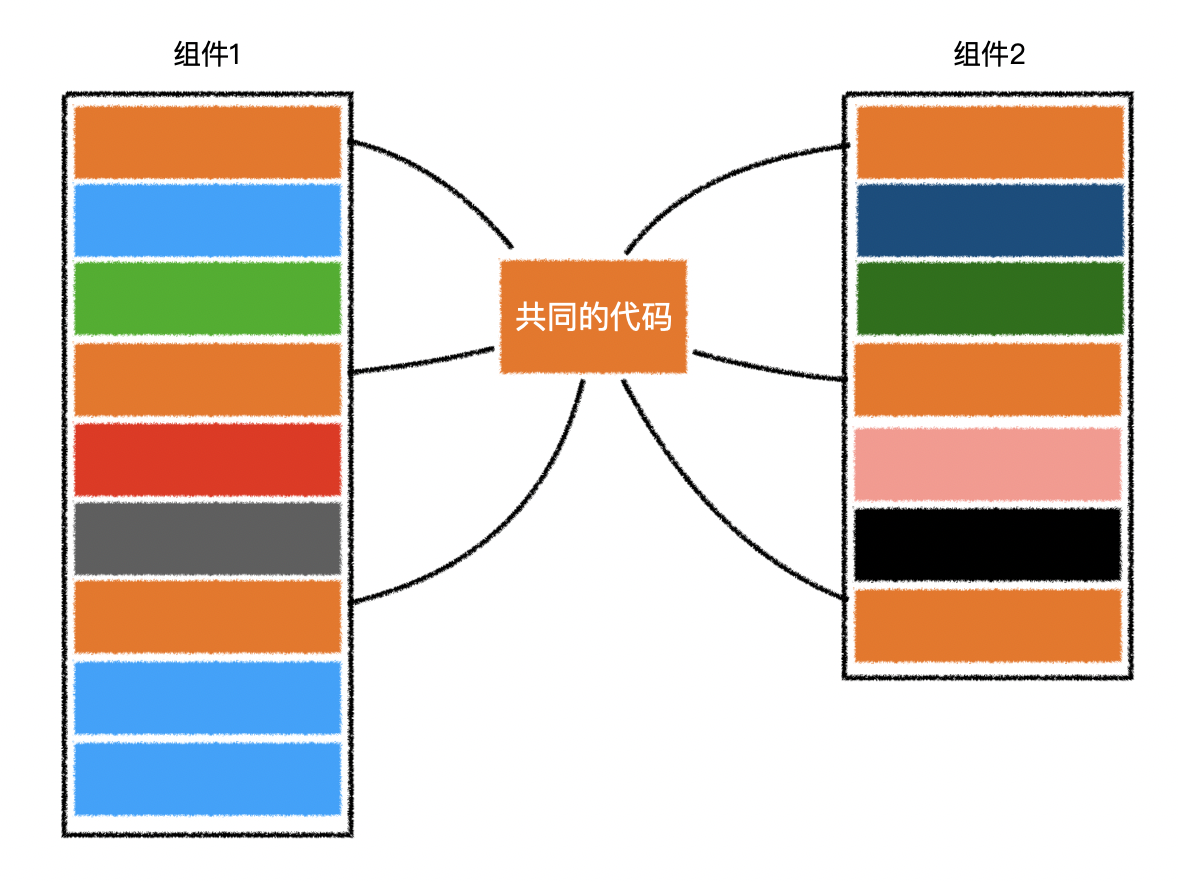
- 可以把这些配置代码抽离出来
- 利用 混入 融合到组件中
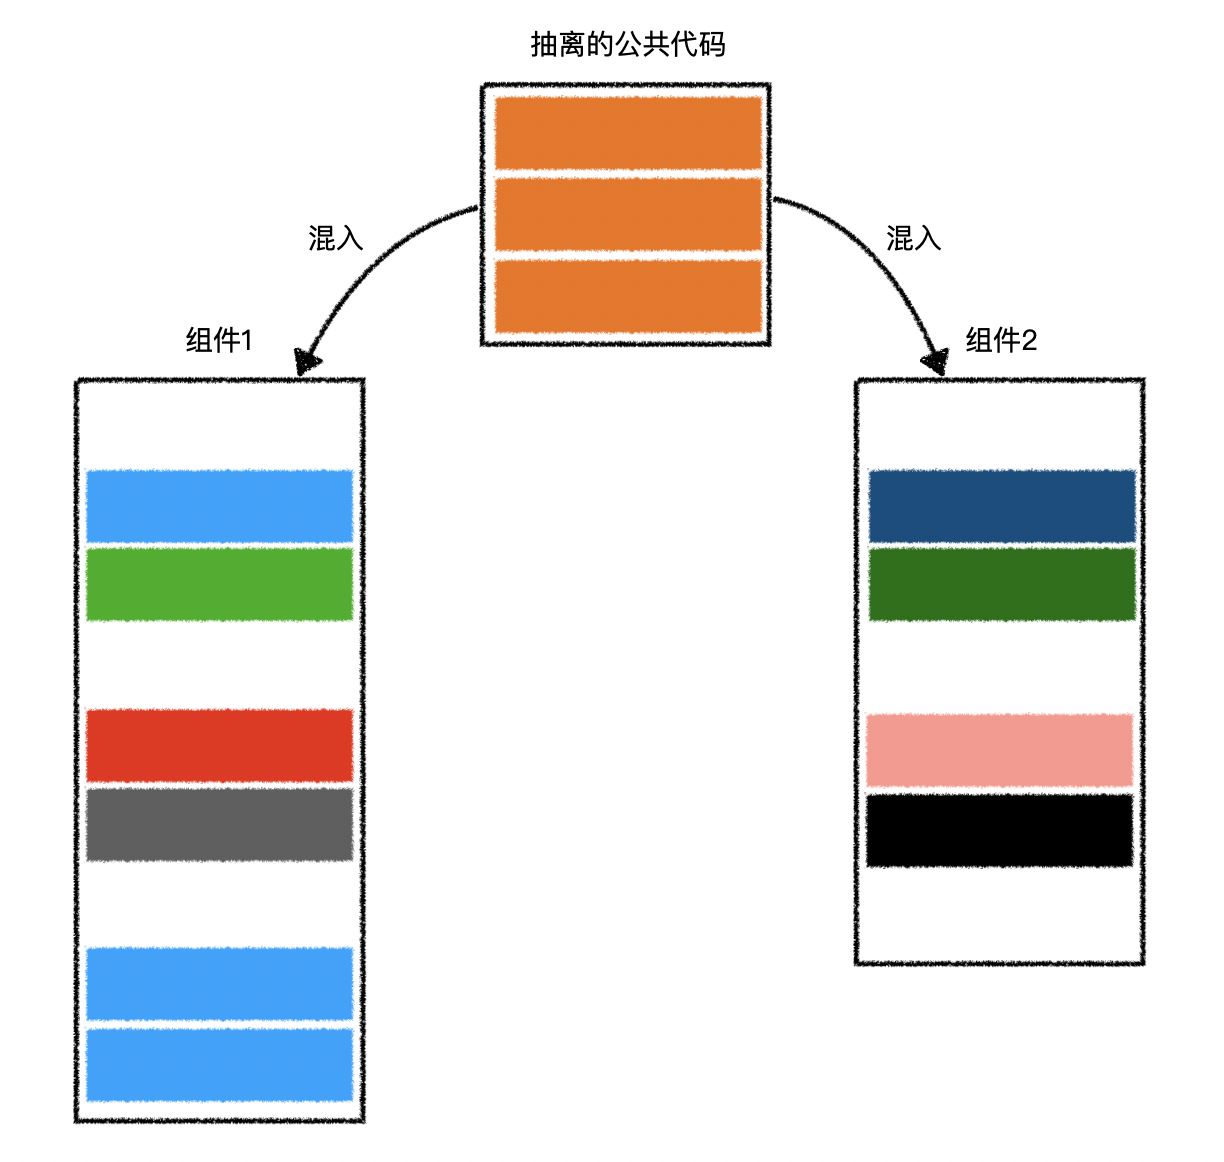
1.抽离的公共代码
const common = {
  data() {
    return {
      a: 1,
      b: 2,
    };
  },
  created() {
    console.log("common created");
  },
  computed: {
    sum() {
      return this.a + this.b;
    },
  },
};
2.使用公共组件
/**
 * 使用comp1,将会得到:
 * common created
 * comp1 created 1 2 3
 */
const comp1 = {
  mixins: [common] // 之所以是数组,是因为可以混入多个配置代码
  created(){
    console.log("comp1 created", this.a, this.b, this.sum);
  }
}
更多细节参见 官网
(二十)组件递归
- 组件用于渲染列表,且列表有嵌套层级,子列表格式和父列表格式完全一致
- 在组件内部使用自身组件渲染子列表
- 需要声明
name属性,作为组件标签名
<template>
  <ul class="sub-menu-container">
    <li
      v-for="(menu, idx) in list"
      :key="idx"
      :class="{
        active: menu.isSelect,
      }"
    >
      {{ menu.name }}
      <SubMenu v-if="menu.children" :list="menu.children" />
    </li>
  </ul>
</template>

<script>
  export default {
    name: "SubMenu",
    props: {
      // [{ name: "", isSelect: true, children: [{ name: "", isSelect: false }] }]
      list: {
        type: Array,
        default: () => [],
      },
    },
  };
</script>

<style lang="less" scoped></style>
注意
组件声明 props 设置默认值时,如果是数组或对象,必须以箭头函数形式返回
(二十一)开发文章列表页 - Part1
1.封装 API
import request from "./request";

/**
 * 获取博客分类
 */
export const getBlogTypes = async () => {
  return await request.get("/api/blogtype");
};

/**
 * 获取博客列表
 * @param {Number} page 当前页码
 * @param {Number} limit 页容量
 * @param {Number} categoryid 所属分类,-1表示全部
 * @param {String} keyword 模糊查询的关键字
 */
export const getBlogs = async (page = 1, limit = 10, categoryid = -1, keyword = "") => {
  return await request.get("/api/blog", {
    params: {
      page,
      limit,
      categoryid,
      keyword,
    },
  });
};
(二十二)开发文章列表页 - Part2
1.路由跳转逻辑
2.组件逻辑
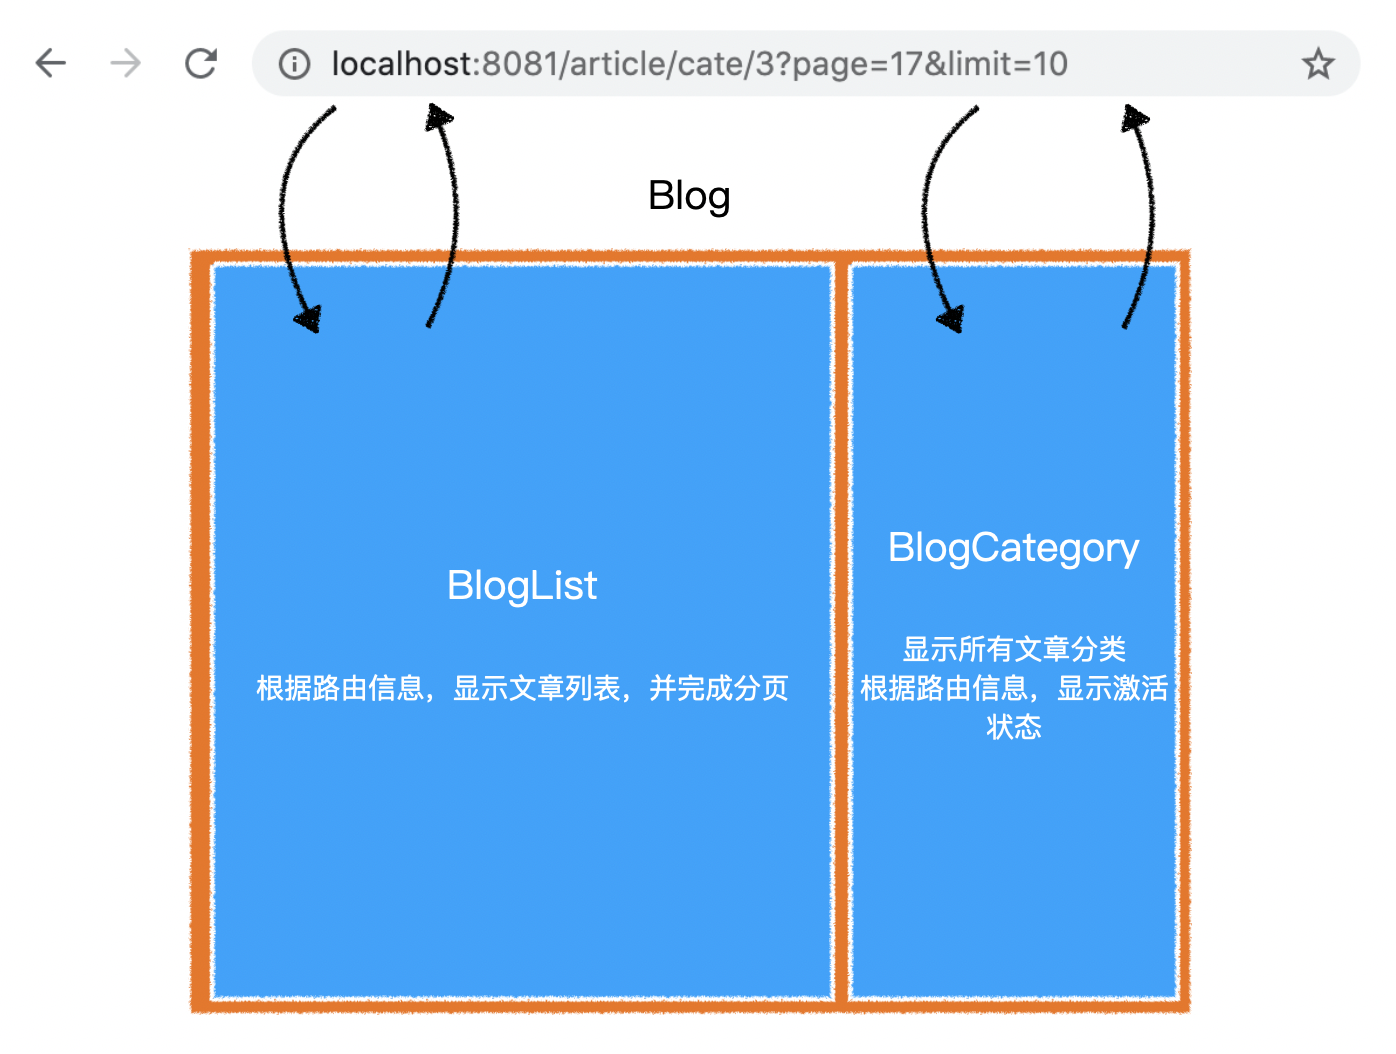
1)BlogList
2)BlogCategory

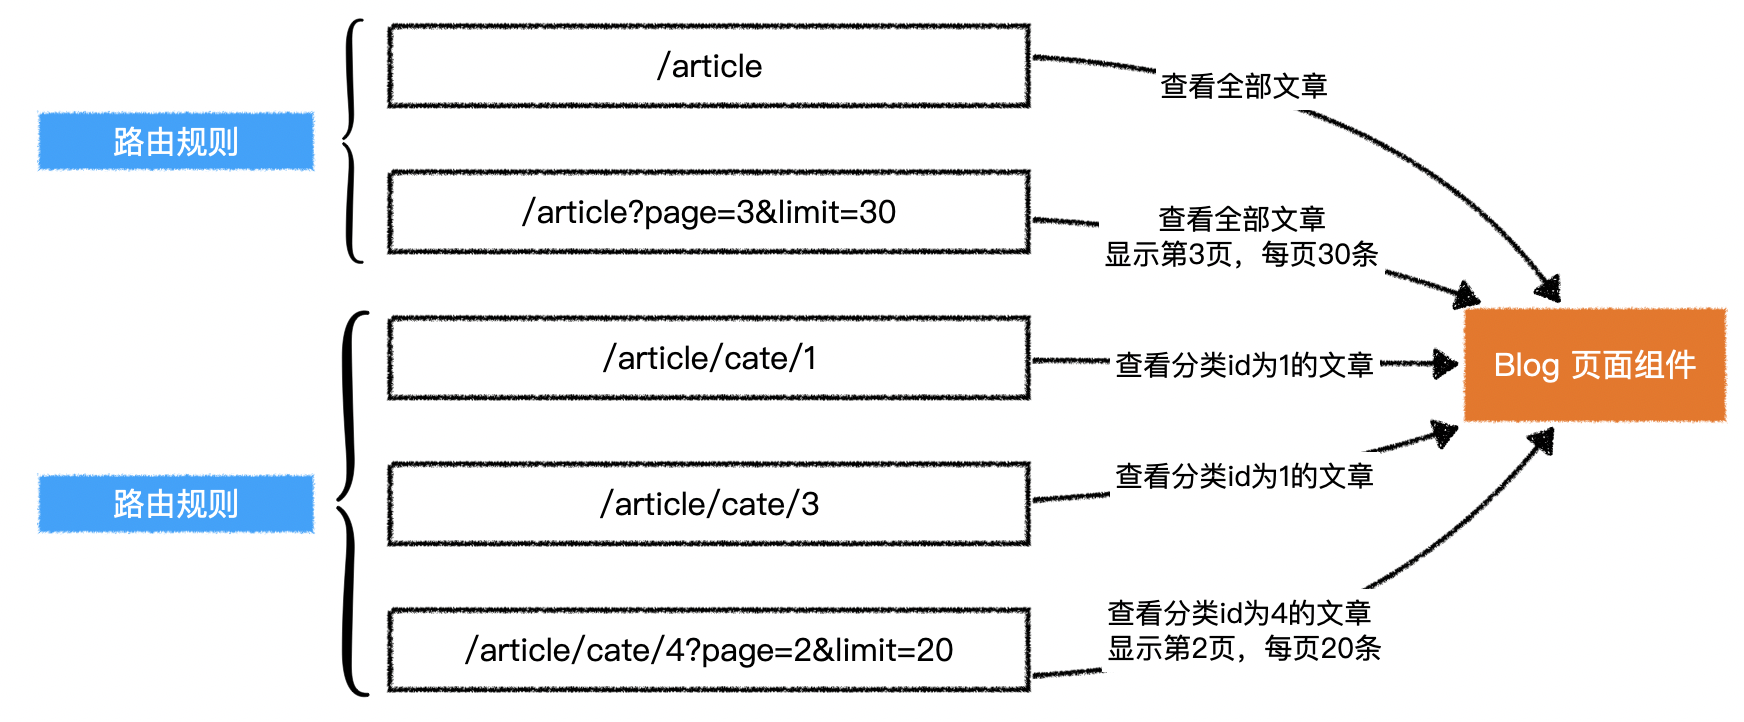
3.动态路由
1)情境引入
- 希望下面的地址都能够匹配到
Blog组件/article,显示全部文章/article/cate/1,显示分类id为1的文章/article/cate/3,显示分类id为3的文章- ...
- 第一种情况很简单,只需要将一个固定的地址匹配到
Blog组件即可
{
  path: "/article",
  name: "Blog",
  component: Blog
}
- 但后面的情况则不同
- 匹配到
Blog组件的地址中,有一部分是动态变化的 - 需要使用一种特殊的表达方式
{
  path: "/article/cate/:categoryId",
  name: "CategoryBlog",
  component: Blog
}
2)路由参数
- 在地址中使用
:xxx来表达这一部分的内容是变化的 - 在
vue-router中,将变化的这一部分称之为params - 可以在
vue组件中通过this.$route.params来获取
// 访问 /article/cate/3
this.$route.params; // { categoryId: "3" }

// 访问 /article/cate/1
this.$route.params; // { categoryId: "1" }
3)动态路由的导航
<router-link to="/article/cate/3">to article of category 3</router-link>

<router-link
  :to="{
   name: 'CategoryBlog',
   params: {
      categoryId: 3
   }
}"
>
  to article of category 3
</router-link>
4.编程式导航
- 除了使用
<RouterLink>超链接导航外 vue-router还允许在代码中跳转页面
// 普通跳转
this.$router.push("跳转地址");

// 命名路由跳转
this.$router.push({
  name: "Blog",
});

// 回退,类似于 history.go
this.$router.go(-1);
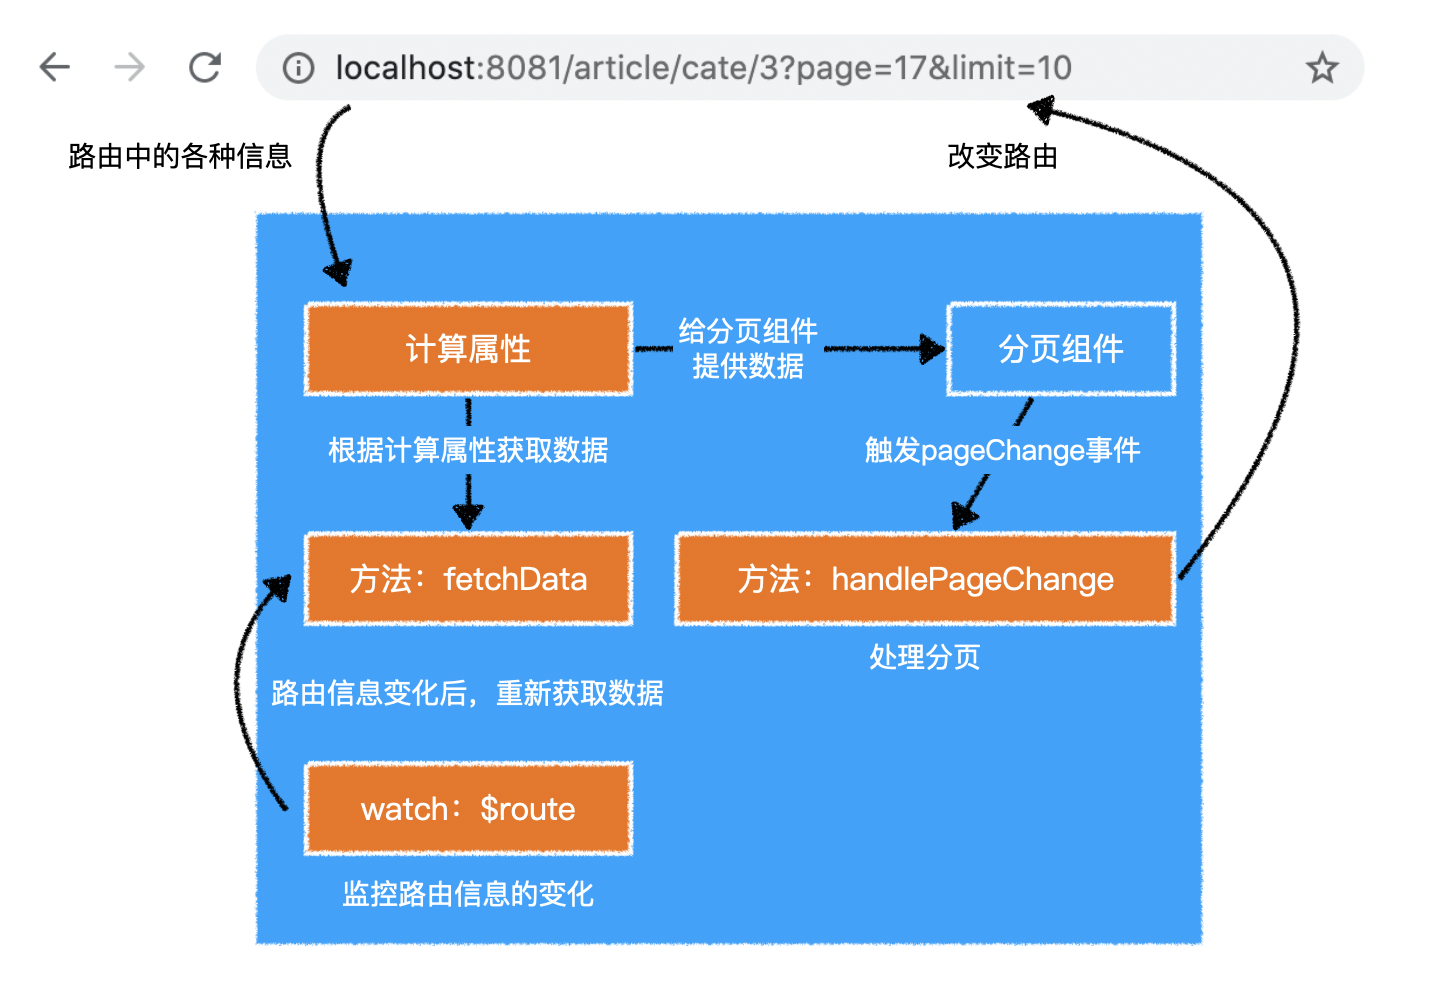
5.watch
- 利用
watch配置,可以直接观察某个数据的变化,变化时可以做一些处理
export default {
  // ... 其他配置
  watch: {
    // 观察 this.$route 的变化,变化后,会调用该函数
    $route(newVal, oldVal){
      // newVal:this.$route 新的值,等同 this.$route
      // oldVal:this.$route 旧的值
    },
    // 完整写法
    $route: {
      handler(newVal, oldVal){},
      deep: false, // 是否监听该数据内部属性的变化,默认 false
      immediate: false // 是否立即执行一次 handler,默认 false
    }
    // 观察 this.$route.params 的变化,变化后,会调用该函数
    ["$route.params"](newVal, oldVal){
      // newVal:this.$route.params 新的值,等同 this.$route.params
      // oldVal:this.$route.params 旧的值
    },
  	// 完整写法
    ["$route.params"]: {
      handler(newVal, oldVal){},
      deep: false, // 是否监听该数据内部属性的变化,默认 false
      immediate: false // 是否立即执行一次 handler,默认 false
    }
  }
}
(二十三)开发文章详情页 - Part1
1.封装 API
/**
 * 获取单个博客
 * @param {String} blogId 博客id
 */
export const getBlogDetail = async (blogId) => {
  return await request.get(`/api/blog/${blogId}`);
};

/**
 * 提交评论
 * @param {Object} commentInfo 评论信息
 */
export const postComment = async (commentInfo) => {
  return await request.post("/api/comment", commentInfo);
};

/**
 * 获取指定页码的评论列表
 * @param {String} blogId 博客id,-1表示不限文章
 * @param {Number} page 当前页码
 * @param {Number} limit 页容量
 * @param {String} keyword 模糊查询的关键字
 */
export const getComments = async (blogId, page = 1, limit = 10, keyword = "") => {
  return await request.get("/api/comment", {
    params: {
      blogId,
      page,
      limit,
      keyword,
    },
  });
};
(二十四)开发文章详情页 - Part2
1.文章数据逻辑
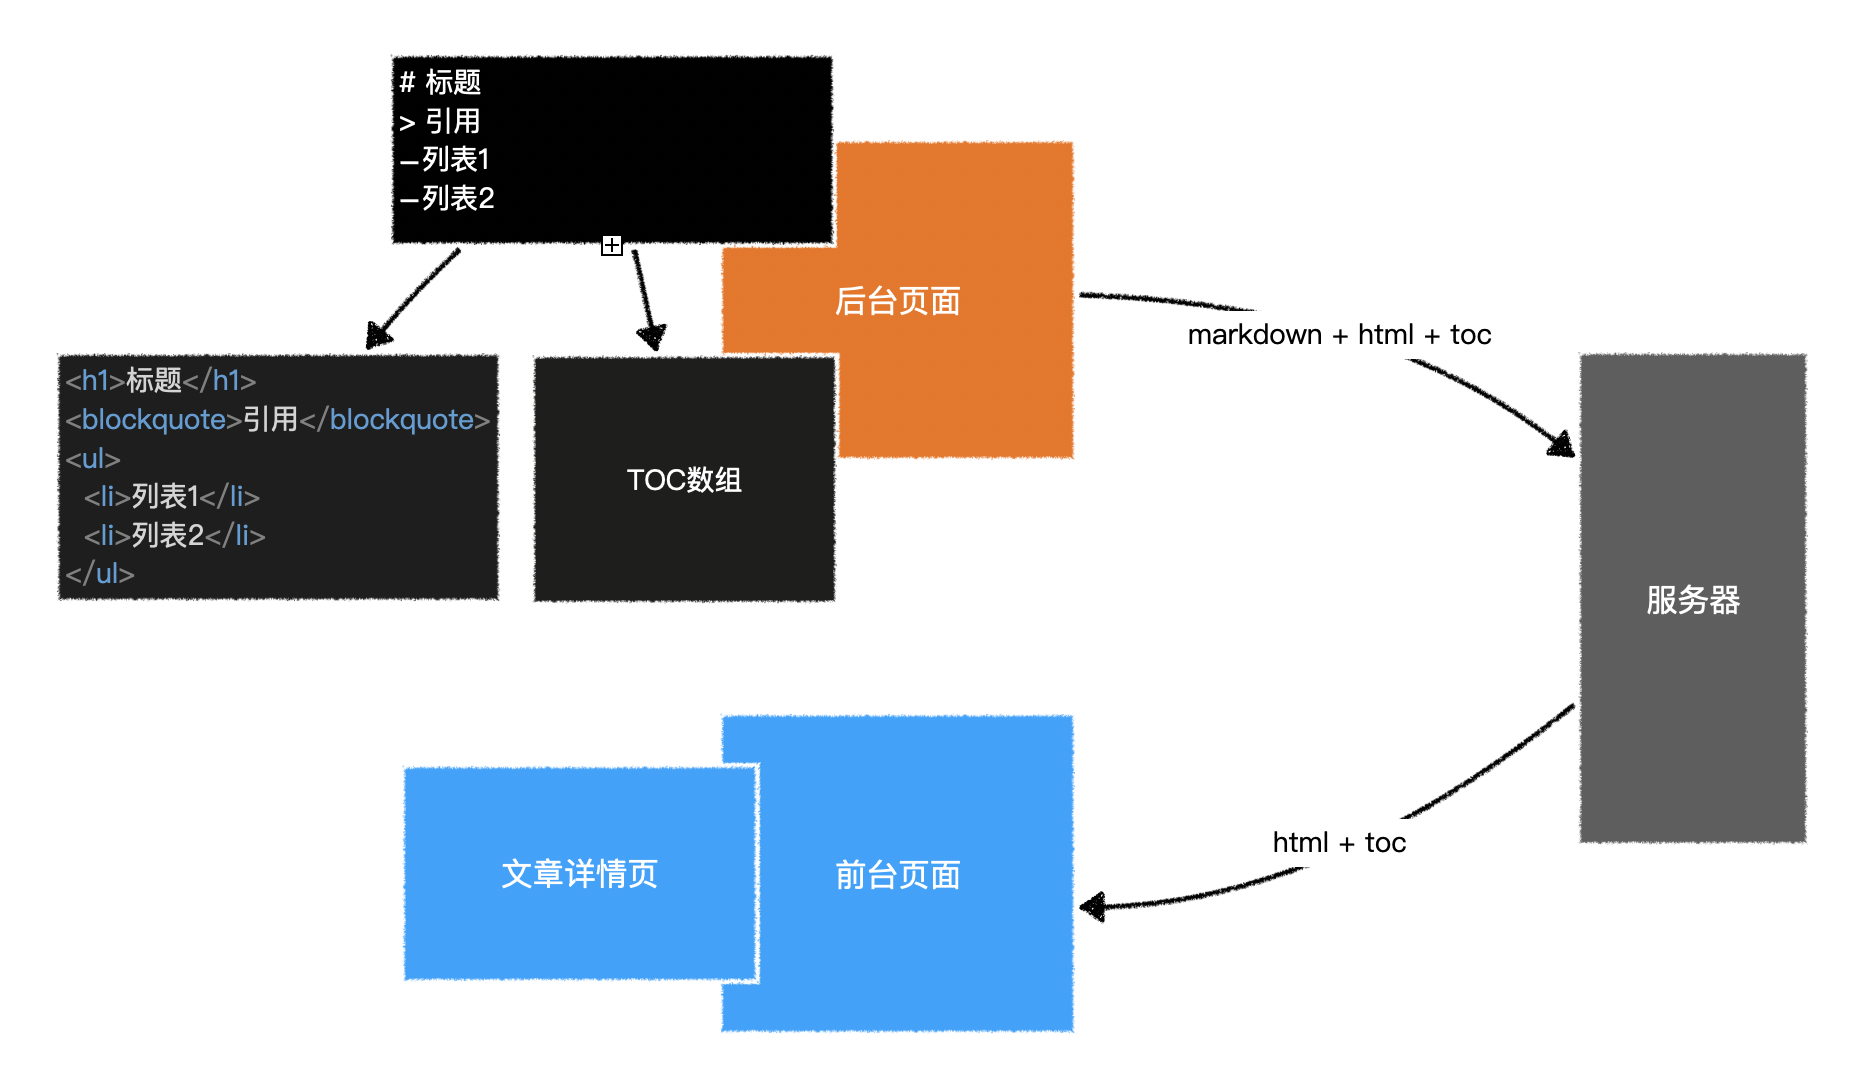
2.组件逻辑
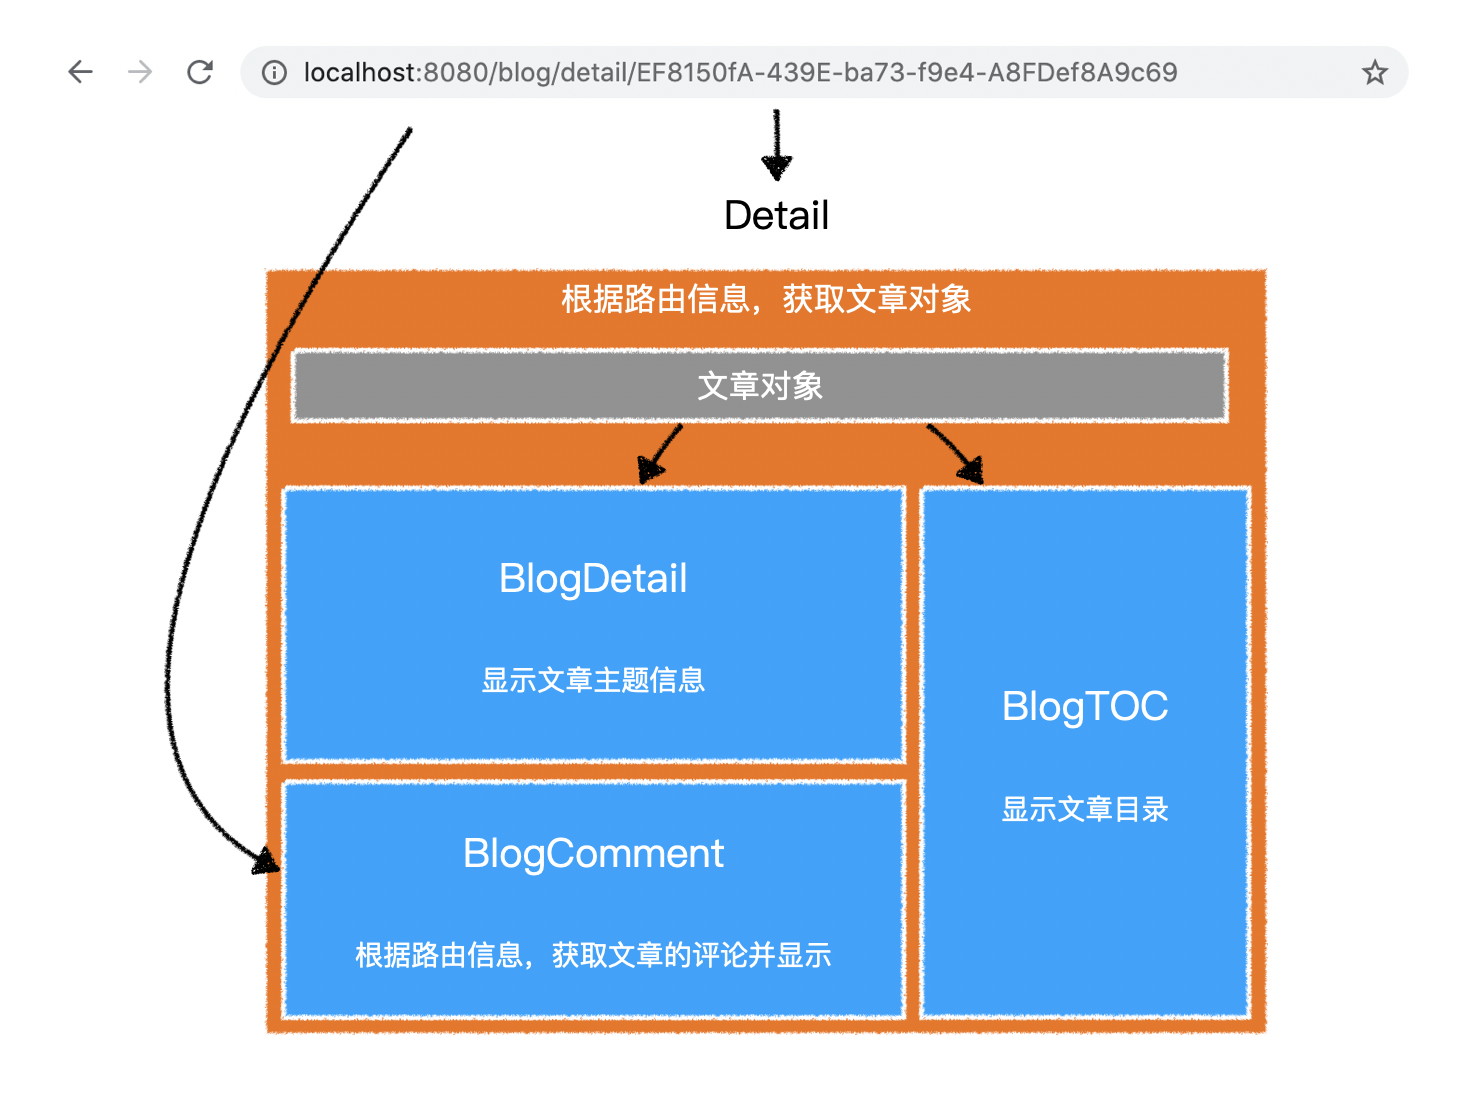
1)BlogDetail
- 根据「属性 - 文章对象」显示出文章信息即可
- 由于文章的内容属于 原始 html
- 因此需要使用
v-html指令来设置
- 因此需要使用
- 文章的内容是不带样式的
- 因此需要选择一款 markdown 的 css 样式(见附件
markdown.css)
- 因此需要选择一款 markdown 的 css 样式(见附件
- 对于文章中脚本部分的样式
- 可以使用第三方库 highlight.js 中提供的样式
import "highlight.js/styles/github.css";
(二十五)$listeners 和 v-model
1.$emit
- 回调模式实现父子组件异步通信
- 子组件在 emit 参数列表传递一个回调函数
- 父组件触发事件异步处理完成后执行该回调函数
1)父组件
<template>
  <Child @click="handleClick" />
</template>

<script>
  import Child from "./Child";
  export default {
    components: {
      Child,
    },
    methods: {
      handleClick(data, callback) {
        console.log(data); // 得到子组件事件中的数据
        setTimeout(() => {
          callback(1); // 一段时间后,调用子组件传递的回调函数
        }, 3000);
      },
    },
  };
</script>
2)子组件
<template>
  <button @click="handleClick">click</button>
</template>

<script>
  export default {
    methods: {
      handleClick() {
        this.$emit("click", 123, (data) => {
          console.log(data); // data为父组件处理完成后得到的数据
        });
      },
    },
  };
</script>
2.$listeners
$listeners是 vue 的一个实例属性- 用于获取父组件传过来的所有事件函数
<!-- 父组件 -->
<Child @event1="handleEvent1" @event2="handleEvent2" />
// 子组件
this.$listeners; // { event1: handleEvent1, event2: handleEvent2 }
- 子组件调用父组件的回调函数实现异步通信
1)父组件
async handleClick(count) {
  console.log("父组件", count);
  return new Promise((resolve) => {
    setTimeout(() => {
      resolve("有一个未知错误");
    }, 3000);
  });
}
2)子组件
async handleClick() {
  this.count++;
  this.error = "";
  this.isLoading = true;
  if (this.$listeners.click) {
    // 判断父组件是否传递了事件处理函数 click
    const err = await this.$listeners.click(this.count);
    this.isLoading = false;
    this.error = err;
  }
}
3.$emit 和 $listeners 通信的异同
1)相同点
- 均可实现子组件向父组件传递消息
2)差异点
$emit更加符合单向数据流,子组件仅发出通知,由父组件监听做出改变- 而
$listeners则是在子组件中直接使用了父组件的方法
- 而
- 调试工具可以监听到子组件
$emit的事件- 但无法监听到
$listeners中的方法调用
- 但无法监听到
- 由于
$listeners中可以获得传递过来的方法,因此调用方法可以得到其返回值- 但
$emit仅仅是向父组件发出通知,无法知晓父组件处理的结果 - 可以在
$emit中传递回调函数来解决
- 但
4.props
- 通过传递函数实现父子组件异步通信
1)父组件
<Child :click="handleClick" />
async handleClick(count) {
  console.log("父组件", count);
  return new Promise((resolve) => {
    setTimeout(() => {
      resolve("有一个未知错误");
    }, 3000);
  });
}
2)子组件
props: {
  click: Function,
},
methods: {
  async handleClick() {
    this.count++;
    this.error = "";
    this.isLoading = true;
    if (this.click) {
      const err = await this.click(this.count);
      this.isLoading = false;
      this.error = err;
    }
  },
}
5.v-model
详见 表单输入绑定
v-model指令实质是一个语法糖,表示双向绑定- 是
value属性和input事件的结合体
<input :value="data" @input="data = $event.target.value" />

<!-- 等同于 -->
<input v-model="data" />
相关信息
change 事件需要表单元素失去焦点才触发,所以绑定的是 input 事件
1)v-model 绑定复选框表单元素
- v-model 绑定复选框值为数组
- 当前复选框的 value 值在数组中,v-model 判断为选中状态
- 反之为未选中状态
<!-- 选中 -->
<input v-model="hobbies" type="checkbox" value="sports" />

<!-- 未选中 -->
<input v-model="hobbies" type="checkbox" value="sleep" />
{
  hobbies: ["sports"];
}
2)v-model 绑定单选框表单元素
- v-model 绑定单选框值为基本数据类型
- 当前单选框的 value 值等同于绑定值,v-model 判断为选中状态
- 反之为未选中状态
- 无需绑定 name 属性
- 因为任一 radio 选中状态改变时,v-model 绑定的值会改变,从而触发重新渲染,此时其他的 radio 选中状态也改变
<!-- 选中 -->
<input v-model="sex" type="radio" value="male" />

<!-- 未选中 -->
<input v-model="sex" type="radio" value="female" />
{
  sex: "male";
}
6.事件修饰符
- 针对 dom 节点的原生事件
- vue 支持多种修饰符以简化代码
| 修饰符 | 含义 |
|---|---|
.stop | 阻止事件冒泡 |
.prevent | 阻止默认事件 |
.capture | 阻止事件捕获 |
.self | 只有事件源是当前绑定的元素时才触发事件 |
.once | 事件只触发一次 |
.passive | 多用于移动端开发的滚动事件或手指滑动事件,提高效率 |
<!-- 绑定value和change事件 -->
<input v-model.lazy="name" />

<!-- value转换为number类型 -->
<input v-model.number="age" />
(二十六)开发文章详情页 - Part3
1.MessageArea
- 消息区域组件,可用于「评论区」和「留言板」
1)属性
| 属性名 | 含义 | 类型 | 必填 | 默认值 |
|---|---|---|---|---|
| title | 列表标题 | String | 否 | "" |
| subTitle | 列表副标题 | String | 否 | "" |
| list | 列表数据 | Array | 否 | [] |
| isListLoading | 列表是否正在加载中 | Boolean | 否 | false |
2)事件
| 事件名 | 含义 | 事件参数 | 参数类型 |
|---|---|---|---|
| submit | 用户点击提交时触发 | 数据对象 | Object |
- submit 的事件参数
{
  nickname:"昵称",
  content:"内容"
}
2.祖孙组件事件传递
1)问题
- 孙组件触发的事件需要由祖组件处理
- 父组件无法处理,但必须从子组件接受后向上传递给祖组件
<!-- 孙组件 -->
<form @submit.prevent="handleSubmit" id="data-form-container" ref="form" class="data-form-container"></form>
<script>
  handleSubmit() {
    this.$emit("submitDataForm", this.formData, (successMsg) => {console.log(successMsg)
    });
  }
</script>
<!-- 父组件 -->
<DataForm @submitDataForm="handleSubmit" />
<script>
  handleSubmit(formData, cb) {
    this.$emit("submitDataForm", formData, cb);
  }
</script>
<!-- 祖组件 -->
<MessageArea :subTitle="` (${data.total}) `" :list="data.rows" :isListLoading="isLoading" @submitDataForm="handleSubmit" title="评论列表" />
<script>
  handleSubmit(formData, cb) {
    setTimeout(() => {
      console.log(formData);
      cb("处理完成");
    }, 1000);
  }
</script>
2)解决
- 父组件直接绑定 v-on,传递对象列表
<DataForm v-on:submit="handleSubmit" />

<!-- 等同于 -->
<DataForm v-on="{ submit: handleSubmit }" />

<!-- 等同于 -->
<DataForm v-on="$listeners" />
(二十七)事件总线
1.事件总线功能
- 提供监听某个事件的接口
- 提供取消监听的接口
- 提供触发事件的接口,可以传递数据
- 触发事件后会自动通知监听者
/**
 * {
 *  "event1": [handler1, handler2],
 *  "event2": [handler1, handler2],
 * }
 */
const listeners = {};

export default {
  // 监听某一个事件
  $on(eventName, handler) {
    if (!listeners[eventName]) {
      listeners[eventName] = new Set();
    }
    listeners[eventName].add(handler);
  },
  // 取消监听某一个事件
  $off(eventName, handler) {
    if (!listeners[eventName]) return;
    listeners[eventName].delete(handler);
  },
  // 触发事件
  $emit(eventName, ...args) {
    if (!listeners[eventName]) return;
    for (const handler of listeners[eventName]) {
      handler(...args);
    }
  },
};
2.使用事件总线
import eventBus from "./eventBus";

const handler1 = (data) => console.log("handler1", data);
const handler2 = (data) => console.log("handler2", data);
eventBus.$on("event1", handler1);
eventBus.$on("event1", handler2);
eventBus.$on("event2", handler1);

eventBus.$emit("event1", 123); // handler1 123 handler2 123
eventBus.$emit("event2", 456); // handler1 456
eventBus.$off("event1", handler1);
eventBus.$emit("event1", 123); // handler2 123
3.利用 Vue 实现事件总线
1)定义
// eventBus.js
import Vue from "vue";

// 方式一
// export default new Vue({});

// 方式二
Vue.prototype.$bus = new Vue({});
2)使用
// 方式一
import eventBus from "./eventBus";
eventBus.$emit("event", 123);

// 方式二
this.$bus; // 无需导入
(二十八)开发文章详情页 - Part4
- 事件名:
mainScroll - 主区域滚动条位置变化后触发
- 参数:滚动的 DOM 元素,如果为 undefined 则表示 DOM 元素不存在
1.父组件监听页面滚动并注册事件总线
<template>
  <div class="detail-container">
    <Layout>
      <div v-loading="isLoading" ref="detailMainContainer" class="main-container">
        <BlogDetail v-if="data" :blog="data" />
        <BlogComment v-if="!isLoading" />
      </div>
      <template #right>
        <div v-loading="isLoading" class="right-container">
          <BlogTOC v-if="data" :toc="data.toc" />
        </div>
      </template>
    </Layout>
  </div>
</template>

<script>
  export default {
    name: "Detail",
    mounted() {
      this.$refs.detailMainContainer.addEventListener("scroll", this.handleScroll);
    },
    methods: {
      handleScroll() {
        this.$bus.$emit("mainScroll", this.$refs.detailMainContainer);
      },
    },
    updated() {
      // 如果链接有锚点,等加载完页面再跳转到相应的标题
      const curHash = location.hash;
      location.hash = "";
      setTimeout(() => {
        location.hash = curHash;
      }, 50);
    },
    beforeDestroy() {
      // 不能使用destroyed,否则detailMainContainer被销毁,值为undefined
      this.$bus.$emit("mainScroll");
      this.$refs.detailMainContainer.removeEventListener("scroll", this.handleScroll);
    },
  };
</script>
2.子组件滚动至底部时加载更多
computed: {
  // 是否还有数据没加载完
  hasMore() {
    return this.data.rows.length < this.data.total;
  },
},
created() {
  // 监听滚动事件
  this.$bus.$on("mainScroll", this.handleScroll);
},
methods: {
  // 处理页面滚动
  handleScroll(dom) {
    if (this.isLoading || !dom) return;
    if (Math.abs(dom.scrollTop + dom.clientHeight - dom.scrollHeight) <= 100)
      this.handleFetchMore();
  },
  // 获取数据
  async fetchData() {
    return await getComments(this.$route.params.blogId, this.page, this.limit);
  },
  // 加载下一页
  async handleFetchMore() {
    if (!this.hasMore) return;
    this.isLoading = true;
    this.page++;
    const res = await this.fetchData();
    this.data.total = res.total;
    this.data.rows = this.data.rows.concat(res.rows);
    this.isLoading = false;
  },
},
destroyed() {
  // 取消监听滚动事件
  this.$bus.$off("mainScroll", this.handleScroll);
}
(二十九)开发文章详情页 - Part5
1.BackTop
- 返回顶部
- 所有超出视口的页面都应该显示该组件,所以要放在 App.vue 中
<template>
  <div v-show="isShow" @click="handleClick" class="back-top-container">
    <span class="top">Top</span>
  </div>
</template>

<script>
  export default {
    name: "BackTop",
    data() {
      return {
        isShow: false,
      };
    },
    created() {
      this.$bus.$on("mainScroll", this.handleScroll);
    },
    methods: {
      handleScroll(dom) {
        if (!dom) {
          this.isShow = false;
          return;
        }
        this.isShow = dom.scrollTop >= 1000;
      },
      handleClick() {
        this.$bus.$emit("setMainScroll", 0);
      },
    },
    destroyed() {
      this.$bus.$off("mainScroll", this.handleScroll);
    },
  };
</script>

<style lang="less" scoped>
  @import "~@/styles/var.less";
  @import "~@/styles/mixin.less";

  .back-top-container {
    @size: 40px;
    @pos: 20px;
    width: @size;
    height: @size;
    border-radius: 50%;
    background-color: @primary;
    position: absolute;
    right: @pos;
    bottom: @pos;
    z-index: 99;
    cursor: pointer;

    .top {
      .self-center();
      font-size: 14px;
      color: @white;
    }
  }
</style>
2.事件总线注册返回顶部事件
1)绑定的组件
- 事件名:
setMainScroll - 当需要设置主区域滚动条位置时触发
- 参数:滚动高度
handleClick() {
  this.$bus.$emit("setMainScroll", 0);
},
2)使用的组件
data() {
  return {
    scrollTop: 0,
  };
},
mounted() {
  this.$bus.$on("setMainScroll", this.handleSetMainScroll);
},
methods: {
  handleSetMainScroll(top) {
    this.$refs.detailMainContainer.scrollTop = top;
  },
},
beforeDestroy() {
  this.$bus.$off("setMainScroll", this.handleSetMainScroll);
}
(三十)代码优化
- 使用混合
1.mainScroll.js
// 页面可滚动时返回顶部

export default (refEl) => {
  return {
    data() {
      return {
        scrollTop: 0,
      };
    },
    mounted() {
      // 监听页面滚动
      this.$refs[refEl].addEventListener("scroll", this.handleMainScroll);
      // 页面主区域超出视口时,注册修改滚动高度事件
      this.$bus.$on("setMainScroll", this.handleSetMainScroll);
    },
    methods: {
      handleMainScroll() {
        // 页面滚动时触发滚动事件,用于激活右侧目录标题
        this.$bus.$emit("mainScroll", this.$refs[refEl]);
      },
      handleSetMainScroll(top) {
        // 修改当前页面滚动高度
        this.$refs[refEl].scrollTop = top;
      },
    },
    beforeDestroy() {
      // 传递undefined给滚动事件,表示当前el不存在
      this.$bus.$emit("mainScroll");
      // 移除当前页面对滚动事件的监听
      this.$refs[refEl].removeEventListener("scroll", this.handleMainScroll);
      // 取消监听修改滚动高度事件
      this.$bus.$off("setMainScroll", this.handleSetMainScroll);
    },
  };
};
2.组件混入
import mainScroll from "@/mixins/mainScroll";
export default {
  name: "Detail",
  mixins: [mainScroll("detailMainContainer")],
};
(三十一)图片懒加载
1.lazy.js
- 自定义指令
- 传入图片的真实路径
- 先加载默认图片,真实图片加载完成后再渲染
import eventBus from "@/eventBus";
import { debounce } from "@/utils";
import defaultGif from "@/assets/default.gif";

// 当前指令绑定的组件所有的图片
let images = [];

/**
 * 遍历images,处理每一张图片
 * @param {Object} img 每一张图片的信息对象
 */
const displayImage = (img) => {
  img.dom.src = defaultGif;
  // 视口高度
  const clientHeight = document.documentElement.clientHeight;
  // 图片高度(未加载时不知道实际高度,默认定为150)
  const rect = img.dom.getBoundingClientRect();
  const height = rect.height || 150;
  if (rect.top >= -height && rect.top <= clientHeight) {
    const temp = new Image();
    temp.onload = () => {
      img.dom.src = img.src;
    };
    temp.src = img.src;
    images = images.filter((image) => image !== img);
  }
};

/**
 * 事件总线主区域滚动事件
 */
const handleScroll = () => {
  images.forEach((img) => {
    displayImage(img);
  });
};
eventBus.$on("mainScroll", debounce(handleScroll, 50));

export default {
  inserted(el, bindings) {
    const img = {
      dom: el,
      src: bindings.value,
    };
    images.push(img);
    // 指令每绑定一张图片就处理
    displayImage(img);
  },
  unbind(el) {
    images = images.filter((img) => img.dom !== el);
  },
};
2.全局注册指令
import vLazy from "./directives/lazy";
Vue.directive("lazy", vLazy);
3.组件使用指令
<RouterLink
  :to="{
    name: 'Detail',
    params: {
      blogId: item.id,
    },
  }"
>
  <img v-lazy="item.thumb" :src="item.thumb" :alt="item.title" :title="item.title" />
</RouterLink>
(三十二)数据共享
1.问题
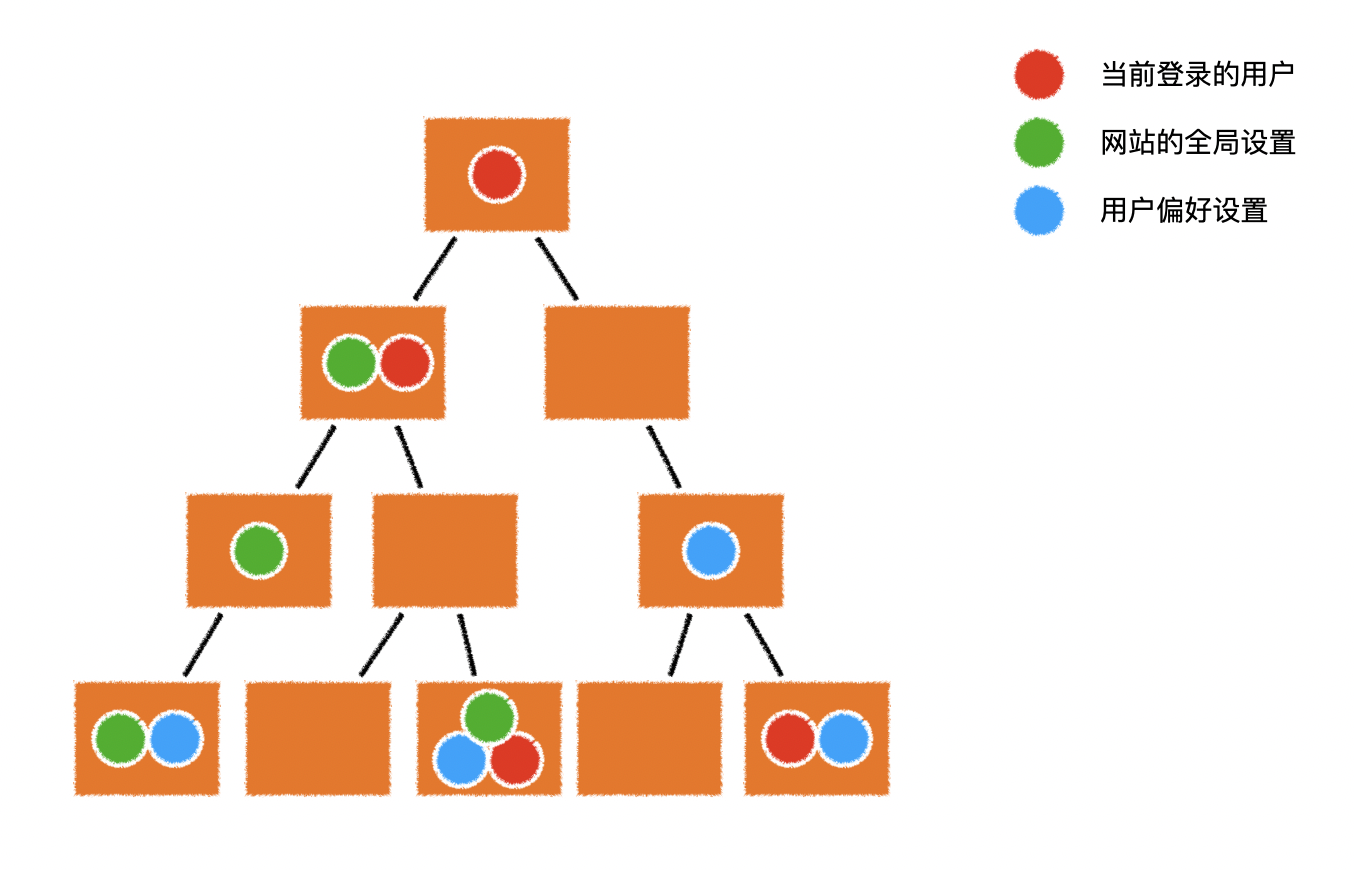
- 在 vue 中遇到 共享数据,会带来多个问题
1)如何保证数据的唯一性
- 如果数据不唯一,则会浪费大量的内存资源,降低运行效率
- 如果数据不唯一,就可能出现不统一的数据,难以维护
2)某个组件改动数据后,如何让其他用到该数据的组件知道数据变化了
- 事件总线貌似可以解决该问题,但需要在组件中手动的维护监听,极其不方便
- 而且事件总线的目的在于「通知」,而不是「共享数据」
2.数据提升至根组件
- 把所有的共享数据全部提升到根组件,然后通过属性不断下发
- 当某个组件需要修改数据时,又不断向上抛出事件,直到根组件完成对数据的修改
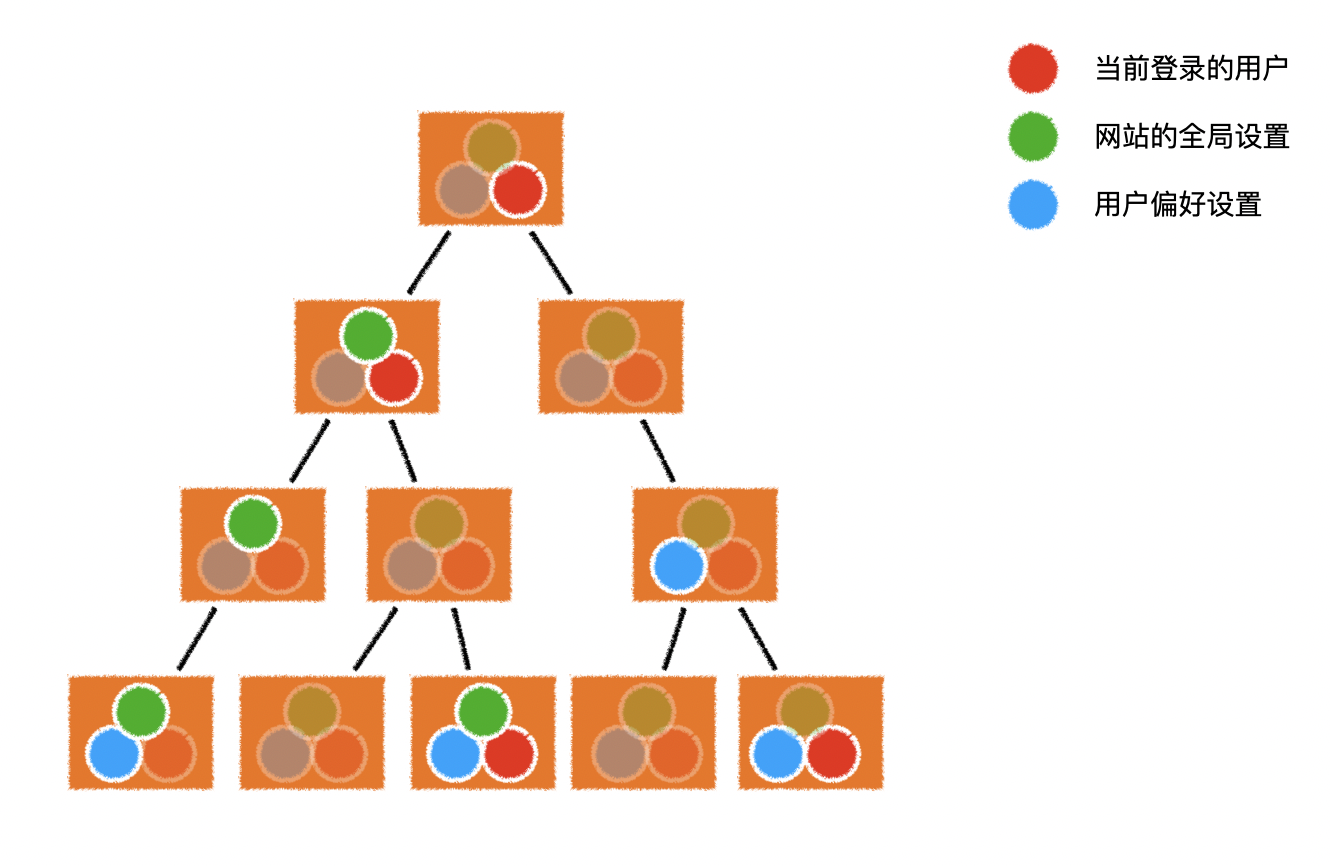
- 这种方案的缺陷也非常明显
- 需要编写大量的代码层层下发数据,很多组件被迫拥有了自己根本不需要的数据
- 需要编写大量的代码层层上抛事件,很多组件被迫注册了自己根本处理不了的事件
3.数据仓库
- 可以简单的设置一个 独立的数据仓库
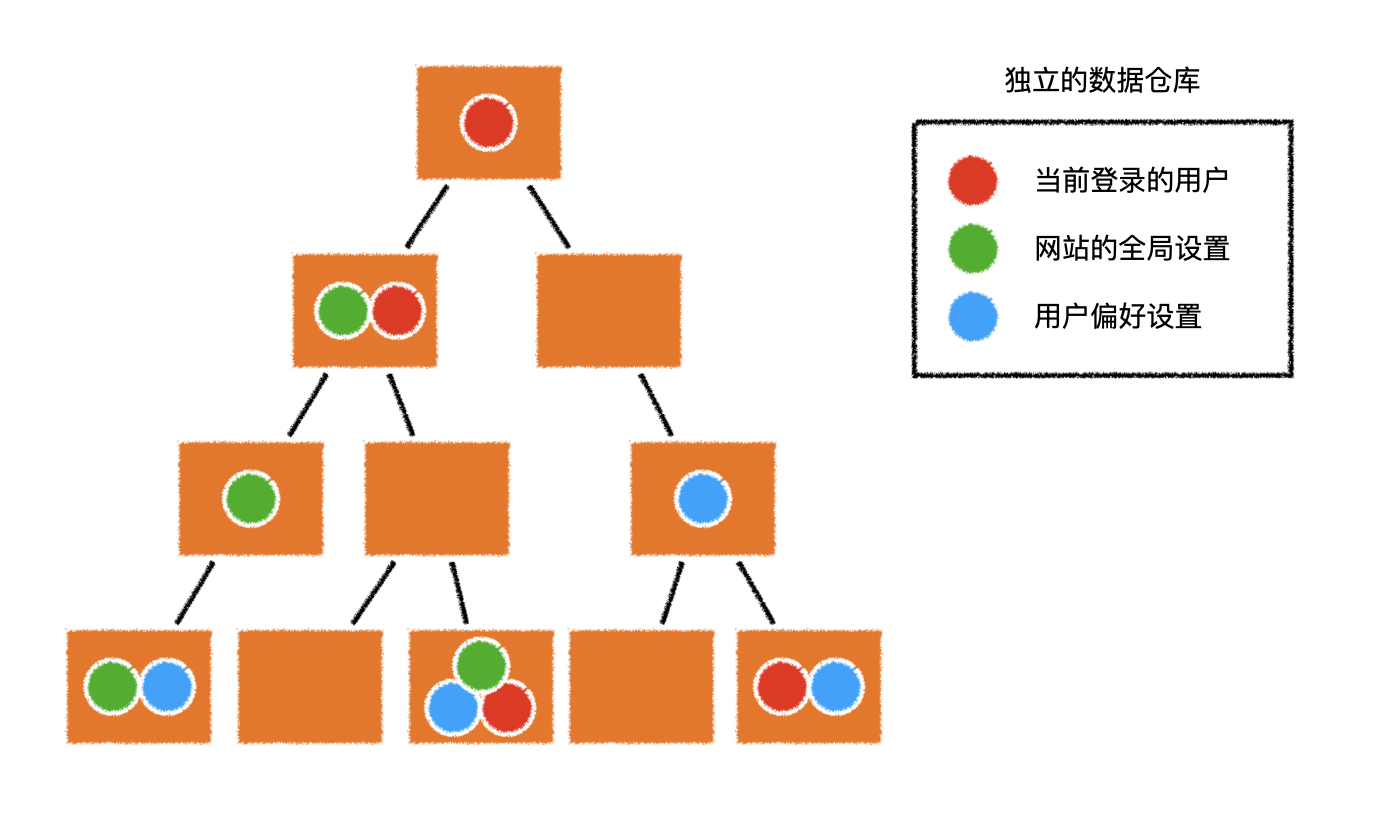
- 组件需要什么共享数据,可以自由的从仓库中获取,需要什么拿什么
- 组件可以自由的改变仓库中的数据,仓库的数据变化后,会自动通知用到对应数据的组件更新
- 要实现这一切,可以选择 vuex
4.创建仓库
- 先安装 vuex
# 为了保证和课程一致,请安装3.6.2版本
npm i vuex@3.6.2
- 安装 vuex 后,可以通过下面的代码创建一个数据仓库
- 在大部分情况下,一个工程仅需创建一个数据仓库
import Vuex from "vue";
import Vue from "vue";
Vue.use(Vuex); // 应用vuex插件
const store = new Vuex.Store({
  // 仓库的配置
  state: {
    // 仓库的初始状态(数据)
    count: 0,
  },
});

export default store;
5.访问数据
- 仓库创建好后,可以使用
store.state来访问仓库中的数据 - 如果希望在 vue 中方便的使用仓库数据,需要将 vuex 作为插件安装
// store.js
import Vuex from "vue";
import Vue from "vue";
Vue.use(Vuex); // 安装Vuex插件
const store = new Vuex({
  // 仓库的配置
  state: {
    // 仓库的初始状态(数据)
    count: 0,
  },
});

export default store;
// main.js
import Vue from "vue";
import App from "./App.vue";
import store from "./store.js";
new Vue({
  store, // 向vue中注入仓库
  render: (h) => h(App),
}).$mount("#app");
- 在 vue 组件中,可以通过实例的
$store属性访问到仓库 - Vuex 会自动将配置的状态数据设置为响应式数据
- 当数据变化时,依赖该数据的组件会自动渲染
6.数据的变更
- 尽管可以利用数据响应式的特点直接变更数据,但这样的做法在大型项目中会遇到问题
- 如果发现某个共享数据是错误的,而有一百多个组件都有可能变更过这块数据,无法知道是哪一步数据变更出现了问题
- 为了能够更好的跟踪数据的变化, vuex 强烈建议使用
mutation来更改数据
const store = new Vuex({
  // 仓库的配置
  state: {
    // 仓库的初始状态(数据)
    count: 0,
  },
  mutations: {
    /**
     * 每个mutation是一个方法,它描述了数据在某种场景下的变化
     * increase mutation描述了数据在增加时应该发生的变化
     * 参数state为当前的仓库数据
     */
    increase(state) {
      state.count++;
    },
    decrease(state) {
      state.count--;
    },
    /**
     * 求n次幂
     * 该mutation需要一个额外的参数来提供指数
     * 我们把让数据产生变化时的附加信息称之为负荷(负载) payload
     * payload可以是任何类型,数字、字符串、对象均可
     * 在该mutation中,我们约定payload为一个数字,表示指数
     */
    power(state, payload) {
      state.count **= payload;
    },
  },
});
- 有了 mutation 后,就不应该直接去改动仓库的数据了
- 而是通过
store.commit方法提交一个 mutation - 可以通过
vue devtools观测到数据的变化
store.commit("mutation的名字", payload);
1)mutation 中不得出现异步操作
- 在实际开发的规范中,甚至要求不得有副作用操作
- 副作用操作
- 异步
- 更改或读取外部环境的信息
- 例如
localStorage、location、DOM等
- 例如
2)提交 mutation 是数据改变的 唯一原因
7.异步处理
- 在 vuex 中要进行异步操作,需要使用
action
const store = new Vuex({
  state: {
    count: 0,
  },
  mutations: {
    increase(state) {
      state.count++;
    },
    decrease(state) {
      state.count--;
    },
    power(state, payload) {
      state.count **= payload;
    },
  },
  actions: {
    /**
     * ctx: 类似于store的对象
     * payload: 本次异步操作的额外信息
     */
    asyncPower(ctx, payload) {
      setTimeout(function () {
        ctx.commit("power", payload);
      }, 1000);
    },
  },
});
(三十三)vuex 经典案例
1.用户模块逻辑示意图
1)路由总体示意图

2)鉴权守卫逻辑示意图
2.参考资料
1)vue
2)vuex
3)router
3.全局仓库
- 开启严格模式后,只允许通过 mutation 改变状态
store.state.loading = true;会报错
// ./src/store/index.js
import Vuex from "vuex";
import Vue from "vue";
import counter from "./counter";
import loginUser from "./loginUser";
Vue.use(Vuex);

const store = new Vuex.Store({
  modules: {
    counter,
    loginUser,
  },
  strict: true,
});

export default store;
4.用户共享数据
- 开启命名空间后,配置对象中的参数 state 只关联当前配置文件的 state
- 其他配置文件的同名 mutations 等方法名不冲突
1)定义配置对象
// ./src/store/loginUser.js
import * as userApi from "../api/user";

export default {
  namespaced: true, // 开启命名空间
  state: {
    loading: false,
    user: null,
  },
  getters: {
    status(state) {
      if (state.loading) {
        return "loading";
      } else if (state.user) {
        return "login";
      } else {
        return "unlogin";
      }
    },
  },
  mutations: {
    setLoading(state, payload) {
      state.loading = payload;
    },
    setUser(state, payload) {
      state.user = payload;
    },
  },
  actions: {
    async login(ctx, payload) {
      ctx.commit("setLoading", true);
      const resp = await userApi.login(payload.loginId, payload.loginPwd);
      ctx.commit("setUser", resp);
      ctx.commit("setLoading", false);
      return resp;
    },
    async whoAmI(ctx) {
      ctx.commit("setLoading", true);
      const resp = await userApi.whoAmI();
      ctx.commit("setUser", resp);
      ctx.commit("setLoading", false);
    },
    async loginOut(ctx) {
      ctx.commit("setLoading", true);
      await userApi.loginOut();
      ctx.commit("setUser", null);
      ctx.commit("setLoading", false);
    },
  },
};
2)分发 action
async handleSubmit() {
  const resp = await this.$store.dispatch("loginUser/login", {
    loginId: this.loginId,
    loginPwd: this.loginPwd,
  });
}
5.mapState
- 返回一个响应式对象
- 相当于 computed
{
  loading(){
    return this.$store.state.loginUser.loading
  },
  user(){
    return this.$store.state.loginUser.user
  }
}
<!-- 组件中使用 -->
<button :disabled="loading">{{ loading ? "loading..." : "登录" }}</button>
1)写法一
import { mapState } from "vuex";
export default {
  computed: mapState({
    loading: (state) => state.loginUser.loading,
  }),
};
2)写法二
import { mapState } from "vuex";
export default {
  // computed: mapState("loginUser", {
  //   loading: "loading",
  // }),
  computed: mapState("loginUser", ["loading"]),
};
3)写法三
import { mapState } from "vuex";
export default {
  // computed: {
  //   // 其他计算属性,
  //   loading: mapState({
  //     loading: (state) => state.loginUser.loading,
  //   }).loading,
  // },
  computed: {
    ...mapState("loginUser", ["loading"]),
  },
};
6.路由前置守卫
- 每当导航切换时(包含首次刷新页面),会运行 beforeEach
- from:之前的路由对象,this.$route
- to:即将进入的路由对象,this.$route
- next:确认导航的一个函数
- 调用时无参,直接进入 to
- 调用时传入参数,根据传入参数进入新的导航
import VueRouter from "vue-router";
import routes from "./routes";
import Vue from "vue";
import store from "../store";

Vue.use(VueRouter);

const router = new VueRouter({
  routes,
  mode: "history",
});

router.beforeEach((to, from, next) => {
  if (to.meta.auth) {
    // 需要鉴权,进入鉴权流程
    const status = store.getters["loginUser/status"];
    if (status === "loading") {
      // 加载中,无法确定是否已经登录
      next({
        path: "/loading",
        query: {
          returnurl: to.fullPath,
        },
      });
    } else if (status === "login") {
      // 登录过了
      next();
    } else {
      // 未登录
      alert("该页面需要登录,你还没有登录,请先登录");
      next({
        path: "/login",
        query: {
          returnurl: to.fullPath,
        },
      });
    }
  } else {
    next();
  }
});

export default router;
7.监权等待页
- 向服务器发送的鉴权请求还未收到回复时,给用户显示一些提示信息
- 使用 vuex 提供的 watch 函数
this.$store.watch()监听 store 中的数据变化- 内部实现和 Vue 提供的 watch 函数一致
this.$watch() - 参数 1: 变化的数据
- 参数 2: 监听的回调函数,收到实时更新的数据
- 参数 3: watch 函数的配置
- 返回值:返回一个函数,调用即可取消监听
- 内部实现和 Vue 提供的 watch 函数一致
<template>
  <h1>正在登录中...</h1>
</template>

<script>
  export default {
    created() {
      this.unWatch = this.$store.watch(
        () => this.$store.getters["loginUser/status"],
        (status) => {
          if (status !== "loading") {
            this.$router.push(this.$route.query.returnurl || "/home").catch(() => {}); // push返回一个Promise,可以直接捕获
          }
        },
        {
          immediate: true,
        },
      );
    },
    destroyed() {
      this.unWatch();
    },
  };
</script>
(三十四)在项目中应用 vuex
1.store
import Vuex from "vuex";
import Vue from "vue";

import banner from "./banner";
import setting from "./setting";

Vue.use(Vuex);

const store = new Vuex.Store({
  strict: true,
  modules: {
    banner,
    setting,
  },
});

export default store;
2.banner
// 用户信息
import { getSetting } from "@/api/setting";

export default {
  namespaced: true,
  state: {
    loading: false,
    data: null,
  },
  mutations: {
    setLoading(state, payload) {
      state.loading = payload;
    },
    setData(state, payload) {
      state.data = payload;
    },
  },
  actions: {
    async fetchSetting(ctx) {
      ctx.commit("setLoading", true);
      const res = await getSetting();
      if (res) {
        ctx.commit("setData", res);
      }
      ctx.commit("setLoading", false);
    },
  },
};
3.setting
// 用户信息
import { getSetting } from "@/api/setting";

export default {
  namespaced: true,
  state: {
    loading: false,
    data: null,
  },
  mutations: {
    setLoading(state, payload) {
      state.loading = payload;
    },
    setData(state, payload) {
      state.data = payload;
    },
  },
  actions: {
    async fetchSetting(ctx) {
      ctx.commit("setLoading", true);
      const res = await getSetting();
      if (res) {
        ctx.commit("setData", res);
        // 修改页签图标
        if (res.favicon) {
          // <link rel=" icon " type="images/x-icon" href="./favicon.ico">
          let link = document.querySelector("link[rel='icon']");
          if (link) return;
          link = document.createElement("link");
          link.rel = "icon";
          link.href = res.favicon;
          document.querySelector("head").appendChild(link);
        }
      }
      ctx.commit("setLoading", false);
    },
  },
};
4.入口文件直接请求全局配置
import store from "./store";
store.dispatch("setting/fetchSetting");
(三十五)页面标题的统一处理
- 标题组成:路由标题-网站标题
- 路由标题:由路由守卫 router 设置
- 网站标题:由数据仓库 store 设置
1.@/utils/displaySiteTitle.js
// 设置网站标题:路由标题-网站标题

let routeTitle = "",
  siteTitle = "";

const setTitle = () => {
  if (!routeTitle && !siteTitle) {
    document.title = "Loading...";
  } else if (routeTitle && !siteTitle) {
    document.title = routeTitle;
  } else if (!routeTitle && siteTitle) {
    document.title = siteTitle;
  } else {
    document.title = `${routeTitle}-${siteTitle}`;
  }
};

export default {
  setRouteTitle(title) {
    routeTitle = title;
    setTitle();
  },
  setSiteTitle(title) {
    siteTitle = title;
    setTitle();
  },
  // 获取当前网站标题,离开文章详情页时将文章标题替换为网站标题
  getSiteTitle() {
    return siteTitle;
  },
};
2.路由标题
// ./router/routes.js

export default [
  {
    name: "Home",
    path: "/",
    component: Home,
    meta: {
      title: "首页",
    },
  },
  // ...
];
router.afterEach((to, from) => {
  if (to.meta.title) {
    displaySiteTitle.setRouteTitle(to.meta.title);
  }
});
3.网站标题
async fetchSetting(ctx) {
  ctx.commit("setLoading", true);
  const res = await getSetting();
  if (res) {
    ctx.commit("setData", res);
    // 修改页签图标
    if (res.favicon) {
      // <link rel=" icon " type="images/x-icon" href="./favicon.ico">
      let link = document.querySelector("link[rel='icon']");
      if (link) return;
      link = document.createElement("link");
      link.rel = "icon";
      link.href = res.favicon;
      document.querySelector("head").appendChild(link);
    }
    // 修改页面标题
    if (res.siteTitle) {
      displaySiteTitle.setSiteTitle(res.siteTitle);
    }
  }
  ctx.commit("setLoading", false);
}
4.文章标题
data() {
  return {
    tempSiteTitle: "",
  };
},
methods: {
  async fetchData() {
    const res = await getBlogDetail(this.$route.params.blogId);
    if (res.title) {
      this.tempSiteTitle = displaySiteTitle.getSiteTitle();
      displaySiteTitle.setSiteTitle(res.title);
    }
    return res;
  },
},
destroyed() {
  displaySiteTitle.setSiteTitle(this.tempSiteTitle);
},
(三十六)完成「关于我」页面
- 使用 iframe 引入个人在线简历
- v-loading 不仅要在数据请求完成前显示,还应在 iframe 加载完成前显示
<template>
  <div v-loading="loading || srcLoading" class="about-container">
    <iframe v-if="data" :src="data" @load="srcLoading = false" frameborder="0" class="content"></iframe>
  </div>
</template>

<script>
  import { mapState } from "vuex";

  export default {
    name: "About",
    data() {
      return {
        srcLoading: true,
      };
    },
    created() {
      this.$store.dispatch("about/fetchAbout");
    },
    computed: {
      ...mapState("about", ["loading", "data"]),
    },
  };
</script>

<style lang="less" scoped>
  .about-container {
    width: 100%;
    height: 100%;
    position: relative;
    overflow: hidden;

    .content {
      width: 100%;
      height: 100%;
    }
  }
</style>
(三十七)完成「项目&效果」页面
<template>
  <div v-loading="loading" class="project-container" ref="projectContainer">
    <div v-for="item in data" :key="item.id" class="item">
      <a :href="item.url ? item.url : `javascript:alert('该项目无法通过外网访问')`" :target="item.url ? '_blank' : '_self'">
        <img v-lazy="item.thumb" class="thumb" />
      </a>
      <div class="info">
        <a :href="item.url ? item.url : `javascript:alert('该项目无法通过外网访问')`" :target="item.url ? '_blank' : '_self'">
          <h2>{{ item.name }}</h2>
        </a>
        <a v-if="item.github" :href="item.github" class="github" target="_blank">GitHub</a>
        <p v-for="(desc, i) in item.description" :key="i">{{ desc }}</p>
      </div>
    </div>
  </div>
</template>

<script>
  import mainScroll from "@/mixins/mainScroll.js";
  import { mapState } from "vuex";

  export default {
    name: "Project",
    mixins: [mainScroll("projectContainer")],
    computed: mapState("project", ["loading", "data"]),
    created() {
      this.$store.dispatch("project/fetchProject");
    },
  };
</script>

<style lang="less" scoped>
  @import "~@/styles/var.less";

  .project-container {
    width: 100%;
    height: 100%;
    padding: 20px;
    position: relative;
    overflow-y: auto;
    scroll-behavior: smooth;

    .item {
      padding: 20px;
      display: flex;
      margin-bottom: 20px;
      transition: 0.5s;

      &:hover {
        box-shadow: -1px 1px 5px @primary;
        transform: scale(1.01) translate(3px, -3px);
      }

      .thumb {
        width: 300px;
        min-height: 250px;
        object-fit: cover;
        border-radius: 5px;
        margin-right: 15px;
      }

      .info {
        line-height: 1.5;
        flex: 1;

        .github {
          font-size: 14px;
          color: @primary;
        }
      }
    }
  }
</style>
(三十八)完成「留言板」页面
<template>
  <div class="message-container" ref="messageContainer">
    <MessageArea :subTitle="` (${data.total}) `" :list="data.rows" :isListLoading="isLoading" @submitDataForm="handleSubmit" title="留言板" />
  </div>
</template>

<script>
  import MessageArea from "@/components/MessageArea";
  import fetchData from "@/mixins/fetchData";
  import mainScroll from "@/mixins/mainScroll";
  import { getMessages, postMessage } from "@/api/message";

  export default {
    name: "Message",
    mixins: [fetchData({ total: 0, rows: [] }), mainScroll("messageContainer")],
    components: {
      MessageArea,
    },
    data() {
      return {
        page: 1,
        limit: 10,
      };
    },
    computed: {
      hasMore() {
        return this.data.rows.length < this.data.total;
      },
    },
    created() {
      this.$bus.$on("mainScroll", this.handleScroll);
    },
    methods: {
      handleScroll(dom) {
        if (this.isLoading || !dom) return;
        if (Math.abs(dom.scrollTop + dom.clientHeight - dom.scrollHeight) <= 100) this.handleFetchMore();
      },
      async fetchData() {
        return await getMessages(this.page, this.limit);
      },
      async handleFetchMore() {
        if (!this.hasMore) return;
        this.isLoading = true;
        this.page++;
        const res = await this.fetchData();
        this.data.total = res.total;
        this.data.rows = this.data.rows.concat(res.rows);
        this.isLoading = false;
      },
      async handleSubmit(formData, cb) {
        const res = await postMessage(formData);
        this.data.rows.unshift(res);
        this.data.total++;
        cb("感谢留言");
      },
    },
    destroyed() {
      this.$bus.$off("mainScroll", this.handleScroll);
    },
  };
</script>

<style lang="less" scoped>
  .message-container {
    width: 100%;
    height: 100%;
    padding: 20px 0;
    overflow-y: auto;
    scroll-behavior: smooth;

    .message-area-container {
      width: 80%;
      margin: 0 auto;
    }
  }
</style>
(三十九)打包结果分析
1.分析打包结果
1)分析插件
- 由于 vue-cli 是利用 webpack 进行打包
- 仅需加入一个 webpack 插件
webpack-bundle-analyzer即可分析打包结果
// vue.config.js

const BundleAnalyzerPlugin = require("webpack-bundle-analyzer").BundleAnalyzerPlugin;
module.exports = {
  // 通过 configureWebpack 选项,可对 webpack 进行额外的配置
  // 该配置最终会和 vue-cli 的默认配置进行合并(webpack-merge)
  configureWebpack: {
    plugins: [new BundleAnalyzerPlugin()],
  },
};
2)区分开发环境和生产环境
- 需要避免在开发环境中启动
webpack-bundle-analyzer
// webpack.config.js

const BundleAnalyzerPlugin = require("webpack-bundle-analyzer").BundleAnalyzerPlugin;

if (process.env.NODE_ENV === "production") {
  // 生产环境
  module.exports = {
    devtool: "none", // 不生成sourcemap文件
    plugins: [new BundleAnalyzerPlugin()],
  };
} else {
  // 开发环境
  module.exports = {};
}
// vue.config.js

module.exports = {
  devServer: {
    proxy: {
      "/api": {
        target: "https://study.duyiedu.com",
      },
    },
  },
  configureWebpack: require("./webpack.config"),
};
2.优化公共库打包体积
1)CDN
- CDN 全称为 Content Delivery Network,称之为内容分发网络
- 基本原理是:架设多台服务器,这些服务器定期从源站拿取资源保存到本地,让不同地域的用户能够通过访问最近的服务器获得资源
- 可以把项目中的所有静态资源都放到 CDN 上(收费),也可以利用现成免费的 CDN 获取公共库的资源
2)页面引入公共库
- 需要告诉 webpack 不要对公共库进行打包
// webpack.config.js

const BundleAnalyzerPlugin = require("webpack-bundle-analyzer").BundleAnalyzerPlugin;

if (process.env.NODE_ENV === "production") {
  // 生产环境
  module.exports = {
    devtool: "none", // 不生成sourcemap文件
    plugins: [new BundleAnalyzerPlugin()],
    externals: {
      vue: "Vue",
      vuex: "Vuex",
      "vue-router": "VueRouter",
      axios: "axios",
    },
  };
} else {
  // 开发环境
  module.exports = {};
}
- 在 index.html 页面中手动加入 cdn 链接
- 如:BootCDN
- 使用模板代码,开发环境时不使用 cdn 包
<body>
  <div id="app"></div>
  <!-- built files will be auto injected -->
  <!-- ref cdn -->
  <% if(NODE_ENV === "production") { %>
  <script src="https://cdn.bootcdn.net/ajax/libs/vue/2.6.12/vue.min.js"></script>
  <script src="https://cdn.bootcdn.net/ajax/libs/vuex/3.5.1/vuex.min.js"></script>
  <script src="https://cdn.bootcdn.net/ajax/libs/vue-router/3.4.7/vue-router.min.js"></script>
  <script src="https://cdn.bootcdn.net/ajax/libs/axios/0.21.0/axios.min.js"></script>
  <% } %>
</body>
3)配置文件引入公共库
- 对于 vuex 和 vue-router ,使用传统方式引入则会自动成为 Vue 的插件(全局变量)
- CDN 引入公共库会造成全局变量污染:
window.Vue、window.Vuex、window.axios
- CDN 引入公共库会造成全局变量污染:
- 因此需要区分是否使用 CDN 引入公共库,是则去掉
Vue.use(xxx)
// store.js
import Vue from "vue";
import Vuex from "vuex";

if (!window.Vuex) {
  // 没有使用传统的方式引入Vuex
  Vue.use(Vuex);
}
// router.js
import VueRouter from "vue-router";
import Vue from "vue";

if (!window.VueRouter) {
  // 没有使用传统的方式引入VueRouter
  Vue.use(VueRouter);
}
3.启用现代模式
- 为了兼容各种浏览器, vue-cli 在内部使用了
@babel/present-env对代码进行降级 - 可以通过
.browserlistrc配置来设置需要兼容的目标浏览器- 这是一种比较偷懒的办法,因为对于那些使用现代浏览器的用户,也被迫使用了降级之后的代码
- 而降低的代码中包含了大量的
polyfill,从而提升了包的体积
- 因此,希望提供两种打包结果
- 降级后的包(大),提供给旧浏览器用户使用
- 未降级的包(小),提供给现代浏览器用户使用
- 除了应用 webpack 进行多次打包外,还可以利用 vue-cli 提供的命令
vue-cli-service build --modern
- 打包后生成如下代码
preload- 预下载,当前页面加载完成后可能会使用到,通知浏览器先下载
modulepreload- 模块预下载,当前页面加载完成后可能会使用到,通知浏览器先下载
- 文件以模块形式导出
<!DOCTYPE html>
<html lang="">
  <head>
    <meta charset="utf-8" />
    <meta http-equiv="X-UA-Compatible" content="IE=edge" />
    <meta name="viewport" content="width=device-width,initial-scale=1" />
    <link href="/css/app.05eba8bf.css" rel="preload" as="style" />
    <link href="/css/chunk-vendors.536efc42.css" rel="preload" as="style" />
    <link href="/js/app.90dfc9e9.js" rel="modulepreload" as="script" />
    <link href="/js/chunk-vendors.11105970.js" rel="modulepreload" as="script" />
    <link href="/css/chunk-vendors.536efc42.css" rel="stylesheet" />
    <link href="/css/app.05eba8bf.css" rel="stylesheet" />
  </head>
  <body>
    <noscript><strong>We're sorry but my-site doesn't work properly without JavaScript enabled. Please enable it to continue.</strong></noscript>
    <div id="app"></div>
    <script src="https://cdn.bootcdn.net/ajax/libs/vue/2.6.12/vue.min.js"></script>
    <script src="https://cdn.bootcdn.net/ajax/libs/vuex/3.5.1/vuex.min.js"></script>
    <script src="https://cdn.bootcdn.net/ajax/libs/vue-router/3.4.7/vue-router.min.js"></script>
    <script src="https://cdn.bootcdn.net/ajax/libs/axios/0.21.0/axios.min.js"></script>

    <!-- 新版浏览器解析到下面两行时,根据type是module,会执行head中modulepreload的两个js文件,忽略nomodule -->
    <script type="module" src="/js/chunk-vendors.11105970.js"></script>
    <script type="module" src="/js/app.90dfc9e9.js"></script>

    <script>
      !(function () {
        var e = document,
          t = e.createElement("script");
        if (!("noModule" in t) && "onbeforeload" in t) {
          var n = !1;
          e.addEventListener(
            "beforeload",
            function (e) {
              if (e.target === t) n = !0;
              else if (!e.target.hasAttribute("nomodule") || !n) return;
              e.preventDefault();
            },
            !0,
          ),
            (t.type = "module"),
            (t.src = "."),
            e.head.appendChild(t),
            t.remove();
        }
      })();
    </script>

    <!-- 旧版浏览器不识别type='module',会解析下面两行,执行CDN方式引入的文件 -->
    <script src="/js/chunk-vendors-legacy.11105970.js" nomodule></script>
    <script src="/js/app-legacy.90dfc9e9.js" nomodule></script>
  </body>
</html>
4.优化项目包体积 —— 页面分包
- 项目包是指 src 目录中的打包结果
- 默认情况下,vue-cli 会利用 webpack 将 src 目录中的所有代码打包成一个
bundle - 导致访问一个页面时,需要加载所有页面的 js 代码
- 可以利用 webpack 对 动态 import 的支持,从而把不同页面的代码打包到不同文件中
- 也称为路由懒加载
// routes
export default [
  {
    name: "Home",
    path: "/",
    component: () => import(/* webpackChunkName: "home" */ "@/views/Home"),
  },
  {
    name: "About",
    path: "/about",
    component: () => import(/* webpackChunkName: "about" */ "@/views/About"),
  },
];
- 打包后生成以下代码
prefetch- 预获取
- 优先级低于 preload
- 后续可能会使用该文件,浏览器下载进程空闲时再下载
<link href="/css/chunk-37a13a72.153060c7.css" rel="prefetch" />
<link href="/css/chunk-4dc0582a.3201792c.css" rel="prefetch" />
<link href="/css/chunk-5c83283a.54b7c5bc.css" rel="prefetch" />
<link href="/css/chunk-5ee61fd4.cb3cc80d.css" rel="prefetch" />
<link href="/css/chunk-5fdfa8f4.1fd02397.css" rel="prefetch" />
<link href="/css/chunk-7f687b5b.6b2858f4.css" rel="prefetch" />
<link href="/js/chunk-37a13a72.f1bb6eb4.js" rel="prefetch" />
<link href="/js/chunk-4dc0582a.75195236.js" rel="prefetch" />
<link href="/js/chunk-5c83283a.49c3c874.js" rel="prefetch" />
<link href="/js/chunk-5ee61fd4.41dcc732.js" rel="prefetch" />
<link href="/js/chunk-5fdfa8f4.6b444f85.js" rel="prefetch" />
<link href="/js/chunk-7f687b5b.505511b7.js" rel="prefetch" />
5.优化首屏响应
- 首页白屏受很多因素的影响
- vue 页面需要通过 js 构建
- 因此在 js 下载到本地之前,页面上什么也没有
- 一个非常简单有效的办法,即在页面中先渲染一个小的加载中效果
- 等到 js 下载到本地并运行后,即会自动替换
#app下的内容
- 等到 js 下载到本地并运行后,即会自动替换
<div id="app">
  <style>
    .loading {
      position: fixed;
      width: 200px;
      height: 200px;
      left: 50%;
      top: 50%;
      transform: translate(-50%, -50%);
    }
  </style>
  <img class="loading" src="./img/loading.gif" alt="" />
</div>
1)static 纯静态资源
- 静态资源的一种
- 一般放在
public目录下 - webpack 不会打包该目录下的文件
- 使用
copy-webpack-plugin插件直接将整个目录内容拷贝到打包后的工程目录 - 因此该目录下的文件名、路径不会变化(没有 hash)
2)assets 嵌入式静态资源
- 静态资源的一种
- 一般放在
src目录下 - webpack 会打包该目录下的文件
- 文件名、路径等打包后会生成 hash 后缀
- 小文件可能会生成 base64 格式的文件
- 需要 import 引入后再使用
(四十)异步组件
- 在代码层面,vue 组件本质上是一个配置对象
var comp = {
  props: xxx,
  data: xxx,
  computed: xxx,
  methods: xxx,
};
- 有的时候,要得到某个组件配置对象需要一个异步的加载过程
- 需要使用 ajax 获得某个数据之后才能加载该组件
- 为了合理的分包,组件配置对象需要通过
import(xxx)动态加载
1.本质
- 如果一个组件 需要通过异步的方式得到组件配置对象 ,该组件可以做成一个异步组件
- 异步组件本质上是一个函数
/**
 * 该函数调用后返回一个Promise
 * Promise成功的结果是一个组件配置对象
 */
const AsyncComponent = () => import("./MyComp");

var App = {
  components: {
    /**
     * 可以把该函数当做一个组件使用(异步组件)
     * Vue会调用该函数,并等待Promise完成,完成之前该组件位置什么也不渲染
     */
    AsyncComponent,
  },
};
提示
- 异步组件的函数不仅可以返回一个 Promise,还支持返回一个对象
- 详见 返回对象格式的异步组件
2.应用
- 异步组件通常应用在 路由懒加载 中,以达到更好的分包
- 为了提高用户体验,可以在组件配置对象加载完成之前给用户显示一些提示信息
- 推荐使用 NProgress 展现一个进度条
var routes = [
  {
    path: "/",
    component: async () => {
      console.log("组件开始加载");
      const HomeComp = await import("./Views/Home.vue");
      console.log("组件加载完毕");
      return HomeComp;
    },
  },
];
3.异步加载组件并显示进度条
process是 nodejs 环境下的全局变量- 浏览器本身不能识别该对象
- 但是 vue-cli 内部做了封装,所以可以使用该对象判断当前执行环境是开发还是生产
// routes
import "nprogress/nprogress.css";
import { start, done, configure } from "nprogress";

configure({
  trickleSpeed: 20,
  showSpinner: false,
});

const delay = (duration) => {
  return new Promise((resolve) => {
    setTimeout(() => {
      resolve();
    }, duration);
  });
};

const loadComponentProgress = (asyncComponent) => {
  return async () => {
    start();
    if (process.env.NODE_ENV === "development") {
      await delay(2000);
    }
    const comp = await asyncComponent();
    done();
    return comp;
  };
};

export default [
  {
    name: "Home",
    path: "/",
    component: loadComponentProgress(() => import("@/views/Home")),
    meta: {
      title: "首页",
    },
  },
];
(四十一)补充:无数据的显示
<Empty v-if="data.rows && data.rows.length === 0 && !isLoading" />
(四十二)补充:404 页面
1.组件
<template>
  <div class="not-found-container">
    <img src="@/assets/404.jpg" alt="" />
  </div>
</template>

<script>
  export default {
    name: "NotFound",
  };
</script>

<style lang="less" scoped>
  .not-found-container {
    background-color: #7ecdc1;
    width: 100%;
    height: 100%;
    display: flex;
    justify-content: center;
    align-items: center;
  }
</style>
2.路由
*通配符- 置于所有路由规则末尾
- 表示上方所有规则都匹配失败时匹配
import NotFound from "@/views/NotFound";

export default [
  {
    name: "Home",
    path: "/",
    component: loadComponentProgress(() => import("@/views/Home")),
    meta: {
      title: "首页",
    },
  },
  // ...
  {
    name: "NotFound",
    path: "*",
    component: NotFound,
    meta: {
      title: "404",
    },
  },
];