四、移动端入门到实战
大约 51 分钟约 15189 字
(一)uni-app
1.简介
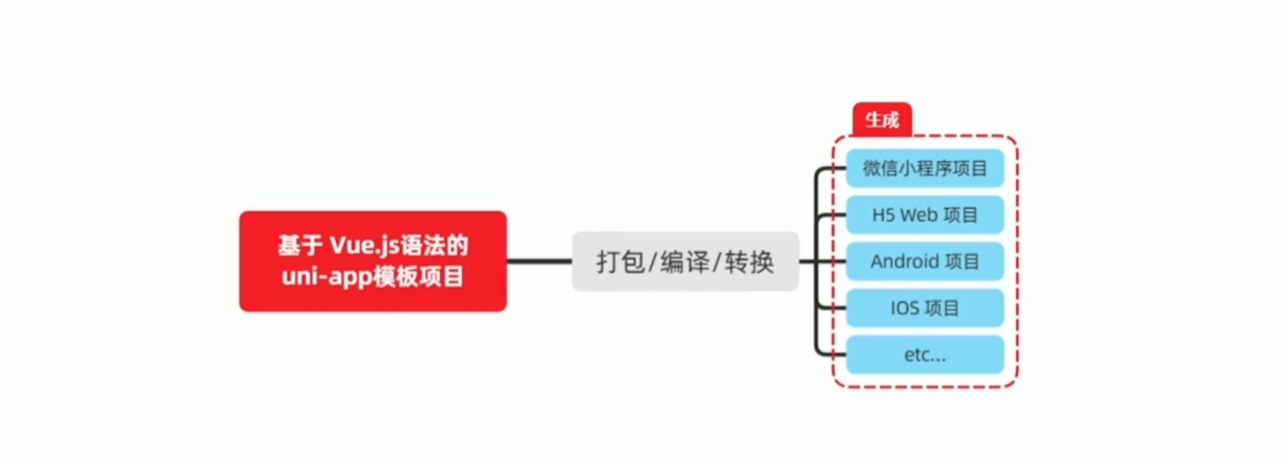
- 一个使用 Vue.js 开发所有前端应用的框架
- 开发者编写一套代码,即可发布到 iOS、Android、H5、以及各种小程序(微信/支付宝/百度/头条/QQ/钉钉/淘宝)、快应用等多个平台
2.形成
- 移动端技术太多,跨端框架或是未来发展趋势
- 一套代码多端发布受开发者青睐
- 完整的生态,受企业青睐
3.优势
4.和 Vue 的关系
- 使用 VueJS 开发
- 在发布到 H5 时,支持所有 vue 语法
- 发布到 App 和小程序时,实现部分 Vue 语法
5.和小程序的关系
- 组件标签靠近小程序规范
- 接口能力(JS API)靠近微信小程序开发
- 完整的小程序生命周期
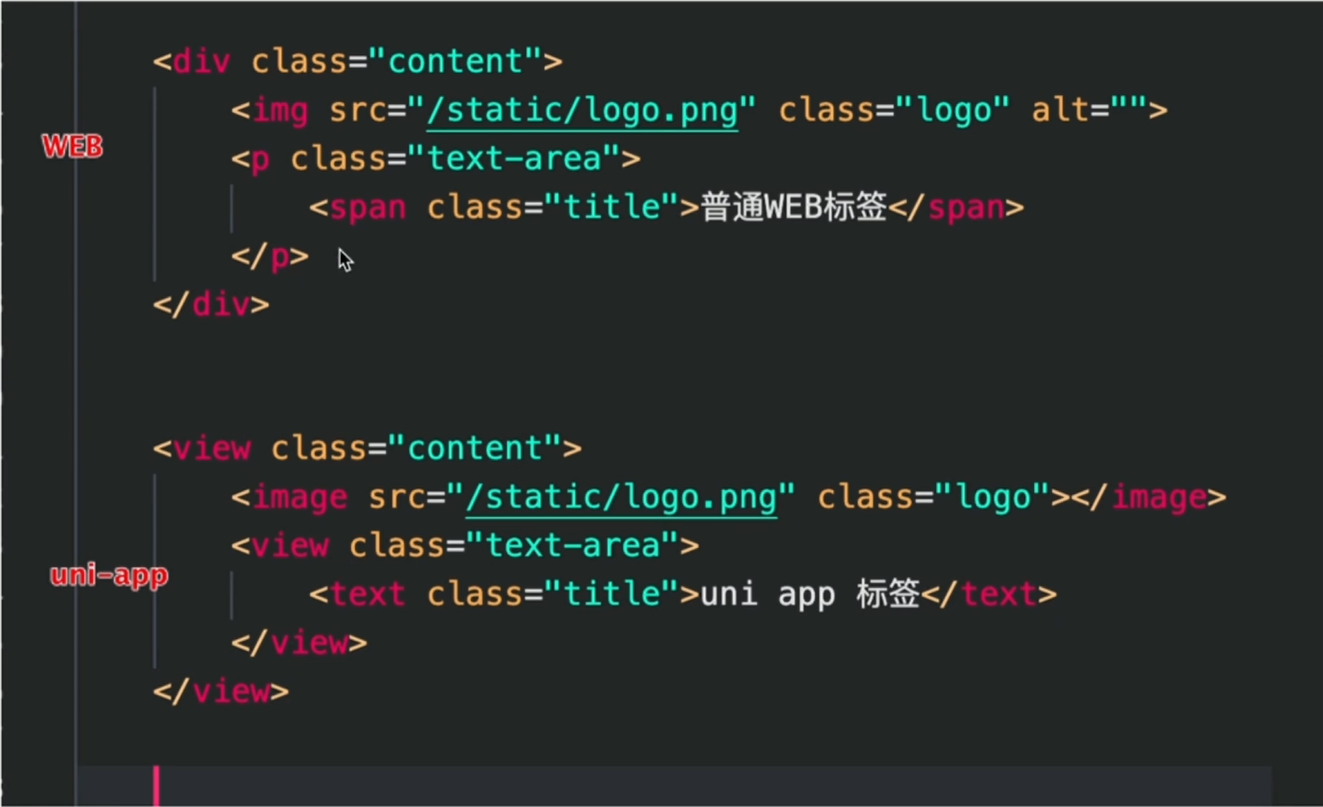
6.和 Web 代码编写的区别
(二)uni-app 实战项目介绍
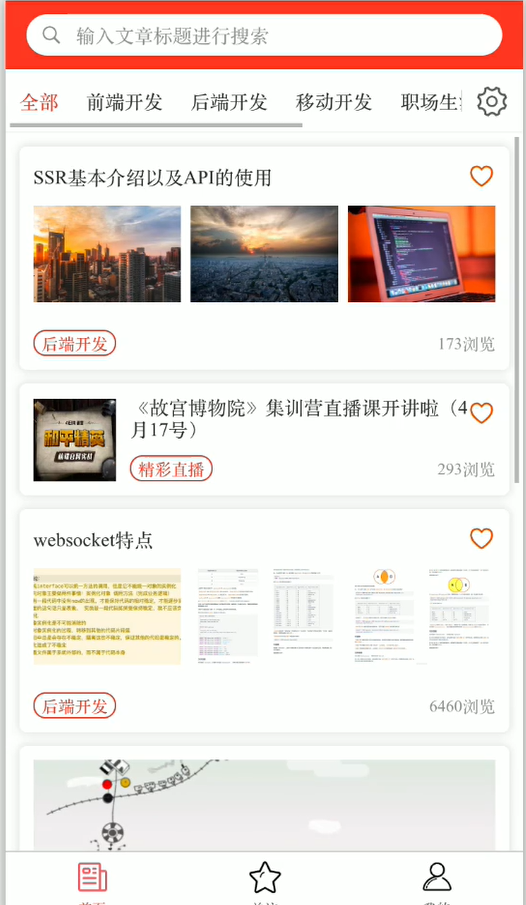
1.项目演示
- h5 访问地址:static-mp-e07dd30e-22ea-4f41-8366-97148a2b9aae.next.bspapp.com
- 安卓应用 apk 下载地址:https://vkceyugu.cdn.bspapp.com/VKCEYUGU-c1da2723-930f-4455-86c1-df51096d1e3e/3f7efbb5-e866-456f-9ea8-550d582c3388.apk
- 微信小程序:小程序内搜索「渡一 uniapp 案例」
2.测试账号
- 账户名:
duyiedu - 密码:
duyiedu
3.项目结构分析
1)首页
- 搜索引导
- 搜索页面
- 导航栏
- 导航列表展示
- 导航标签设置
- 文章列表
- 文章收藏
- 图文信息展示
- 文章详情
- 作者关注
- 富文本渲染
- 文章评论
- 评论回复
- 指定评论回复
- 评论发布
- 评论组件展示
2)关注
- 文章
- 文章列表展示
- 作者
- 作者列表展示
3)我的
- 登录
- 个人信息展示
- 我的文章
- 意见反馈
- 图片上传
- 反馈信息上传
- 未登录
- 登录信息提示
- 跳转登录页面
4)注册登录模块
- 登录
- 账号登录
- 账号密码实现登录功能
- 手机登录
- 手机号验证码实现登录功能
- 账号登录
5)项目整体流程
- 页面构建
- 数据处理
- 逻辑实现
- 适配发行
- 多平台适配
- 多平台打包
- 多平台发布(安卓、IOS、小程序、h5)
(三)微信小程序简介
1.文档相关
2.开发者工具
1)必选项处理
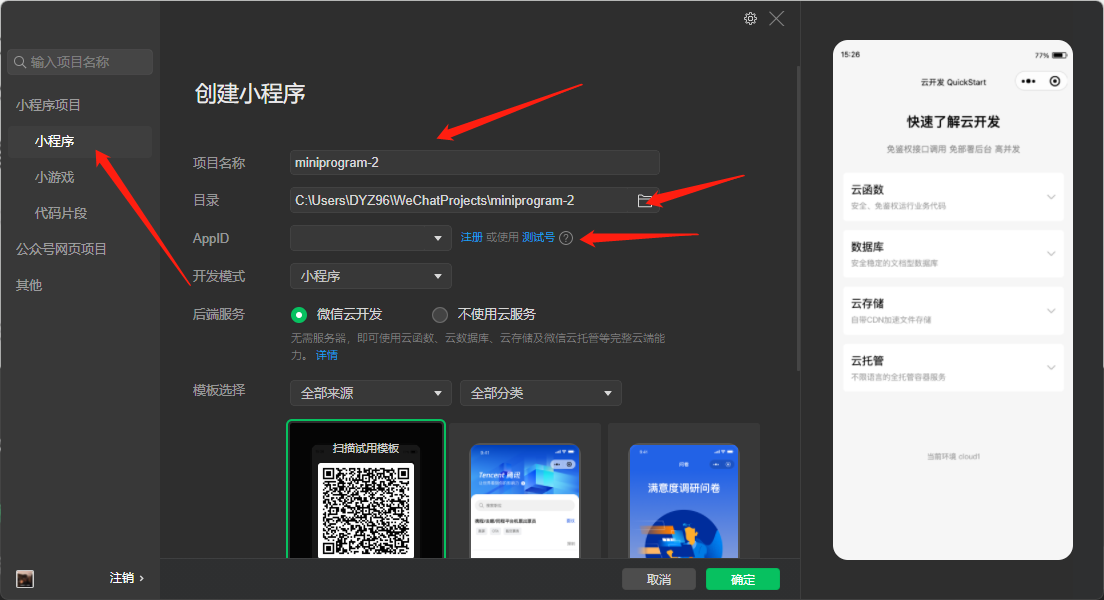
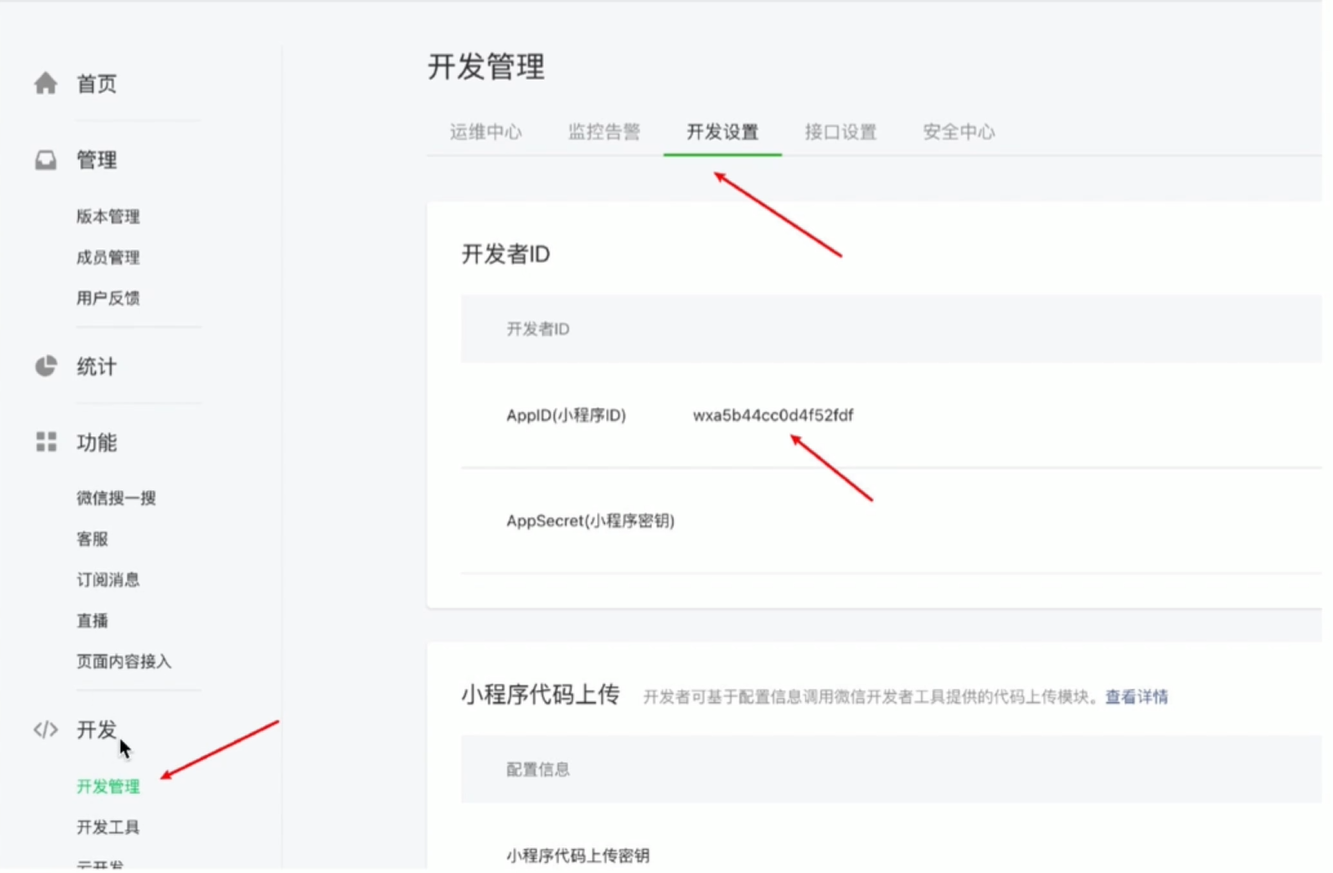
2)appID 获取
- 获取微信公众平台 appID
3.小程序代码构成
.json后缀的JSON配置文件.wxml后缀的WXML模板文件.wxss后缀的WXSS样式文件.js后缀的JS脚本逻辑文件
4.小程序基本结构
<view class="container">
  <view class="userinfo">
    <button wx:if="{{!hasUserInfo && canIUse}}">获取头像昵称</button>
    <block wx:else>
      <image src="{{userInfo.avatarUrl}}" background-size="cover"></image>
      <text class="userinfo-nickname">{{userInfo.nickName}}</text>
    </block>
  </view>
  <view class="usermotto">
    <text class="user-motto">{{motto}}</text>
  </view>
</view>
5.小程序基本操作
1)配置信息
{
  "pages": ["pages/index/index", "pages/logs/index"],
  "window": {
    "navigationBarTitleText": "Demo"
  },
  "tabBar": {
    "list": [
      {
        "pagePath": "pages/index/index",
        "text": "首页"
      },
      {
        "pagePath": "pages/logs/index",
        "text": "日志"
      }
    ]
  },
  "networkTimeout": {
    "request": 10000,
    "downloadFile": 10000
  },
  "debug": true
}
- 页面配置
{
  "navigationBarBackgroundColor": "#ffffff",
  "navigationBarTextStyle": "black",
  "navigationBarTitleText": "微信接口功能演示",
  "backgroundColor": "#eeeeee",
  "backgroundTextStyle": "light"
}
2)生命周期
- 全局生命周期函数
  /**
   * 当小程序初始化完成时,会触发 onLaunch(全局只触发一次)
   */
  onLaunch: function () {

  },

  /**
   * 当小程序启动,或从后台进入前台显示,会触发 onShow
   */
  onShow: function (options) {

  },

  /**
   * 当小程序从前台进入后台,会触发 onHide
   */
  onHide: function () {

  },

  /**
   * 当小程序发生脚本错误,或者 api 调用失败时,会触发 onError 并带上错误信息
   */
  onError: function (msg) {

  }
  onLoad: function(options) {
    // 页面创建时执行
  },
  onShow: function() {
    // 页面出现在前台时执行
  },
  onReady: function() {
    // 页面首次渲染完毕时执行
  },
  onHide: function() {
    // 页面从前台变为后台时执行
  },
  onUnload: function() {
    // 页面销毁时执行
  },
  onPullDownRefresh: function() {
    // 触发下拉刷新时执行
  },
  onReachBottom: function() {
    // 页面触底时执行
  },
  onShareAppMessage: function () {
    // 页面被用户分享时执行
  },
  onPageScroll: function() {
    // 页面滚动时执行
  },
  onResize: function() {
    // 页面尺寸变化时执行
  }
Component({
  lifetimes: {
    created() {
      console.log("created,组件实例刚刚被创建好时, created 生命周期被触发");
    },
    attached() {
      console.log("组件实例进入页面节点树时执行");
    },
    detached() {
      console.log("在组件实例被从页面节点树移除时执行");
    },
  },
});
3)页面跳转
- 新页面打开
- 调用 API: wx.navigateTo
<navigator open-type="navigateTo" />
- 页面重定向
- 调用 API: wx.redirectTo
<navigator open-type="redirectTo" />
- 页面返回
- 调用 API: wx.navigateBack
- 用户按左上角返回按钮
<navigator open-type="navigateBack" />
- Tab 切换
- 调用 API: wx.switchTab
- 用户切换 Tab
<navigator open-type="switchTab" />
- 重启动
- 调用 API: wx.reLaunch
<navigator open-type="reLaunch" />
4)数据绑定
<view>{{message}}</view>
Page({
  data: {
    message: "hello world",
  },
});
5)条件渲染
<view wx:if="{{isShow}}">条件判断显示</view>
Page({
  data:{
    isShow:false
  }
})
6)列表渲染
<view wx:for="{{list}}" wx:for-index="idx" wx:for-item="itemName">{{idx}}: {{itemName.name}}</view>
Page({
  data: {
    list: [{ name: "a" }, { name: "b" }],
  },
});
(四)uni-app 环境搭建
1.uni-app 开发规范
- 页面文件遵循 Vue 单文件组件(SFC)规范
- 组件标签靠近小程序规范
<template>
  <view>页面内容</view>
</template>

<script>
  export default {
    data() {
      return {};
    },
    methods: {},
  };
</script>

<style></style>
- 接口能力(JS API)靠近小程序规范
uni.getStorageInfoSync();
- 数据绑定事件处理同 Vue 规范
<template>
  <view @click="onClickFn">点击事件绑定</view>
</template>

<script>
  export default {
    methods: {
      onClickFn() {
        console.log("click事件");
      },
    },
  };
</script>

<style lang="scss" scoped></style>
- 兼容多端运行,使用 flex 布局开发
2.uni-app 开发环境
1)开发工具
- uni-app 官方推荐使用 HBuilderX 来开发 uni-app 类型的项目
- 优点
- 模板丰富
- 完善的智能提示
- 一键运行
2)下载 HBuilderX
- 访问 HBuilderX 官网首页
- 点击首页的 DOWNLOAD 按钮
- 选择下载 正式版 或者 Alpha 版(App 开发版)
- 解压缩下载的 zip 包
- 将解压之后的文件夹,存放到 纯英文 的目录中(且不能包含括号等特殊字符)
- 双击 HBuilderX.exe 即可启动 HBuilderX
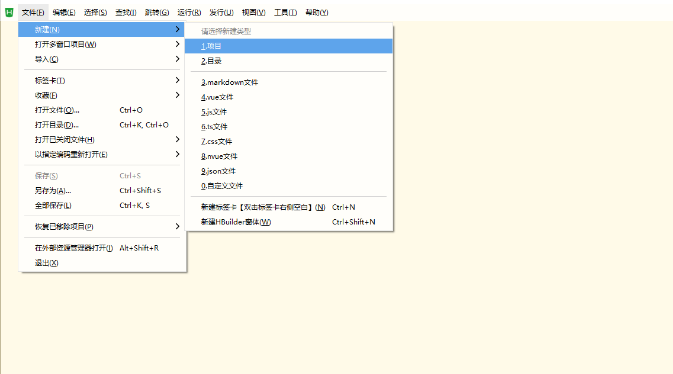
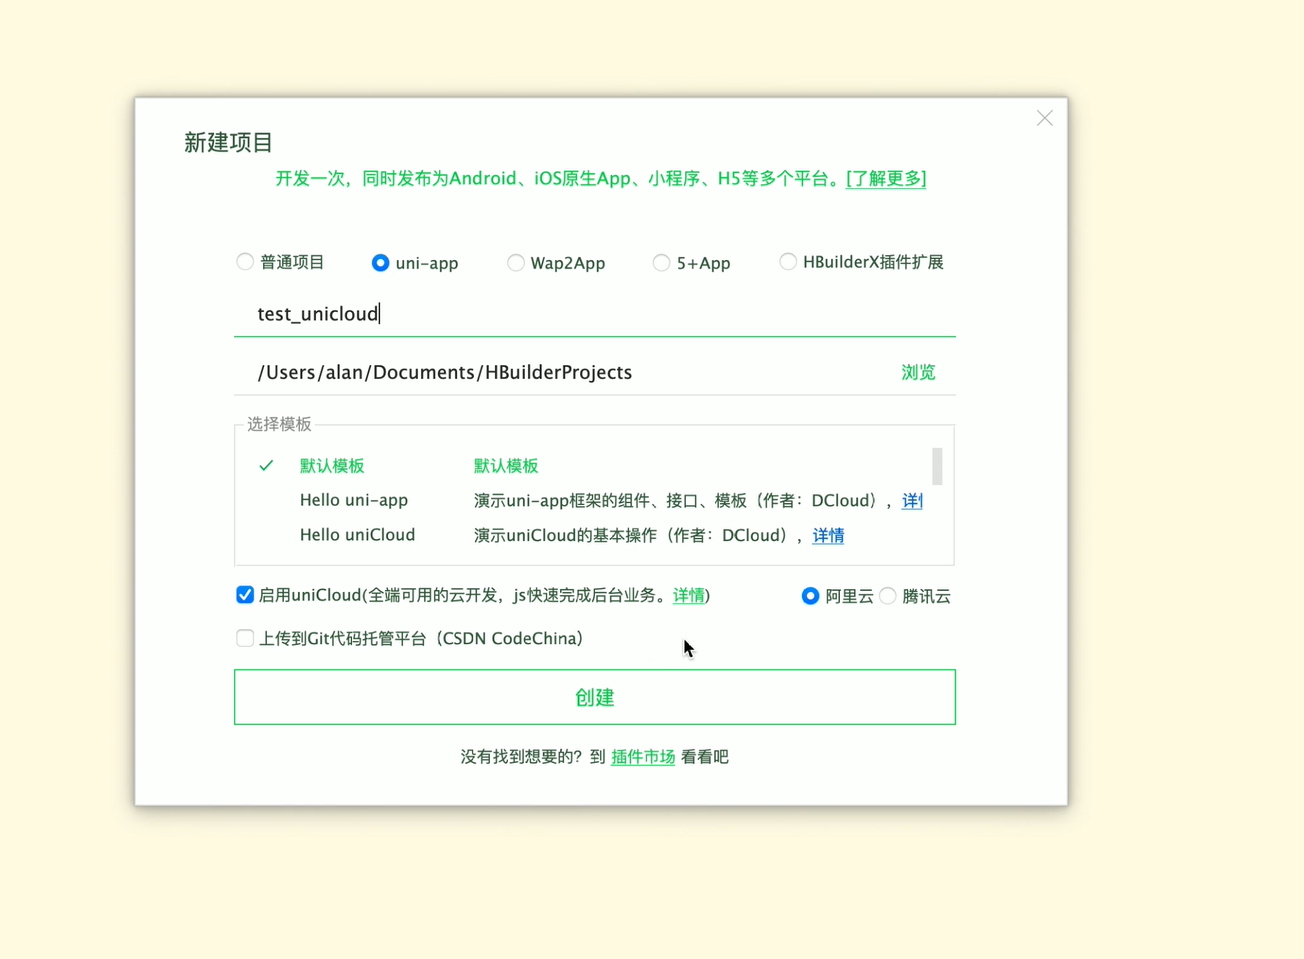
3.工程搭建
- 文件 => 新建 => 项目
- 填写项目基本信息
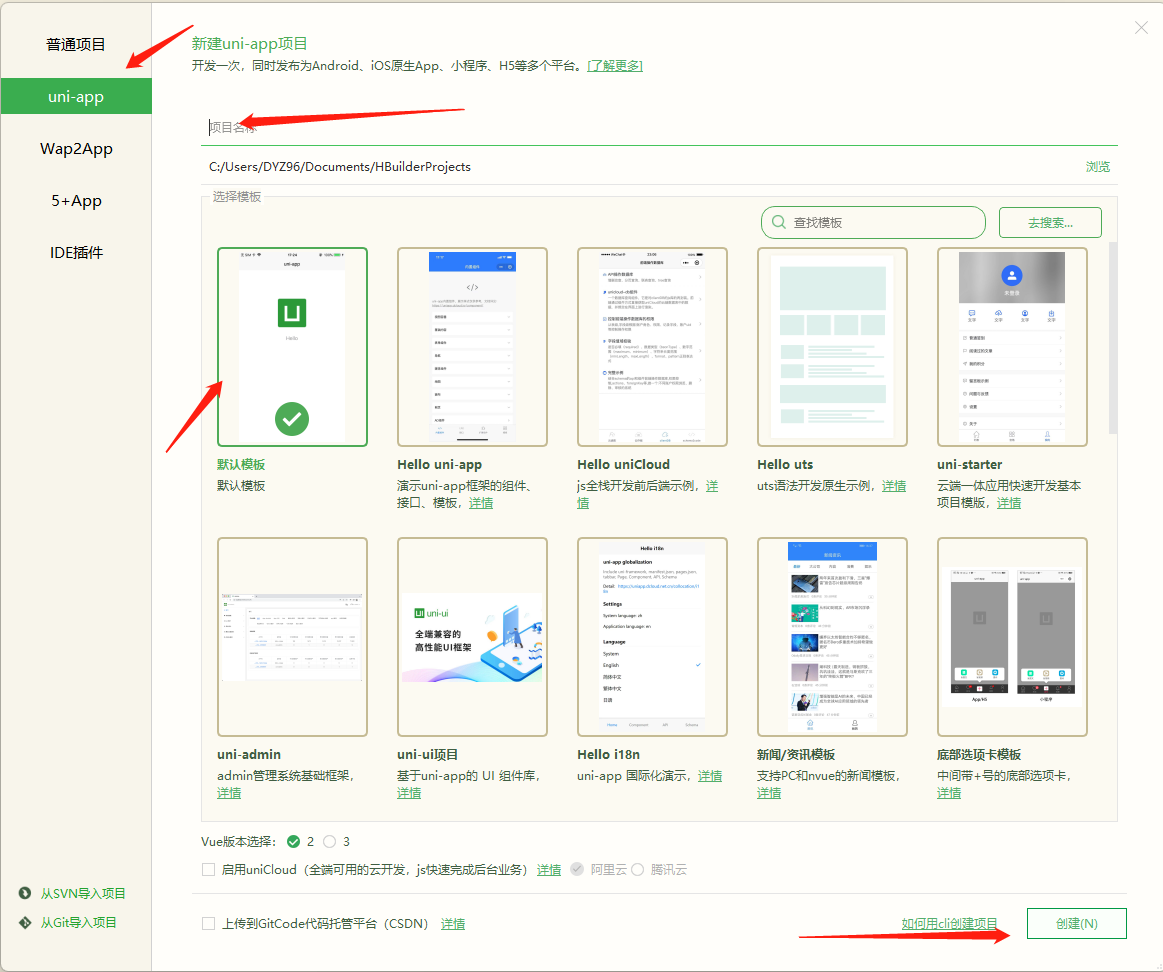
- 项目创建成功
4.基本目录结构
| 目录名/文件名 | 作用 |
|---|---|
| 【pages】 | 内部存放所有页面 |
| 【static】 | 存放所有静态资源,比如图片,字体图标 |
| 【unpackage】 | 存放所有打包生成后的文件 |
| app.vue | 应用配置,用来配置 App 全局样式以及监听应用生命周期 |
| main.js | Vue 初始化入口文件 |
| manifest.json | 配置应用名称、appid、logo、版本等打包信息 |
| pages.json | 配置页面路由、导航条、选项卡等页面类信息 |
| uni.scss | 用途是为了方便整体控制应用的风格。比如按钮颜色、边框风格,uni.scss 文件里预置了一批 scss 变量预置 |
5.项目运行
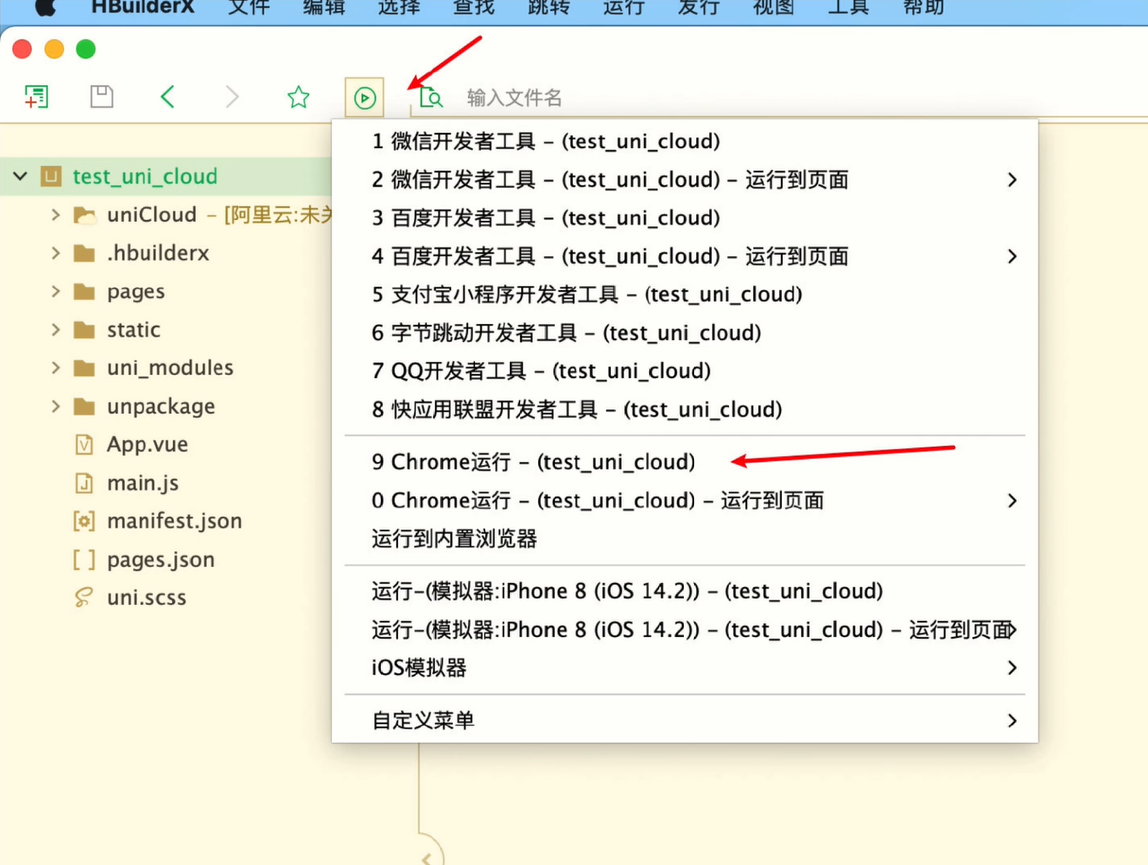
1)浏览器运行
2)小程序运行
- 填写自己的微信小程序的 AppID

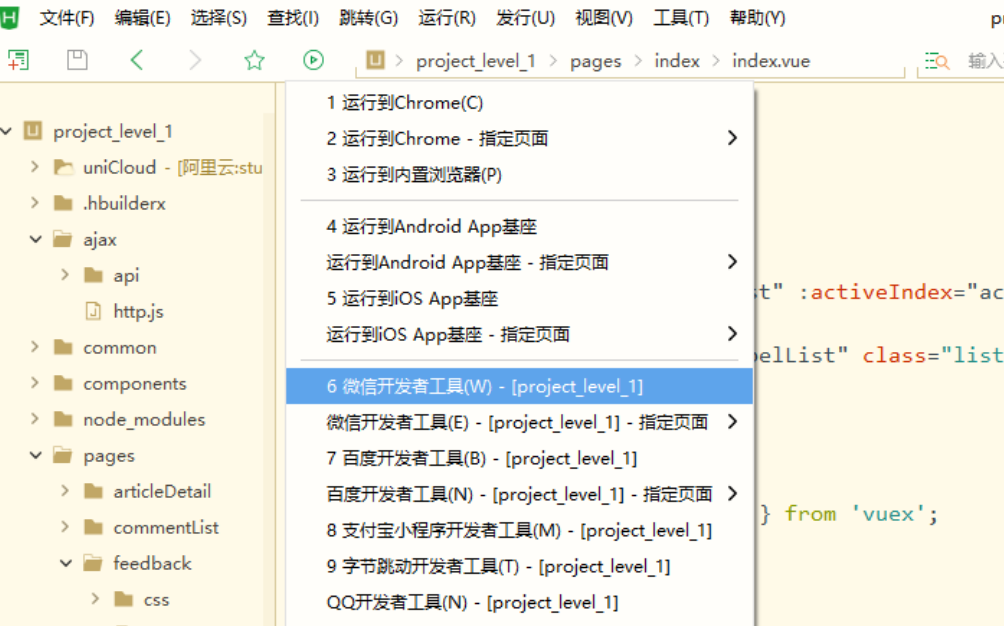
- 在 HBuilderX 中,配置“微信开发者工具”的安装路径
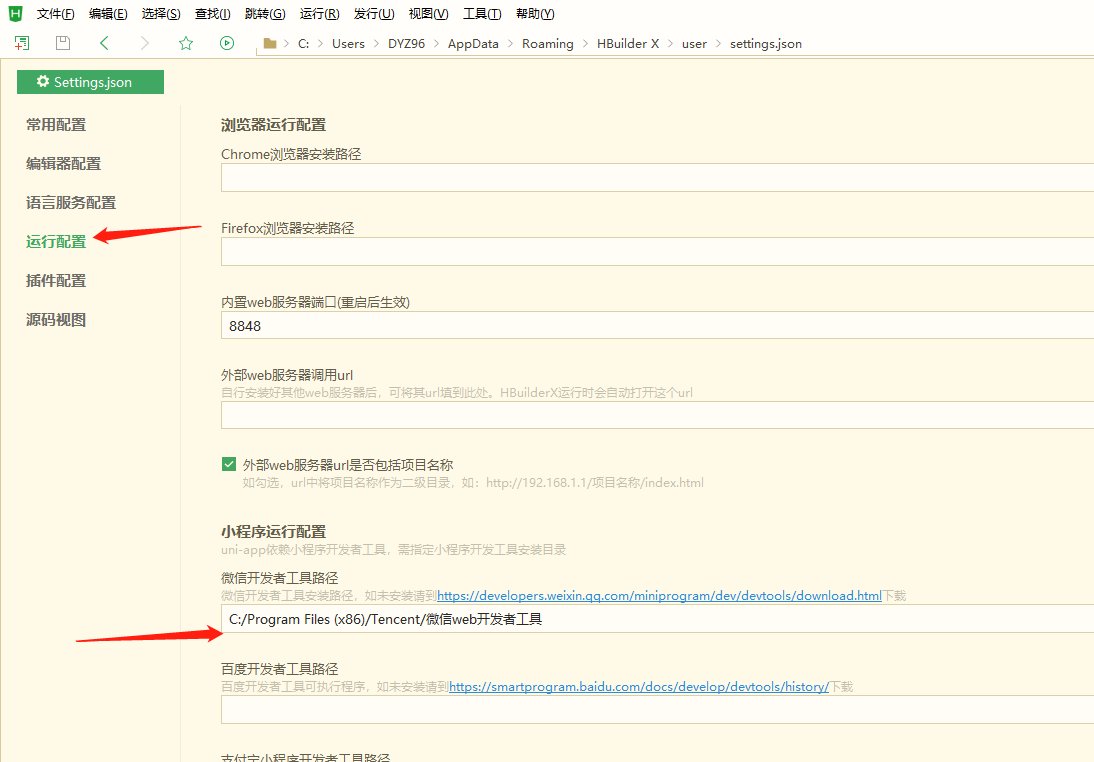
- 在微信开发者工具中,通过设置-安全设置面板,开启“微信开发者工具”的服务端口
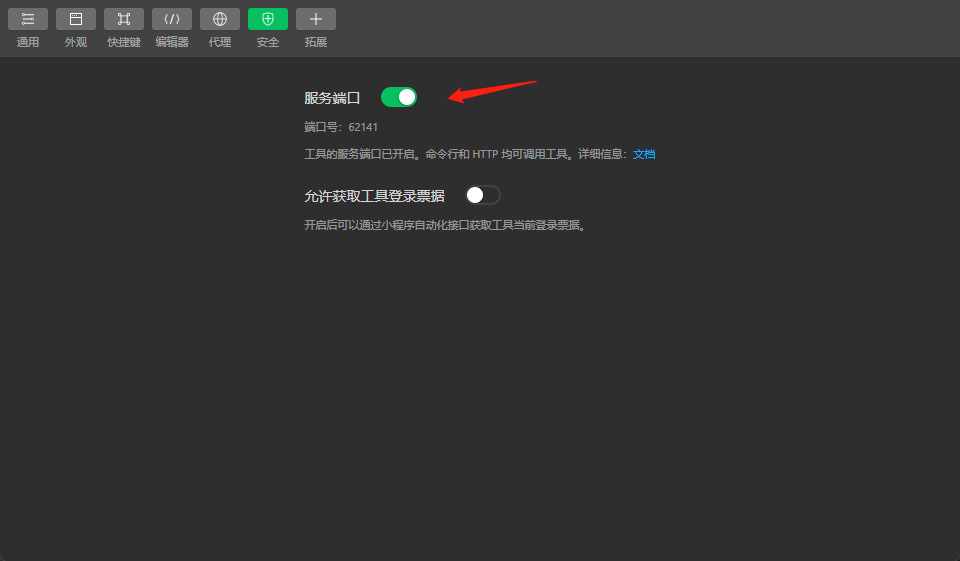
- 在 HBuilderX 中,点击菜单栏中的运行-运行到小程序模拟器-微信开发者工具,将当前 uni-app 项目编译之后,自动运行到微信开发者工具中,从而方便查看项目效果与调试
3)app 真机运行
确保手机与电脑是在同一个局域网下
- 手机开启开发者模式
- 选择数据管理
- HBuilderX 选择真机运行
- 等待基座安装
- 安装完成手机运行项目
4)iOS 模拟器运行
- 下载 XCode
- 定义版本,运行模拟器
(五)uni-app 基础 API
1.基础组件
- 基础组件在 uni-app 框架中已经内置
- 无需将内置组件的文件导入项目,也无需注册内置组件
- 随时可以直接使用,比如
<view>组件
1)视图容器
| 组件 | 作用 |
|---|---|
| view | 视图容器,类似于 html 中的 div |
| scroll-view | 可滚动试图容器,要有宽度或高度才能滚动 |
| swiper | 滑块视图容器,比如用于轮播 banner |
2)基础内容
| 组件 | 作用 |
|---|---|
| icon | 图标,uni-icons |
| text | 文字,无法进行标签文本字符串解析 |
| rich-text | 文字,使用 nodes 属性可以解析标签文本字符串 |
| progress | 进度条 |
3)表单组件(Form)
| 组件 | 作用 |
|---|---|
| button | 按钮 |
| checkbox | 多项选择器 |
| editor | 富文本输入框 |
| form | 表单 |
| input | 输入框 |
| label | 标签 |
| picker | 弹出式聊表选择器 |
| picker-view | 窗体内嵌入式聊表选择器 |
| radio | 单项选择器 |
| slider | 滑动选择器 |
| switch | 开关选择器 |
| textarea | 多行文本输入框 |
4)路由与页面跳转(Navigation)
| 组件 | 作用 |
|---|---|
| navigator | 页面链接,类似于 html 中的 a 标签 |
5)媒体组件
| 组件 | 作用 |
|---|---|
| audio | 音频 |
| camera | 相机 |
| image | 图片 |
| video | 视频 |
6)组件公共属性集合
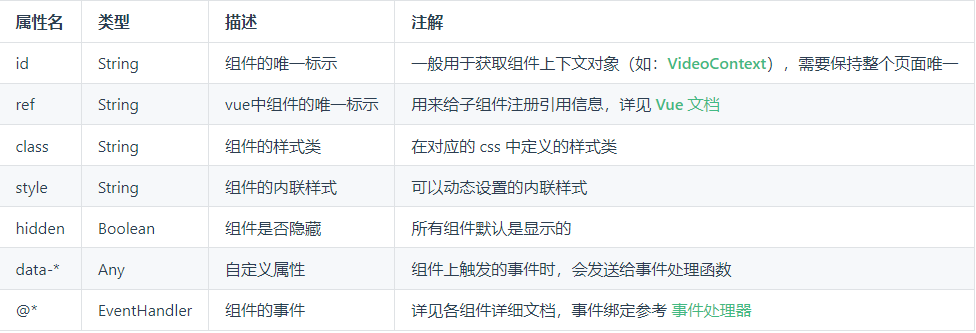
- 特殊属性以
v-开头,称为 vue 指令 - 如 v-if、v-else、v-for、v-model
2.扩展组件
3.自定义组件
- Components 文件夹下定义组件
- 页面引用组件,无需导入,直接使用即可
- 其他操作(组件传值,事件绑定)同 Vue
4.基础 API
1)网络请求
| API | 作用 |
|---|---|
| uni.request | 发起网络请求 |
- 解决 uni.request 网络请求 API 相对简单的问题
- 可使用
@escook/request-miniprogram处理网路请求
- 可使用
- 在小程序中,无法使用 fetch 及 axios 发送网络请求
- 测试接口地址:https://study.duyiedu.com/api/herolist
2)上传和下载
| API | 作用 |
|---|---|
| uni.unloadFile | 上传文件 |
| uni.downloadFile | 下载文件 |
3)图片处理
| API | 作用 |
|---|---|
| uni.chooseImage | 从相册选择图片,或者拍照 |
| uni.previewImage | 预览图片 |
| uni.getImageInfo | 获取图片信息 |
4)数据缓存
| API | 作用 |
|---|---|
| uni.getStorage | 异步获取本地数据缓存 |
| uni.getStorageSync | 同步获取本地数据缓存 |
| uni.setStorage | 异步设置本地数据缓存 |
| uni.setStorageSync | 同步设置本地数据缓存 |
| uni.removeStorage | 异步删除本地数据缓存 |
| uni.removeStorageSync | 同步删除本地数据缓存 |
5)交互反馈
| API | 作用 |
|---|---|
| uni.showToast | 显示提示框 |
| uni.showLoading | 显示加载提示框 |
| uni.hideToast | 隐藏提示框 |
| uni.hideLoading | 隐藏加载提示框 |
| uni.showModal | 显示模态框 |
| uni.showActionSheet | 显示菜单列表 |
6)路由
| API | 作用 |
|---|---|
| uni.navigateTo | 保留当前页面,跳转到应用内某个页面 使用 uni.navigateBack 返回原页面 |
| uni.redirectTo | 关闭当前页面,跳转到应用内的某个页面 |
| uni.reLaunch | 关闭所有页面,打开应用内的某个页面 |
| uni.switchTab | 跳转到 tab Bar 页面 |
5.页面布局相关
1)page
- 页面容器 css 属性
page {
  height: 100%;
  background-color: red;
}
2)尺寸单位
- px
- rpx
- upx
- rem
- vh
- vw
3)外部样式文件引入
- 同 vue 使用相同
6.uni-app 生命周期
1)应用生命周期
- 只能在 App.vue 里面监听,在其他页面监听无效
| 钩子 | 作用 |
|---|---|
| onLaunch | 初始化完成时触发,全局只触发一次 |
| onShow | uni-app 启动,或从后台进入前台显示时触发 |
| onHide | uni-app 应用从前台进入后台时触发 |
2)页面生命周期
| 钩子 | 作用 |
|---|---|
| onLoad | 监听页面加载 可获取上个页面传递的参数 |
| onShow | 监听页面显示,每次出现在屏幕上都触发 |
| onReady | 监听页面初次渲染完成 |
| onHide | 监听页面隐藏 |
| onUnload | 监听页面卸载 |
| onReachBottom | 页面滚动到底部事件 |
3)组件生命周期
| 钩子 | 作用 |
|---|---|
| beforeCreate | 组件创建前 |
| created | 组件创建后,组件挂载前 |
| beforeMount | 组件挂载前 |
| mounted | 组件挂载后 |
| beforeDestroy | 组件销毁前 |
| destroyed | 组件销毁后 |
7.uni-app 特色
1)条件编译
- 条件编译是用特殊的注释作为标记
- 在编译时根据这些特殊的注释,将注释里面的代码编译到不同平台
- 以
#ifdef或#ifndef加%PLATFORM%开头,以#endif结尾
| 写法 | 说明 |
|---|---|
#ifdef | if defined,仅在某平台存在 |
#ifndef | if not defined,除了某平台均存在 |
%PLATFORM% | 平台名称 |
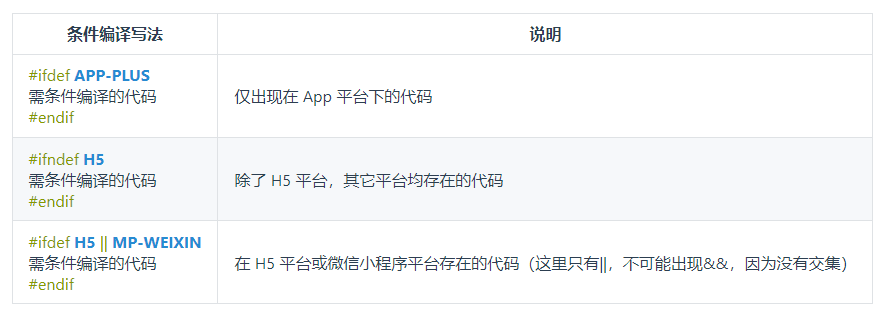
%PLATFORM%取值
| 值 | 生效条件 |
|---|---|
| VUE3 | HBuilderX 3.2.0+(uni-app js 引擎版) |
| APP | App |
| APP-PLUS | App(uni-app js 引擎版) |
| APP-PLUS-NVUE 或 APP-NVUE | App nvue 页面 |
| APP-ANDROID | App Android 平台 仅限 uts 文件 |
| APP-IOS | App iOS 平台 仅限 uts 文件 |
| UNI-APP-X | HBuilderX 3.9.0+(uni-app x 项目) |
| H5 | H5 |
| MP-WEIXIN | 微信小程序 |
| MP-ALIPAY | 支付宝小程序 |
| MP-BAIDU | 百度小程序 |
| MP-TOUTIAO | 抖音小程序 |
| MP-LARK | 飞书小程序 |
| MP-QQ | QQ 小程序 |
| MP-KUAISHOU | 快手小程序 |
| MP-JD | 京东小程序 |
| MP-360 | 360 小程序 |
| MP | 微信小程序/支付宝小程序/百度小程序/抖音小程序/飞书小程序/QQ 小程序/360 小程序 |
| QUICKAPP-WEBVIEW | 快应用通用(包含联盟、华为) |
| QUICKAPP-WEBVIEW-UNION | 快应用联盟 |
| QUICKAPP-WEBVIEW-HUAWEI | 快应用华为 |
- 条件编译支持的文件
- .vue
- .js
- .css
- pages.json
- 各预编译语言文件
- .scss
- .less
- .stylus
- .ts
- .pug
- 条件编译是利用注释实现的,在不同语法里注释写法不一样
- js 使用
// 注释 - css 使用
/* 注释 */ - vue/nvue 模板里使用
<!-- 注释 -->;
- js 使用
2)插件安装
- scss 安装
- 可以使用多种预编译处理器安装
- 以 scss 文件为例,下载地址
(六)uniCloud 基础配置
1.HBuilderX 中使用 uniCloud 云开发平台
1)传统业务开发流程
- 前端 => 后端 => 运维 => 发布上线
2)使用 uniCloud 云开发平台
- 前端 => 运维 => 发布上线
3)简介
- uniCloud 是 DCloud 联合阿里云、腾讯云,为开发者提供的基于 serverless 模式和 js 编程的实现后端服务的云开发平台
- 不需要服务器的购买配置即可快速创建一个完整的后端服务
4)优点
- 用 JavaScript 开发前后台整体业务
- 非 H5 项目免域名使用服务器
- 敏捷性业务处理,不需要前后端分离开发
2.开发流程

1)云函数
2)云数据库
3)云存储及 CDN
- 可存储文件
3.创建云函数工程
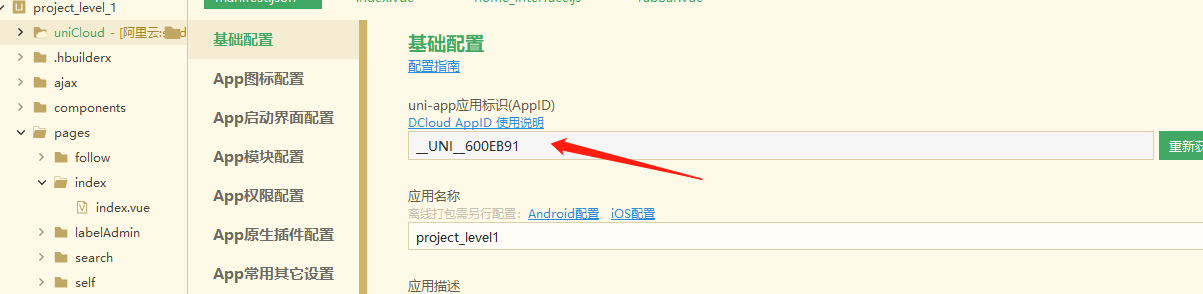
1)指定 uniCloud 工程创建
2)保证 uni-app 应用标识 appID 填写
- 保证用户为登录状态
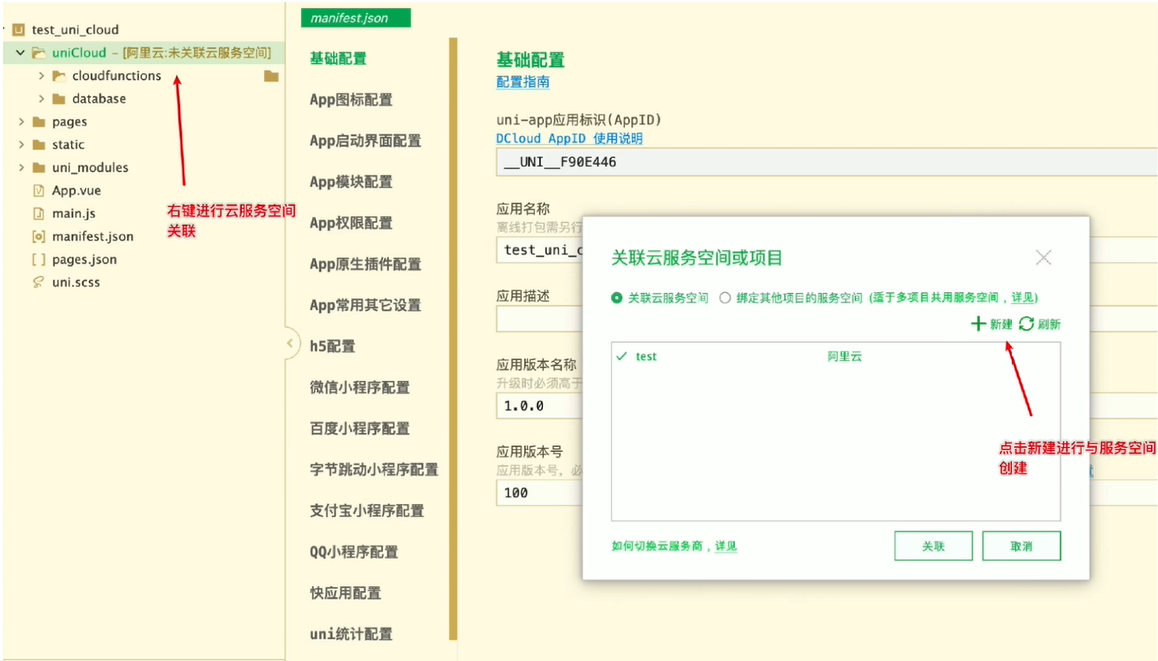
3)创建云服务空间
- 如果未实名认证,会跳转至实名认证页面认证
- 等待实名认证审核之后可以开通服务空间
- 若腾讯云实名认证提示身份证下已创建过多账户,则需要在腾讯云官网注销不用的账户
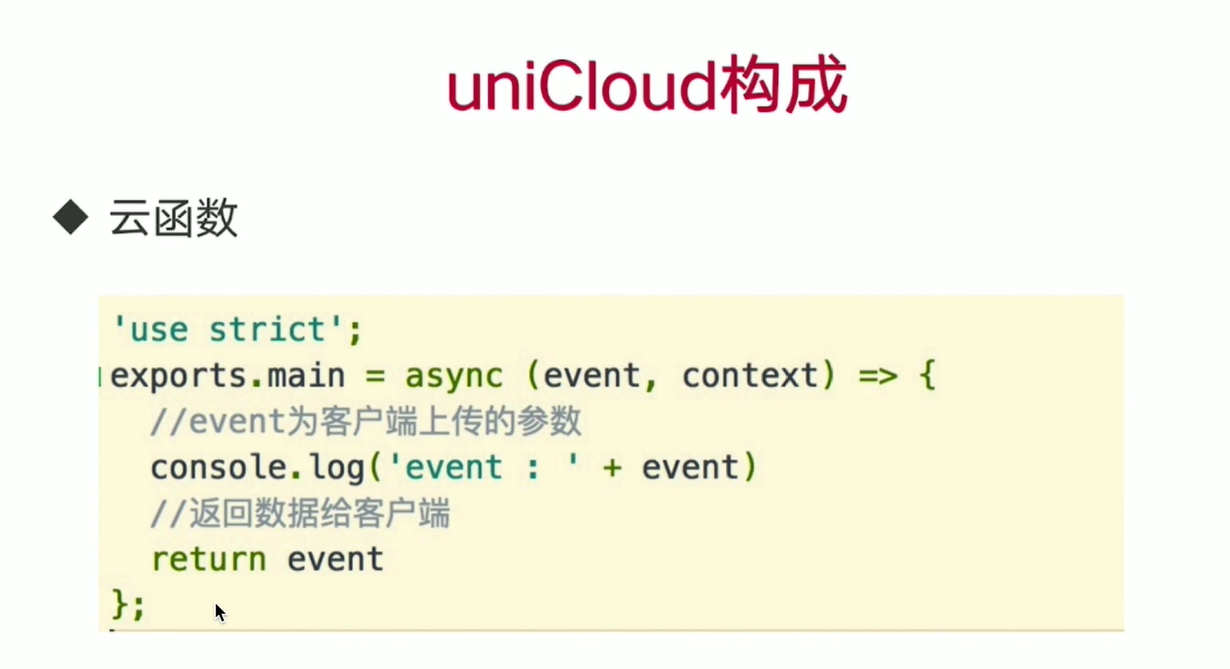
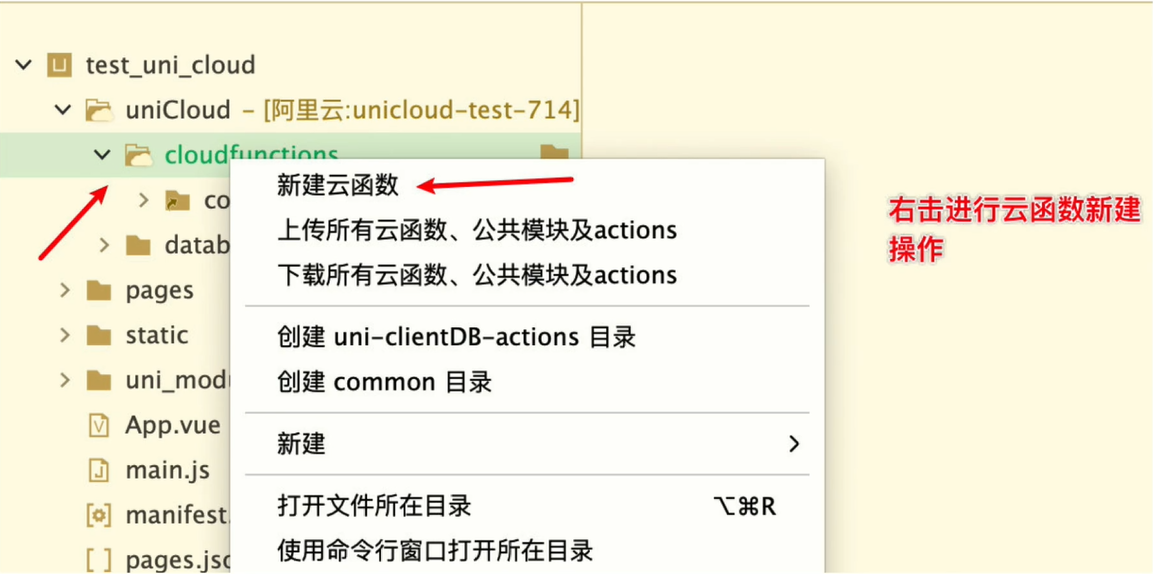
4)创建云函数
"use strict";
// 一个通过nodeJS运行的函数在服务器端使用
exports.main = async (event, context) => {
  // event为客户端上传的参数
  // context 包含了调用信息及运行状态,获取每次调用的上下文
  console.log("event : ", event);

  // 返回数据给客户端
  return {
    code: 0,
    msg: "云函数调用成功",
  };
};
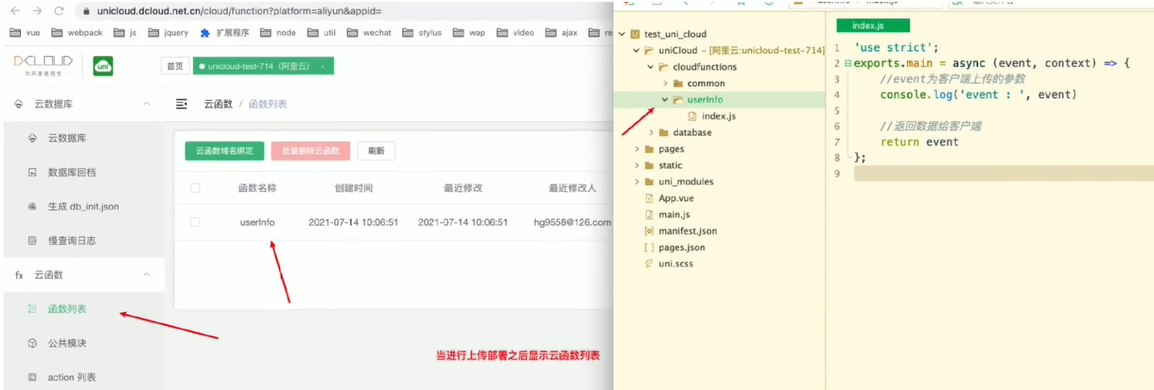
5)云 WEB 控制台查看
6)云数据库操作
- 在云数据库中操作数据,全部使用 双引号 定义值
7)云存储
- 在云存储中上传文件
- API 使用
uniCloud.uploadFile({});
8)跨域处理
(七)uniCloud API 操作
1.云函数调用
1)promise 方式
uniCloud
  .callFunction({
    name: "test", // 云函数名称
    data: {
      a: 1,
    }, // 请求参数
  })
  .then((res) => {});
2)callback 方式
uniCloud.callFunction({
  name: "test",
  data: {
    a: 1,
  },
  success() {}, // 成功
  fail() {}, // 失败
  complete() {}, // 完成(不管成功与失败)
});
2.云函数实现云数据库基本增删改查
1)获取数据库引用
const db = uniCloud.database();
2)获取数据表集合引用
const collection = db.collection("unicloud-test-714"); // unicloud-test-714 为数据表名称
3)新增记录
const res = collection.add({
  user: "alan",
});
"use strict";
const db = uniCloud.database(); // 获取数据库引用

exports.main = async (event, context) => {
  // 获取集合引用
  const collection = db.collection("unicloud-test-714");
  // 新增数据
  const res = await collection.add({
    user: "alan",
  });
  console.log(res);
  return {
    code: 0,
    msg: "云函数调用成功",
  };
};
4)删除记录
const res = await collection.doc("60ee51103b7d3500014124c1").remove();
5)数据更新
const res = await collection.doc("60ee52a1827eca0001e56bc4").update({
  name: "joob",
});

// 如果获取不到内容,需要重新插入记录
const res = await collection.doc("60ee52a1827eca0001e56bc4").set({
  name: "joob",
  type: "javascript",
});
update 与 set 的区别
- 当没有找到指定记录时,使用 update 无法更新
- 当没有找到指定记录时,使用 set 可以新增内容
- 不存在创建添加
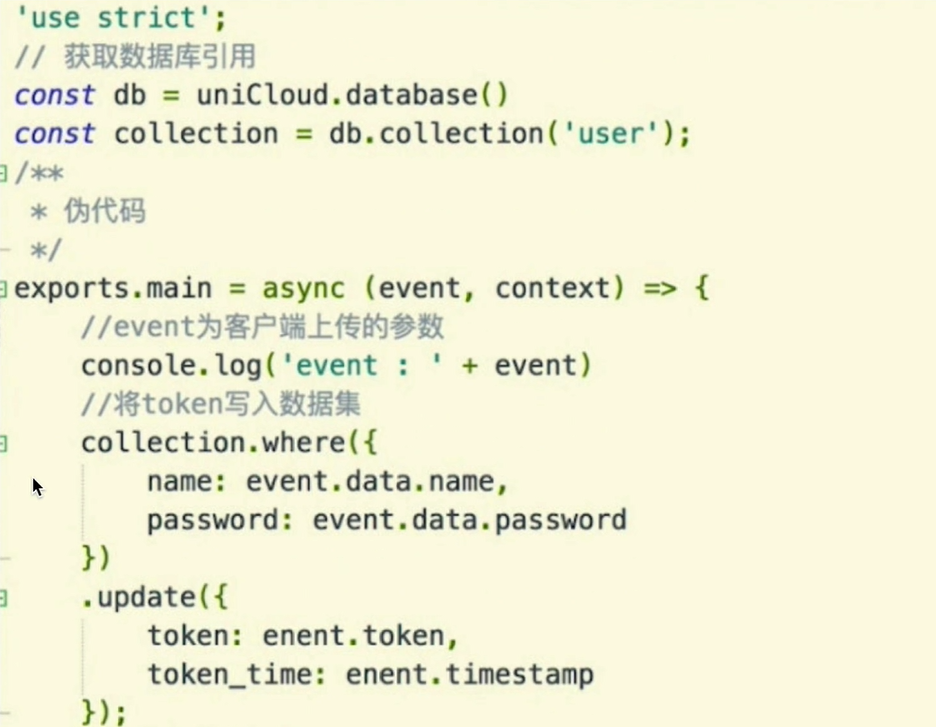
6)数据查找
// 查询全部
const res = await collection.get();

// 指定条件查询-查询id
const res = await collection.doc("id").get();

// 指定条件查询-查询其他条件
const res = await collection
  .where({
    name: "alan",
  })
  .get();
3.云存储操作
1)图片选择获取
- 使用 uni.chooseImage
uni.chooseImage({
  count: 1,
  success(res) {
    console.log(JSON.stringify(res.tempFilePaths));
  },
});
2)文件上传
- 使用 uniCloud.uploadFile
uni.chooseImage({
  count: 1,
  async success(res) {
    let result = await uniCloud.uploadFile({
      filePath: res.tempFilePaths[0],
      cloudPath: "a.jpg",
      success(res) {
        console.log(res);
      },
      fail(err) {
        console.log(err);
      },
    });
  },
});
3)图片删除
- 使用 uniCloud.deleteFile
- 阿里云函数删除不能在客户端删除,应该在云函数中删除
let result = await uniCloud.deleteFile({
  fileList: ["https://vkceyugu.cdn.bspapp.com/VKCEYUGU-6ce25980-c28e-4e78-bdef-a96eb40ad98b/06a1cb3a-84b7-47a0-b554-8aff299cb255.jpg"],
});
console.log(result);
(八)项目搭建
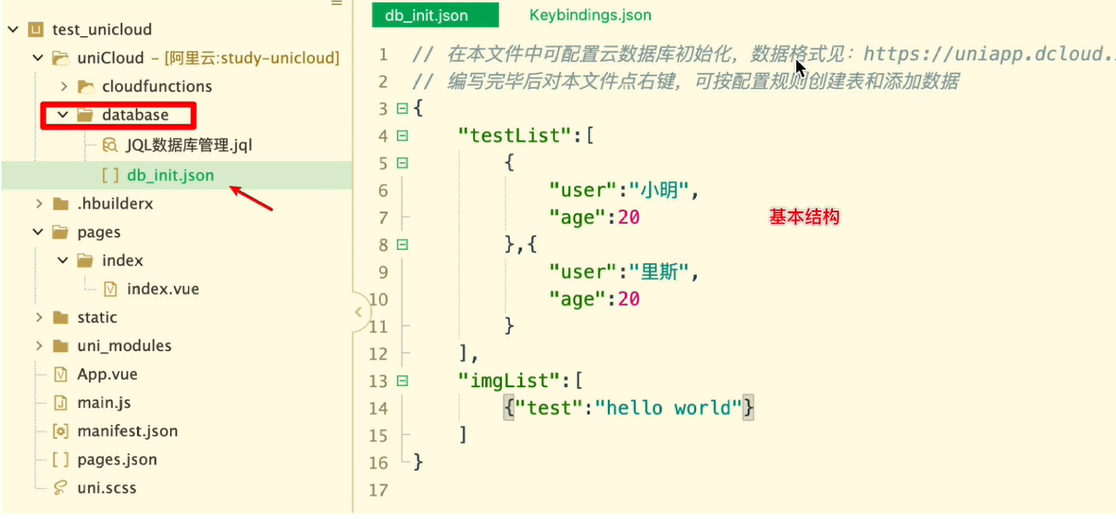
1.初始化数据库
1)定义(选择)云服务空间
2)初始化数据库
- 使用 db_init.json 文件
- 初始化 db_init.json 文件
- source 文件夹 => db_init.json 文件
- uniCloud 目录找到 database 目录,添加 db_init.json 文件
2.静态文件配置
1)导入 static 文件
- 导入项目中需要的图片文件到
static/img/目录下
2)定义 css 预编译处理器
- uni.scss 文件定义公共变量及混编方法
- 每个页面下直接使用样式方法及变量
@mixin flex($level_style: space-between, $vertical_style: row, $isWrapper: nowrap) {
  display: flex;
  align-items: center;
  justify-content: $level_style;
  flex-wrap: $isWrapper;
  flex-direction: $vertical_style;
}

$base-color: #f25037;

* {
  box-sizing: border-box;

  &::before,
  &::after {
    box-sizing: border-box;
  }
}
3)创建 tabBar
- 在
pages目录中,创建首页(Home)、我的(Self)、关注(Follow) 3 个 tabBar 页面 - 在 HBuilderX 中快速新建页面
- 在
pages目录上鼠标右键,选择 新建页面 - 在弹出的窗口中, 勾选 scss 模板、填写 页面的名称 之后,点击创建按钮
- 在
- 配置 tabBar 效果,修改项目根目录中的
pages.json配置文件,新增tabBar的配置节点
"tabBar": {
  "color": "#666",
  "selectedColor": "#f25037",
  "backgroundColor": "#fff",
  // 显示页面信息
  "list": [{
      // 页面路径
      "pagePath": "pages/Home/Home",
      // 默认图片
      "iconPath": "static/img/home.png",
      // 选中图片
      "selectedIconPath": "static/img/home-active.png",
      // 文字描述信息
      "text": "首页"
    },
    {
      "pagePath": "pages/Follow/Follow",
      "iconPath": "static/img/follow.png",
      "selectedIconPath": "static/img/follow-active.png",
      "text": "关注"
    },
    {
      "pagePath": "pages/Self/Self",
      "iconPath": "static/img/my.png",
      "selectedIconPath": "static/img/my-active.png",
      "text": "我的"
    }
  ]
}
- 修改 globalStyle 样式
"globalStyle": {
  "navigationBarTextStyle": "white",
  "navigationBarTitleText": "渡一教育",
  "navigationBarBackgroundColor": "#f25037",
  "backgroundColor": "#F8F8F8"
}
4)创建 tabBar 需要的页面文件
- Home.vue
- Follow.vue
- Self.vue
5)pages.json 设置前景色
"navigationBarTextStyle": "white"
(九)制作导航栏并适配多端
1.定义导航栏组件 NavBar
2.引入导航栏组件
- 同名组件支持 easycom 规范
- 不需要使用 import 导入
- 特点:局部引入
easyCom components/组件名/组件名.vue
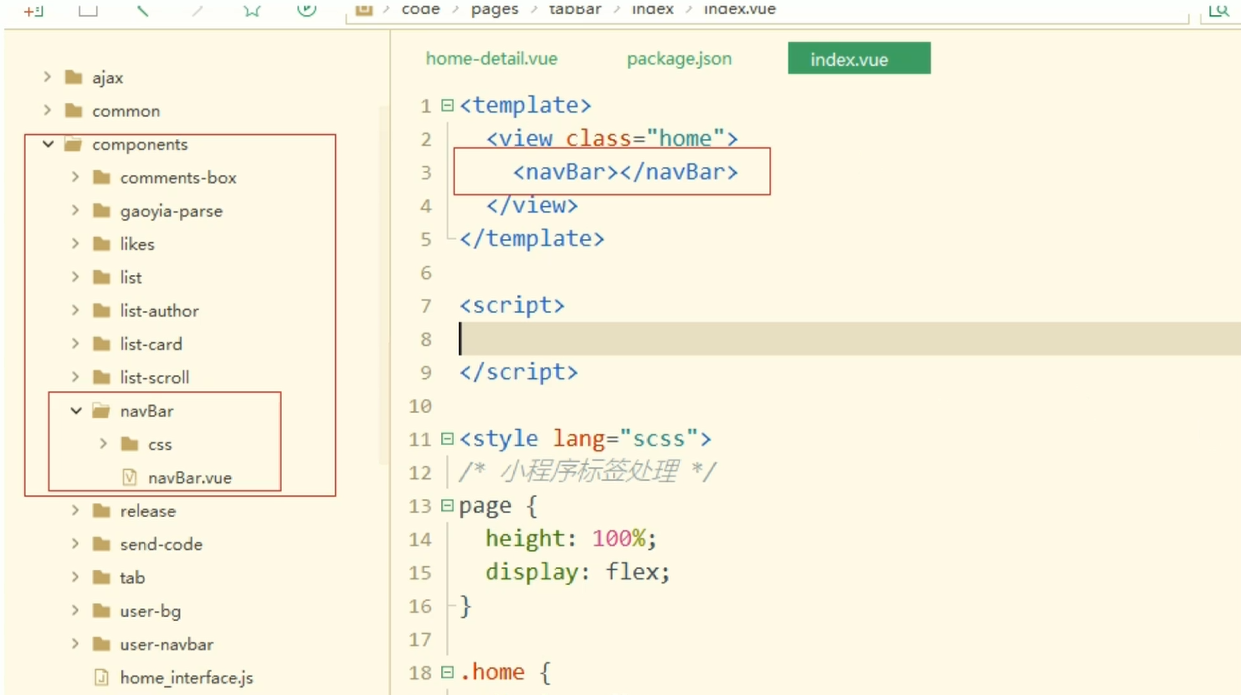
3.搭建结构
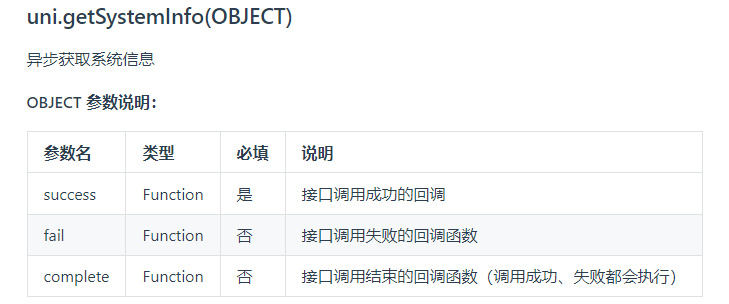
4.处理小程序显示错位问题
// 获取手机系统信息
const systemInfo = uni.getSystemInfoSync();
// 设置状态栏高度
this.statusBarHeight = systemInfo.statusBarHeight ? systemInfo.statusBarHeight * 2 : 20;
5.获取胶囊信息
- 需要实现条件编译
// #ifdef MP-WEIXIN
// 获取胶囊信息
const menuButtonInfo = uni.getMenuButtonBoundingClientRect();
this.marginRight = menuButtonInfo.width * 2 + 50;
this.statusBarHeight = menuButtonInfo.top * 2;
// #endif
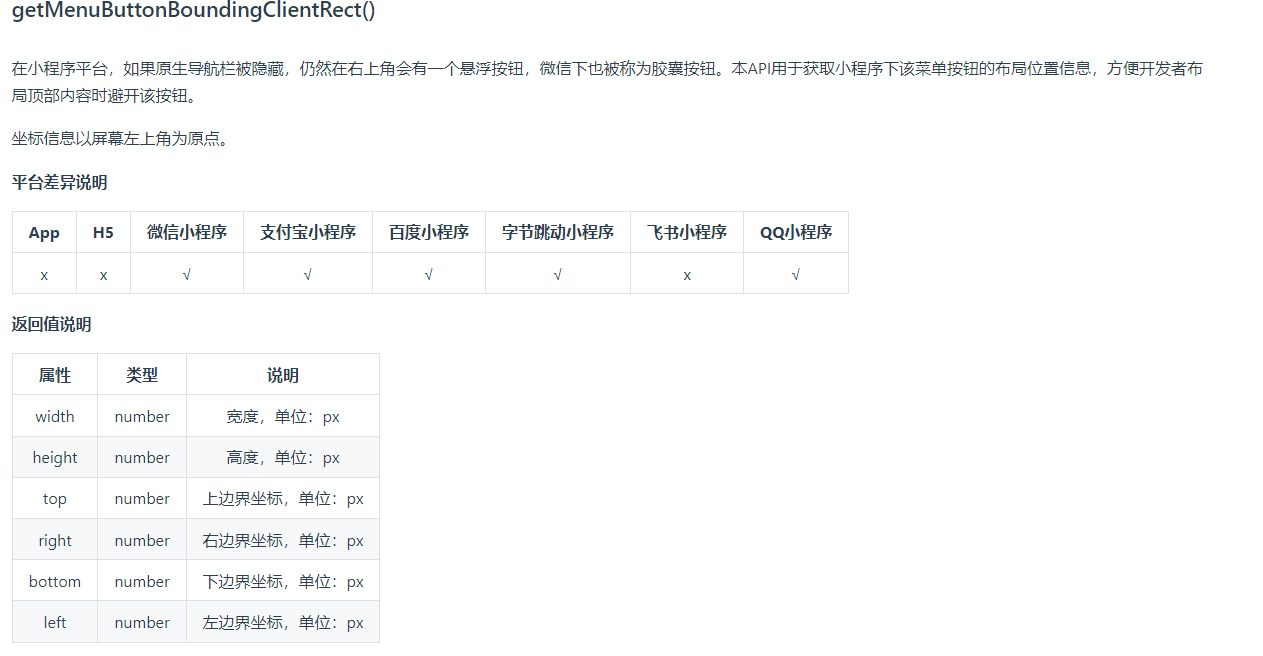
// (胶囊底部高度 - 状态栏的高度) + (胶囊顶部高度 - 状态栏内的高度) = 导航栏的高度
this.navBarHeight = menuButtonInfo.bottom - info.statusBarHeight + (menuButtonInfo.top - info.statusBarHeight);
(十)制作选项卡

1.创建组件
- 定义组件 TabBar.vue
- 在 Home.vue 中引入
2.使用 scroll-view 组件
- 使用
scroll-view横向滚动的时候,内部需添加一个容器包裹滚动内容
<scroll-view class="tab-scroll" scroll-x="true">
  <view class="tab-scroll-box">
    <view
      v-for="(item, index) in labelList"
      :class="{ active: activeIndex === index }"
      :key="index"
      @click="handleClickTabBarItem(index)"
      class="tab-scroll-item"
    >
      {{ item.name }}
    </view>
  </view>
</scroll-view>
3.点击设置按 icon 跳转到设置标签页面
<view class="tab-icons">
  <uni-icons @click="toLabelEditPage" type="gear" size="26" color="#666"></uni-icons>
</view>
- 创建 LabelEdit 页面后跳转
toLabelEditPage() {
  uni.navigateTo({
    url: '/pages/LabelEdit/LabelEdit'
  });
}
4.数据获取
- 在 Home.vue 的 onLoad 生命周期内定义
getLabelList方法
onLoad() {
  this.getLabelList();
}
- 定义云函数,获取 label 表中的数据
"use strict";
const db = uniCloud.database();
exports.main = async (event, context) => {
  // event为客户端上传的参数
  const collection = db.collection("label");
  const res = await collection.get();

  // 返回数据给客户端
  return {
    code: 0,
    data: res.data,
  };
};
- Home.vue 获取数据,并将数据传递到 TabBar 组件
<TabBar :labelList="labelList"></TabBar>
- 使用 uniCloud.callFunction 方法获取数据
getLabelList() {
  uniCloud.callFunction({
    name: 'getLabelList',
    success: (res) => {
      this.labelList = res.result.data;
    }
  });
}
- TabBar 组件内部使用 props 属性获取数据
props: {
  labelList: {
    type: Array,
    default: () => []
  }
}
(十一)封装请求方法
- 减少代码的冗余
- 优化代码的可读性及可维护性
1.定义公共的 http 请求方法
- 创建 http.js 文件,导出一个封装好的 promise 对象
- 内部调用 uniCloud
export default ({ name, data = {} }) => {
  return new Promise((resolve, reject) => {
    uni.showLoading({});
    uniCloud.callFunction({
      name, // 要调用的云函数名称
      data,
      success({ result }) {
        if (result.code === 0) {
          resolve(result.data);
        } else {
          uni.showToast({
            icon: "error",
            title: result.msg,
          });
        }
      },
      fail(err) {
        // 网络错误或后端错误
        reject(err);
      },
      complete() {
        // 不论请求成功还是失败都执行
        uni.hideLoading();
      },
    });
  });
};
2.创建接口文件调用公共方法
- ajax/api/interface/home.js
import ajax from "../../http.js";

export const _getLabelList = (data) =>
  ajax({
    name: "getLabelList",
    data,
  });
3.将 http 方法挂载到 Vue 原型上
- 供每个页面使用
- 使用 Webpack 的
require.context方法对所有的请求函数收集 - 通过执行
require.context()获取一个特定的上下文- 主要用来实现自动化导入模块
- 在前端工程中,如果遇到从一个文件夹引入很多模块的情况,可以使用这个 API
- 会遍历文件夹中的指定文件,然后自动导入,不需要每次显式调用 import 导入模块
- ajax/api/index.js
/**
 * 批量导出文件
 * 参数1:API目录的相对路径
 * 参数2:是否查询子目录
 * 参数3:需要查询的文件后缀名
 */

const requireApi = require.context(".", true, /.js$/);
let modules = {};
requireApi.keys().forEach((key, index) => {
  // 当前文件,跳过
  if (key === "./index.js") return;

  Object.assign(modules, requireApi(key));
});
export default modules;
- main.js 挂载 $http 方法
import modules from "./ajax/api/index.js";
Vue.prototype.$http = modules;
4.页面/组件内部调用方法
async getLabelList() {
  const res = await this.$http.getLabelList();
  this.labelList = res;
}
(十二)制作文章列表
1.容器组件
1)定义 ArticleList 组件
- 使用 swiper 组件 实现滚动效果
- SwiperItem 数量动态变化,当前的 SwiperItem 数量应该与选项卡的数量相同
- 获取选项卡的数量,根据选项卡数量渲染 SwiperItem
- Home.vue 传递 labelList 和 activeIndex
<ArticleList :labelList="labelList" :activeIndex="activeIndex" @changeActiveIndex="handleChangeActiveIndex"></ArticleList>
- ArticleList 内根据 labelList 数量渲染 SwiperItem
<swiper class="swiper-container">
  <swiper-item v-for="(item, index) in labelList" :key="index">
    <view class="swiper-item uni-bg-red">
      <ListItem :item="item"></ListItem>
    </view>
  </swiper-item>
</swiper>
2)实现选项卡与 Swiper 组件联动效果
- 绑定选项卡点击事件
- 发送事件,调整 activeIndex 值,将 activeIndex 值调整为父组件传递的值
- Swiper 指定 current 属性为 currentIndex
- 观察 activeIndex 的变化,同步变化 currentIndex
- 监听 Swiper 的 change 事件,触发父组件改变 activeIndex 属性
<swiper :current="currentIndex" @change="changeActiveIndex" class="swiper-container">
  <swiper-item v-for="(item, index) in labelList" :key="index">
    <view class="swiper-item uni-bg-red">
      <ListItem :item="item"></ListItem>
    </view>
  </swiper-item>
</swiper>
data() {
  return {
    currentIndex: 0
  };
},
watch: {
  activeIndex(newVal) {
    this.currentIndex = newVal;
  }
},
methods: {
  changeActiveIndex(e) {
    const idx = e.detail.current;
    this.$emit('changeActiveIndex', idx);
  }
}
3)选项卡自动调整位置
- scroll-view 组件 添加属性
scroll-with-animation及scroll-left属性 - 动态设置
scroll-into-view属性 - 为每一项添加 ID 属性切换跳转
- 值应为某子元素 id(id 不能以数字开头)
<scroll-view :scroll-with-animation="true" :scroll-into-view="`item${activeIndex}`" class="tab-scroll" scroll-x="true">
  <view class="tab-scroll-box">
    <view
      v-for="(item, index) in labelList"
      :class="{ active: activeIndex === index }"
      :key="index"
      :id="`item${index}`"
      @click="handleClickTabBarItem(index)"
      class="tab-scroll-item"
    >
      {{ item.name }}
    </view>
  </view>
</scroll-view>
2.文章卡片
1)创建文章组件 ListItem
- 使用 scroll-view 实现竖向滚动容器
<view class="list-scroll-container">
  <scroll-view scroll-y="true" class="list-scroll">
    <view>
      <ListCard v-for="item in 50" :key="item"></ListCard>
    </view>
  </scroll-view>
</view>
- 注意在样式定义时设定多级高度
.list-scroll-container {
  height: 100%;

  .list-scroll {
    overflow: hidden;
    height: 100%;
  }
}
2)定义文章卡片组件 ListCard
- 创建基本样式及结构
- 定义多状态卡片模块
- 通过父组件传递
mode属性 - 根据 mode 展示相应类型的卡片
3)定义 uni-app 模板
- 需要使用自定义模板的场景
- 调整页面 head 中的 meta 配置
- 补充 SEO 相关的一些配置(仅首页)
- 加入百度统计等三方 js
- Referrer 是 HTTP 请求头中的一部分,用于指示浏览器从哪个页面跳转到了当前页面
- Referrer-Policy 是一个新的 HTTP 头,用于控制浏览器如何发送 Referrer 信息
- never 表示浏览器永远不会发送 Referrer 信息,即使用户从其他页面跳转到当前页面
- 可以提高用户的隐私保护,防止敏感信息泄露
- 解决请求某些第三方网站资源 403 错误
<!-- 设置页面的Referrer-Policy -->
<meta name="referrer" content="never" />
- 根目录下创建 index.html 文件
- manifest 文件的 Web 配置中 index 模板路径使用 index.html 文件
<!DOCTYPE html>
<html lang="zh-CN">
  <head>
    <meta charset="utf-8" />
    <meta http-equiv="X-UA-Compatible" content="IE=edge" />
    <meta name="viewport" content="width=device-width,initial-scale=1,minimum-scale=1,maximum-scale=1,user-scalable=no" />
    <meta name="referrer" content="never" />
    <title><%= htmlWebpackPlugin.options.title %></title>
    <link rel="stylesheet" href="<%= BASE_URL %>static/index.<%= VUE_APP_INDEX_CSS_HASH %>.css" />
  </head>
  <body>
    <noscript>
      <strong>Please enable JavaScript to continue.</strong>
    </noscript>
    <div id="app"></div>
    <!-- built files will be auto injected -->
  </body>
</html>
3.数据渲染
1)创建云函数
- 定义云函数 getArticleList
- 删除不需要返回的文章内容 content
"use strict";
const db = uniCloud.database();
exports.main = async (event, context) => {
  const res = await db
    .collection("article")
    .aggregate()
    .project({
      content: 0,
    })
    .end();

  // 返回数据给客户端
  return {
    code: 0,
    msg: "数据请求成功",
    data: res.data,
  };
};
- 配置 interface
export const getArticleList = (data) =>
  ajax({
    name: "getArticleList",
    data,
  });
2)前端获取数据
- ArticleList 组件
created() {
  this.getArticleList();
},
methods: {
  async getArticleList() {
    const res = await this.$http.getArticleList();
    this.articleList = res;
  }
}
3)数据渲染
- ListItem 组件中循环渲染
<view class="list-scroll-container">
  <scroll-view scroll-y="true" class="list-scroll">
    <view>
      <ListCard v-for="article in articleList" :article="article" :key="article._id"></ListCard>
    </view>
  </scroll-view>
</view>
4)根据选项卡分类渲染数据
- Home.vue 添加“全部”分类
async getLabelList() {
  const res = await this.$http.getLabelList();
  this.labelList = [
    {
      name: '全部'
    },
    ...res
  ];
}
- 请求 ArticleList 时传递数据
- 为了保证导航数据的正确获取,调整 created 函数的
getArticleList方法在 watch 中调用
// created() {
//   this.getArticleList();
// },
watch: {
  activeIndex(newVal) {
    this.currentIndex = newVal;
  },
  labelList() {
    this.getArticleList();
  }
}
- 云函数过滤数据
"use strict";
const db = uniCloud.database();
exports.main = async (event, context) => {
  const { classify } = event;

  let match = {};
  if (classify !== "全部") {
    match = {
      classify,
    };
  }

  const res = await db
    .collection("article")
    .aggregate() // 使用聚合的形式获取数据
    .match(match) // 根据匹配条件返回数据
    .project({
      content: 0, // 本次查询不需要返回文章内容 content 字段
    })
    .end();

  // 返回数据给客户端
  return {
    code: 0,
    msg: "数据请求成功",
    data: res.data,
  };
};
- 前端缓存数据
- 将数组形式的文章列表转换存储为对象形式
- 每次 change 切换卡片内容时判断是否有缓存数据
- 使用
$set方法重新渲染页面
data() {
  return {
    currentIndex: 0,
    // articleList: []
    articleData: {}
  };
},
watch: {
  activeIndex(newVal) {
    this.currentIndex = newVal;
  },
  labelList() {
    this.getArticleList(this.currentIndex);
  }
},
methods: {
  changeActiveIndex(e) {
    const idx = e.detail.current;
    this.$emit('changeActiveIndex', idx);
    if (!this.articleData[idx] || this.articleData[idx].length === 0) {
      this.getArticleList(idx);
    }
  },
  async getArticleList(idx) {
    // const res = await this.$http.getArticleList();
    // this.articleList = res;
    const res = await this.$http.getArticleList({
      classify: this.labelList[idx].name
    });
    this.$set(this.articleData, idx, res);
  }
}
4.上拉加载更多
1)ListItem 组件使用 uni-load-more 插件
<uni-load-more v-if="articleList.length === 0 || articleList.length > 5" :status="loadData.loading"></uni-load-more>
props: {
  articleList: {
    type: Array,
    default: () => []
  },
  loadData: {
    type: Object,
    default: () => ({
      loading: 'loading'
    })
  }
}
2)修改参数传递
- 云函数添加 page 及 pageSize 属性
- 云函数内限制返回值
"use strict";
const db = uniCloud.database();
exports.main = async (event, context) => {
  const { classify, page = 1, pageSize = 10 } = event;

  let match = {};
  if (classify !== "全部") {
    match = {
      classify,
    };
  }

  const res = await db
    .collection("article")
    .aggregate() // 使用聚合的形式获取数据
    .match(match) // 根据匹配条件返回数据
    .project({
      content: 0, // 本次查询不需要返回文章内容 content 字段
    })
    .skip(pageSize * (page - 1)) // 首页从0开始
    .limit(pageSize) // 每页最多返回多少条数据
    .end();

  // 统计总数据
  const { total } = await db.collection("article").where(match).count();

  // 返回数据给客户端
  return {
    code: 0,
    msg: "数据请求成功",
    data: {
      data: res.data,
      total,
    },
  };
};
- 子组件监听 scroll-view 的
scrolltolower事件 - 触底时,通知父组件根据当前的 page 值请求新的数据
handleLoadMoreArticle() {
  this.page++;
  this.getArticleList(this.currentIndex);
}
- 前端调整数据处理,将直接赋值变为追加数据
async getArticleList(idx) {
  const { data: res, total } = await this.$http.getArticleList({
    classify: this.labelList[idx].name,
    page: this.page,
    pageSize: this.pageSize
  });

  // 填充数据时改变为追加数据
  let oldList = this.articleData[idx] || [];
  oldList.push(...res);
  this.$set(this.articleData, idx, oldList);
}
3)分类页数处理
- 创建每一个分类的存储对象
- 存储当前请求的 page 和数据加载状态
async getArticleList(idx) {
  // 初始化判断当前分类是否含有数据,并记录当前的分类页数
  if (!this.loadData[idx]) {
    this.loadData[idx] = {
      page: 1,
      loading: 'loading',
      total: 0
    };
  }

  const { data: res, total } = await this.$http.getArticleList({
    classify: this.labelList[idx].name,
    page: this.loadData[idx].page,
    pageSize: this.pageSize
  });

  // 填充数据时改变为追加数据
  let oldList = this.articleData[idx] || [];
  oldList.push(...res);
  this.loadData[idx].total = total;
  this.$set(this.articleData, idx, oldList);
}
- 处理数据全部加载完成状态
handleLoadMoreArticle() {
  // 没有数据时不再进行数据的请求
  if (this.loadData[this.currentIndex].total === this.articleData[this.currentIndex].length) {
    this.loadData[this.currentIndex] = {
      ...this.loadData[this.currentIndex],
      ...{
        loading: 'noMore',
        page: this.loadData[this.currentIndex].page
      }
    };
    this.$forceUpdate();
    return;
  }
  this.loadData[this.currentIndex].page++;
  this.getArticleList(this.currentIndex);
}
(十三)用户登录
1.搭建登录页面
1)下载 uni-forms 插件
2)封装 SendCode 组件
<template>
  <view class="code-container">
    <view @click="getForm" class="vCode-btn">{{ runTime ? `${time}秒后重新获取` : '获取验证码' }}</view>
  </view>
</template>
- 创建定时器
- 组件销毁时,清除定时器副作用
// 离开页面时清除定时器
beforeDestroy () {
  clearInterval(this.timeId);
  this.timeId = null;
  this.runTime = false;
  this.time = 60;
}
2.表单验证
1)创建 userRulesMixin 文件
- common 文件夹下创建 userRulesMixin
export default {
  // 使用install的形式安装mixin
  install(Vue) {
    Vue.mixin({
      data() {
        return {
          userRules: {
            loginName: {
              rules: [
                {
                  required: true,
                  errorMessage: "账户名不能为空",
                },
                {
                  validateFunction: this.validateLoginName,
                }, // 自定义验证规则
              ],
            },
            password: {
              rules: [
                {
                  required: true,
                  errorMessage: "密码不能为空",
                },
              ],
            },
            phone: {
              rules: [
                {
                  required: true,
                  errorMessage: "电话号码不能为空",
                },
                {
                  validateFunction: this.validatePhone,
                }, // 自定义验证规则
              ],
            },
            vCode: {
              rules: [
                {
                  required: true,
                  errorMessage: "验证码不能为空",
                },
              ],
            },
          },
          mobileReg: /^(0|86|17951)?(13[0-9]|15[012356789]|166|17[3678]|18[0-9]|14[57])[0-9]{8}$/,
        };
      },
      methods: {
        validateLoginName(rule, val, data, callback) {
          switch (true) {
            case val.length < 6:
              callback("用户名长度不正确");
              break;
            default:
              return true;
          }
        },
        /* 验证手机号码 */
        validatePhone(rule, val, data, callback) {
          switch (true) {
            case !this.mobileReg.test(val):
              callback("手机号码格式不正确");
              break;
            default:
              return true;
          }
        },
      },
    });
  },
};
2)main.js 中使用 mixin 文件
import userRulesMixin from "./common/userRulesMixin.js";
Vue.use(userRulesMixin);
3)组件或页面内直接使用
<uni-forms :modelValue="formData" :rules="userRules" class="form" ref="form"></uni-forms>
onLoad() {
  console.log(this.test()); // 调用 mixin 中的 methods
}
验证手机号码的正则表达式
/^(0|86|17951)?(13[0-9]|15[012356789]|166|17[3678]|18[0-9]|14[57])[0-9]{8}$/
3.账户名密码登录
1)前端数据整理
- 定义发送函数,将用户信息和本次请求的用户登录类型传递给后端
async handleSubmitLogin() {
  const res = await this.$refs.form.validate();
  this.sendUserInfo({
    ...res,
    type: this.type
  });
}
- 创建用户相关请求接口 user.js
import ajax from "../../http.js";

export const sendUserInfo = (data) =>
  ajax({
    name: "sendUserInfo",
    data,
  });
- 定义云函数 sendUserInfo
"use strict";
const db = new uniCloud.database();
exports.main = async (event, context) => {
  const { loginName, password, phone, type } = event;

  const { affectedDocs, data } = await db
    .collection("user")
    .aggregate()
    .match(
      type === "account"
        ? {
            loginName,
            password,
          }
        : {
            phone,
          },
    )
    .end();

  // 返回数据给客户端
  return affectedDocs
    ? {
        code: 0,
        msg: "获取用户信息成功",
        data: data[0],
      }
    : {
        code: 1,
        msg: type === "account" ? "获取用户信息失败,请检查用户名或密码" : "验证码或手机号码错误",
      };
};
- 前端接收返回信息,处理数据
- 跳转到上一个历史记录
- 使用 uni-app 内置的 Vuex 存储用户信息
2)使用 Vuex 存储用户信息
- 实例化 Store 对象
- index.js
import Vue from "vue";
import Vuex from "vuex";
import state from "./state.js";
import mutations from "./mutations.js";

Vue.use(Vuex);

export default new Vuex.Store({
  state,
  mutations,
});
- state.js
export default {
  userInfo: uni.getStorageSync("userInfo") || null,
};
- mutations.js
export default {
  updateUserInfo(state, userInfo) {
    uni.setStorageSync("userInfo", userInfo);
    state.userInfo = userInfo;
  },
};
- main.js 中注册 store
// 使用Vuex
import store from "./store/index.js";

App.mpType = "app";
const app = new Vue({
  ...App,
  store,
});
- Login.vue 获取用户信息后保存
import { mapMutations } from "vuex";
export default {
  methods: {
    ...mapMutations(["updateUserInfo"]),
    async handleSendUserInfo(userInfo) {
      const res = await this.$http.sendUserInfo(userInfo);
      if (res) {
        this.updateUserInfo(res);
        uni.showToast({
          icon: "success",
          title: "登录成功",
        });
        setTimeout(() => {
          // #ifdef H5
          uni.switchTab({
            url: "/pages/Home/Home",
          });
          // #endif
          // #ifndef H5
          uni.navigateBack();
          // #endif
        }, 2000);
      }
    },
  },
};
4.手机验证码登录
1)处理小程序兼容问题
- 小程序不兼容
:rules="userRules"的写法
<SendCode @getFormRefs="handleGetFormRefs" @setCurrentCode="returnCode = $event" class="code-component"></SendCode>
onReady() {
  this.$refs.form.setRules(this.userRules);
}
- 小程序无法通过 props 获取父组件的 refs 对象
- 通过父子组件 emit 回调函数传参解决
// Login.vue
handleGetFormRefs(cb) {
  cb && cb(this.$refs.form);
}

// SendCode.vue
getFormRefs() {
  if (this.runTime) return; // 防抖
  this.$emit('getFormRefs', this.handleSendCode);
}
2)定义云函数 sendVerificationCode
- 定义 uniCloud 短信服务
"use strict";
exports.main = async (event, context) => {
  const { phone } = event;
  // 创建一个随机数,返回给前端
  const currentNumber = Math.random().toString().substr(2, 6);

  try {
    const res = await uniCloud.sendSms({
      appid: "__UNI__ACE04D2", // manifest.json中进行获取
      smsKey: "25cfa81fcade420555022b1ee4021a8a",
      smsSecret: "d79e45ec2456c4d6ffc7956dba4e1f43",
      phone,
      templateId: "12333", // 获取的短信模版
      data: {
        code: currentNumber,
        expMinute: "1",
      },
    });
    // 调用成功,请注意这时不代表发送成功
    return {
      code: 0,
      data: {
        mobileCode: currentNumber,
        msg: "请在手机注意查收验证码",
      },
    };
  } catch (err) {
    return {
      code: 1,
      msg: "短信验证码发送失败",
    };
  }
};
3)发送验证码
- 通过 form 对象单独验证手机号码格式
- 启动定时器,调整文本显示内容
- 调用云函数,发送验证码
- 前端接受返回值,保存验证码,加入验证码验证规则
- 提交用户数据,指定参数 phone 及 type 类型
methods: {
  async handleSendCode(form) {
    const { phone } = await form.validateField(['phone']);
    // 开启定时器
    this.runTime = true;
    this.setTimer();
    // 发送数据请求到云函数
    const { msg, mobileCode } = await this.$http.sendVerificationCode({ phone });
    uni.showToast({
      icon: 'none',
      title: msg
    });
    this.$emit('setCurrentCode', mobileCode);
  },
  setTimer() {
    this.timer = setInterval(() => {
      if (this.time === 1) {
        clearInterval(this.timer);
        this.timer = null;
        this.runTime = false;
        this.time = 60;
      }
      this.time--;
    }, 1000);
  }
},
beforeDestroy() {
  if (this.timer) clearInterval(this.timer);
  this.timer = null;
  this.runTime = false;
  this.time = 60;
}
(十四)实现收藏按钮组件
1.获取用户信息及文章信息
- 由于多个页面中都会用到 userInfo 对象,可将 userInfo 对象放在一个全局的 mixin 中
- 保证每个页面或组件内部都可以使用
1)定义 commonMixin 文件
import { mapState, mapMutations } from "vuex";

export default {
  install(Vue) {
    Vue.mixin({
      computed: {
        ...mapState(["userInfo"]),
      },
      methods: {
        ...mapMutations(["updateUserInfo"]),
        // 检测用户是否登录
        async handleCheckedLogin() {
          return new Promise((resolve) => {
            if (this.userInfo) {
              resolve();
            } else {
              uni.navigateTo({
                url: "/pages/UserInfo/Login/Login",
              });
            }
          });
        },
      },
    });
  },
};
// SaveLikes.vue
async handleChangeSaveStatus() {
  await this.handleCheckedLogin();
}
2)main.js 文件中使用 commonMixin 文件
// main.js
import commonMixin from "./common/commonMixin.js";
Vue.use(commonMixin);
2.定义云函数
- 获取用户记录值
- 找到指定字段
article_likes_ids - 通过
db.command更新指令修改article_likes_ids - 处理完成,将
article_likes_ids修改后重新存储
"use strict";
// 定义数据库引用
const db = uniCloud.database();
// 定义修改指令
const dbCmd = db.command;

exports.main = async (event, context) => {
  const { userId, articleId } = event;
  // 获取用户Ids集合
  const userInfo = await db.collection("user").doc(userId).get();

  const articleIds = userInfo.data[0].article_likes_ids;
  let returnMsg = null;
  let articleArr = null;

  if (articleIds.includes(articleId)) {
    // 如果包含则删除收藏
    articleArr = dbCmd.pull(articleId);
    returnMsg = "取消收藏成功";
  } else {
    articleArr = dbCmd.addToSet(articleId);
    returnMsg = "添加收藏成功";
  }

  await db.collection("user").doc(userId).update({
    article_likes_ids: articleArr,
  });
  const updateUserInfo = await db.collection("user").doc(userId).get();

  // 返回数据给客户端
  return {
    code: 0,
    data: {
      msg: returnMsg,
      newUserInfo: updateUserInfo.data[0],
    },
  };
};
3.调用云函数
1)将文章信息传递到 SaveLikes.vue 内部使用
<!-- ListCard.vue -->
<SaveLikes :item="article"></SaveLikes>
2)暴露云函数调用
export const updateSaveLikes = (data) =>
  ajax({
    name: "updateSaveLikes",
    data,
  });
3)点击 icon 发送数据到云服务器
- 修改存储的用户信息
article_likes_ids数组 - 弹出提示信息
async handleChangeSaveStatus() {
  await this.handleCheckedLogin();
  const { msg, newUserInfo } = await this.$http.updateSaveLikes({
    articleId: this.item._id,
    userId: this.userInfo._id
  });
  uni.showToast({
    icon: 'success',
    title: msg
  });
  this.updateUserInfo({
    ...this.userInfo,
    ...newUserInfo
  });
}
- 重新对保存状态 icon 图标赋值
<view @click.stop="handleChangeSaveStatus" class="save-icons">
  <uni-icons :type="isLike ? 'heart-filled' : 'heart'" color="#ff6600" size="20"></uni-icons>
</view>
- 使用计算属性保存用户收藏状态
computed: {
  isLike () {
    return this.userInfo && this.userInfo.article_likes_ids.includes(this.item._id);
  }
}
(十五)搜索页面
1.调整 NavBar 为动态组件
- 添加是否为搜索页面的判断
1)isSearch
- 当页面为搜索页面时,添加返回 icon 图标,并绑定返回事件
<view v-if="isSearch" :style="{ top: statusBarHeight + 'rpx' }" @click="returnArticleList" class="return-icon">
  <uni-icons type="back" size="22" color="white"></uni-icons>
</view>
2)为点击事件添加条件处理
- 当页面为搜索页面时,阻止跳转事件
toSearchPage() {
  if (this.isSearch) return;
  uni.navigateTo({
    url: '/pages/Search/Search'
  });
}
3)添加回退事件
- 根据平台使用指定事件
returnArticleList() {
  // #ifdef H5
  uni.switchTab({
    url: '/pages/Home/Home'
  });
  // #endif
  // #ifndef H5
  uni.navigateBack();
  // #endif
}
2.搭建搜索页面结构
- 根据当前状态,条件渲染
<view class="search-container">
  <!-- 搜索导航组件 -->
  <NavBar :isSearch="isSearch"></NavBar>
  <!-- 搜索包裹 -->
  <view class="search-wrapper">
    <!-- 没有进行搜索的操作 -->
    <view v-if="false" class="search-history-container">
      <!-- 头部 -->
      <view class="search-header">
        <text class="history-text">搜索历史</text>
        <text class="history-clean">清空</text>
      </view>
      <!-- 内容部分 -->
      <view class="search-history-content">
        <view v-for="item in 10" :key="item" class="history-content-item">直播</view>
      </view>

      <view class="no-data">当前没有搜索历史</view>
    </view>

    <!-- 开始进行搜索的操作 -->
    <view v-else class="search-list-container">
      <ListItem v-if="searchList.length"></ListItem>
      <view v-else class="no-data">没有搜索到相关数据</view>
    </view>
  </view>
</view>
3.业务逻辑处理
1)获取文本输入内容
- 添加右下角点击按钮事件
- 调整右下角显示文字
<NavBar :isSearch="isSearch" :parentVal="parentVal" @sendSearchData="handleSendSearchKeyword" @updateVal="parentVal = $event"></NavBar>
- 父子组件实现数据双向绑定
// NavBar.vue
computed: {
  searchVal: {
    get() {
      return this.parentVal;
    },
    set(val) {
      this.$emit('updateVal', val);
      if (!val) {
        this.$emit('sendSearchData');
      }
    }
  }
}
2)定义云函数并返回数据
"use strict";
const db = uniCloud.database();
exports.main = async (event, context) => {
  const { searchVal } = event;

  const res = await db
    .collection("article")
    .aggregate() // 使用聚合的形式进行数据的获取
    .match({
      title: new RegExp(searchVal),
    }) // 使用正则表达式进行模糊匹配,只要包含就返回
    .project({
      content: 0, // 本次查询不需要返回文章详情给前端
    })
    .end();

  // 返回数据给客户端
  return {
    code: 0,
    msg: "搜索数据请求成功",
    data: {
      articleList: res.data,
    },
  };
};
3)搜索关键词
- 处理空数据内容,清空操作后返回一个空的 searchList
async handleSendSearchKeyword() {
  this.isShowHistory = false;
  if (!this.parentVal) {
    this.isShowHistory = true;
    this.searchList = [];
    return;
  }
  const { articleList, total } = await this.$http.getSearchHistory({
    searchVal: this.parentVal
  });
  this.searchList = articleList;
}
4)切换历史记录显示
- 定义显示状态标识
// Search.vue
data() {
  return {
    isShowHistory: true,
    searchList: [],
  }
}
- 点击卡片生成历史记录
// ListCard.vue
toArticleDetail() {
  this.$emit('saveHistory');
}
- 通过自定义事件形式传递数据到 Search.vue
<!-- ListItem.vue -->
<view>
  <ListCard v-for="article in articleList" :article="article" :key="article._id" @saveHistory="$emit('saveHistory')"></ListCard>
</view>
<uni-load-more v-if="isShowLoading && (articleList.length === 0 || articleList.length > 5)" :status="loadData.loading"></uni-load-more>
saveHistory() {
  this.updateSearchHistory(this.parentVal);
}
5)Vuex 管理搜索历史记录
// state.js
export default {
  // 初始值绑定
  searchHistory: uni.getStorageSync("searchHistory") || [],
};

// mutations.js
updateSearchHistory(state, keyword) {
  let history = state.searchHistory;
  if (history.length > 0 && history.findIndex(item => item === keyword) > -1)
    return;
  history.unshift(keyword)
  uni.setStorageSync("searchHistory", history);
  state.searchHistory = history;
}
- 点击历史记录搜索
openHistory(val) {
  this.parentVal = val;
  this.handleSendSearchKeyword();
}
- 点击清空按钮清空历史记录
- 通过 ListCard.vue 发送自定义事件
- Search.vue 接收到自定义事件后,通过触发 mutation 里面的指定事件,清空 state 的指定属性
// mutations.js
cleanSearchHistory(state) {
  uni.removeStorageSync("searchHistory");
  state.searchHistory = [];
  uni.showToast({
    icon: "success",
    title: "清空完成",
  });
}
(十六)标签页面
1.跳转标签页面鉴权
- 判断用户是否登录,未登录直接跳转登录页面
// TabBar.vue
async toLabelEditPage() {
  await this.handleCheckedLogin();
  uni.navigateTo({
    url: '/pages/LabelEdit/LabelEdit'
  });
}
2.控制标签按钮状态
- 添加状态属性监听
- 发送切换按钮文本及是否修改标签体
<view @click="handleEditLabel" class="label-edit">{{ this.isEdit ? '完成' : '编辑' }}</view>
data() {
  return {
    isEdit: false
  };
},
methods: {
  handleEditLabel() {
    this.isEdit && this.handleUpdateLabel();
    this.isEdit = !this.isEdit;
  },
  handleUpdateLabel() {}
}
3.保存 labelList 到全局仓库
- store 定义 labelList 属性
// state.js
export default {
  labelList: uni.getStorageSync("labelList") || [],
};

// mutations.js
updateLabelList(state, labelList) {
  uni.setStorageSync('labelList', labelList);
  state.labelList = labelList;
},
- 在 ArticleList.vue 替换 labelList 的引用
created() {
  this.labelList.length && this.getArticleList(this.activeIndex);
}
- 修改父组件 Home.vue
import { mapState, mapMutations } from "vuex";
export default {
  name: "Home",
  onLoad() {
    this.getLabelList();
  },
  data() {
    return {
      activeIndex: 0,
    };
  },
  computed: {
    ...mapState(["labelList"]),
  },
  methods: {
    ...mapMutations(["updateLabelList"]),
    async getLabelList() {
      if (this.labelList.length) return;
      const res = await this.$http.getLabelList();
      this.updateLabelList([
        {
          name: "全部",
        },
        ...res,
      ]);
    },
  },
};
4.选项卡业务逻辑处理
1)创建我的标签及推荐标签数组
- 使用计算属性创建数组
computed: {
  ...mapState(['labelList']),
  selfLabelList() {
    return this.labelList.filter((item) => this.labelIds.includes(item._id));
  },
  recommendLabelList() {
    return this.labelList.filter((item) => !this.labelIds.includes(item._id) && item._id);
  }
}
- 初始化定义本地数据对象
- 为了不影响用户数据,页面内定义属性拷贝用户数组信息数据
- 在 watch 中调用,为了防止用户在修改之后,改变用户时无法获取准确信息
- 使用 immediate 初始化
watch: {
  userInfo: {
    immediate: true,
    handler(newVal, oldVal) {
      this.labelIds = [...this.userInfo.label_ids];
    }
  }
}
- 渲染页面数据
<!-- 用户标签组 -->
<view class="label-content">
  <view v-for="(item, index) in selfLabelList" :key="item._id" class="label-content-item">
    {{ item.name }}
    <uni-icons v-if="isEdit" @click="deleteLabelItem(item)" class="icon-close" type="clear" size="20" color="red"></uni-icons>
  </view>
  <view v-if="!selfLabelList.length" class="no-data">当前没有数据</view>
</view>

<!-- 推荐标签组 -->
<view class="label-content">
  <view v-for="(item, index) in recommendLabelList" :key="item._id" @click="changeSelfList(item)" class="label-content-item">{{ item.name }}</view>
  <view v-if="!recommendLabelList.length" class="no-data">当前没有数据</view>
</view>
- 为标签切换添加点击事件
- 切换标签应该在 isEdit 情况下切换
- 追加用户标签,直接修改 labelIds
- 删除标签,只过滤匹配内容
- 在未点击保存按钮时,不需要真正地存储数据
changeSelfList(item) {
  if (!this.isEdit) return;
  this.labelIds.push(item._id);
},
deleteLabelItem(item) {
  this.labelIds = this.labelIds.filter((val) => val !== item._id);
}
2)发送数据
- 创建云函数
- 修改数据库中用户 label_ids 字段
"use strict";
const db = uniCloud.database();
exports.main = async (event, context) => {
  const { userId, label_ids } = event;

  const res = await db.collection("user").doc(userId).update({
    label_ids,
  });

  // 返回数据给客户端
  return {
    code: 0,
    data: {
      msg: "修改成功",
    },
  };
};
- 前端收集数据
- 当前用户 ID
- 现阶段收藏的数组 selfIds
- 前端接收返回值
- 重新调整 userInfo
async handleUpdateLabel() {
  const label_ids = this.selfLabelList.map((item) => item._id);
  const res = await this.$http.updateLabelIds({
    userId: this.userInfo._id,
    label_ids
  });
  uni.showToast({
    icon: 'success',
    title: res.msg
  });
  this.updateUserInfo({
    ...this.userInfo,
    label_ids
  });
}
3)处理其他页面副作用
- 调整 Home.vue 中 labelList 获取方式
- 判断是否包含用户信息
- 不包含直接返回
- 否则,显示用户收藏内容
computed: {
  // ...mapState(['labelList'])
  labelList() {
    if (this.userInfo) {
      this.activeIndex = 0;
      return [...this.$store.state.labelList.slice(0, 1), ...this.$store.state.labelList.filter((item) => this.userInfo.label_ids.includes(item._id))];
    } else {
      return this.$store.state.labelList;
    }
  }
}
- ArticleList.vue 监听到 labelList 的值改变后,清空列表对象
watch: {
  labelList() {
    this.articleData = {};
    this.loadData = {};
    this.getArticleList(this.currentIndex);
  }
}
(十七)文章详情页面
- 搭建基本结构
- 初始化样式
1.URL 参数处理
- 在 ListCard 组件跳转过程中,携带参数到详情页面实现数据渲染
toArticleDetail() {
  this.$emit('saveHistory');
  const {
    _id,
    title,
    author,
    create_time,
    thumbs_up_count,
    browse_count
  } = this.article;
  const params = {
    _id,
    title,
    author,
    create_time,
    thumbs_up_count,
    browse_count
  };
  uni.navigateTo({
    url: `/pages/ArticleDetail/ArticleDetail?params=${JSON.stringify(params)}`
  });
}
- ArticleDetail.vue 中接收参数
onLoad(...options) {
  this.articleData = JSON.parse(options[0].params);
}
2.发送数据请求
- 前端传递当前文章 ID
onLoad(...options) {
  this.articleData = JSON.parse(options[0].params);
  this.getArticleDetail();
},
data() {
  return {
    articleData: null
  };
},
methods: {
  async getArticleDetail() {
    const res = await this.$http.getArticleDetail({
      article_id: this.articleData._id
    });
    this.articleData = res;
  }
}
- 定义云函数
"use strict";
const db = uniCloud.database();
exports.main = async (event, context) => {
  const { article_id } = event;

  const articleList = await db
    .collection("article")
    .aggregate()
    .match({
      _id: article_id,
    })
    .end();

  // 返回数据给客户端
  return {
    code: 0,
    msg: "文章获取成功",
    data: articleList.data[0],
  };
};
3.将文章详情内容解析为 Markdown 格式
1)解析内容数据
- 使用第三方插件 uParse
import uParse from "@/components/gaoyia-parse/parse.vue";

export default {
  name: "ArticleDetail",
  components: {
    uParse,
  },
};
- App.vue 全局引入 uParse 样式
<style>
  /*每个页面公共css */
  @import url("/components/gaoyia-parse/parse.css");
</style>
2)解析 markdown 文本
- 使用第三方插件 marked
npm install marked或yarn add marked
import marked from "marked";

export default {
  computed: {
    content() {
      // // 小程序没有加载到this.articleData前调用子属性会报错
      // return this.articleData.content ? marked(this.articleData.content) : null;
      try {
        return marked(this.articleData.content);
      } catch (e) {
        return null;
      }
    },
  },
};
4.制作评论组件
- 插件市场内下载插件 uni-popup
- 定义弹出层组件 CommentModel ,传递是否打开弹窗标识属性
<CommentModel :showModel="showModel"></CommentModel>
- 完成内容区域结构样式创建
- 当用户为未登录状态时,跳转登录页面
<view @click="handleOpenCommentModel" class="input-container">
  <text>谈谈你的看法</text>
  <uni-icons type="compose" size="16" color="#f07373"></uni-icons>
</view>
async handleOpenCommentModel() {
  await this.handleCheckedLogin();
  this.showModel = true;
}
- 前端收集数据,获取用户 id,文章 id,评论内容
async handleSendComment(content) {
  const { msg } = await this.$http.updateArticleComment({
    articleId: this.articleData._id,
    userId: this.userInfo._id,
    content
  });
  uni.showToast({
    icon: 'success',
    title: msg
  });
  this.showModel = false;
}
- 创建云函数
- 为 article 追加评论内容
- 为 comment_id 指定随机 id 值
"use strict";
const db = uniCloud.database();
const dbCmd = db.command;
exports.main = async (event, context) => {
  const { userId, articleId, content } = event;

  // 获取用户信息
  let user = await db.collection("user").doc(userId).get();
  user = user.data[0];

  const article = await db.collection("article").doc(articleId).get();

  let commentObj = {
    comment_id: generatedId(5),
    comment_content: content,
    create_time: Date.now(),
    author: {
      author_id: user._id,
      author_name: user.author_name,
      avatar: user.avatar,
      professional: user.professional,
    },
    replyArr: [],
    is_reply: false,
  };

  commentObj = dbCmd.unshift(commentObj);
  await db.collection("article").doc(articleId).update({
    comments: commentObj,
  });

  // 生成随机数id
  function generatedId(num) {
    return Number(Math.random().toString().substr(3, num) + Date.now()).toString(36);
  }

  // 返回数据给客户端
  return {
    code: 0,
    data: {
      msg: "添加数据成功",
    },
  };
};
5.制作评论展示组件
- 下载 日期格式化组件
- 获取评论列表
async getCommentList() {
  const res = await this.$http.getCommentList({
    articleId: this.articleData._id
  });
  this.commentList = res;
}
- 定义云函数 getCommentList
"use strict";
const db = uniCloud.database();
exports.main = async (event, context) => {
  const { articleId, pageSize = 10, page = 1 } = event;

  const list = await db
    .collection("article")
    .aggregate()
    .match({
      _id: articleId,
    })
    .unwind("$comments") // 从指定的节点获取内容
    .project({
      _id: 0,
      comments: 1,
    })
    .replaceRoot({
      newRoot: "$comments",
    })
    .skip(pageSize * (page - 1))
    .limit(pageSize)
    .end();

  // 返回数据给客户端
  return {
    code: 0,
    msg: "数据请求成功",
    data: list.data,
  };
};
- 获取文章详情时过滤 comments 字段
const articleList = await db
  .collection("article")
  .aggregate()
  .match({
    _id: article_id,
  })
  .project({
    comments: 0,
  })
  .end();
- 创建评论展示组件 CommentList.vue
6.回复指定评论
1)绑定指定评论回复按钮点击事件
- 添加 comment_id 传递给云函数
- 保证云函数知道当前是回复哪条评论
<view class="comment-info">
  <view @click="handleReplyComment({ comment, isReply })" class="comment-button">回复</view>
</view>
2)调整云函数
- 从当前的 comments 集合当中,通过传递的 comment_id 获取指定的记录值
- 为当前的记录值的 replyArr 属性插入新的评论内容
- 修改指定索引值的数据的 replyArr 的记录值
"use strict";
const db = uniCloud.database();
const dbCmd = db.command;
exports.main = async (event, context) => {
  const { userId, articleId, content, comment_id = "", reply_id = "", is_reply = false } = event;

  // 获取用户信息
  let user = await db.collection("user").doc(userId).get();
  user = user.data[0];

  const article = await db.collection("article").doc(articleId).get();
  // 获取指定文章下的所有的评论内容
  const comments = article.data[0].comments;

  let commentObj = {
    comment_id: generatedId(5),
    comment_content: content,
    create_time: Date.now(),
    author: {
      author_id: user._id,
      author_name: user.author_name,
      avatar: user.avatar,
      professional: user.professional,
    },
    replyArr: [],
    is_reply,
  };

  // 当前的评论内容是空的时候的处理
  if (comment_id === "") {
    commentObj.replyArr = [];
    commentObj = dbCmd.unshift(commentObj);
  } else {
    let commentAuthor = null;
    // 获取对当前这一条评论的子回复的索引值获取
    let commentIndex = comments.findIndex((item) => item.comment_id === comment_id);
    if (is_reply) {
      commentAuthor = comments[commentIndex].replyArr.find((item) => item.comment_id === reply_id).author.author_name;
    } else {
      commentAuthor = comments.find((item) => item.comment_id === comment_id).author.author_name;
    }

    commentObj.to = commentAuthor;
    commentObj = {
      [commentIndex]: {
        replyArr: dbCmd.unshift(commentObj),
      },
    };
  }

  /*
  	const obj = {arr:[{name:'1'},{name:2}]}
  	xxx.update({
  		arr:{
  			0:{
  				name:3
  			}
  		}
  	})
  */

  await db.collection("article").doc(articleId).update({
    comments: commentObj,
  });

  // 生成随机数id
  function generatedId(num) {
    return Number(Math.random().toString().substr(3, num) + Date.now()).toString(36);
  }

  // 返回数据给客户端
  return {
    code: 0,
    data: {
      msg: "添加数据成功",
    },
  };
};
3)使用组件自调用的形式
- 在自调用的过程当中需要保证组件指定了 name 属性值
- 使用自调用的过程中父组件 ArticleDetail 会接收到两次$emit 事件
- 一次是当前组件 CommentList 作为父组件时获取到的递归子组件触发的事件
- 一次是当前组件 CommentList 向上级 ArticleDetail 组件传递时触发的事件
<!-- CommentList.vue -->
<view class="comment-info">
  <view @click="handleReplyComment({ comment, isReply })" class="comment-button">回复</view>
</view>
<view v-for="item in comment.replyArr" :key="item._comment_id" class="comment-reply-list">
  <CommentList :isReply="true" :comment="item" @replyComment="handleReplyComment"></CommentList>
</view>
handleReplyComment(data) {
  // 区分主回复还是子回复
  if (data.isReply) {
    data.comment.reply_id = data.comment.comment_id;
    data.comment.comment_id = this.comment.comment_id;
  }
  this.$emit('replyComment', data);
}
4)父组件处理更新评论内容
- 当指定回复发送事件时,需要指定 reply_id,并且调整 comment_id 值
- 渲染完成后,将 replayData 清空
handleReplyComment(data) {
  this.replyData = {
    comment_id: data.comment.comment_id,
    is_reply: data.isReply
  };
  // 当前为回复内容的时候添加回复的ID
  data.comment.reply_id && (this.replyData.reply_id = data.comment.reply_id);
  this.handleOpenCommentModel();
}
7.关注作者
- 判断当前的登录用户是否包含文章作者的用户 ID
<button @click="handleFollowAuthor" type="default" class="detail-header-button">{{ isFollowing ? '取消关注' : '关注' }}</button>
computed: {
  isFollowing() {
    // 解决小程序报错
    try {
      return this.userInfo && this.userInfo.author_likes_ids.includes(this.articleData.author.id);
    } catch (e) {
      return false;
    }
  }
}
- 绑定事件,传递文章作者 ID 及当前登录用户 ID
async handleFollowAuthor() {
  await this.handleCheckedLogin();
  const { msg } = await this.$http.updateFollowAuthor({
    authorId: this.articleData.author.id,
    userId: this.userInfo._id
  });
  uni.showToast({
    icon: 'success',
    title: msg
  });
  // 处理用户存储信息
  let followIds = [...this.userInfo.author_likes_ids];
  if (followIds.includes(this.articleData.author.id)) {
    followIds = followIds.filter((item) => item !== this.articleData.author.id);
  } else {
    followIds.push(this.articleData.author.id);
  }
  this.updateUserInfo({
    ...this.userInfo,
    author_likes_ids: followIds
  });
}
- 定义云函数
"use strict";
const db = uniCloud.database();
const dbCmd = db.command;
exports.main = async (event, context) => {
  const { userId, authorId } = event;

  const user = await db.collection("user").doc(userId).get();
  const authorLikesIds = user.data[0].author_likes_ids;
  let returnMsg = "";

  let author_ids = null;
  if (authorLikesIds.includes(authorId)) {
    returnMsg = "取消关注成功";
    author_ids = dbCmd.pull(authorId);
  } else {
    returnMsg = "关注作者成功";
    author_ids = dbCmd.addToSet(authorId);
  }

  // 将处理完的内容重新插入
  await db.collection("user").doc(userId).update({
    author_likes_ids: author_ids,
  });

  // 返回数据给客户端
  return {
    code: 0,
    data: {
      msg: returnMsg,
    },
  };
};
- 使用公共组件 SaveLikes 收藏文章
<!-- ArticleDetail.vue -->
<SaveLikes :item="articleData" size="22" class="detail-bottom-icon-box"></SaveLikes>
<!-- SaveLikes.vue -->
<uni-icons :type="isLike ? 'heart-filled' : 'heart'" :size="size" color="#ff6600"></uni-icons>

<script>
  export default {
    props: {
      item: Object,
      size: {
        type: String,
        default: "20",
      },
    },
  };
</script>
- ArticleList.vue 解决每次请求都要加载文章列表的 Bug
labelList(newVal, oldVal) {
  // 判断当前labelList与新的labelList是否相同,相同则不重新数获取据
  if (JSON.stringify(newVal) === JSON.stringify(oldVal)) return;

  this.articleData = {};
  this.loadData = {};
  this.getArticleList(this.currentIndex);
}
8.实现点赞+浏览次数
- 请求文章详情的云函数 getArticleDetail ,浏览次数+1
"use strict";
const db = uniCloud.database();
const dbCmd = db.command;
exports.main = async (event, context) => {
  const { article_id } = event;

  // 每次请求+1
  await db.collection("article").update({
    browse_count: dbCmd.inc(1),
  });

  const articleList = await db
    .collection("article")
    .aggregate()
    .match({
      _id: article_id,
    })
    .project({
      comments: 0,
    })
    .end();

  // 返回数据给客户端
  return {
    code: 0,
    msg: "文章获取成功",
    data: articleList.data[0],
  };
};
- ArticleDetail.vue 使用计算属性渲染点赞 icon
isLike() {
  try {
    return this.userInfo && this.userInfo.thumbs_up_article_ids.includes(this.articleData._id);
  } catch (e) {
    return false;
  }
}
- 定义云函数
"use strict";
const db = uniCloud.database();
// 使用操作符
const dbCmd = db.command;
exports.main = async (event, context) => {
  const { articleId, userId } = event;

  const userList = await db.collection("user").doc(userId).get();
  const thumbs_up_article_ids = userList.data[0].thumbs_up_article_ids;
  let tempArr = null;
  let returnMsg = "";
  let thumbsNumber = null;

  // 判断当前用户是否有点赞操作
  if (thumbs_up_article_ids.includes(articleId)) {
    tempArr = dbCmd.pull(articleId);
    thumbsNumber = -1;
    returnMsg = "您取消了点赞";
  } else {
    tempArr = dbCmd.addToSet(articleId);
    thumbsNumber = 1;
    returnMsg = "点赞成功";
  }

  // 处理用户字段
  await await db.collection("user").doc(userId).update({
    thumbs_up_article_ids: tempArr,
  });

  // 处理文章数量字段
  await await db
    .collection("article")
    .doc(articleId)
    .update({
      thumbs_up_count: dbCmd.inc(thumbsNumber),
    });

  // 返回数据给客户端
  return {
    code: 0,
    data: {
      msg: returnMsg,
    },
  };
};
- 绑定点赞文章事件
async handleLikeArticle() {
  await this.handleCheckedLogin();

  const { msg } = await this.$http.updateLikeArticle({
    articleId: this.articleData._id,
    userId: this.userInfo._id
  });
  msg &&
    uni.showToast({
      icon: 'success',
      title: msg
    });

  // 修改用户信息
  let thumbsArr = [...this.userInfo.thumbs_up_article_ids];
  if (thumbsArr.includes(this.articleData._id)) {
    this.articleData.thumbs_up_count -= 1;
    thumbsArr = thumbsArr.filter((item) => item != this.articleData._id);
  } else {
    this.articleData.thumbs_up_count += 1;
    thumbsArr.push(this.articleData._id);
  }
  this.updateUserInfo({
    ...this.userInfo,
    thumbs_up_article_ids: thumbsArr
  });
}
(十八)评论页面
1.创建 CommentDetail.vue
- 创建页面
- pages.json 中注册页面
- 跳转页面时携带指定的文章 ID
toCommentDetail() {
  uni.navigateTo({
    url: `/pages/CommentDetail/CommentDetail?articleId=${this.articleData._id}`
  });
}
2.编写结构样式
1)使用评论组件
<view v-for="item in commentList" :key="item.comment_id" class="comment-content-container">
  <CommentList :comment="item" @replyComment="handleReplyComment"></CommentList>
</view>
2)使用 uni-load-more 组件
- 调整组件内部初始化属性
<uni-load-more
  v-if="commentList.length === 0 || commentList.length > 5"
  :status="loading"
  :contentText="{ contentdown: '上拉显示更多', contentrefresh: '正在加载...', contentnomore: '没有更多评论了' }"
></uni-load-more>
3)追加评论列表
async getCommentList() {
  const res = await this.$http.getCommentList({
    articleId: this.articleId,
    page: this.page,
    pageSize: this.pageSize
  });
  if (res.length === 0) {
    this.loading = 'noMore';
    return;
  }
  let oldList = JSON.parse(JSON.stringify(this.commentList));
  oldList.push(...res);
  this.commentList = oldList;
}
3.添加评论内容输入组件
<CommentModel :showModel="showModel" @sendComment="handleSendComment" @hideCommentModel="showModel = $event"></CommentModel>
4.发布评论
1)回复事件函数处理
handleReplyComment(data) {
  this.replyData = {
    comment_id: data.comment.comment_id,
    is_reply: data.isReply
  };
  // 当前为回复内容的时候添加回复的ID
  data.comment.reply_id && (this.replyData.reply_id = data.comment.reply_id);
  this.handleOpenCommentModel();
}
2)处理副作用
async handleSendComment(content) {
  const { msg } = await this.$http.updateArticleComment({
    articleId: this.articleId,
    userId: this.userInfo._id,
    content,
    ...this.replyData // 扩展当前是否为回复指定评论内容
  });
  uni.showToast({
    icon: 'success',
    title: msg
  });
  this.showModel = false;
  this.getCommentList();
  this.replyData = {};
  this.page = 1;
  this.commentList = [];
  this.loading = 'loading';
}
(十九)关注页面
1.添加路由守卫
{
  "dependencies": {
    "marked": "^2.1.3",
    "uni-read-pages": "^1.0.5",
    "uni-simple-router": "^2.0.7"
  }
}
1)pages.json 增加配置项 meta
{
  "path": "pages/Follow/Follow",
  "style": {
    "navigationBarTitleText": "关注",
    "enablePullDownRefresh": false
  },
  "meta": {
    "auth": true
  }, {
    "path": "pages/UserInfo/Login/Login",
    "style": {
      "navigationBarTitleText": "用户登录",
      "enablePullDownRefresh": false
    },
    "name": "Login"
  }
}
2)vue.config.js 扩展读取 meta 属性
const TransformPages = require("uni-read-pages");
const { webpack } = new TransformPages();
module.exports = {
  configureWebpack: {
    plugins: [
      new webpack.DefinePlugin({
        ROUTES: webpack.DefinePlugin.runtimeValue(() => {
          const tfPages = new TransformPages({
            includes: ["path", "name", "meta", "aliasPath"], // 扩展meta属性
          });
          return JSON.stringify(tfPages.routes);
        }, true),
      }),
    ],
  },
};
3)添加守卫规则
// 全局路由前置守卫
router.beforeEach((to, from, next) => {
  // 判断当前页面是否需要登录并且现在是没有登录的状态
  if (to.meta.auth && !store.state.userInfo) {
    next({
      name: "Login",
      NAVTYPE: "push", // 跳转到普通页面,新开保留历史记录
    });
  } else {
    next();
  }
});
4)ArticleDetail.vue 修改路由参数接收方式
onLoad(...options) {
  // this.articleData = JSON.parse(options[0].params);
  this.articleData = this.$Router.currentRoute.query.params;
  this.getArticleDetail();
  this.getCommentList();
}
5)Follow.vue 处理小程序无法兼容问题
onLoad() {
  // #ifdef MP-WEIXIN
  if (!this.$store.state.userInfo) {
    uni.redirectTo({
      url: '/pages/UserInfo/Login/Login'
    });
    return;
  }
  // #endif
}
2.收藏文章列表
1)定义云函数
"use strict";
const db = uniCloud.database();
const $ = db.command.aggregate; // 获取一个聚合的操作符

exports.main = async (event, context) => {
  const { userId } = event;

  let userInfo = await db.collection("user").doc(userId).get();
  let article_likes_ids = userInfo.data[0].article_likes_ids; // 获取用户的收藏文章的数组

  const list = await db
    .collection("article")
    .aggregate()
    .addFields({
      // 判断这个文章的数组是否包含文章的_id ,$_id 指的是文章列表里面的_id,如果包含,返回true,否则,返回false,在这个里面是过滤查询的每一条记录值
      is_like: $.in(["$_id", article_likes_ids]),
    })
    .project({
      content: 0,
    })
    .match({
      is_like: true,
    })
    .end();

  // 返回数据给客户端
  return {
    code: 0,
    msg: "请求成功",
    data: list.data,
  };
};
2)获取当前登录用户的收藏文章列表
onLoad() {
  // #ifdef MP-WEIXIN
  if (!this.$store.state.userInfo) {
    uni.redirectTo({
      url: '/pages/UserInfo/Login/Login'
    });
    return;
  }
  // #endif
  this.getFollowArticle();
},
data() {
  return {
    currentIndex: 0,
    articleList: [],
    isShowLoading: false,
    noData: false
  };
},
methods: {
  async getFollowArticle() {
    const res = await this.$http.getFollowArticle({
      userId: this.userInfo._id
    });
    this.articleList = res;
    !res.length && (this.noData = true);
  }
}
3.关注作者列表
1)监听全局事件
- 处理关注页面数据不刷新问题
- 使用
uni.$emit事件注册全局事件
// SaveLikes.vue
async handleChangeSaveStatus() {
  // ......
  // 触发 Follow.vue 重新获取列表数据
  uni.$emit('updateArticle');
}
// Follow.vue
onLoad() {
  // #ifdef MP-WEIXIN
  if (!this.$store.state.userInfo) {
    uni.redirectTo({
      url: '/pages/UserInfo/Login/Login'
    });
    return;
  }
  // #endif
  this.getFollowArticle();

  // 没有这个历史记录栈的时候不会触发这个事件
  uni.$on('updateArticle', (e) => {
    this.getFollowArticle('noLoading');
  });
}
2)搭建关注作者区域结构
- 关联 swiper 滑动组件
- 添加结构样式
<swiper :current="currentIndex" @change="currentIndex = $event.detail.current" class="follow-list-swiper">
  <swiper-item :class="{ 'no-data': articleDataNone }">
    {{ articleDataNone && '暂无收藏的文章' }}
    <ListItem v-if="articleList.length" :isShowLoading="isShowLoading" :articleList="articleList"></ListItem>
  </swiper-item>
  <swiper-item>
    <AuthorList v-if="authorList.length" :authorList="authorList"></AuthorList>
    <view v-if="authorDataNone" class="no-data">暂无关注的作者</view>
  </swiper-item>
</swiper>
3)定义云函数
"use strict";
const db = uniCloud.database();
const $ = db.command.aggregate; // 获取一个聚合的操作符

exports.main = async (event, context) => {
  const { userId } = event;

  let userInfo = await db.collection("user").doc(userId).get();
  let author_likes_ids = userInfo.data[0].author_likes_ids; // 获取用户的收藏文章的数组

  const list = await db
    .collection("user")
    .aggregate()
    .addFields({
      // 判断这个文章的数组是否包含文章的_id ,$_id 指的是文章列表里面的_id,如果包含,返回true,否则,返回false,在这个里面是过滤查询的每一条记录值
      is_like: $.in(["$id", author_likes_ids]),
    })
    .project({
      password: 0,
      loginName: 0,
    })
    .match({
      is_like: true,
    })
    .end();

  // 返回数据给客户端
  return {
    code: 0,
    msg: "请求成功",
    data: list.data,
  };
};
4)客户端渲染
<AuthorList v-if="authorList.length" :authorList="authorList"></AuthorList>
async getFollowAuthor(isLoading) {
  const res = await this.$http.getFollowAuthor({
    userId: this.userInfo._id,
    isLoading
  });
  if (res.length) {
    this.authorDataNone = '';
  } else {
    this.authorDataNone = true;
  }
  this.authorList = res;
}
- 请求防抖处理
// http.js
export default ({ name, data = {} }) => {
  const loading = data.isLoading;
  data.isLoading && delete data.isLoading;

  return new Promise((resolve, reject) => {
    !loading &&
      uni.showLoading({
        title: "加载中...",
      });
    uniCloud.callFunction({
      name, // 要调用的云函数名称
      data,
      success({ result }) {
        if (result.code === 0) {
          resolve(result.data);
        } else {
          uni.showToast({
            icon: "error",
            title: result.msg,
          });
        }
      },
      fail(err) {
        // 网络错误或后端错误
        reject(err);
      },
      complete() {
        // 不论请求成功还是失败都执行
        !loading && uni.hideLoading();
      },
    });
  });
};
5)同步数据
- 定义全局事件,实现修改关注作者时触发 updateAuthor 事件重新调用
// ArticleDetail.vue
async handleFollowAuthor() {
  // ......
  // 更新关注作者列表
  uni.$emit('updateAuthor');
}
// Follow.vue
uni.$on("updateAuthor", (e) => {
  this.getFollowAuthor("noLoading");
});
6)修改卡片组件跳转方式
// ListCard.vue
toArticleDetail() {
  // ......

  // 手动转换为绝对路径
  // uni.navigateTo({
  //   url: `/pages/ArticleDetail/ArticleDetail?params=${JSON.stringify(params)}`
  // });

  // 使用Router对象方法进行跳转
  this.$Router.push({
    path: '/pages/ArticleDetail/ArticleDetail',
    query: params
  });
}
// ArticleDetail.vue
onLoad(...options) {
  // this.articleData = JSON.parse(options[0].params);
  // this.articleData = this.$Router.currentRoute.query.params;
  this.articleData = this.$Router.currentRoute.query;
  this.getArticleDetail();
  this.getCommentList();
}
(二十)个人中心
1.页面结构搭建
1)未登录状态
- 展示未登录提示结构
- 在未登录状态下可实现页面跳转
2)登录状态
- 展示用户登录信息内容
- 添加退出按钮,定义退出函数
2.我的文章
1)渲染用户信息
2)Self.vue 处理 app 升级版本逻辑
- 初始化 onLoad 事件
- 判断是否有新版本下载,获取当前的版本
onLoad() {
  // 判断是否有新版本进行下载及获取当前的版本
  // #ifdef APP-PLUS
  uni.getSystemInfo({
    success: (res) => {
      if (res.platform == 'android') {
        plus.runtime.getProperty(plus.runtime.appid, (wgtinfo) => {
          this.currentVersion = wgtinfo;
          this.checkVersion();
        });
      }
    }
  });
  // #endif
}
- 判断当前版本是否小于最新版本
async checkVersion() {
  const { version, downLoadLinkUrl } = await this.$http.getCurrentVersion();
  if (version > this.currentVersion) {
    this.haveNewVersion = true;
    this.downLoadLinkUrl = downLoadLinkUrl;
  }
}
// common.js
import ajax from "../../http.js";

export const getCurrentVersion = (data) =>
  ajax({
    name: "getCurrentVersion",
    data,
  });
- 下载最新版本内容并安装
getNewVersion() {
  uni.showLoading({
    title: '下载中,请稍后'
  });
  let dTask = plus.downloader.createDownload(this.downLoadLinkUrl, {}, function (d, status) {
    // 下载完成
    uni.hideLoading({});
    if (status == 200) {
      plus.runtime.install(plus.io.convertLocalFileSystemURL(d.filename), {}, {}, function (error) {
        uni.showToast({
          title: '安装失败',
          duration: 1500,
          icon: 'none'
        });
      });
    } else {
      uni.showToast({
        title: '更新失败',
        duration: 1500,
        icon: 'none'
      });
    }
  });
  dTask.start();
}
3)处理我的文章
- 创建页面,引入组件
<view>
  <ListCard v-for="article in articleList" :article="article" :key="article._id"></ListCard>
  <view v-if="noArticle" class="no-data">您还没有发布过任何文章</view>
</view>
- 获取数据,定义云函数
"use strict";
const db = uniCloud.database();
const dbCmd = db.command;

exports.main = async (event, context) => {
  const { userId } = event;

  let userInfo = await db.collection("user").doc(userId).get();
  let article_ids = userInfo.data[0].article_ids;

  const list = await db
    .collection("article")
    .aggregate()
    .project({
      content: 0,
      comments: 0,
    })
    .match({
      id: dbCmd.in(article_ids),
    })
    .end();

  // 返回数据给客户端
  return {
    code: 0,
    msg: "请求成功",
    data: list.data,
  };
};
3.意见反馈
1)搭建页面结构
- 创建结构
- 处理样式
2)上传图片
async handleUploadImage() {
  const count = 5 - this.imageList.length;
  uni.chooseImage({
    count,
    success: (res) => {
      const tempFilePaths = res.tempFilePaths;
      tempFilePaths.forEach((url, index) => {
        if (index < count) {
          this.imageList.push({
            url,
            // #ifdef H5
            name: res.tempFiles[index].name,
            // #endif
            // #ifndef H5
            name: Date.now().toString() + url.substr(url.lastIndexOf('.')) // 时间戳 + 获取扩展名
            // #endif
          });
        }
      });
    }
  });
}
3)发送数据到云函数
- 收集图片上传成功之后的访问地址 fileID
getFileId() {
  return this.imageList.map((item) => {
    return new Promise(async (resolve) => {
      const result = await uniCloud.uploadFile({
        filePath: item.url,
        cloudPath: item.name
      });
      resolve(result.fileID);
    });
  });
}
- 定义云函数
"use strict";
const db = uniCloud.database();
exports.main = async (event, context) => {
  const { userId, feedbackImageList, content } = event;

  await db.collection("feedback").add({
    user_id: userId,
    feedbackImageList,
    content,
  });

  return {
    code: 0,
    data: {
      msg: "提交反馈成功",
    },
  };
};
4)修改用户头像
- 获取修改头像内容,上传云函数
- 修改图片,删除原图片
"use strict";
const db = uniCloud.database();
const dbCmd = db.command;
exports.main = async (event, context) => {
  const { userId, filePath } = event;

  // 更新用户
  const user = await db.collection("user").doc(userId).get();
  const oldUrl = user.data[0].avatar;
  try {
    await uniCloud.deleteFile({
      fileList: [oldUrl],
    });
  } catch (e) {
    console.log(e);
  }

  // 更新作者头像
  const id = user.data[0].id;
  let res = await db
    .collection("article")
    .where({
      "author.id": id,
    })
    .update({
      "author.avatar": filePath,
    });

  await db.collection("user").doc(userId).update({
    avatar: filePath,
  });

  // 返回数据给客户端
  return {
    code: 0,
    data: {
      msg: "修改头像成功",
    },
  };
};
// Self.vue
async getAvatarFileId(filePath, cloudPath) {
  const { fileID } = await uniCloud.uploadFile({
    filePath,
    cloudPath
  });
  return fileID;
},
async handleUploadAvatar(filePath) {
  const { msg } = await this.$http.updateUserAvatar({
    userId: this.userInfo._id,
    filePath
  });
  uni.showToast({
    title: msg,
    icon: 'none'
  });
  this.updateUserInfo({
    ...this.userInfo,
    avatar: filePath
  });
},
handleChangeAvatar() {
  uni.chooseImage({
    count: 1,
    success: async (res) => {
      const filePath = await this._uploadFile(
        res.tempFilePaths[0],
        res.tempFiles[0].name || Date.now().toString() + res.tempFilePaths[0].substr(res.tempFilePaths[0].lastIndexOf('.'))
      );
      await this.handleUploadAvatar(filePath);
    }
  });
}
(二十一)发布
1.Wap 端发行打包
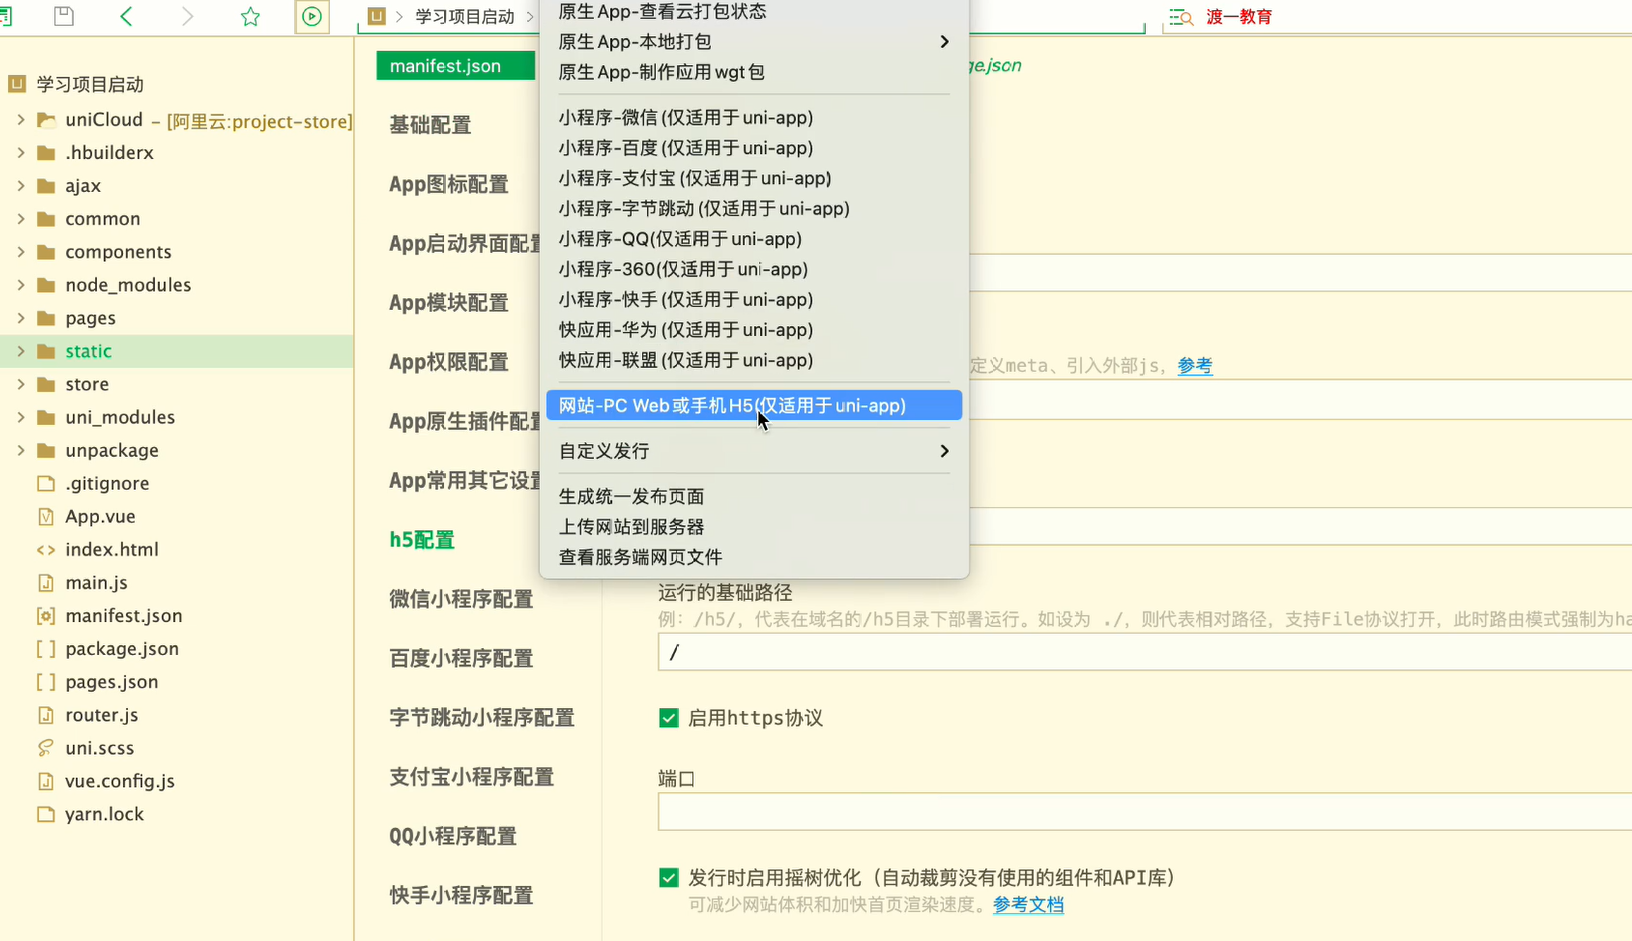
- uniCloud 网页托管配置
- 使用 uniCloud 前端网页托管,需要配置安全域名
2.微信小程序发布
- 打包配置文件
- 获取小程序 ID
- 配置安全域名
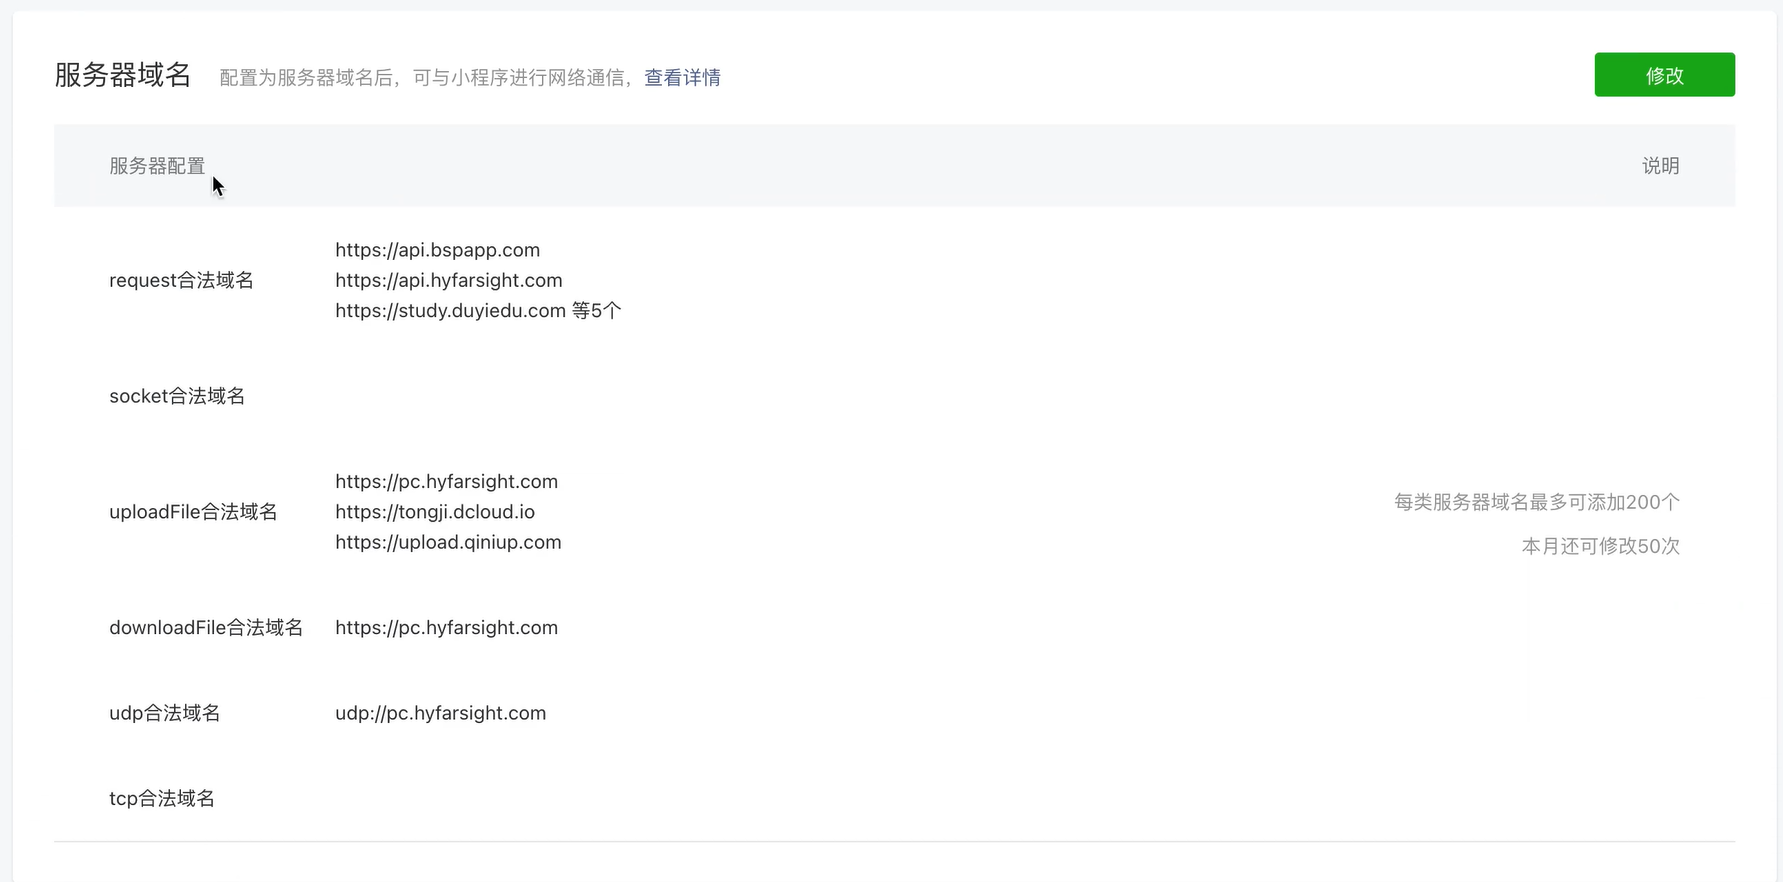
- 发布小程序
- 提交预发布版本
- 提交审核
3.App 安卓系统应用打包发布
1)配置
- 基础配置
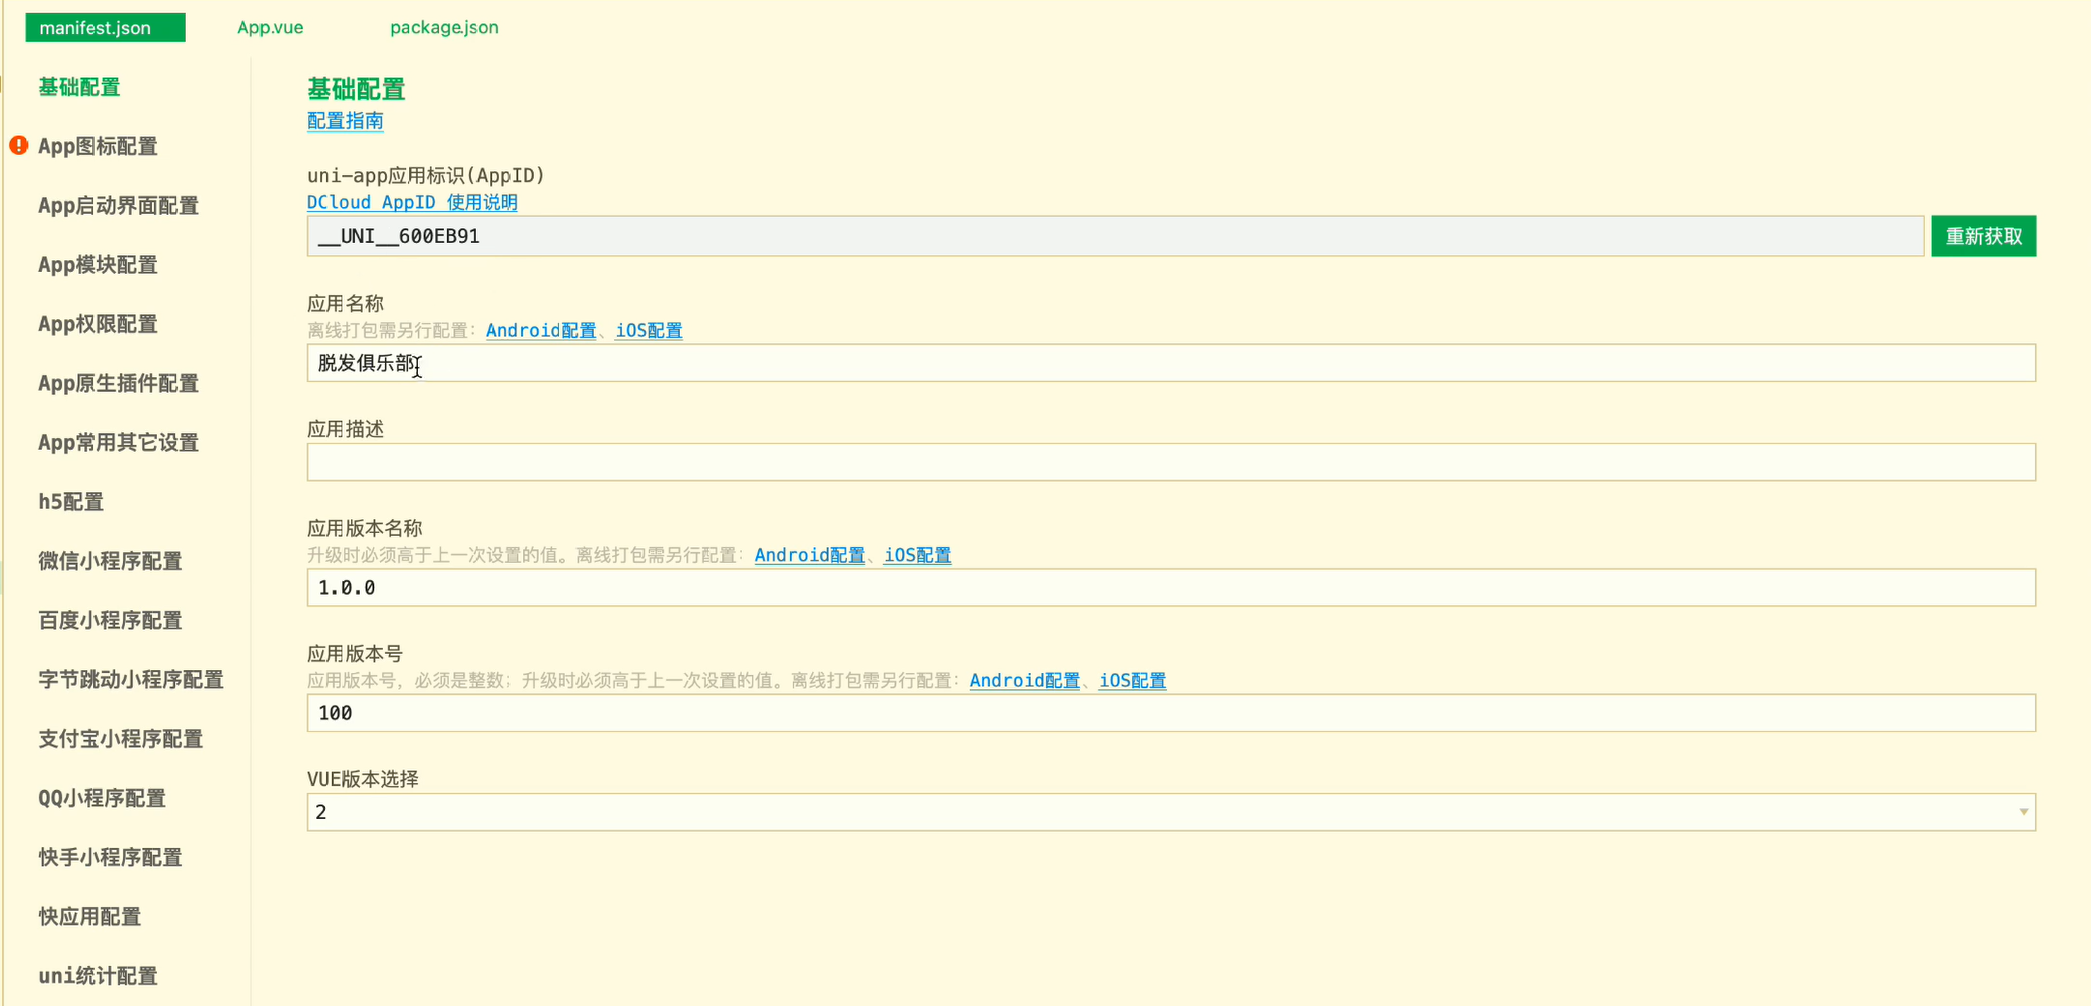
- 使用图标
- 使用
1024 * 1024图标
- 使用
- 其他配置暂时忽略