三、全栈项目-个人博客服务端设计
大约 14 分钟约 4108 字
(一)三层架构
1.简介
引用自百度百科的解释
- 三层架构,3-tier architecture
- 通常意义上的三层架构就是将整个业务应用划分为:
- 界面层 User Interface layer
- 业务逻辑层 Business Logic Layer
- 数据访问层 Data access layer
- 区分层次的目的是为了 高内聚低耦合 的思想
- 在软件体系架构设计中,分层式结构是最常见,也是最重要的一种结构
- 微软推荐的分层式结构一般分为三层,从上至下分别为
- 表示层
- 业务逻辑层
- 数据访问层(也称之为持久层)
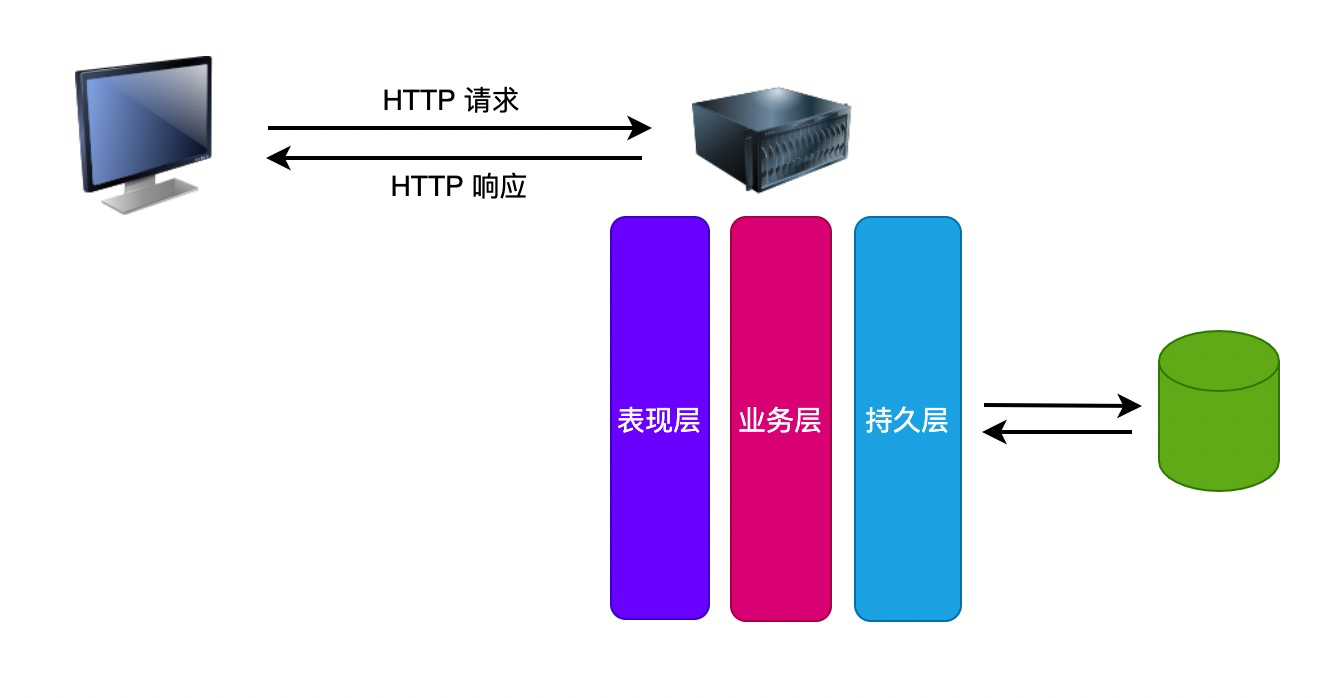
| 层 | 作用 |
|---|---|
| 表示层 | 接收用户请求,返回数据,为客户端提供应用程序的访问 |
| 业务逻辑层 | 负责操作数据层,组合数据层的操作 |
| 数据访问层 | 取决于数据层是否包含逻辑处理,各个函数主要完成对各个数据文件的操作,不必管其他操作 |
2.简单实现
(二)项目准备
1.使用 Express 脚手架搭建项目
# 全局安装 express 脚手架
npm i -g express-generator

# 查看脚手架版本
express --version

# 创建项目
express 项目名
// package.json
{
  "name": "00mypractice",
  "version": "0.0.0",
  "private": true,
  "scripts": {
    "start": "node ./bin/www"
  },
  "dependencies": {
    "cookie-parser": "~1.4.3",
    "debug": "~2.6.9",
    "express": "~4.16.0",
    "http-errors": "~1.6.2",
    "jade": "~1.11.0",
    "morgan": "~1.9.0"
  }
}
2.修改端口和启动输出
// bin/www
var port = normalizePort(process.env.PORT || "3001");

function onListening() {
  var addr = server.address();
  var bind = typeof addr === "string" ? "pipe " + addr : "port " + addr.port;
  debug("Listening on " + bind);
  console.log("服务器端已启动,监听 3001 端口...");
}
3.按照三层架构修改目录
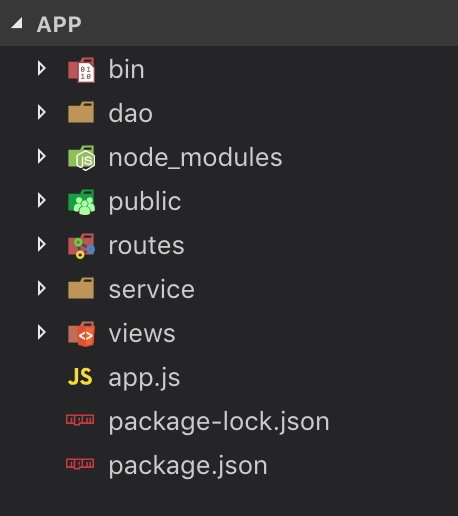
| 目录 | 含义 |
|---|---|
| routes | 表示层 |
| service | 业务逻辑层 |
| dao | 数据访问层 |
| public | 静态文件目录 |
1)移除模板引擎
- 删除 views 目录
- 删除 app.js 中对 views 目录的引用
2)全局安装 nodemon
npm i -g nodemon
nodemon npm start

# npm start # 需要配置启动脚本
- 配置启动脚本
"scripts": {
  "start": "nodemon -x npm run server",
  "server": "node ./bin/www"
}
4.连接 MySQL 数据库
1)安装 Sequelize 和 MySQL2 驱动
"dependencies": {
  "mysql2": "^2.3.3",
  "sequelize": "^6.13.0"
}
2)创建数据库并配置连接
// dao/dbConnect.js
const { Sequelize } = require("sequelize");

// 创建数据库连接
const sequelize = new Sequelize("mysite", "root", "123123", {
  host: "localhost",
  dialect: "mysql",
  logging: false,
});

module.exports = sequelize;

// 测试连接
(async () => {
  try {
    await sequelize.authenticate();
    console.log("Connection has been established successfully.");
  } catch (error) {
    console.error("Unable to connect to the database:", error);
  }
})();
3)入口文件引入数据库
// app.js
require("./dao/dbConnect");
5.提取配置信息到单独文件
1)安装第三方库
npm i dotenv
2)根目录新建环境变量文件
# .env
DB_NAME=mysite
DB_USER=root
DB_PASS=123123
DB_HOST=localhost
3)入口文件引入数据库
// app.js
// 默认读取项目根目录下的 .env 环境变量文件
require("dotenv").config();
// 引入数据库
require("./dao/dbConnect");
4)数据库配置文件中使用
const sequelize = new Sequelize(process.env.DB_NAME, process.env.DB_USER, process.env.DB_PASS, {
  host: process.env.DB_HOST,
  dialect: "mysql",
  logging: false,
});
(三)编写错误处理类
1.业务处理错误基类
// utils/errors.js

const { formatResponse } = require("./tool");
class ServiceError extends Error {
  /**
   * 构造函数
   * @param {String} message 错误消息
   * @param {Number} code 错误消息码
   */
  constructor(message, code) {
    super(message);
    this.code = code;
  }

  /**
   * 以JSON格式将错误信息响应给客户端
   */
  toResponseJSON() {
    return formatResponse(this.code, this.message, null);
  }
}
2.自定义错误
/**
 * 文件上传错误
 */
exports.UploadError = class extends ServiceError {
  constructor(message) {
    super(message, 413);
  }
};

/**
 * 禁止访问错误
 */
exports.ForbiddenError = class extends ServiceError {
  constructor(message) {
    super(message, 401);
  }
};

/**
 * 验证错误
 */
exports.ValidationError = class extends ServiceError {
  constructor(message) {
    super(message, 406);
  }
};

/**
 * 无资源错误
 */
exports.NotfoundError = class extends ServiceError {
  constructor() {
    super("Not found", 406);
  }
};

/**
 * 未知错误
 */
exports.UnknownError = class extends ServiceError {
  constructor() {
    super("Server internal error", 500);
  }
};

module.exports.ServiceError = ServiceError;
(四)实现登录功能
1.定义管理员数据模型
// dao/model/adminModel.js
const { DataTypes } = require("sequelize");
const sequelize = require("../dbConnect");

// 定义数据模型
module.exports = sequelize.define(
  "admin",
  {
    loginId: {
      type: DataTypes.STRING,
      allowNull: false,
    },
    name: {
      type: DataTypes.STRING,
      allowNull: false,
    },
    loginPwd: {
      type: DataTypes.STRING,
      allowNull: false,
    },
  },
  {
    freezeTableName: true,
    createdAt: false,
    updatedAt: false,
  },
);
2.初始化数据库
// dao/db.js
// 数据库连接实例
const sequelize = require("./dbConnect");

// 数据模型
const adminModel = require("./model/adminModel");

const md5 = require("md5");

(async () => {
  // 同步数据模型和数据表
  await sequelize.sync({
    alter: true,
  });

  // 同步完成后部分表生成初始化数据
  const adminCount = await adminModel.count();
  if (!adminCount) {
    // 该表没有数据
    await adminModel.create({
      loginId: "admin",
      name: "超级管理员",
      loginPwd: md5("123456"),
    });
    console.log("初始化管理员数据完毕...");
  }

  console.log("数据库数据同步完毕...");
})();
3.定义路由层
1)定义 API 接口
// routes/admin.js
const express = require("express");
const router = express.Router();

const { loginService } = require("../service/adminService");

// 管理员登录
router.post("/login", async (req, res, next) => {
  // 请求时会拼接 app.js 中的一级路由 —— /api/admin/login

  // 校验验证码
  if (req.body.captcha.toLowerCase() !== req.session.captcha.toLowerCase()) {
    throw new ValidationError("验证码错误");
  }

  const result = await loginService(req.body);
  console.log(result);
});

module.exports = router;
2)引入
- 要在初始化数据库后引入
// app.js
const adminRouter = require("./routes/admin");
app.use("/api/admin", adminRouter);
4.定义业务逻辑层
// service/adminService.js
const md5 = require("md5");

const { loginDao } = require("../dao/adminDao");

// 登录
module.exports.loginService = async (loginInfo) => {
  loginInfo.loginPwd = md5(loginInfo.loginPwd);

  // 数据验证 —— 查询数据库
  let data = await loginDao(loginInfo);
  if (data && data.dataValues) {
    // TODO 添加token
  }

  return {
    data,
  };
};
5.定义数据层
// dao/adminDao.js
const adminModel = require("./model/adminModel");

// 登录
module.exports.loginDao = async (loginInfo) => {
  return await adminModel.findOne({
    where: {
      loginId: loginInfo.loginId,
      loginPwd: loginInfo.loginPwd,
    },
  });
};
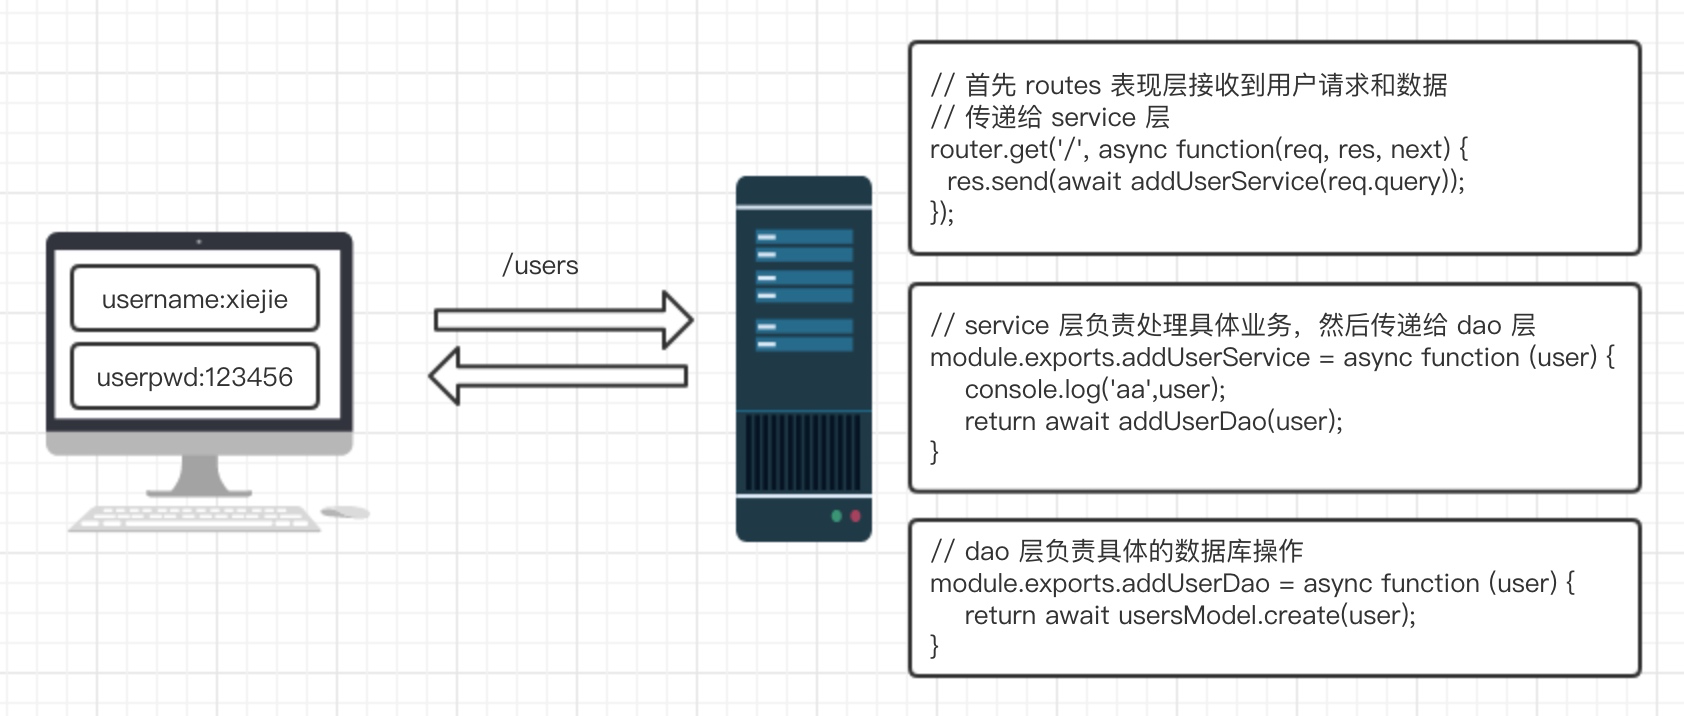
三层架构流程
- 客户端请求 API 接口
/api/admin/login - 先执行服务器路由层
routes/admin.js - 如果需要处理业务逻辑,转去执行业务逻辑层
service/adminService.js - 如果需要操作数据库,转去执行数据层
dao/adminDao.js - 数据层通过模型操作数据库
dao/model/adminModel.js - 最后数据从数据层依次返回到路由层,响应给客户端
(五)token 的生成和验证
1.安装第三方库
"dependencies": {
  "jsonwebtoken": "^8.5.1",
  "express-jwt": "^6.1.0"
}
2.完善登录业务逻辑
- 生成 token
module.exports.loginService = async (loginInfo) => {
  loginInfo.loginPwd = md5(loginInfo.loginPwd);

  // 数据验证 —— 查询数据库
  let data = await loginDao(loginInfo);
  if (data && data.dataValues) {
    // 添加token
    data = {
      id: data.dataValues.id,
      loginId: data.dataValues.loginId,
      name: data.dataValues.name,
    };
    // 是否登录七天
    const loginPeriod = loginInfo.remember ? +loginInfo.remember : 1;
    // 生成token
    const token = jwt.sign(data, md5(process.env.JWT_SECRET), {
      expiresIn: 24 * 60 * 60 * loginPeriod,
    });
    return {
      token,
      data,
    };
  }

  return {
    data,
  };
};
3.完善登录路由处理
1)定义格式化响应信息工具函数
// utils/tool.js
/**
 * 格式化响应信息
 * {
 *    "code": code,
 *    "msg": msg,
 *    "data": data
 * }
 */
module.exports.formatResponse = (code, msg, data) => {
  return {
    code,
    msg,
    data,
  };
};
2)路由层处理
const { formatResponse } = require("../utils/tool");
router.post("/login", async (req, res, next) => {
  // 请求时会拼接 app.js 中的一级路由 —— /api/admin/login

  // TODO 校验验证码

  const result = await loginService(req.body);
  if (result.token) {
    res.setHeader("authentication", result.token);
  }
  res.send(formatResponse(0, "", result.data));
});
3)验证 token
- 在路由中间件之前配置验证接口
- 如果验证失败,不会调用路由中间件
- 直接执行错误处理中间件
// app.js
const expressJWT = require("express-jwt");
// 引入路由
const adminRouter = require("./routes/admin");
// 配置验证token接口
app.use(
  expressJWT({
    secret: md5(process.env.JWT_SECRET),
    algorithms: ["HS256"], // 新版本express-jwt要求必须指定算法
  }).unless({
    // 需要排除token验证的路由
    path: [
      {
        url: "/api/admin/login",
        methods: ["POST"],
      },
    ],
  }),
);
// 使用路由中间件
app.use("/api/admin", adminRouter);
- 解析 token
// utils/tool.js
const jwt = require("jsonwebtoken");
const md5 = require("md5");
module.exports.analysisToken = (token) => {
  return jwt.verify(token.split(" ")[1], md5(process.env.JWT_SECRET));
};
- 路由层恢复登录
// routes/admin.js
const { analysisToken } = require("../utils/tool");
router.get("/whoami", async (req, res, next) => {
  // 解析token
  const token = analysisToken(req.get("Authorization"));
  res.send(
    formatResponse(0, "", {
      id: token.id,
      loginId: token.loginId,
      name: token.name,
    }),
  );
});
- 错误处理中间件
// app.js
const { ForbiddenError } = require("./utils/errors");
app.use(function (err, req, res, next) {
  if (err.name === "UnauthorizedError") {
    // token验证错误
    res.send(new ForbiddenError("未登录,或者登录凭证已过期").toResponseJSON());
  } else if (err instanceof ServiceError) {
    res.send(err.toResponseJSON());
  } else {
    res.send(new UnknownError().toResponseJSON());
  }
});
(六)完成管理员模块
1.定义更新管理员信息接口
router.put("/", async (req, res, next) => {
  res.send(await updateAdminService(req.body));
});
2.定义业务逻辑
module.exports.updateAdminService = async (accountInfo) => {
  // 根据传入的账号信息查询管理员
  const adminInfo = await loginDao({
    loginId: accountInfo.loginId,
    loginPwd: md5(accountInfo.oldLoginPwd),
  });
  if (adminInfo && adminInfo.dataValues) {
    // 修改密码
    const result = await updateAdminDao({
      loginId: accountInfo.loginId,
      loginPwd: md5(accountInfo.loginPwd),
      name: accountInfo.name,
    });
    return formatResponse(0, "", {
      id: adminInfo.dataValues.id,
      loginId: accountInfo.loginId,
      name: accountInfo.name,
    });
  } else {
    // 密码不正确
    throw new ValidationError("旧密码不正确");
  }
};
3.定义数据交互
module.exports.updateAdminDao = async (newInfo) => {
  return await adminModel.update(newInfo, {
    where: {
      loginId: newInfo.loginId,
    },
  });
};
4.express 捕获异步错误
- 安装第三方库
"dependencies": {
  "express-async-errors": "^3.1.1"
}
- app.js 引入
// 捕获异步错误
require("express-async-errors");
(七)制作验证码
1.获取验证码并保存到 session
// routes/captcha.js
router.get("/", async (req, res, next) => {
  // 生成验证码
  const captcha = await getCaptchaService();
  // 保存到session
  req.session.captcha = captcha.text;
  // 设置响应头
  res.setHeader("Content-Type", "images/svg+xml");
  res.send(captcha.data);
});
- 使用 session
// app.js
const session = require("express-session");
app.use(
  session({
    secret: process.env.SESSION_SECRET,
    resave: true,
    saveUninitialized: true,
  }),
);
2.生成验证码
// service/captchaService.js
const svgCaptcha = require("svg-captcha");
module.exports.getCaptchaService = async () => {
  return svgCaptcha.create({
    size: 4,
    ignoreChars: "iIl10Oo",
    noise: 6,
    color: true,
  });
};
(八)完成首页标语模块
(九)实现上传文件功能
1.工具函数
// utils/tool.js
const multer = require("multer");
const storage = multer.diskStorage({
  // 文件存储位置
  destination: function (req, file, cb) {
    cb(null, __dirname + "/../public/static/uploads");
  },
  // 处理上传文件的文件名
  filename: function (req, file, cb) {
    // 获取后缀名
    const extname = path.extname(file.originalname);
    // 获取文件名
    const basename = path.basename(file.originalname, extname);
    const newName = basename + new Date().getTime() + Math.floor(Math.random() * 9000 + 1000) + extname;
    cb(null, newName);
  },
});
module.exports.uploading = multer({
  storage,
  limits: {
    fileSize: 2 * 1024 * 1024,
    files: 1,
  },
});
2.API 接口
const multer = require("multer");
const { UploadError } = require("../utils/errors");
const { uploading, formatResponse } = require("../utils/tool");

router.post("/", async (req, res, next) => {
  // 参数是前端上传控件的name值
  const upload = uploading.single("file");
  upload(req, res, (err) => {
    if (err instanceof multer.MulterError) {
      next(new UploadError("上传文件失败,请检查文件大小,控制在2MB内"));
    }
    res.send(formatResponse(0, "", "/static/uploads/" + req.file.filename));
  });
});
(十)完成文章类型模块
1.安装验证第三方库
"dependencies": {
  "validate.js": "^0.13.1"
}
2.业务逻辑层验证数据
// service/blogTypeService.js
const { validate } = require("validate.js");

// 新增博客分类
module.exports.addBlogTypeService = async (newBlogTypeInfo) => {
  // 数据验证规则
  const blogTypeRule = {
    name: {
      presence: {
        allowEmpty: false,
      },
      type: "string",
    },
    order: {
      presence: {
        allowEmpty: false,
      },
      type: "string",
    },
  };
  // 进行数据验证
  const validateResult = validate.validate(newBlogTypeInfo, blogTypeRule);
  if (!validateResult) {
    // 验证通过
    newBlogTypeInfo.articleCount = 0; // 因为是新增的文章分类,所以一开始文章数量为 0
    const data = await addBlogTypeDao(newBlogTypeInfo);
    return formatResponse(0, "", data);
  } else {
    // 验证失败
    throw new ValidationError("数据验证失败");
  }
};
(十一)完成文章模块
1.定义模型之间的关联关系
// dao/db.js
const blogTypeModel = require("./model/blogTypeModel");
const blogModel = require("./model/blogModel");

(async () => {
  // 定义模型之间的关联关系
  blogTypeModel.hasMany(blogModel, {
    foreignKey: "categoryId",
    targetKey: "id",
  });
  blogModel.belongsTo(blogTypeModel, {
    foreignKey: "categoryId",
    targetKey: "id",
    as: "category",
  });
  console.log("数据库数据同步完毕...");
})();
2.扩展验证规则
// service/blogService.js
const { validate } = require("validate.js");

validate.validators.categoryIdIsExist = async (value) => {
  const blogTypeInfo = blogTypeModel.findByPk(value);
  if (blogTypeInfo) {
    return;
  }
  return "CategoryId Is Not Exist";
};
3.异步验证
// service/blogService.js
module.exports.addBlogService = async (newBlogInfo) => {
  // TODO 处理 TOC

  // 将处理好的TOC格式转为字符串
  newBlogInfo.toc = JSON.stringify('["a":"b"]');

  // 初始化新文章的其他信息
  newBlogInfo.scanNumber = 0; // 阅读量初始化为 0
  newBlogInfo.commentNumber = 0; // 评论数初始化为 0

  // 定义验证规则
  const blogRule = {
    // ......
    categoryId: {
      presence: true,
      type: "integer",
      categoryIdIsExist: true,
    },
  };

  // 验证数据
  try {
    // 因为扩展的验证规则里面涉及到异步的操作,所以要采用异步的验证方式
    await validate.async(newBlogInfo, blogRule);
    const data = await addBlogDao(newBlogInfo); // 新增
    // 文章新增了,对应的文章分类也应该新增
    await addBlogToType(newBlogInfo.categoryId);
    return formatResponse(0, "", data);
  } catch (e) {
    // 验证未通过
    throw new ValidationError("数据验证失败");
  }
};
4.根据 id 新增文章分类
// dao/blogTypeDao.js
module.exports.addBlogToType = async (id) => {
  const data = await blogTypeModel.findByPk(id);
  data.articleCount++;
  await data.save();
  return;
};
(十二)处理 TOC 目录
1.安装第三方库
"dependencies": {
  "markdown-toc": "^1.2.0"
}
2.定义业务逻辑
// service/blogService.js
module.exports.addBlogService = async (newBlogInfo) => {
  // 处理TOC
  newBlogInfo = handleTOC(newBlogInfo);
  // 将处理好的TOC格式转为字符串
  newBlogInfo.toc = JSON.stringify(newBlogInfo.toc);

  // ......
};
3.定义工具函数
// utils/tool.js
const toc = require("markdown-toc");
module.exports.handleTOC = (info) => {
  let result = toc(info.markdownContent).json;

  // 经过上面 toc 方法的处理,就将整个 markdown 里面的标题全部提取出来了
  // 形成一个数组,数组里面是一个个对象,每个对象记录了标题的名称以及等级,如下:

  // [
  //     { content: '数值类型概述', slug: '数值类型概述', lvl: 2, i: 0, seen: 0 },
  //     { content: '整数和浮点数', slug: '整数和浮点数', lvl: 3, i: 1, seen: 0 },
  //     { content: '数值精度', slug: '数值精度', lvl: 4, i: 2, seen: 0 },
  //     { content: '数值范围', slug: '数值范围', lvl: 3, i: 3, seen: 0 },
  //     { content: '数值的表示方法', slug: '数值的表示方法', lvl: 2, i: 4, seen: 0 }
  // ]

  // 但是这不是我们想要的格式,我们想要转换为
  // [
  //     { "name": "章节1", "anchor": "title-1" },
  //     { "name": "章节2", "anchor": "title-2",
  //         "children": [
  //             { "name": "章节2-1", "anchor": "title-2-1" },
  //             { "name": "章节2-2", "anchor": "title-2-2" },
  //         ]
  //     }
  // ]

  // 转换格式
  const transfer = (flatArr) => {
    const stack = [],
      result = [];

    // 创建toc对象
    const createTOCItem = (item) => ({
      name: item.content,
      author: item.slug,
      level: item.lvl,
      children: [],
    });

    // 处理toc子级对象
    const handleTOCItem = (item) => {
      // stack为空返回undefined,stack不为空则返回最后一个元素【栈顶】
      const top = stack[stack.length - 1];
      if (!top) {
        stack.push(item);
      } else if (item.level > top.level) {
        // toc等级比栈顶(上一个toc对象)大,应该成为上一个toc对象的子级
        top.children.push(item);
        stack.push(item);
      } else {
        stack.pop();
        handleTOCItem(item);
      }
    };

    // 标题最小级别
    let min = 6;
    // 寻找最小级别的标题
    for (const i of flatArr) {
      if (i.lvl < min) min = i.lvl;
    }

    for (const item of flatArr) {
      const tocItem = createTOCItem(item);
      if (tocItem.level === min) {
        // 当前目录不会是children
        result.push(tocItem);
      }
      // 有可能是其他目录的子级
      handleTOCItem(tocItem);
    }

    return result;
  };

  info.toc = transfer(result);

  delete info.markdownContent;

  // 为各个级别的标题添加id
  for (const i of result) {
    let newStr = "";
    switch (i.lvl) {
      case 1:
        newStr = `<h1 id="${i.slug}">`;
        info.htmlContent = info.htmlContent.replace("<h1>", newStr);
        break;
      case 2:
        newStr = `<h2 id="${i.slug}">`;
        info.htmlContent = info.htmlContent.replace("<h2>", newStr);
        break;
      case 3:
        newStr = `<h3 id="${i.slug}">`;
        info.htmlContent = info.htmlContent.replace("<h3>", newStr);
        break;
      case 4:
        newStr = `<h4 id="${i.slug}">`;
        info.htmlContent = info.htmlContent.replace("<h4>", newStr);
        break;
      case 5:
        newStr = `<h5 id="${i.slug}">`;
        info.htmlContent = info.htmlContent.replace("<h5>", newStr);
        break;
      case 6:
        newStr = `<h6 id="${i.slug}">`;
        info.htmlContent = info.htmlContent.replace("<h6>", newStr);
        break;
    }
  }

  return info;
};
(十三)完成项目管理模块
(十四)完成评论管理和留言板模块
1.随机生成头像地址
// service/messageService.js
const fs = require("fs");
const dir = "./public/static/avatar";

/**
 * 读取一个目录下有多少个文件
 * @param {*} dir 目录地址
 */
const readDirLength = async (dir) => {
  return new Promise((resolve) => {
    fs.readdir(dir, (err, files) => {
      if (err) throw new UnknownError();
      resolve(files);
    });
  });
};

// 新增评论或者留言
module.exports.addMessageService = async (newMessage) => {
  // 数据验证规则
  const messageRule = {
    nickname: {
      presence: {
        allowEmpty: false,
      },
      type: "string",
    },
    content: {
      presence: {
        allowEmpty: false,
      },
      type: "string",
    },
    blogId: {
      type: "string",
    },
  };

  // 进行数据验证
  const validateResult = validate.validate(newMessage, messageRule);
  if (!validateResult) {
    newMessage.blogId = newMessage.blogId ? newMessage.blogId : null;
    newMessage.createDate = Date.now();
    // 有一个头像的地址,该头像是随机生成的
    // 读取 static 下面的 avatar 目录
    const files = await readDirLength(dir);
    // 随机摇一个文件出来
    const randomIndex = Math.floor(Math.random() * files.length);
    newMessage.avatar = "/static/avatar/" + files[randomIndex];
    // 接下来开始新增
    const data = await addMessageDao(newMessage);
    // 如果是文章的评论,那么对应文章的评论数量也要自增
    if (newMessage.blogId) {
      const blogData = await findBlogByIdDao(newMessage.blogId);
      blogData.commentNumber++;
      await blogData.save();
    }
    return formatResponse(0, "", data);
  } else {
    throw new ValidationError("数据验证失败");
  }
};
2.分页获取评论或留言
// dao/messageDao.js
module.exports.findMessageByPageDao = async (pageInfo) => {
  // 如果有 blogid,说明是获取对应 blogid 的文章评论,如果没有,说明是获取留言
  if (pageInfo.blogid) {
    // 这边又分为两种情况,获取所有的文章评论,还有一种就是获取对应文章的评论
    if (pageInfo.blogid === "all") {
      // 返回所有评论
      return await messageModel.findAndCountAll({
        offset: (pageInfo.page * 1 - 1) * pageInfo.limit,
        limit: pageInfo.limit * 1,
        where: {
          blogId: {
            [Op.ne]: null,
          },
        },
        include: [
          {
            model: blogModel,
            as: "blog",
          },
        ],
      });
    } else {
      // 返回对应文章的评论
      return await messageModel.findAndCountAll({
        offset: (pageInfo.page * 1 - 1) * pageInfo.limit,
        limit: pageInfo.limit * 1,
        where: {
          blogId: pageInfo.blogid * 1,
        },
        order: [["createDate", "DESC"]],
      });
    }
  } else {
    // 获取留言
    return await messageModel.findAndCountAll({
      offset: (pageInfo.page * 1 - 1) * pageInfo.limit,
      limit: pageInfo.limit * 1,
      where: {
        blogId: null,
      },
      order: [["createDate", "DESC"]],
    });
  }
};
(十五)完成全局设置和关于模块
(十六)完善项目细节
1.删除文章时删除相应的评论
- blogService.js
module.exports.deleteBlogService = async (id) => {
  // 根据 id 查询到该篇文章的信息
  const data = await findBlogByIdDao(id);
  // 根据该文章对应的分类,该分类下的文章数量自减
  const categoryInfo = await findOneBlogTypeDao(data.dataValues.categoryId);
  categoryInfo.articleCount--;
  await categoryInfo.save();
  // 删除该文章下所对应的评论
  await deleteMessageByBlogIdDao(id);
  // 删除文章
  await deleteBlogDao(id);
  return formatResponse(0, "", true);
};
- messageDao.js
// 删除评论(传入的 id 是 message 表中的 blogId)
module.exports.deleteMessageByBlogIdDao = async (blogId) => {
  return await messageModel.destroy({
    where: {
      blogId,
    },
  });
};
2.删除博客分类时返回受影响的文章数量
- blogTypeService.js
module.exports.deleteBlogTypeService = async (id) => {
  const count = await blogCountByBlogType(id);
  await deleteBlogTypeDao(id);
  // 返回受影响的文章的数量
  return formatResponse(0, "", count);
};
- blogDao.js
// 根据博客类别 id,统计对应该博客类型 id 的博文数量
module.exports.blogCountByBlogType = async (categoryId) => {
  return await blogModel.count({
    where: {
      categoryId,
    },
  });
};
3.修改文章时判断是否修改了博客分类
- blogService.js
module.exports.updateBlogService = async (id, newBlogInfo) => {
  // 判断正文内容有没有改变,会影响 TOC
  if (newBlogInfo.htmlContent) {
    // 重新处理 TOC 目录
    newBlogInfo = handleTOC(newBlogInfo);
    newBlogInfo.toc = JSON.stringify(newBlogInfo.toc);
  }

  // 判断博客分类有没有修改,如果有修改,之前的文章分类对应的文章数量要自减,新的文章分类对应的文章数量要自增
  const { dataValues: oldBlogInfo } = await findBlogByIdDao(id);
  if (newBlogInfo.categoryId !== oldBlogInfo.categoryId) {
    // 旧的自减
    if (oldBlogInfo.categoryId) {
      const oldBlogType = await findOneBlogTypeDao(oldBlogInfo.categoryId);
      oldBlogType.articleCount--;
      await oldBlogType.save();
    }

    // 新的自增
    const newBlogType = await findOneBlogTypeDao(newBlogInfo.categoryId);
    newBlogType.articleCount++;
    await newBlogType.save();
  }

  const { dataValues } = await updateBlogDao(id, newBlogInfo);
  return formatResponse(0, "", dataValues);
};