四、设计模式
大约 28 分钟约 8427 字
(一)简介
推荐书籍:《JS 设计模式》、《JS 模式》
- Design Pattern,设计模式
- 是一套被反复使用、多数人知晓的、经过分类的代码设计经验的总结
1.模式
- 指从生产经验和生活经验中经过抽象和升华提炼出来的核心知识体系
- 即解决某一类问题的方法论
2.目的
- 为了提高代码可重用性,让代码更容易被理解,保证代码可靠性
- 使代码编写真正实现工程化
- 是软件工程的基石脉络,类似大厦的结构
- 经典例子:高斯求和
(二)类型
1.创建型
- 研究高效地创建对象
| 名称 | 英文 |
|---|---|
| 单例模式 | Singleton Pattern |
| 抽象工厂模式 | Abstract Factory Pattern |
| 建造者模式 | Builder Pattern |
| 工厂模式 | Factory Pattern |
| 原型模式 | Prototype Pattern |
2.结构型
- 设计对象的结构和关系
| 名称 | 英文 |
|---|---|
| 适配器模式 | Adapter Pattern |
| 桥接模式 | Bridge Pattern |
| 装饰模式 | Filter、Criteria Pattern |
| 组合模式 | Composite Pattern |
| 外观模式 | Facade Pattern |
| 享元模式 | Flyweight Pattern |
| 代理模式 | Proxy Pattern |
3.行为型
- 设计对象的行为
| 名称 | 英文 |
|---|---|
| 模板方法模式 | Template Pattern |
| 命令模式 | Command Pattern |
| 迭代器模式 | Iterator Pattern |
| 观察者模式 | Observer Pattern |
| 中介者模式 | Mediator Pattern |
| 备忘录模式 | Memento Pattern |
| 解释器模式 | Interpreter Pattern |
| 状态模式 | State Pattern |
| 策略模式 | Strategy Pattern |
| 职责链模式 | Chain of Responsibility Pattern |
| 访问者模式 | Visitor Pattern |
(三)六大原则
- 减少耦合,增强复用性,降低代码的开发、维护、扩展成本
1.耦合关系
- 指某两个事物之间一种相互作用、相互影响的关系
1)复杂度高
- 代码质量不高
- 可维护性差
- 复用性差
- 不易扩展
2)耦合度
- 不可能没有耦合度
- 最合理为低耦合度
- 耦合度过高不易维护
- 但依旧有良好的复用性和扩展性
开发流程
- 优先降低复杂度,尽量降低耦合度
- 利用单一职责原则、开闭原则、里氏代换原则降低复杂度
- 利用迪米特法则减少耦合度
- 利用依赖倒置原则消除可以没有的耦合
2.单一职责原则 SRP
- Single Responsibility Principle
- 一个方法只做一件事情
- 如:请求数据的函数不应该渲染函数
3.开闭原则 OCP
- Open Closed Principle
- 一个软件实体(类、模块、函数)应该面向扩展开放,面向修改关闭,同时增强代码复用性
- 如:JQuery 的 Extend
const validator = new Validator();
validator.extend({});
4.里氏代换原则 LSP
- Liskov Substitution Principle
- 任何基类可以出现的地方,子类一定可以出现
- 即:子类可以扩展父类的功能,但不能改变父类原有的功能
- 一个父类可以访问的接口,当父类忙于处理其他逻辑时,可以由子类访问
5.迪米特法则 LOD / 最少知识原则 LKP
- Law of Demeter / Least Knowledge Principle
- 一个接口和一个方法,传入的参数越少越好
- 形成的关联越少越好,依赖最少
- 降低耦合度,同时也降低复杂度
6.依赖倒置原则 DIP
- Dependency Inversion Principle
- 依赖接口,不依赖方法
- 不关注底层,只需要知道表现
- 最常用的原则
- 降低耦合度
- 前端应用中可以理解为多者之间依赖状态,而不依赖彼此
- 如:定义全局变量
- JS 中没有接口的概念
7.接口分离原则 ISP
- Interface Segregation Principle
- 将大接口拆分为小接口
- 不能一个接口全部实现增删改查
- 降低耦合度
8.合成/聚合复用原则 CARP【扩展】
- 也叫合成复用原则,Composite Reuse Principle, CRP
- 尽量使用合成/聚合,而不是通过继承达到复用的目的
- 在一个新的对象里使用一些已有的对象,使之成为新对象的一部分
- 新的对象通过向内部持有的这些对象的委派达到复用已有功能的目的
- 而不是通过继承来获得已有的功能
- 聚合
- 表示一种弱的"拥有"关系,一般表现为松散的整体和部分的关系
- 所谓整体和部分也可以是完全不相关的
- 如:A 对象持有 B 对象,B 对象并不是 A 对象的一部分
- 也就是 B 对象的生命周期是 B 对象自身管理,和 A 对象不相关
- 合成
- 表示一种强的"拥有"关系,一般表现为严格的整体和部分的关系
- 部分和整体的生命周期是一样的
9.总结
| 标记 | 原则 | 简单定义 |
|---|---|---|
| SRP | 单一职责原则 | 一个类只负责一个功能领域中的相应职责 |
| OCP | 开闭原则 | 对扩展开放,对修改关闭 |
| LSP | 里氏代换原则 | 所有引用基类的地方必须能透明地使用其子类的对象 |
| LOD | 迪米特法则 | 一个软件实体应当尽可能少的与其他实体发生相互作用 |
| DIP | 依赖倒置原则 | 依赖于抽象,不能依赖于具体实现 |
| ISP | 接口分离原则 | 类之间的依赖关系应该建立在最小的接口上 |
| CARP | 合成/聚合复用原则 | 尽量使用合成/聚合,而不是通过继承达到复用的目的 |
代码是一团乱麻,先靠 单一、开闭、里氏 分成多块,通过 最小知道 弱化关系,最后需要 依赖倒置 把消除没必要的耦合
先原则,再模式
- 原则是理论,模式是在理论上的具体方式
- 代码质量的高低是素质,学会权衡才是高价值的开发经验
我希望并建议你考试 100 分,但都是理论,具体还需要落在实际方式方法上
但不可以只追求理论,其中有时间成本问题,用更多时间去玩还能保证不低的分数也是可以的
(四)UML
1.简介
- Unified Modeling Language,标准建模语言
- 用于对软件密集系统进行可视化建模的语言
- 在开发阶段,说明、可视化、构建和书写一个面向对象软件密集系统的制品的开放方法
开发软件系统如建筑,代码是砖头,用于实现功能,但也需要设计图纸
UML 是写设计图纸的语言,专业人士可以通过图纸沟通理解
2.应用
1)场景
- 系统前期设计时,会用于进行专业性的方案讨论
- 日常开发中设计系统功能时,可以通过 UML 描述
- 有几个接口,涉及几个类,关联性、状态如何,顺序流程等等
2)步骤
- 确定系统边界
- 功能
- 确定使用者
- 用户
- 画用例图
- 画活动图
- 强调流程
- 画时序图
- 强调时间和层次
- 用于复杂项目中
- 画状态图
- 体现重要实例在事件触发时状态的切换
- 画类图
- 精细化部分重要类
3)三大流派
- Booch 画法、James Rumbaugh、Jacobson 雅各布森
- James Rumbaugh 最后同意了 UML 过程
- UML 建模过程叫 UP
- RUP 优化了 UML 统一建模语言
3.用例图
- 用例
- 用户对系统可以做的事、产生的行为
- 目的在于需求捕获、测试依据
4.状态图
- 描述实体对象不同状态的转化
- A 状态->B 状态需要触发什么事件
- 目的在于梳理触发事件
- 图中的每一个方块都是名词,代表状态
5.活动图
- 描述一个具体的流程
- 本质就是流程图
- 图中的每一个方块都是动词,代表动作
6.时序图
- 描述对象之间发送消息的时间顺序
- 目的在于显示多个对象之间的层次和动态协作
7.类图
| 关系 | 图示 |
|---|---|
| 继承关系 | 实线空三角 |
| 实现关系 | 虚线空三角 |
| 关联关系 | 一条实线 或 三线箭头 |
| 聚合关系 | 以三线箭头开始,以空心菱形结束 |
| 组合关系 | 以三线箭头开始,以实心菱形结束 |
| 依赖关系 | 虚线三线箭头 |
(五)设计模式详解
适用场景
- 业务复杂达到一定程度才选用设计模式去解决复杂的问题
- 扩展性和复用性要求低、冗余度小的情况下没必要使用
- 反模式
- 不能滥用模式,有时候仅仅是给代码增加了复杂度
1.单例模式
1)定义
- 保证一个类中仅有一个实例,并提供一个访问它的全局访问点
- 在数学和逻辑学中,Singleton 表示 有且仅有一个元素的集合
- 核心结构中只包含一个特殊类(单例)
- 通过单例模式,可以保证系统中每一个应用该模式的类只有一个实例
- 即:一个类只有一个对象实例
- 如:页面中只有一个弹框,只控制其显示隐藏、替换文本即可
- 通过闭包实现
- 一个函数内部的一个函数称为闭包
2)代码实现一:返回构造函数的属性
- 违背了开闭原则
- 可以随意更改该属性
function Test(name) {
  // let this = Object.create(Test.prototype);

  if (typeof Test.instance === "object") {
    // 不是首次创建
    return Test.instance;
  }
  this.name = name;
  // 将首次创建的Test实例永久保存
  Test.instance = this;

  // return this;
}

const a = new Test("one");
const b = new Test();
console.log(a === b); // true

const a = new Test("one");
// 可以随意更改,不符合开闭原则
Test.instance = {};
const b = new Test();
console.log(a === b); // false
3)代码实现二:使用闭包函数
- 丢失了原型链
// Test在GO中
function Test(name) {
  // 首次调用Test创建的实例
  // AO => instance === this
  const instance = this;

  this.name = name;

  // 由于Test本身在GO中,所以该方法将闭包保存到了全局
  // 首次创建后全局的Test函数直接返回instance
  Test = function () {
    return instance;
  };
}

const a = new Test();
const b = new Test();
const c = new Test();
console.log(a === b, b === c); // true true

const a = new Test();
// 构造函数都是一开始GO中的Test,添加的lastName也是在一开始这个Test的原型链上,首次调用后执行的闭包Test没有lastName属性
Test.prototype.lastName = "D";
const b = new Test();
const c = new Test();
console.log(a.lastName, b.lastName); // undefined undefined
4)代码实现三:使用闭包函数【完美】
- 使用闭包函数,每次仅返回同一个函数
圣杯模式
- 圣杯:希望得到永生的对象
- JS 中可以永生的对象:全局变量、闭包
const Test = (function () {
  let instance;
  return function (name) {
    if (typeof instance === "object") {
      return instance;
    }
    instance = this;
    this.name = name;
  };
})();

const a = new Test();
Test.prototype.lastName = "A";
const b = new Test();
console.log(a === b, a.lastName, b.lastName); // true 'A' 'A'
5)代码实现四:转换为单例模式【高级】
<button id="oBtn">login</button>
a)非单例模式
- 频繁创建、移除 DOM 元素
- 影响重排重绘
const createAlert = function (text) {
  const oDiv = document.createElement("div");
  oDiv.innerText = text;
  oDiv.style.display = "none";
  document.body.appendChild(oDiv);
  return oDiv;
};

const oButton = document.getElementById("oBtn");
oButton.onclick = function () {
  const thisDiv = createAlert("Hello Duyi");
  thisDiv.style.display = "block";
};
b)单例模式一
- 只返回同一个 DOM 元素
- 全局只可以用一次
const singleAlert = (function () {
  let oDiv = null;
  return function (text) {
    if (oDiv) {
      return oDiv;
    }
    oDiv = document.createElement("div");
    oDiv.innerText = text;
    oDiv.style.display = "none";
    document.body.appendChild(oDiv);
    return oDiv;
  };
})();

const oButton = document.getElementById("oBtn");
oButton.onclick = function () {
  const thisDiv = singleAlert("Hello Duyi");
  thisDiv.style.display = "block";
};
c)单例模式二
- 全局可以用多次
- 将不是单例模式的函数转换为单例模式
// 多个非单例模式的函数
const createAlert = function (text) {
  const oDiv = document.createElement("div");
  oDiv.innerText = text;
  oDiv.style.display = "none";
  document.body.appendChild(oDiv);
  return oDiv;
};
// const createIframe = function () {}
// ....

// 转换为单例模式的函数
const getSingleFunc = function (func) {
  let result = null;
  return function () {
    if (!result) {
      result = func.apply(this, arguments);
    }
    return result;
  };
};

const singleAlert = getSingleFunc(createAlert);
// const singleFrame = getSingleFunc(createFrame);

const oButton = document.getElementById("oBtn");
oButton.onclick = function () {
  const thisDiv = singleAlert("Hello Duyi");
  thisDiv.style.display = "block";
};
最终实现
export default {
  singleTon(fn) {
    let res = null;
    return (...args) => {
      if (!res) res = fn.apply(this, args);
      return res;
    };
  },
};
2.代理模式
1)定义
- 为一个对象提供一种代理,用于控制对这个对象的访问
- 代理对象起到类似中介的作用
- 用户访问的是代理对象
- 代理对象对请求做出一些处理后,再把请求转交给本体对象
- 会增加一些功能
- 如:校验、合并等等
- 会去掉一些原有对象的功能
- 会增加一些功能
/**
 * 举个例子
 */
const mrDeng = {
  sendFlower: function (target) {
    const flower = "sunflower";
    target.receiveFlower(flower);
  },
};

// 代理人 利用原有对象的功能 加上 自己额外的部分 去和 要访问的对象 互动
const cheng = {
  proxyFlower: function (target) {
    this.listenMood(target, function () {
      mrDeng.sendFlower(target);
    });
  },
  listenMood: function (target, cb) {
    const timer = setInterval(function () {
      if (target.mood) {
        cb();
        clearInterval(timer);
      }
    }, 500);
  },
};

const goddess = {
  mood: null,
  receiveFlower: function (flower) {
    console.log(this.mood ? "ok" : "get out");
  },
  changeMood: function () {
    this.mood = Math.random() > 0.8 ? true : false;
  },
  createMood: function () {
    this.changeMood();
    const self = this;
    setInterval(function () {
      self.changeMood();
    }, 300);
  },
};
goddess.createMood();

// // 不保准,可能成功可能失败
// mrDeng.sendFlower(goddess);

// 只有女神心情好的时候才送花
cheng.proxyFlower(goddess);
2)虚拟代理
- 将一些开销很大的对象,延迟到真正需要它的时候再创建执行
- 应用
- 图片懒加载
- 预加载:待渲染大图未加载完成前先渲染的小图
- 懒加载:监控大图是否加载完成,完成即替换预加载的小图
- 优点:提高用户体验的同时,减少对性能的消耗
- 文件上传
- 图片懒加载
<!-- 图片懒加载 -->
<div id="demo"></div>
<style>
  #demo {
    display: inline-block;
    border: 1px solid;
    width: 100%;
  }
  #demo img {
    width: 100%;
    height: 100%;
    object-fit: contain;
  }
</style>
<script>
  const MyImage = function (id) {
    const oImg = new Image();
    this.setSrc = function (src) {
      oImg.src = src;
    };
    document.getElementById(id).appendChild(oImg);
  };

  // const oMyImage = new MyImage("demo");
  // oMyImage.setSrc("https://yuziikuko.gitee.io/logo.png");

  const ProxyImage = (function () {
    const oMyImage = new MyImage("demo");
    const oNewImage = new Image();

    // 请求图片成功
    oNewImage.onload = function () {
      setTimeout(() => {
        oMyImage.setSrc(oNewImage.src);
      }, 2000);
    };

    return function (occupySrc, src) {
      // 先渲染占位小图
      oMyImage.setSrc(occupySrc);
      // 请求要渲染的大图
      oNewImage.src = src;
    };
  })();

  ProxyImage(
    "https://img1.baidu.com/it/u=1827916190,1810617224&fm=253&fmt=auto&app=138&f=GIF?w=171&h=171",
    "https://img2.baidu.com/it/u=3009795247,2906968078&fm=253&fmt=auto&app=138&f=JPEG?w=889&h=500",
  );
</script>
3)安全代理/保护代理
- 控制真实对象的访问权限,起到保护作用
- 应用
- 登录后才能查看所有功能
- 前端校验,过滤不必要的请求
- 如:验证用户名是否唯一
4)远程代理
- 一个对象将不同空间的对象进行局部代理
- 应用
- 监控多个对象的状态
- 总机监控分店
5)智能代理
- 调用对象代理处理另外一些事情,提供额外的服务
- 应用
- 垃圾回收机制
- 火车站代售处
代理模式的本质
保护和中介
3.策略模式
1)定义
- 指对一系列的算法定义,并将每一个算法封装起来,使其可以相互替换
- 让算法独立于它的使用者,并且能独立变化
2)特点
- 提供了管理相关算法族的办法
- 支持在运行时选择算法
- 提供了可以替换继承关系的办法
- 可以避免使用多重条件转移语句
4.场景 —— 表单验证
- 需求
- 用户名长度不能超过四个
- 密码不能为空 密码长度不能小于 6
<div>
  用户名:
  <input id="userDom" name="username" type="text" />
  <span id="showUser"></span>

  密码:
  <input id="psDom" name="code" type="password" />
  <span id="showPs"></span>

  邮箱:
  <input id="emDom" name="email" type="text" />
  <span id="showEm"></span>

  <button id="submit">提交</button>
</div>
1)写法一:普通函数
- 绑定的函数比较庞大,包含许多 if-else,需要覆盖所有的校验规则
- 绑定的函数缺乏弹性,如果校验规则有变化还需要进一步判断
- 绑定的函数的内部实现违背了开放封闭原则
- 绑定的函数复用性差,如果另一个表单也需要类似的校验,还需要复制后修改
// 先假定 数据是可以发送成功的
let flag = true;
submit.onclick = function () {
  showUser.innerText = "";
  showPs.innerText = "";
  if (userDom.value == "") {
    flag = false;
    showUser.innerText = "用户名不能为空";
  } else if (userDom.value.length >= 4) {
    flag = false;
    showUser.innerText = "用户名长度不能大于等于4";
  }

  if (psDom.value == "") {
    flag = false;
    showPs.innerText = "密码不能为空";
  } else if (psDom.value.length < 6) {
    flag = false;
    showPs.innerText = "密码不能小于6";
  }

  if (flag) Request();
};

function Request() {
  console.log("send");
}
2)写法二:结合代理模式和策略模式
a)封装 Validator.js
- 用一个类对象实例来管理规则的校验
- 该对象需要主动添加对规则的相应处理办法
- 校验数据时可以返回相关信息
- 通常封装成第三方库
/**
 * ==============================
 * 自定义验证类 Validator.js
 * 用作第三方库
 * ==============================
 */
function Validator() {
  // 缓存校验方法
  this.cache = [];
  // 保存所有显示错误提示的DOM元素
  this.warnDom = [];
}

/**
 * 定义校验规则策略
 */
Validator.prototype.strategies = {
  isNonEmpty: function (value, errorMsg) {
    if (value === "") return errorMsg;
    return true;
  },
  maxLength: function (value, length, errorMsg) {
    if (value !== "" && value.length > length) return errorMsg;
    return true;
  },
  minLength: function (value, length, errorMsg) {
    if (value !== "" && value.length < length) return errorMsg;
    return true;
  },
};

/**
 * 定义 add 方法,用于添加校验规则
 * @param {HTMLElement} dom 要校验内容的DOM元素
 * @param {HTMLElement} showDom 显示错误信息的DOM元素
 * @param {Array} rules 自定义的校验规则
 * {
 *    strategy: 'isNonEmpty',
 *    errorMsg: '用户名不为空'
 * }, {
 *    strategy: "maxLength:4",
 *    errorMsg: "用户名长度不能超过4"
 * }
 */
Validator.prototype.add = function (dom, showDom, rules) {
  const self = this;
  this.warnDom.push(showDom);
  rules.forEach(function (ele, index) {
    self.cache.push(function () {
      // arr => [['isNonEmpty'], ['maxLength', '4']]
      const arr = ele.strategy.split(":");

      // arr => [[], ['4']]
      // type => ['isNonEmpty', 'maxLength']
      const type = arr.shift();

      // arr => [[dom.value], [dom.value, '4']]
      arr.unshift(dom.value);
      // arr => [[dom.value, ele.errorMsg], [dom.value, '4', ele.errorMsg]]
      arr.push(ele.errorMsg);

      const msg = self.strategies[type].apply(self, arr);
      if (msg !== true) showDom.innerText = msg;
      return msg;
    });
  });
};

/**
 * 定义 start 方法,用于开始校验,返回真正的校验结果
 */
Validator.prototype.start = function () {
  // 标记最终校验结果是否通过
  let flag = true;

  // 清空错误提示文本
  this.warnDom.forEach(function (ele) {
    ele.innerText = "";
  });

  // cache中保存了add方法里添加的所有校验规则
  this.cache.forEach(function (validate) {
    if (validate() !== true) {
      flag = false;
    }
  });

  return flag;
};

/**
 * 定义 extend 方法,用于扩展校验规则算法
 * @param {Object} config 规则对象
 * {
 *    isMail: function () {}
 * }
 */
Validator.prototype.extend = function (config) {
  for (const prop in config) {
    Validator.prototype.strategies[prop] = config[prop];
  }
};
b)使用封装库
<script src="./Validator.js"></script>
<script>
  /**
   * ==============================
   * 用户引入第三方库后,通过实例对象使用封装好的方法
   * ==============================
   */
  const validator = new Validator();

  // 扩展校验规则
  validator.extend({
    isEmail: function (value, errorMsg) {
      if (value !== "" && value.indexOf("@") == -1) {
        return errorMsg;
      }
      return true;
    },
    isPhone: function (value, errorMsg) {
      if (value !== "" && value.length != 11) {
        return errorMsg;
      }
      return true;
    },
  });

  const ProxyRequest = (function () {
    validator.add(userDom, showUser, [
      {
        strategy: "isNonEmpty",
        errorMsg: "用户名不为空",
      },
      {
        strategy: "maxLength:4",
        errorMsg: "用户名长度不能超过4",
      },
    ]);
    validator.add(psDom, showPs, [
      {
        strategy: "isNonEmpty",
        errorMsg: "密码不能为空",
      },
      {
        strategy: "minLength:6",
        errorMsg: "密码长度不能小于6",
      },
    ]);
    validator.add(emDom, showEm, [
      {
        strategy: "isNonEmpty",
        errorMsg: "邮箱不能为空",
      },
      {
        strategy: "isEmail",
        errorMsg: "邮箱格式不正确",
      },
    ]);

    return function () {
      if (validator.start() === true) {
        Request();
      }
    };
  })();

  function Request() {
    console.log("send");
  }

  submit.onclick = function () {
    ProxyRequest();
  };
</script>
最终实现
const strategies = {
  strategy1(a, b) {
    // do something
  },
  strategy2(a, b) {
    // do something
  },
  strategy3(a, b) {
    // do something
  },
  // other strategies
};
5.工厂模式
1)定义
- 定义创建对象的接口,由子类实例化
- 即:将类的实例化延迟到子类
2)特点
- 工厂类集中了所有对象的创建,便于对象创建的统一管理
- 对象的使用者仅仅是使用产品,实现了单一职责
- 便于扩展,如果新增业务
- 只需要增加相关业务对象类和工厂类中的生产业务对象的方法
- 不需要修改其他地方
- 确实违背了开闭原则
3)飞机大战代码实现
- 定义子类
function SmallPlane() {
  this.width = 100;
  this.height = 100;
  this.name = "smallPlane";
  this.blood = 100;
  this.touch = function () {
    this.blood -= 100;
    if (this.blood == 0) {
      console.log("die");
    }
  };
}

function BigPlane() {
  this.width = 150;
  this.height = 200;
  this.blood = 200;
  this.name = "bigPlane";
  this.touch = function () {
    this.blood -= 50;
    if (this.blood == 0) {
      console.log("die");
    }
  };
}

function AttackPlane() {
  this.width = 125;
  this.height = 100;
  this.blood = 100;
  this.name = "AttackPlane";
  this.touch = function () {};
  this.attack = function () {
    console.log("butt");
  };
}
- 定义统一工厂类
function PlaneFactory(type) {
  let newPlane = null;
  switch (type) {
    case "SmallPlane":
      newPlane = new SmallPlane();
      break;
    case "BigPlane":
      newPlane = new BigPlane();
      break;
    case "AttackPlane":
      newPlane = new AttackPlane();
      break;
  }
  newPlane.die = function () {
    console.log("bomb");
  };
  return newPlane;
}
6.工厂方法模式
1)定义
- 创建产品时不再使用唯一的工厂类,而是将不同的产品交给对应的工厂子类实现
- 每个产品由负责生产的子工厂创造
- 如果添加新产品,只需要添加新的子工厂类和产品类
- 不需要修改其他工厂
- 更加符合面向对象的开放封闭原则
| 组成 | 作用 |
|---|---|
| 抽象工厂类 | 负责定义创建产品的公共接口 |
| 产品子工厂 | 继承抽象工厂类,实现抽象工厂类定义的接口 |
| 每一种产品各自的产品类 |
2)特点
- 代码比简单工厂模式复杂,引入抽象层和子工厂,增加代码复杂度和理解难度
- 相比简单工厂模式,提高了代码的维护性和扩展性
3)示例
function CarFactory() {}

CarFactory.baoma = function () {
  this.name = "宝马";
};
CarFactory.benchi = function () {
  this.name = "奔驰";
};
CarFactory.aodi = function () {
  this.name = "奥迪";
};

CarFactory.prototype.drive = function () {
  return this.name;
};

CarFactory.factory = function (che) {
  if (typeof CarFactory[che] !== "function") {
    throw "没有这个车";
  }
  if (typeof CarFactory[che].prototype.drive !== "function") {
    CarFactory[che].prototype = new CarFactory();
  }
  const newCar = new CarFactory[che]();
  return newCar;
};

const iCar = CarFactory.factory("baoma");
const iCar2 = CarFactory.factory("aodi");
iCar.drive();
iCar2.drive();
4)飞机大战代码实现
function PlaneFactory() {}

// 子类工厂都可以使用的的公共方法
PlaneFactory.prototype.touch = function () {
  this.blood -= 50;
  if (this.blood == 0) {
    this.die();
  }
};
PlaneFactory.prototype.die = function () {
  alert("bomb");
};

// 创建对象的接口
PlaneFactory.create = function (type) {
  // 判断一下是否存在该类型的子类工厂
  if (PlaneFactory.prototype[type] == undefined) {
    throw "no this constructor";
  }
  // 继承
  if (PlaneFactory.prototype[type].prototype.__proto__ !== PlaneFactory.prototype) {
    PlaneFactory.prototype[type].prototype = new PlaneFactory();
  }
  const arg = [].slice.call(arguments, 1);
  return new PlaneFactory.prototype[type](...arg);
};

// 真正定义子类工厂
PlaneFactory.prototype.SmallPlane = function (x, y) {
  this.x = x;
  this.y = y;
  this.width = 100;
  this.height = 100;
  this.blood = 100;
  this.name = "SmallPlane";
};

PlaneFactory.prototype.BigPlane = function (x, y) {
  this.x = x;
  this.y = y;
  this.width = 150;
  this.height = 200;
  this.blood = 200;
  this.name = "BigPlane";
};

PlaneFactory.prototype.AttackPlane = function (x, y) {
  this.x = x;
  this.y = y;
  this.width = 100;
  this.height = 125;
  this.blood = 100;
  this.name = "AttackPlane";
  this.attack = function () {
    console.log("biu~ biu~ biu!");
  };
};

const oAp = PlaneFactory.create("AttackPlane", 10, 20);
const oSp = PlaneFactory.create("SmallPlane", 20, 30);
const oBp = PlaneFactory.create("BigPlane", 30, 40);
7.装饰者模式
1)定义
- 在不改变原对象的基础上,对其进行包装拓展
- 即:添加属性和方法
- 使原有的对象可以满足用户更复杂的需求
2)特点
- 能够在不改变对象自身的基础上,在程序运行期间为对象动态添加职责
- 继承模式在脚本运行时增加子类行为,会影响原有类所有的实例
- 而装饰者能给不同对象各自添加新行为
3)飞机大战代码实现
- 构造函数需要一个装饰资源池
- 提供相应的装饰方法
- 提供添加装饰方法的方法
function PlaneFactory() {
  this.decorate_list = [];
}

// 集合所有装饰方法
PlaneFactory.prototype.decorators = {
  eatOneLife: function (obj) {
    obj.blood += 100;
  },
  eatTwoLife: function (obj) {
    obj.blood += 200;
  },
  eatShrinkLife: function (obj) {
    obj.blood -= 50;
  },
};
// 搜集对某对象的装饰描述
PlaneFactory.prototype.decorate = function (decorator) {
  this.decorate_list.push(decorator);
};

// 让装饰方法作用在该对象的身上
PlaneFactory.prototype.update = function () {
  for (let i = 0; i < this.decorate_list.length; i++) {
    this.decorators[this.decorate_list[i]] && this.decorators[this.decorate_list[i]](this);
  }
};

PlaneFactory.prototype.empty = function () {
  this.decorate_list = [];
};

PlaneFactory.prototype.remove = function (type) {
  // eatOneLife
  this.decorate_list = this.decorate_list.filter(function (eleType) {
    return !(eleType == type);
  });
};

// 子类工厂都可以使用的的公共方法
PlaneFactory.prototype.touch = function () {
  this.blood -= 50;
  if (this.blood == 0) {
    this.die();
  }
};
PlaneFactory.prototype.die = function () {
  alert("bomb");
};

// 创建对象的接口
PlaneFactory.create = function (type) {
  // 判断一下是否存在该类型的子类工厂
  if (PlaneFactory.prototype[type] == undefined) {
    throw "no this constructor";
  }
  // 继承
  if (PlaneFactory.prototype[type].prototype.__proto__ !== PlaneFactory.prototype) {
    PlaneFactory.prototype[type].prototype = new PlaneFactory();
  }
  const arg = [].slice.call(arguments, 1);
  return new PlaneFactory.prototype[type](...arg);
};

// 真正定义子类工厂
PlaneFactory.prototype.SmallPlane = function (x, y) {
  this.x = x;
  this.y = y;
  this.width = 100;
  this.height = 100;
  this.blood = 100;
  this.name = "SmallPlane";
};

PlaneFactory.prototype.BigPlane = function (x, y) {
  this.x = x;
  this.y = y;
  this.width = 150;
  this.height = 200;
  this.blood = 200;
  this.name = "BigPlane";
};

PlaneFactory.prototype.AttackPlane = function (x, y) {
  this.x = x;
  this.y = y;
  this.width = 100;
  this.height = 125;
  this.blood = 100;
  this.name = "AttackPlane";
  this.attack = function () {
    console.log("biu~ biu~ biu!");
  };
};

const oAp1 = PlaneFactory.create("AttackPlane", 10, 20);
const oAp2 = PlaneFactory.create("AttackPlane", 20, 70);
const oSp = PlaneFactory.create("SmallPlane", 20, 30);
const oBp = PlaneFactory.create("BigPlane", 30, 40);

// 装饰者模式
oAp1.decorate("eatOneLife");
oAp1.decorate("eatTwoLife");
oAp1.remove("eatOneLife");
8.观察者模式(发布订阅模式)
适用场景
当一个对象的改变,需要同时改变其他对象,且不知道待改变的对象数量时
1)定义
- 定义对象间的一种 一对多 的依赖关系
- 当一个对象的状态发生改变时,所有依赖于它的对象都将收到通知
- 如:为 DOM 元素绑定事件函数(事件机制)
2)特点
- 观察者订阅了一些消息
- 被观察者在有消息时通知观察者,并且传递消息
- 该模式存在的意义就是 解耦
- 被观察者无需关心观察者如何处理该消息
- 多线程,可以发布消息、订阅消息、退订消息
3)飞机大战代码实现
- 实现一个 Event 模块
function PlaneFactory() {
  this.decorate_list = [];
}

PlaneFactory.prototype = new Event();

// 集合所有装饰方法
PlaneFactory.prototype.decorators = {
  eatOneLife: function (obj) {
    obj.blood += 100;
  },
  eatTwoLife: function (obj) {
    obj.blood += 200;
  },
  eatShrinkLife: function (obj) {
    obj.blood -= 50;
  },
};
// 搜集对某对象的装饰描述
PlaneFactory.prototype.decorate = function (decorator) {
  this.decorate_list.push(decorator);
};

// 让装饰方法作用在该对象的身上
PlaneFactory.prototype.update = function () {
  for (let i = 0; i < this.decorate_list.length; i++) {
    this.decorators[this.decorate_list[i]] && this.decorators[this.decorate_list[i]](this);
  }
};

PlaneFactory.prototype.empty = function () {
  this.decorate_list = [];
};

PlaneFactory.prototype.remove = function (type) {
  // eatOneLife
  this.decorate_list = this.decorate_list.filter(function (eleType) {
    return !(eleType == type);
  });
};

// 子类工厂都可以使用的的公共方法
PlaneFactory.prototype.touch = function () {
  this.blood -= 50;
  if (this.blood == 0) {
    this.die();
  }
};
PlaneFactory.prototype.die = function () {
  alert("bomb");
};

// 创建对象的接口
PlaneFactory.create = function (type) {
  // 判断一下是否存在该类型的子类工厂
  if (PlaneFactory.prototype[type] == undefined) {
    throw "no this constructor";
  }
  // 继承
  if (PlaneFactory.prototype[type].prototype.__proto__ !== PlaneFactory.prototype) {
    PlaneFactory.prototype[type].prototype = new PlaneFactory();
  }
  const arg = [].slice.call(arguments, 1);
  return new PlaneFactory.prototype[type](...arg);
};

// 真正定义子类工厂
PlaneFactory.prototype.SmallPlane = function (x, y) {
  this.x = x;
  this.y = y;
  this.width = 100;
  this.height = 100;
  this.blood = 100;
  this.name = "SmallPlane";
};

PlaneFactory.prototype.BigPlane = function (x, y) {
  this.x = x;
  this.y = y;
  this.width = 150;
  this.height = 200;
  this.blood = 200;
  this.name = "BigPlane";
};

PlaneFactory.prototype.AttackPlane = function (x, y) {
  this.x = x;
  this.y = y;
  this.width = 100;
  this.height = 125;
  this.blood = 100;
  this.name = "AttackPlane";
  this.attack = function () {
    console.log("biu~ biu~ biu!");
  };
};

/**
 * Event 模块
 * 手写 Event 事件:on、emit、remove、once
 * 有助于了解观察者模式
 * Node 模块中经常使用到,如fs、http
 */
function Event() {
  // 存储 不同事件类型对应的不同处理函数
  this.cache = {};
}

Event.prototype.on = function (type, handle) {
  if (!this.cache[type]) {
    this.cache[type] = [handle];
  } else {
    this.cache[type].push(handle);
  }
};

Event.prototype.emit = function () {
  const type = arguments[0];
  const arg = [].slice.call(arguments, 1);
  for (let i = 0; i < this.cache[type].length; i++) {
    this.cache[type][i].apply(this, arg);
  }
};

Event.prototype.empty = function (type) {
  this.cache[type] = [];
};

Event.prototype.remove = function (type, handle) {
  this.cache[type] = this.cache[type].filter((ele) => ele !== handle);
};

Event.prototype.once = function (type, handle) {};

/**
 * 测试 Event 模块
 */
// const oE = new Event();
// function deal1(time) {
//     console.log('overtime1:' + time);
// }
// oE.on('over', deal1);
// function deal2(time) {
//     console.log('overtime2:' + time);
// }
// oE.on('over', deal2);
// oE.emit('over', '2018-9-25');
// oE.remove('over', deal2);
// oE.emit('over', 'second-2018-9-25');

const oAp1 = PlaneFactory.create("AttackPlane", 10, 20);
const oAp2 = PlaneFactory.create("AttackPlane", 20, 70);

const oSp = PlaneFactory.create("SmallPlane", 20, 30);
const oBp = PlaneFactory.create("BigPlane", 30, 40);

// 装饰者模式
oAp1.decorate("eatOneLife");
oAp1.decorate("eatTwoLife");
oAp1.remove("eatOneLife");

oAp1.on("over", function () {
  this.die();
});
最终实现
export default {
  observer() {
    const _message = {};
    return {
      // 订阅信息
      on(type, fn) {
        if (!_message[type]) {
          _message[type] = [fn];
        } else {
          _message[type].push(fn);
        }
      },
      // 发布信息
      emit(type, args) {
        // 如果消息没有被注册,则返回
        if (!_message[type]) {
          return;
        }
        // 定义消息信息
        const events = {
          type: type,
          args: args || {},
        };
        for (let i = 0; i < _message[type].length; i++) {
          _message[type][i].call(this, events);
        }
      },
      // 移除信息
      remove(type, fn) {
        if (_message[type] instanceof Array) {
          _message[type] = _message[type].filter((func) => func !== fn);
        }
      },
    };
  },
};
9.外观模式
1)定义
- 将多个方法封装在一个方法内部
- 用户调用一个方法后,实际上调用了多个方法
2)特点
- 使用方便
- 通常用作兼容不同版本浏览器的 dom0 级的事件
3)代码实现
<div id="myDiv">23r243423432432</div>
<script>
  const addMyEvent = (el, ev, fn) => {
    if (el.addEventListener) {
      el.addEventListener(ev, fn, false);
    } else if (el.attachEvent) {
      el.attachEvent("on" + ev, fn);
    } else {
      el["on" + ev] = fn;
    }
  };
  const myDiv = document.getElementById("myDiv");
  addMyEvent(myDiv, "click", function () {
    console.log("绑定了");
  });
</script>
最终实现
export default {
  addEvents(el, event, fn) {
    if (el.addEventListener) {
      el.addEventListener(event, fn, false);
    } else if (el.attachEvent) {
      // IE9及以下
      el.attachEvent("on" + event, fn);
    } else {
      el["on" + event] = fn;
    }
  },
};
10.迭代器模式
1)定义
- 提供一种方法,可以顺序访问一个聚合对象中的各个元素
- 且不暴露该对象的内部表示
2)代码实现
const agg = (() => {
  const data = [
    1,
    2,
    3,
    {
      1: 2,
    },
  ];
  let length = data.length;
  let index = 0; // 计数器
  return {
    next() {
      if (!this.hasNext()) {
        return null;
      }
      let element = data[index];
      index++;
      return element;
    },
    hasNext() {
      return index < length;
    },
    current() {
      return data[index];
    },
  };
})();

while (agg.hasNext()) {
  console.log(agg.next());
}
console.log(agg.current());
最终实现
export default {
  iterator() {
    const data = [
      // add something
    ];
    let length = data.length;
    let index = 0; // 计数器
    return {
      next() {
        if (!this.hasNext()) {
          return null;
        }
        return data[index++];
      },
      hasNext() {
        return index < length;
      },
      current() {
        return data[index];
      },
    };
  },
};
11.适配器模式
1)定义
- 将一个类(对象)的接口(方法或属性)转化成另外一个接口
- 以满足用户需求,并通过适配器解决类(对象)之间接口不兼容的问题
2)代码实现
function doThing(obj) {
  const _obj = {
    name: "于大爷",
    age: "18",
    title: "设计模式",
    color: "red",
    size: 100,
  };
  for (let i in _obj) {
    _obj[i] = obj[i] || _obj[i];
  }
  console.log(_obj);
}

const obj = {};
obj.name = "邓哥";
doThing(obj);
/* {
  name: "邓哥",
  age: "18",
  title: "设计模式",
  color: "red",
  size: 100,
} */
最终实现
export default {
  adapter(obj) {
    const _obj = {
      // add something
    };
    for (let i in _obj) {
      _obj[i] = obj[i] || _obj[i];
    }
    return _obj;
  },
};
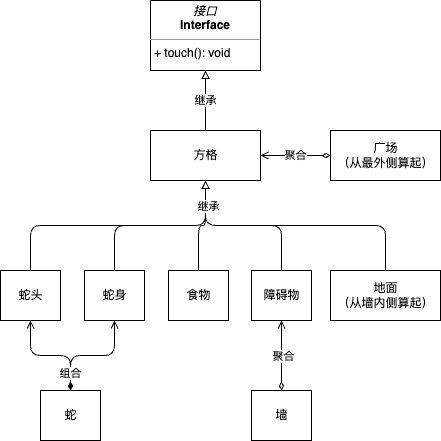
(六)项目实战:贪吃蛇
1.准备工具函数
const jsUtil = {
  // 原型的继承【圣杯模式】
  inherit(target, origin) {
    const temp = function () {};
    temp.prototype = origin.prototype;
    target.prototype = new temp();
    target.prototype.constructor = target;
  },
  // 通用继承方法
  extends(origin) {
    const result = function () {
      origin.apply(this, arguments);
    };
    // 遵循单一职责原则
    this.inherit(result, origin);
    return result;
  },
  // 单例模式
  single(origin) {
    let singleResult = (function () {
      // // 不能初始化为null,否则会进下方的if判断,首次实例化失败
      // let instance = null;
      let instance;
      return function () {
        // 闭包中已经有实例对象了,直接返回
        if (typeof instance === "object") {
          return instance;
        }
        // 保存初始实例对象到闭包中
        instance = this;
        // 如果传了参数,说明需要将该非单例模式构造函数转换为单例模式的构造函数
        origin && origin.apply(this, arguments);
        return instance;
      };
    })();
    // 将转换后的单例模式构造函数的原型继承回转换前的原型
    origin && this.inherit(singleResult, origin);
    return singleResult;
  },
};
2.准备初始化变量
// 棋盘(广场)的宽度和高度
const X_LEN = 30;
const Y_LEN = 30;

// 小格子宽度
const SQUARE_WIDTH = 20;

// 棋盘坐标
const BASE_X = 100;
const BASE_Y = 100;

// 蛇的速度
const SPEED = 500;
3.定义基类(方块类)
function Square(x, y, width, height, viewContent) {
  this.x = x;
  this.y = y;
  this.width = width;
  this.height = height;
  // 基类实例默认渲染为div
  this.viewContent = viewContent || document.createElement("div");
}
Square.prototype.touch = function () {
  console.log("touch>>>");
};
Square.prototype.update = function (x, y) {
  this.x = x;
  this.y = y;
  this.viewContent.style.left = x * SQUARE_WIDTH + "px";
  this.viewContent.style.top = y * SQUARE_WIDTH + "px";
};
4.定义子类继承关系
// 地面
const Floor = jsUtil.extends(Square);

// 障碍物
const Stone = jsUtil.extends(Square);
// 墙
const Wall = jsUtil.extends(Stone);

// 食物
const Food = jsUtil.single(Square);

// 蛇身
const SnackBody = jsUtil.extends(Square);
// 蛇头
const SnackHead = jsUtil.single(Square);
// 蛇
const Snack = jsUtil.single(Square);

// 广场
const Ground = jsUtil.single(Square);

// 控制游戏的抽象实例,不用传参
const Game = jsUtil.single();
5.定义基类方法【工厂方法模式】
function SquareFactory() {}

// 基类方法统一创建子类
SquareFactory.create = function (type, x, y, color) {
  if (typeof SquareFactory.prototype[type] === undefined) {
    throw "No this type";
  }
  // 重新绑定流水线的原型继承关系
  const Child = SquareFactory.prototype[type];
  if (Child.prototype.__proto__ !== SquareFactory.prototype) {
    Child.prototype = new SquareFactory();
  }
  // 统一创建子类
  return new Child(x, y, color);
};

// 子类出厂前的初始化
SquareFactory.prototype.init = function (square, color, message) {
  square.viewContent.style.position = "absolute";
  square.viewContent.style.width = square.width + "px";
  square.viewContent.style.height = square.height + "px";
  square.viewContent.style.left = square.x * SQUARE_WIDTH + "px";
  square.viewContent.style.top = square.y * SQUARE_WIDTH + "px";
  square.viewContent.style.backgroundColor = color;
  square.touch = function () {
    return message;
  };
};

// 自定义子类类型
SquareFactory.prototype.Floor = function (x, y, color) {
  const floor = new Floor(x, y, SQUARE_WIDTH, SQUARE_WIDTH);
  this.init(floor, color, STRATEGIES_ENUM.move);
  return floor;
};

SquareFactory.prototype.Stone = function (x, y, color) {
  const stone = new Stone(x, y, SQUARE_WIDTH, SQUARE_WIDTH);
  this.init(stone, color, STRATEGIES_ENUM.die);
  return stone;
};

SquareFactory.prototype.Food = function (x, y, color) {
  const food = new Food(x, y, SQUARE_WIDTH, SQUARE_WIDTH);
  this.init(food, color, STRATEGIES_ENUM.eat);
  food.update(x, y);
  return food;
};

SquareFactory.prototype.SnakeHead = function (x, y, color) {
  const snakeHead = new SnakeHead(x, y, SQUARE_WIDTH, SQUARE_WIDTH);
  this.init(snakeHead, color, STRATEGIES_ENUM.die);
  snakeHead.update(x, y); // 更新单例属性
  return snakeHead;
};

SquareFactory.prototype.SnakeBody = function (x, y, color) {
  const snakeBody = new SnakeBody(x, y, SQUARE_WIDTH, SQUARE_WIDTH);
  this.init(snakeBody, color, STRATEGIES_ENUM.die);
  return snakeBody;
};
6.初始化广场
const ground = new Ground(BASE_X_POINT, BASE_Y_POINT, X_LEN * SQUARE_WIDTH, Y_LEN * SQUARE_WIDTH);

ground.init = function () {
  this.viewContent.style.position = "absolute";
  this.viewContent.style.backgroundColor = "#8aaf21";
  this.viewContent.style.width = this.width + "px";
  this.viewContent.style.height = this.height + "px";
  this.viewContent.style.left = this.x + "px";
  this.viewContent.style.top = this.y + "px";
  document.body.appendChild(this.viewContent);

  // 二维数组,存储广场中的方块对象
  this.squareTable = [];
  // (x, y) => (j, i)
  for (let i = 0; i < Y_LEN; i++) {
    this.squareTable[i] = new Array(X_LEN);
    for (let j = 0; j < X_LEN; j++) {
      let newSquare;
      if (i === 0 || j === 0 || i === Y_LEN - 1 || j === X_LEN - 1) {
        // 创建石头组成墙
        newSquare = SquareFactory.create("Stone", j, i, "#0E2F18");
      } else {
        // 创建地板
        newSquare = SquareFactory.create("Floor", j, i, "#818D79");
      }
      this.squareTable[i][j] = newSquare;
      this.viewContent.appendChild(newSquare.viewContent);
    }
  }
};
7.操作地板
1)拆除地板
- 移除当前坐标的 DOM 元素,显露广场底色
- 模拟蛇前进一格
ground.remove = function (x, y) {
  // 定位方块
  const square = this.squareTable[y][x];
  this.viewContent.removeChild(square.viewContent);
  this.squareTable[y][x] = null;
};
2)安装地板
- 增加当前坐标 DOM 元素,遮盖广场底色
ground.append = function (square) {
  this.viewContent.appendChild(square.viewContent);
  this.squareTable[square.y][square.x] = square;
};
8.初始化蛇
1)枚举蛇移动方向
const DIRECTION = {
  LEFT: {
    x: -1,
    y: 0,
  },
  RIGHT: {
    x: 1,
    y: 0,
  },
  UP: {
    x: 0,
    y: -1,
  },
  DOWN: {
    x: 0,
    y: 1,
  },
};
2)初始化
const snake = new Snake();
snake.head = null;
snake.tail = null;

snake.init = function (ground) {
  // 创建蛇头和第一节蛇身
  const snakeHead = SquareFactory.create("SnakeHead", 3, 1, "green");
  const snakeBody1 = SquareFactory.create("SnakeBody", 2, 1, "lightgreen");
  const snakeBody2 = SquareFactory.create("SnakeBody", 1, 1, "lightgreen");
  // 双向链表结构
  snakeHead.last = null;
  snakeHead.next = snakeBody1;
  snakeBody1.last = snakeHead;
  snakeBody1.next = snakeBody2;
  snakeBody2.last = snakeBody1;
  snakeBody2.next = null;
  // 记录头尾指针
  this.head = snakeHead;
  this.tail = snakeBody2;
  // 渲染
  ground.remove(snakeHead.x, snakeHead.y);
  ground.append(snakeHead);
  ground.remove(snakeBody1.x, snakeBody1.y);
  ground.append(snakeBody1);
  ground.remove(snakeBody2.x, snakeBody2.y);
  ground.append(snakeBody2);
  // 默认向右移动
  snake.direction = DIRECTION.RIGHT;
};
9.移动蛇头【策略模式】
1)引入策略处理蛇的移动
- 集合所有策略消息
// init.js
const STRATEGIES_ENUM = {
  move: "MOVE",
  eat: "EAT",
  die: "DIE",
};
- 策略方法
snake.strategies = {
  MOVE: function (snake, square, ground, fromEat) {
    // 创建蛇身
    const newBody = SquareFactory.create("SnakeBody", snake.head.x, snake.head.y, "lightgreen");
    newBody.next = snake.head.next;
    newBody.next.last = newBody;
    newBody.last = null;
    ground.remove(snake.head.x, snake.head.y);
    ground.append(newBody);
    // 创建蛇头
    const newHead = SquareFactory.create("SnackHead", 10, 20, "green");
    newHead.last = null;
    newHead.next = newBody;
    newBody.last = newHead;
    ground.remove(newHead.x, newHead.y);
    ground.append(newHead);
    snake.head = newHead;
    // 删除蛇尾
    if (!fromEat) {
      const floor = SquareFactory.create("Floor", snake.tail.x, snake.tail.y, "#818D79");
      ground.remove(snake.tail.x, snake.tail.y);
      ground.append(floor);
      snake.tail = snake.tail.next;
    }
  },
  EAT: function (snake, square, ground) {
    this.MOVE(snake, square, ground, true);
    game.score++;
    createFood(ground);
  },
  DIE: function () {
    game.over();
  },
};
2)移动
snake.move = function (ground) {
  const square = ground.squareTable[this.head.y + this.direction.y][this.head.x + this.direction.x];
  // 获取对应的行动消息
  if (typeof square.touch === "function") {
    // this => snake
    this.strategies[square.touch()](this, square, ground);
  }
};
10.处理游戏
1)创建食物
function createFood() {
  let x = null,
    y = null,
    flag = true;
  while (flag) {
    // [0, 28)
    x = 1 + parseInt(Math.random() * 28);
    x = 1 + parseInt(Math.random() * 28);
    let ok = true;
    for (let node = snake.head; node; node = node.next) {
      ok = false;
      break;
    }
    if (ok) {
      flag = false;
    }
  }
  const food = SquareFactory.create("Food", x, y, "green");
  ground.remove(food.x, food.y);
  ground.append(food);
}
2)初始化游戏
const game = new Game();

// 游戏分数
game.score = 0;
// 设置时间点
game.timer = null;
// 地板
game.ground = null;
// 速度
game.speedInterval = 400;

// 初始化
game.init = function () {
  ground.init();
  snake.init(ground);
  createFood(ground);
  document.onkeydown = function (e) {
    if (e.key === "ArrowLeft" && e.direction !== DIRECTION.RIGHT) {
      snake.direction = DIRECTION.LEFT;
    } else if (e.key === "ArrowUp" && e.direction !== DIRECTION.DOWN) {
      snake.direction = DIRECTION.UP;
    } else if (e.key === "ArrowRight" && e.direction !== DIRECTION.LEFT) {
      snake.direction = DIRECTION.RIGHT;
    } else if (e.key === "ArrowDown" && e.direction !== DIRECTION.UP) {
      snake.direction = DIRECTION.DOWN;
    }
  };
};
game.init();
3)游戏开始结束
// 游戏开始
game.start = function () {
  clearInterval(game.timer);
  game.timer = setInterval(function () {
    snake.move(ground);
  }, game.speedInterval);
};

// 游戏结束
game.over = function () {
  clearInterval(game.timer);
  console.log("你的得分:" + this.score);
};